Brother MFC-860 Скачать руководство пользователя страница 12

4

5

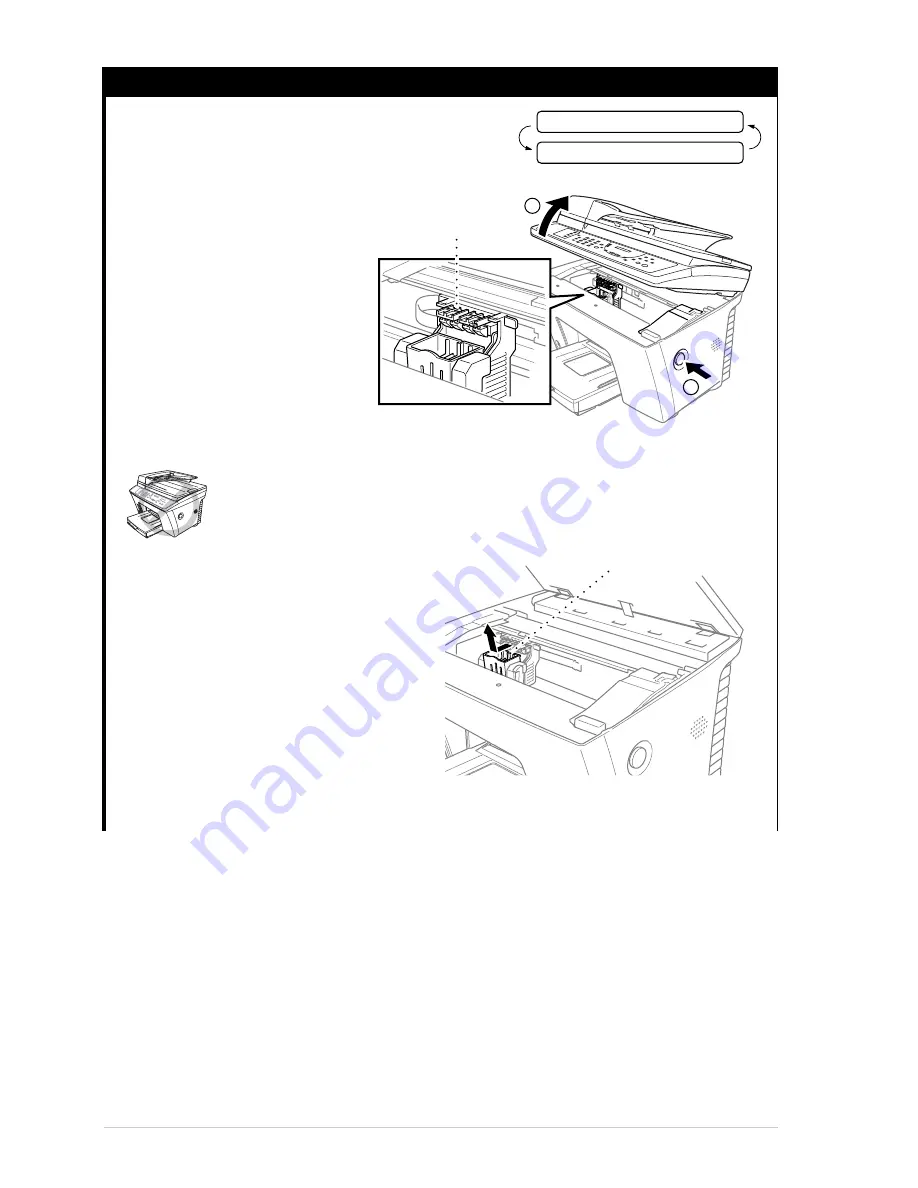
Install the Ink Cartridges

1

The screen alternately displays

2

Press the blue Scanner Cover 
Release Button on the right side 
of the MFC and lift the scanner 
cover. After a few seconds, the 
print head will move left to its 
replacement position. 

3

Remove the yellow shipping cover by pulling it toward you and lifting it up and out.

The bottom of the yellow shipping 
cover may have a small amount of 
wet ink so it should be wiped after 
removal.

We recommend that you install the 
ink cartridges from left to right in 
this order: Black, Yellow, Cyan, 
Magenta.

4

Open the Black ink cartridge bag and remove the ink cartridge.

PLS OPEN COVER

SET CARTRIDGES

2

1

Print Head

Yellow Shipping Cover

Содержание MFC-860

Страница 1: ...MFC 860 OWNER S MANUAL ...

Страница 2: ...E APPROPRIATE CONNECTOR APPROVAL INFORMATION Brother advises that this product may not function correctly in a country other than which it was originally purchased and does not offer any warranty in the event that this product is used on public telecommunication lines in another country ...

Страница 3: ... a specific feature or function by checking the Index at the back of this manual Also throughout this manual you will see special symbols alerting you to important information cross references and warnings Illustrations of some screen displays also help you choose the correct key presses Symbols Used In This Manual Additionally your MFC has a Help Key Press Help to print a list of basic operationa...

Страница 4: ...or PhotoCapture Centre Menu When you enter the Menu Mode your MFC displays a list of Level One Menus from which you can choose These menu options appear one after the other on the display Select an option by pressing Set when the option appears on the LCD You can scroll more quickly through options by pressing When the screen displays your selection press Set Use to scroll backward if you passed y...

Страница 5: ...mber 23 Sending Operation 25 Chapter 3 Receiving a Fax Receive Mode Settings 28 Receiving a Fax 30 Chapter 4 Printing Reports Types of Reports 32 Transmission Report 32 Setting Reports 33 ADVANCED USE Chapter 5 Advanced Sending Advanced Operations 34 Chapter 6 Advanced Receiving Operation from an External or Extension Telephone 42 Telephone Service 43 Chapter 7 Polling Polling Receive 44 Polling T...

Страница 6: ...with Your PC 78 Before You Install Multi Function Link Pro 78 Using a bi directional IEEE 1284 compliant parallel cable to Connect the MFC to the PC Using Windows 95 98 98SE Windows NT Workstation Version 4 0 and Windows 2000 Professional 79 Using a USB Cable to Connect the MFC to the PC Using Windows 98 98SE and Windows 2000 Professional Only 93 Installing the Brother Software 103 Chapter 13 Usin...

Страница 7: ...lti Function Link Pro Software Introduction 141 MFC Remote Setup 142 Chapter 18 Using the PhotoCapture Centre from Your PC For Windows Only Introduction 143 Chapter 19 Using the Brother MFC with a New Power Macintosh G3 G4 or iMac iBook Set up Your USB Equipped Apple Macintosh G3 G4 or iMac with Mac OS 8 5 8 51 8 6 9 0 144 Installing the Brother Printer and Scanner Drivers 144 Using Brother Printe...

Страница 8: ...Instructions 168 IMPORTANT For Your Safety 169 APPENDIX Chapter 22 Specifications Fax Specifications 170 Printer Specifications 171 Compilation and Publication Notice 172 Trademarks 172 Brother Paper 173 Entering Text 176 Menu Selection Table 177 About Fax Machines 181 Glossary 182 Index 185 ...

Страница 9: ...VANCED USE 1 Make sure you have the items shown below Caution Whenever you transport the MFC use the packing materials that came with your MFC If you do not pack the MFC correctly you may invalidate your warranty 2 Release the Scanner Lock 1 Press the blue scanner cover release button on the right side of the MFC and lift the scanner cover until it locks in the open position Paper Cassette Owner s...

Страница 10: ...sette cover 2 Adjust guides to A4 paper size 3 Stack up to 250 sheets of paper face down in the cassette and slide the paper adjusters at the front and right to fit around it Do not place paper above the maximum paper height line as paper may not feed correctly 4 Replace the cassette cover 5 Slide the paper cassette into the MFC until it locks into place Unlock Lock Scanner Lock Lever Button Legal...

Страница 11: ...nstall the ink cartridges will permanently damage the print head 1 Connect the power cord When you connect the power the screen alternately displays 2 Connect the telephone line cord Connect one end of the telephone line cord to the socket on the MFC and the other end to a modular wall socket Paper Output Tray Power Cord Telephone Line Cord PLS OPEN COVER SET CARTRIDGES ...

Страница 12: ...ition 3 Remove the yellow shipping cover by pulling it toward you and lifting it up and out The bottom of the yellow shipping cover may have a small amount of wet ink so it should be wiped after removal We recommend that you install the ink cartridges from left to right in this order Black Yellow Cyan Magenta 4 Open the Black ink cartridge bag and remove the ink cartridge PLS OPEN COVER SET CARTRI...

Страница 13: ...nner cover Your MFC enters a head cleaning cycle for approximately 6 minutes The dot counters for each colour are initialised and the machine goes online ready for printing Make sure the paper is loaded in the paper cassette The LCD displays CLEANING BLACK After the cleaning cycle is finished the LCD shows PRESS START KEY 9 Press Start within one minute The MFC starts printing the Test Sheet Only ...

Страница 14: ... may cause damage to the print head and will void your product warranty If the INK EMPTY XXXX error message is on the screen display after you have installed the ink cartridges check and make sure that the ink cartridges are installed correctly 6 Set the date and time 1 Press Menu 1 1 2 2 Enter the last two digits of the year and press Set 01 is registered as 2001 in the machine 3 Enter two digits...

Страница 15: ...ten next page Make sure documents written with ink are completely dry Documents must be from 14 7 to 21 6 cm wide and from 12 7 to 35 6 cm long 1 Insert documents FACE UP TOP EDGE FIRST 2 Adjust the paper guides to fit the width of your pages LCD How it works When to use it FAX ONLY automatic receive EXT TEL TAD External telephone External Telephone Answering Device MANUAL manual receive The MFC a...

Страница 16: ...ss platen 3 Close the document cover If the document is a book or is thick do not slam the cover or press on it as damage to the glass platen may result 10 Faxing from the ADF Automatic Document Feeder 1 Insert the documents face up in the feeder 2 Dial the fax number then press Start 11 Faxing from the Glass Platen 1 Place the document face down on the glass platen 2 Dial the fax number then pres...

Страница 17: ...2 To stop the copy process and release the original press Stop 13 Multiple Copies Using the ADF 1 Insert the document face up in the feeder 2 Press Mono Copy or Colour Copy To sort the copies use Option key See Using the Options Key in Chapter 9 3 Using the dial pad enter the number of copies you want up to 99 For example press 3 8 for 38 copies 4 Press Mono Copy or Colour Copy again You must pres...

Страница 18: ... the power supply Avoid interference sources such as speakers or the base units of cordless phones Connecting the Power Cord Keep the MFC out of strong light such as direct sunlight If CHECK SCAN LOCK appears on the LCD immediately release the scanner lock lever and press Stop If you see MACHINE ERROR AF or AE stop operation Make sure the scanner lock was released and then press Stop Contact your ...

Страница 19: ... The wires in the mains lead of this appliance are coloured in accordance with the following code Green and yellow Earth Blue Neutral Brown Live As the wires in the mains lead of this apparatus may not correspond with the coloured markings identifying the terminals in your plug proceed as follows The wire which is coloured green and yellow must be connected to the terminal in the plug which is mar...

Страница 20: ...for the United Kingdom 41 for Switzerland Your local area code minus any leading 0 9 in Spain A space Your number on the local exchange using spaces to aid readability as appropriate As an example if your MFC is installed in the United Kingdom is to be used for both fax and voice calls and your national telephone number is 0161 444 5555 then you must set the fax and telephone number parts of your ...

Страница 21: ... most PABX or key systems that allow a two wire analogue connection However we recommend that you have a separate telephone line for your MFC You can then leave the MFC in Fax Mode to receive faxes any time of day or night If you are installing the machine to work with a PABX 1 It is not guaranteed that the unit will operate correctly under all circumstances with a PABX Any cases of difficulty sho...

Страница 22: ...e connected downstream of your machine in a master slave configuration In such a configuration this machine can always detect whether a telephone is in use thus it will not attempt to seize the line during that time This is known as telephone off hook detection The inadvisable configuration is shown in figure 1 below and the recommended master slave configuration is shown in figure 2 This new conn...

Страница 23: ...not hear CNG tones until the TAD has answered the call and with four rings there are only 8 10 seconds of CNG tones left for the fax handshake Make sure you carefully follow instructions in this manual for recording your outgoing message We do not recommend using the toll saver feature on your external answering machine if it exceeds 4 rings Connections 1 You may connect an external TAD to your MF...

Страница 24: ... 3 End your 20 second message by giving your Remote Activation Code for people sending manual faxes For example After the beep leave a message or send a fax manually by pressing 5 1 and Start Connecting an External Telephone Your MFC is equipped with a handset that you can use as a regular phone However you can also connect a separate telephone to your MFC as shown below Whenever this external pho...

Страница 25: ...Preparation and Simple Use Guide 17 PREPARATION AND SIMPLE USE Control Panel Overview 1 2 3 4 5 6 7 8 9 10 11 12 13 ...

Страница 26: ...u Lets you access the function and programming mode Left Arrow Help Moves the LCD cursor to the left Press this key with Shift key whenever you want a quick reference Help List printed The Help List shows how to perform functions how to register information and how to get basic information Right Arrow Verify Moves the LCD cursor to the right When the machine is idle you can also use this key to pr...

Страница 27: ...setting OFF LOW MED or HIGH 3 Press Set when the screen displays your selection 4 Press Stop to exit Setting the Ring Volume You can select how loud or if the MFC rings 1 Press Menu 1 1 6 2 Press or to select OFF LOW MED or HIGH 3 Press Set when the screen displays your selection 4 Press Stop to exit PABX and TRANSFER Your MFC is initially set to be connected with PSTN Public Switched Telephone Ne...

Страница 28: ...et 3 Press 1 to change to Winter Time or Summer Time OR Press 2 to exit without changing You can program an R keypress as part of a number stored in a One Touch or Speed Dial location When programming the One Touch or Speed dial number Function menu 1 5 1 or 1 5 2 press Shift and R first the screen displays then enter the telephone number If you do this you do not need to press Shift and R each ti...

Страница 29: ... location you selected 3 Enter a number up to 20 digits and press Set The screen prompts you to enter a name for this number 4 Use the dial pad to enter the name up to 15 characters See Entering Text in Chapter 22 OR Go to Step 5 to store the number without a name 5 Press Set The screen prompts you to select the type of number this is Use or to select the type you want 6 Press Set Return to Step 2...

Страница 30: ... 5 Press Set The screen prompts you to select the type of number this is Use or to select the type you want 6 Press Set Return to Step 2 to store another Speed Dial number OR Press Stop to exit Changing One Touch and Speed Dial Numbers If you try to store a One Touch or Speed Dial number in a location where a number is already stored the screen displays the current name stored there then prompts y...

Страница 31: ...key Press Fax Resolution continuously until you see your selection on the screen See Multiple Resolution Transmission Not Available for Colour Fax in Chapter 5 Dialling a Number One Touch Dialling 1 Insert the document face up in the feeder or face down on the glass platen 2 Press the One Touch key of the location you want to call 3 Press Start Standard Suitable for most typed documents No lights ...

Страница 32: ...bers in any combination The combined number will be dialled in the order you entered it as soon as you press Start For example You store 555 on One Touch Dial key 1 and 7000 on One Touch Dial key 2 If you press One Touch 1 2 and Start you can dial 555 7000 To temporarily change a number you can substitute part of the number with manual dialling using the dial pad So if you press One Touch 1 and pr...

Страница 33: ...e dial pad One Touch Speed Dial or Search 3 Press Start Manual Transmission With an External Telephone Manual transmission lets you hear the dial tone ringing and fax receiving tones before sending the fax 1 Insert the document face up in the feeder or face down on the glass platen 2 Pick up the handset of the external telephone and listen for a dial tone 3 Enter the fax number you want to call Se...

Страница 34: ... first page of a fax press Stop to cancel a scan If you get a MEMORY FULL message while scanning in a subsequent page you ll have the option to press Start to transmit the pages scanned so far or to press Stop to cancel the operation 1 Make sure the document feeder is empty 2 Place the document face up in the feeder 3 Enter the fax number 4 Press Start The machine starts scanning the document and ...

Страница 35: ... on the glass platen 2 Press Menu 1 3 8 The screen displays 3 To change the default setting press or to select ON or OFF and press Set Go to Step 6 OR For the next fax transmission only press or to select NEXT FAX ONLY 4 Press Set 5 For the next fax only press or to select ON or OFF and press Set 6 Press 1 if you want to select additional settings The display returns to the SETUP SEND menu OR Pres...

Страница 36: ... telephone External Telephone Answering Device If an external telephone is connected to the EXT jack you control the phone line and must answer every call yourself If an external TAD telephone answering device is connected to the EXT jack the TAD automatically answers every call Voice messages are stored in the external TAD Fax messages are printed Use this mode if you receive very few faxes Use t...

Страница 37: ...ld the handset and wait for several seconds When you see RECEIVE on the fax screen or when you hear chirps through the handset of an extension phone connected to another wall socket just replace the handset and your machine does the rest Selecting ON allows the machine to receive fax calls automatically even if you lift the handset of an extension or external phone Selecting OFF means you ll have ...

Страница 38: ...88 83 or 70 Choose 100 if you don t want a reduction 3 Press Set when the screen displays your selection 4 Press Stop to exit If you receive faxes that are split on two pages change the reduction to AUTO OR choose a lower reduction percentage When you use Auto Reduction to reduce incoming documents to fit on one page of recording paper you can do so only as long as the original document is not lon...

Страница 39: ...nted as soon as fresh paper is put in the paper cassette If the MEMORY RECEPTION switch is OFF at this time The current fax reception will continue with the remaining page s being stored in memory subject to available memory Subsequent incoming fax calls will not be automatically answered until fresh paper is put in the paper cassette The last fax received will be printed as soon as fresh paper is...

Страница 40: ...rint a portion of the first page of the fax message on the report 1 Press Menu 1 6 1 2 Press or to select OFF OFF IMAGE ON and ON IMAGE 3 Press Set 4 Press Stop to exit Choose if Transmission Verification Report is printed after all fax are sent Journal lists information about the last 50 incoming and outgoing faxes TX means Transmit RX means Receive Lists names and numbers stored in One Touch and...

Страница 41: ...hours 2 4 or 7 days If you set the interval to OFF you can print the report by following the steps in the previous section 1 Press Menu 1 6 2 2 Press or to display JOURNAL PERIOD and press Set 3 Press or to choose your setting If you choose 7 days the screen prompts you to choose a day at which to begin the 7 day countdown 4 When the screen displays the setting you want press Set 5 Enter the time ...

Страница 42: ...ge Setup and Cover Page Message functions will change their default settings Cover Page for Next Fax Only Make sure Station ID is set up See Setting the Station ID in Preparation and Simple Use Guide This feature does not work without the Station ID You can set the MFC to send a cover page with a particular document This cover page will include the number of pages in your document 1 Insert the doc...

Страница 43: ...1 if you want to select additional settings The display returns to the SETUP SEND menu OR Press 2 to exit if you are finished choosing settings Using a Printed Cover Page If you prefer using a printed cover page that you can write on you can print the sample page and attach it to your fax 1 Press Menu 1 3 1 2 Press or to select PRINT SAMPLE and press Set when the screen displays your selection 3 P...

Страница 44: ...ater 1 Insert the document face up in the feeder or face down on the glass platen 2 Press Menu 1 3 6 3 Enter the time you want the fax to be sent in 24 hour format for example enter 19 45 for 7 45 PM and press Set 4 Press 1 if you want to select additional settings The display returns to the SETUP SEND menu OR Press 2 if you are finished choosing settings and go to Step 5 The screen prompts you to...

Страница 45: ...h Speed Dial Group number Search or the dial pad See Setting Groups for Broadcasting in this Chapter Example Group number 3 Press Set You will be prompted to press the next number 4 Enter the next number Example Speed Dial 5 Press Set 6 Enter the next fax number Example Manual dialling using the dial pad 7 Press Start Your MFC will read the documents into memory and then start sending faxes to all...

Страница 46: ...7 Press Stop to exit Cancelling a Scheduled Job in Memory You can cancel tasks you ve scheduled such as Delayed Fax Delayed Polling Receive or Polling Transmit If the MFC is idle 1 Press Menu 1 4 Any waiting jobs appear on the display If nothing is waiting the screen displays NO JOB WAITING 2 If you have more than two jobs waiting use or to select the job you want to cancel Press Set when the scre...

Страница 47: ...play returns to the Setup Send menu OR Press 2 if you are finished choosing settings and go to Step 5 The screen prompts you to enter the fax number you want to call 5 Enter the fax number you re calling and press Start STANDARD For most typed documents FINE Good for small print transmits slower than standard resolution S FINE Good for small print or art work transmits slower than fine resolution ...

Страница 48: ...tored The screen displays ACCEPTED for 2 seconds followed by TX LOCK MODE TX Lock is now switched ON Changing the TX Lock Password 1 Press Menu 1 0 2 2 Press or to choose SET PASSWORD 3 Press Set The screen prompts you to enter the old password 4 Enter the current password 5 Press Set The screen prompts you to enter the new password 6 Enter a 4 digit number as a new password If the password you en...

Страница 49: ...ts you to enter the password followed by Set 2 Enter a 4 digit password and press Set The screen displays ACCEPTED then after 2 seconds the display reverts to normal TX Lock is now switched OFF If you forget the TX Lock password please contact your Brother dealer for assistance If the password you enter at Step 4 is incorrect the screen would display WRONG PASSWORD After 2 seconds the display will...

Страница 50: ...ss Start to send the fax The Remote Activation Code also can be used by your callers When you are using a external TAD your outgoing message OGM should end with the statement to send a fax press 5 1 See Outgoing Message OGM of External TAD in Preparation and Simple Use Guide Changing Remote Codes Remote Codes might not work with some telephone systems The preset Activation Code is 5 1 To change Re...

Страница 51: ...distinctive ringing function allowing you to dedicate a second phone number on the same phone line just for receiving faxes To enable the machine to work with BT Call Sign Only with your external phone 1 Set the machine to MANUAL mode 2 Press Menu 1 0 1 The screen displays the current setting of this feature 3 Press or to select ON or OFF 4 Press Set 5 Press Stop to exit You can switch it off temp...

Страница 52: ...er fax machine Your four digit ID number must be entered on the fax machine that polls for your documents Setup for Polling Receive Polling Receive is when you call another fax machine to receive a fax from it 1 Press Menu 1 2 6 The screen displays 2 Press or to choose STANDARD and press Set The screen prompts you to enter the fax number you want to poll and then to press Start 3 Enter the fax num...

Страница 53: ...p Delayed Polling Receive You can set your MFC to begin Polling Receive at a later time 1 Press Menu 1 2 6 The screen displays 2 Press or to choose TIMER and press Set 3 The screen prompts you to enter the time you want to begin polling 4 Enter the time in 24 hour format you want to begin polling For example enter 21 45 for 9 45 PM 5 Press Set The screen prompts you to enter the fax number you are...

Страница 54: ...ormat you want to begin polling and press Set 4 Specify the destination fax machines which you wish to poll by using One Touch Speed Dial a Group Tel Index or the dial pad You must press Set between each location 5 Press Start Your MFC polls each number or group number in turn for a document Polling Transmit Not Available for Colour Fax Polling Transmit is when you set up your MFC to wait with a d...

Страница 55: ...rns to the SETUP SEND menu OR Press 2 if you are finished choosing settings and go to Step 6 6 Press Start and wait for the fax to be polled Cancelling a Job While Scanning the Document You can cancel a job while you are scanning it into memory by pressing Stop Eject the document by pressing Stop again Checking Job Status You can check which jobs are in memory waiting to be sent Press Menu 1 4 to ...

Страница 56: ...in memory then dials the fax machine phone number you ve programmed and forwards the fax message See Changing the Fax Forwarding Number in this Chapter 1 Press Menu 1 7 1 2 Press or to select ON or OFF and press Set The screen prompts you to enter the number of the fax machine where faxes will be forwarded 3 Enter the forwarding number up to 20 digits and press Set 4 Press Stop to exit You cannot ...

Страница 57: ...s Code To receive faxes at your location you must call from a fax machine using touch tone For convenience you can retrieve faxes from a touch tone phone by having them sent to a fax machine For example if your hotel room does not have a fax machine you can enter the number of the fax machine at the hotel s Front Desk 1 Dial your fax number from a touch tone phone 2 When your fax machine answers a...

Страница 58: ...e are no faxes stored in the memory or if all faxes have been erased using Remote Control 9 6 3 Retrieve a Fax Press 9 6 then to Print a Memory Status List Press 1 then enter the number of remote fax machine and then press After the beep hang up and wait Retrieve all faxes Press 2 then enter the number of remote fax machine and then press After the beep hang up and wait Erase all fax messages Pres...

Страница 59: ...calls the remote fax machine Your fax machine then sends the Memory Status List to the fax machine that you are calling from Retrieving Fax Messages 1 Dial your fax machine s number 2 When you hear the beep immediately enter your Remote Access Code the factory setting is 1 5 9 3 As soon as you hear two short beeps use the dial pad to press 9 6 2 4 Using the dial pad enter the number up to 20 digit...

Страница 60: ...u hear two short beeps use the dial pad to press 9 6 1 6 Use the dial pad to enter the number of the remote fax machine up to 20 digits and then press 7 After you hear your fax machine beep hang up and wait Your fax machine calls the remote fax machine Your fax machine then sends the Memory Status List showing the new forwarding number to the fax machine that you are calling from 8 Check the forwa...

Страница 61: ...y process and release the original press Stop Multiple Copies Using the ADF You can make multiple copies using the ADF Unless you select SORT multiple copies will be STACKED all copies of page 1 then all copies of pages etc Use Options key to select SORT collated 1 Insert the document face up in the feeder or face down on the glass platen 2 Press Mono Copy or Colour Copy 3 Using the dial pad enter...

Страница 62: ...r Copy 4 Using the dial pad enter the number of copies you want up to 99 and press Set For example press 3 8 for 38 copies The MFC starts scanning the original 5 Place the next page to be copied on the scanner glass and press Set 6 Press Mono Copy or Colour Copy again You must press the same key that you pressed in Step 3 To sort the copies use the Options key See Using the Options Key in this Cha...

Страница 63: ...hich best suits your needs Making Enlarged or Reduced Copies Temporary Setting 1 Insert the document face up in the feeder or face down on the glass platen 2 Press Enlarge Reduce The screen displays 3 Press or to choose an enlargement or reduction ratio You can reduce to 93 87 75 50 or 25 of the original size OR You can enlarge to 120 125 150 200 or 400 OR You can select MANUAL and press Set then ...

Страница 64: ...4 Press or to select the type of paper you are using PLAIN INK JET GLOSSY PHOTO or TRNSPRNCY and press Set If you use premium paper the copy quality will be improved For best results we recommend using Brother special paper Brother coated paper is ink jet paper If you are using non Brother ink jet paper or Brother coated paper select INK JET COPY PAPER TYPE PAPER PLAIN PAPER INK JET PAPER GLOSSY I...

Страница 65: ...6 Repeat Step 3 7 Press to make a lighter copy OR press to make a darker copy and press Set To select COPY QUALITY 8 Repeat Step 3 9 Press or to select DRAFT NORMAL HIGH or PHOTO and press Set NOTE See Choosing the Quality next page To select special COPY OPTIONS 10 Repeat Step 3 11 Press or to select STACK SORT 2 IN 1 4 IN 1 or POSTER and press Set 2 in 1 4 in 1 ...

Страница 66: ...NORMAL HIGH PHOTO or DRAFT Poster size copy can be made only by using scanner glass DRAFT Fast copy speed and lowest ink consumption Use DRAFT to save time documents to be proof read large documents or many copies NORMAL Recommended mode for ordinary printouts Good copy quality with adequate copy speed HIGH Better copy quality than normal and faster copy speed than PHOTO PHOTO Use this mode to cop...

Страница 67: ...ting you want to change 1 PAPER TYPE Press Menu and 3 PAPER PLAIN PAPER INK JET PAPER GLOSSY PAPER PHOTO PAPER TRNSPRNCY INK JET BROTHER INK JET OTHER QUALITY DRAFT QUALITY PHOTO COLOUR RED COLOUR GREEN COLOUR BLUE R 2 QUALITY 3 COLOUR ADJUST 4 CONTRAST 5 ONE COLOUR B G COLOUR OFF COLOUR CYAN COLOUR MAGENTA COLOUR YELLOW is default QUALITY HIGH QUALITY NORMAL 1 PAPER TYPE Press Menu and 3 PAPER PL...

Страница 68: ... the screen displays your selection 3 Press Stop to exit Colour Adjustment 1 Press Menu 3 3 2 Press or to select RED GREEN or BLUE and press Set 3 Press or to adjust the degree of colour and press Set 4 Return to Step 2 to select the next colour OR Press Stop to exit Copy Contrast You can choose the contrast setting for a copy Greater contrast can help an image look sharper and more vivid This fea...

Страница 69: ...hibition In case of doubt we suggest that you consult with the legal authorities in your individual country as to the legality of any particular questionable documents The following are examples of documents which should not be copied Paper money Bonds or other certificates of indebtedness Certificates of Deposit Armed Forces Service or Draft papers Passports Postage stamps cancelled or uncancelle...

Страница 70: ... video equipment to the MFC and turn the video signal on the MFC Copy keys automatically switch to video printing mode and the screen displays Some camcorders digital cameras video games or VCRs do not correctly conform with PAL standards If they are not 100 PAL compatible then printing problems may be experienced As soon as you turn off the video equipment or disconnect it the Colour Copy keys re...

Страница 71: ...3 Press Colour Copy when you see the picture you want to capture and print The MFC begins printing and beeps when printing is complete Black White Video Printing For Black and white video printing follow the steps for Colour Video Printing using Mono Copy instead of Colour Copy If the MFC is not receiving video signals Colour Copy will not work However if there is a document in the feeder the MFC ...

Страница 72: ...below Press Options 1 Make sure the ADF is empty Plug the cable from your video camera s Out jack into the MFC s RCA pin jack 2 Press Options 3 Press or to select VIDEO PAPER TYPE VIDEO VIDEO TYPE VIDEO PRINT SIZE VIDEO BRIGHTNESS and VIDEO QUALITY and press Set If you selected the VIDEO PAPER TYPE If you use premium paper the copy quality will be improved For best results we recommend using Broth...

Страница 73: ...ss or to select 14 6x10 8 10x7 6 or 6x 10x7 6 and press Set To select VIDEO BRIGHTNESS 10 Repeat Step 3 11 Press to make a lighter copy OR press to make a darker copy and press Set To select VIDEO QUALITY 12 Repeat Step 3 13 Press or to select NORMAL or HIGH and press Set NOTE See Choosing the Quality in Chapter 9 14 Press Mono Copy or Colour Copy 15 Using the dial pad enter the number of copies y...

Страница 74: ... PHOTO PAPER TRNSPRNCY 3 Press or to select a paper type and press Set when the screen displays your selection If you are using Brother coated paper select INK JET then select BROTHER If you are using non Brother ink jet paper select OTHER 4 Press Stop to exit 1 PAPER TYPE Press Menu and 4 PAPER PLAIN QUALITY HIGH QUALITY NORMAL PAPER INK JET PAPER GLOSSY PAPER PHOTO PAPER TRNSPRNCY INK JET BROTHE...

Страница 75: ...en you see the frame you want to print 1 Press Menu 4 3 The screen displays 3 VIDEO TYPE 2 Press or to select video type and press Set when the screen displays your selection VIDEO STILL VIDEO MOVING 3 Press Stop to exit Setting Print Size 1 Press Menu 4 4 2 Press or to select print size SIZE 14 6 X 10 8 SIZE 10 X 7 6 SIZE 6 X 10 X 7 6 3 Press Set when the screen displays your selection 4 Press St...

Страница 76: ... select the next colour OR Press Stop to exit Video Printing Contrast You can choose the contrast setting for a copy Greater contrast can help an image look sharper and more vivid This feature is available only for colour copying 1 Press Menu 4 6 2 Press to decrease contrast OR Press to increase contrast and press Set when the screen displays your setting 3 Press Stop to exit R Light Dark B G ...

Страница 77: ...ed 1 Insert the media card into the media drive PhotoCapture Centre Media Card Indicator Lights LED light is on when the media card is inserted properly If LED is not on the media card is not properly inserted If LED is blinking the media card is being read or written Please note that there are two slots on your MFC one is for a CompactFlash card and the other is for a SmartMedia card Please note ...

Страница 78: ...utomatically 1 Insert your media card into the appropriate slot The LCD shows If there is a DPOF file on the card the LCD shows 2 Press or to select DPOF PRINT YES and press Set The LCD shows OR If you want to print an Index thumbnails or choose the images and their print option now select DPOF PRINT NO and press Set For details see Printing the index Thumbnails and Printing Images in this Chapter...

Страница 79: ...on your media card Printing Images The LCD shows 1 Press Colour Copy to select whether you want to print a thumbnail page or the images from your media card 2 Press 2 to select individual images 3 Enter the image number You can select more than one image at the same time Press for comma 1 3 6 meaning image 1 3 and 6 Press to print in sequence 1 5 meaning images 1 through 5 4 If you want to change ...

Страница 80: ...Press or to select the type of paper you are using PLAIN INK JET GLOSSY PHOTO or TRNSPRNCY and press Set If you use premium paper the copy quality will be improved For best results we recommend using Brother special paper Brother coated paper is ink jet paper PAPER TYPE PAPER PLAIN QUALITY NORMAL PAPER INK JET PAPER GLOSSY PAPER TRNSPRNCY PAPER PHOTO QUALITY ENHANCE OFF ENHANCE ON COLOUR ENHANCE S...

Страница 81: ...The MFC allows you to customize the colour enhance is set by using Function key if you select ENHANCE ON See Colour Enhancement in this Chapter 11 Press Colour Copy to return to the screen Select the number of copies you wish to make and press Colour Copy If you are using non Brother ink jet paper or Brother coated paper select INK JET The PhotoCapture Centre only prints in colour no Black White p...

Страница 82: ...ugh the options for each setting Press Set to save your selection Press Menu 5 1 PAPER TYPE PAPER PLAIN QUALITY HIGH PAPER INK JET PAPER GLOSSY PAPER TRNSPRNCY PAPER PHOTO 2 QUALITY 3 BRIGHTNESS COLOUR RED COLOUR GREEN COLOUR BLUE 5 COLOUR ADJUST WHITE BALANCE SHARPNESS COLOUR DENSITY 6 COLOUR ENHANCE is default QUALITY PHOTO QUALITY NORMAL INK JET BROTHER INK JET OTHER 4 CONTRAST R B G ...

Страница 83: ...lays 2 QUALITY 2 Press or to select a quality and press Set 3 Press Stop to exit Photo Brightness You can adjust the brightness setting before making a copy 1 Press Menu 5 3 2 Press to make a darker copy and press Set OR Press to make a lighter copy and press Set 3 Press Stop to exit Photo Contrast You can choose the contrast setting for a copy Greater contrast can help an image look sharper and m...

Страница 84: ...ge This is similar to adjusting the fine focus on a camera If the focus is off a small amount you can not clearly see the fine details of an image Colour Density This setting adjusts the total amount of colour in the image You can increase or decrease the amount of colour in an image to improve a picture which may appear washed out or weak Understanding Error Messages Once you are familiar with th...

Страница 85: ...nd other image file extensions will not be recognized Walk Up PhotoCapture Centre printing must be performed separately from PhotoCapture Centre operations using the PC Simultaneous operation is not available When printing the INDEX or IMAGE the PhotoCapture Centre will print all the valid images even if one or more images has been corrupted Depending on where the bad data occurs a portion of a co...

Страница 86: ...n Link Pro If you have previously installed Brother Multi Function Link Pro software for another machine uninstall it first If you have a USB cable For Windows 98 98SE and Windows 2000 Professional users only see Using a USB Cable to Connect the MFC to the PC Using Windows 98 98SE and Windows 2000 Professional Only in this Chapter If you have a bi directional IEEE 1284 compliant parallel cable see...

Страница 87: ...ce cable 3 Connect the parallel interface cable to the parallel interface port of the MFC and secure the wire clips COMPUTER REQUIREMENTS Windows Operating System Speed or Higher RAM HD Space CD ROM Speed 95 98 98SE Pentium 75MHz 24MB 32MB rec 50MB 2X NT 4 0 Workstation Pentium 75MHz 32MB 64MB rec 50MB 2X 2000 Professional Pentium 133MHz 64MB 128MB rec 50MB 2X Use only a shielded parallel interfac...

Страница 88: ... and 98SE For Windows 95 OSR2 98 98SE user 6 When the Add New Hardware Wizard screen appears click Next Please follow the instructions for the operating system you are using Now begin the installation of the Brother Drivers If you are using Windows 2000 Professional go to Using Windows 2000 Professional on page 84 If you are using Windows NT Workstation Version 4 0 go to Using Windows NT Workstati...

Страница 89: ...m disk provided by hardware manufacturer and click OK 7 Select Recommended and click Next 8 Insert the MFL Pro CD ROM into your CD ROM drive 9 Select Specify a location and remove the other check marks then click Browse to locate the file The instructions in Steps 7 to 16 are samples for Windows 98SE ...

Страница 90: ...ck the CD icon and click the x w9x para folder X is the drive letter for your CD ROM drive then click OK 11 Make sure Specify a location is selected and click Next 12 Make sure your printer driver name is displayed and click Next ...

Страница 91: ... can use the name supplied on screen When you have finished click Finish 14 When the Add New Hardware Wizard displays click Finish 15 When the Setup Window appears and the status bar reaches 100 the remaining drivers will be copied 16 Click OK 17 All the drivers have been installed Now you can print and scan ...

Страница 92: ...New Hardware Wizard screen appears click Next 7 Select Recommended and click Next 8 Insert the MFL Pro CD ROM into your CD ROM drive If you want to install PaperPort or Multi Function Link Pro go to the CD section See Installing the Brother Software in this Chapter ...

Страница 93: ...INTER SCANNER 9 Select Specify a location and remove the other check marks then click Next 10 Click Browse to locate the file 11 Double click on the CD icon and click on the x w2k para x is the drive letter for your CD ROM drive folder then click OK ...

Страница 94: ...86 Chapter 12 12 Make sure Specify a location is selected and click Next 13 Click Finish 14 Repeat Steps 6 13 to install the Printer and Scanner drivers ...

Страница 95: ...n the Setup window appears and the status bar reaches 100 the remaining drivers will be copied 17 Click OK 18 All the drivers have been installed Now you can print and scan You might see Digital Signature NotFound dialog during installation If you see it click Yes to install the driver ...

Страница 96: ...nstall the drivers manually Click the Start button in the Task bar and select Setting then Printer Then double click Add Printer 7 Select My Computer and click Next 8 Select LPT1 and click Next If you want to install PaperPort or Multi Function Link Pro go to the CD section See Installing the Brother Software in this Chapter ...

Страница 97: ... the MFL Pro CD ROM into your CD ROM drive Click Have Disk 10 Click Browse to locate the file 11 Double click on the CD icon and click on the x nt40 x is the drive letter for your CD ROM drive folder then click Open 12 Make sure Specify a location is selected and click OK ...

Страница 98: ...90 Chapter 12 13 Select your printer model then click Next This dialog box may not be displayed on some MFC models 14 Click Next 15 Select Not Shared then click Next ...

Страница 99: ...ck Finish 17 After the test page has been printed click Yes 18 Now the printer driver has been installed and you can see the driver in the Printer list 19 The rest of the Brother drivers will have to be installed manually Click the Start button in the task bar then select Run Enter x nt40 setup setup exe and click OK ...

Страница 100: ...bar reaches 100 the remaining drivers will be copied 21 Click OK 22 All the drivers have been installed Now you can print and scan If you want to install PaperPort or Multi Function Link Pro go to the CD section See Installing the Brother Software in this Chapter ...

Страница 101: ...is turned off 2 Connect the USB cable to both the MFC and the PC 3 Turn on your PC IMPORTANT To install the software using Windows 2000 Professional you must be logged on as the Administrator Before you can connect the MFC to your computer you must purchase a USB cable that is no longer than 6 feet 1 8 meters Now begin the installation of the Brother Drivers If you are using Windows 2000 Professio...

Страница 102: ...5 Select Recommended and click Next 6 Insert the MFL Pro CD ROM into your CD ROM drive 7 Select Specify a location and remove the other check marks then click Browse to locate the file Each operating system has different dialog Each driver may be installed in different order depending on which operating system you are using ...

Страница 103: ...lder for Windows 98 98SE user then click OK 9 Make sure Specify a location is selected and click Next 10 Click Next Make sure the location is x W98 usb for Windows 98 98SE If the Insert Disk Wizard appears remove the MFL Pro CD ROM and insert the Windows 98 98SE CD ROM to get the Windows standard driver and click OK ...

Страница 104: ... If you inserted the Windows 98 98SE CD ROM remove the CD ROM and reinsert the MFL Pro CD ROM 12 After the Composite USB Device is installed and the Add New Hardware Wizard reappears click Next 13 Select Recommended and click Next ...

Страница 105: ... Together 97 PRINTER SCANNER 14 Select Specify a location and click Next 15 Click Next 16 When the Add New Hardware Wizard displays the message that installation is completed click Finish To install all the drivers repeat Steps 4 to 10 ...

Страница 106: ...nner and Printer Drivers have been installed select BRUSB USB Printer Port as the printer port and click Next 18 Enter a name for the printer or you can use the name supplied When you have finished click Next 19 Select Yes Recommended to Print a Test Page and click Finish ...

Страница 107: ...he message that the software has been installed click Finish 22 All the drivers have been installed Now you can print and scan Using Windows 2000 Professional 4 When the Found New Hardware Wizard screen appears then click Next If you want to install PaperPort or Multi Function Link Pro go to the CD section See Installing the Brother Software in this Chapter ...

Страница 108: ...hapter 12 5 Select Recommended and click Next 6 Insert the MFL Pro CD ROM into your CD ROM drive 7 Select Specify a location and remove the other check marks then click Next 8 Click Browse to locate the file ...

Страница 109: ...Work Together 101 PRINTER SCANNER 9 Double click on the CD icon and click on the x W2K usb x is the driver letter for your CD ROM drive folder then click OK 10 Make sure Specify a location is displayed 11 Click Next 12 Click Finish ...

Страница 110: ...e been installed Now you can print and scan You might see Digital Signature Not Found dialog during installation If you see it click Yes to install the driver If you want to install PaperPort or Multi Function Link Pro go to the CD section See Installing the Brother Software in this Chapter ...

Страница 111: ...stalled first then MFL Pro will be installed After the installation you must restart your PC IMPORTANT You must install drivers for Printer and Scanner before you install the software MFL Pro See the beginning of this chapter If you are using Windows 2000 Professional or NT 4 0 you must be logged on as the Administrator before you can install the software Clicking Install MFL Pro will install the ...

Страница 112: ...tation click Back to return the main CD ROM screen To View Brother Home Page From the main screen you can access the Brother Home Page by clicking Brother Home Page To access our web site at www brother com where you will find additional information about Brother products and services such as specification sheets and Frequently Asked Questions FAQs click Brother Home Page Helpful Hints for Windows...

Страница 113: ... glossy paper gives you high resolution output Brilliant 4 Colour Output at 1200 dpi Printing at 1200 dpi resolution on special coated paper or glossy paper gives you highest resolution output Low Running Cost Whenever you run out of a particular colour ink you will replace only the cartridge that s empty Bi directional Parallel Interface The parallel interface allows bi directional IEEE 1284 comp...

Страница 114: ...cations for Cassette and Manual Slot in Chapter 22 Loading Paper in Multi Purpose Paper Cassette 1 Remove the paper cassette lift and pull out 2 Remove any paper from the paper cassette and fan the stack of paper before loading Load the paper stack with the print coated side face down Slide the paper guide Make sure the paper is stacked below the maximum paper height line You can load up to 250 sh...

Страница 115: ...int more than one page using the Manual Feed Slot on your PC in the printer driver Properties Paper tab select manual feed 1 Place the paper on top of the paper cassette with the print side face down 2 Align the paper against the right paper guide and slide it into the manual feed slot If you see ink smudges on the top centre of the printed pages press the purple thickness adjustment lever down If...

Страница 116: ...e manual feed slot 7 From your PC application tell the MFC to begin printing On completion you can place another envelope in the manual feed slot Simultaneous Printing Fax Your MFC can print data from your computer while sending or receiving a fax or while scanning information into the computer However when the MFC is copying or receiving a fax on paper it pauses the PC printing operation and resu...

Страница 117: ... message NEAR EMPTY or INK EMPTY you will need to replace the ink cartridge for the appropriate colour See Troubleshooting and Maintenance in Chapter 20 Turning Off Bi directional Printing You can further improve print quality by turning off bi directional printing and setting the MFC to print in one direction only However this will reduce print speed by one half 1 Press Menu 2 3 2 Press or to sel...

Страница 118: ...so you can change print properties as needed The Paper Tab The paper tab screen allows you to set up the Paper Size Paper Source Orientation Scaling and Copies To access the Brother printer driver select Print from the File menu In the Print dialog box select Brother MFC 860 Series from the Name drop down list Click the Properties button The Brother MFC 860 Series on BRMFC Properties dialog box wi...

Страница 119: ...Executive US 184 2 x 266 7 mm 7 1 4 x 10 1 2 inches A4 International 210 x 297 mm A5 International 148 x 210 mm 5 8 x 8 3 inches Post Card US 127 x 177 8 mm 5 x 7 inches Photo Card US 101 6 x 152 4 mm 4 x 6 inches Envelopes B5 International envelope 176 x 250 mm 6 9 x 9 8 inches C5 International envelope 162 x 229 mm 6 4 x 9 inches COM 10 104 8 x 241 mm 4 1 8 x 9 1 2 inches DL International envelo...

Страница 120: ...up so that the following pages are stacked on top of previous pages Page 5 Page 4 Page 3 Page 1 When you want to get correct ordered printouts use this function The MFC spools the job in your computer and sends the data starting from the last page to the printer Since the MFC prints from the last page forward the printouts are stacked Page 1 2 3 Page 5 Please note that this function takes more tim...

Страница 121: ...eet by sheet The MFC stops before printing and the Printer Driver shows Load one sheet message Insert a sheet into the manual feed slot and click OK to resume printing The Quality Colour Tab The Quality Colour tab enables you to select the print quality media colours matched to PC monitor custom colours or mono and document type Click the Quality Colour tab to display this screen Select the Apply ...

Страница 122: ... Photo Select this mode for Photographic images Draft 300 x 150 dpi The fastest print mode approximately two to four times faster than normal mode and gives lower ink consumption Use this mode to print large volume documents or a document for proofing Normal 300 x 300 dpi Recommended mode for ordinary printouts Good print quality with comfortable printing speed Fine 600 x 600 dpi Better print qual...

Страница 123: ...phs and text The colour is adjusted to give more vivid colour Bi Directional Printing The MFC prints by moving its print head Normally it prints in both directions By turning this option OFF default setting is ON the MFC prints uni directional so that the print speed will be reduced to half Sometimes the moving speed of the print head may not be stable due to temperature changes etc and the printe...

Страница 124: ...the white sections back to pure white Brightness Change the brightness of the whole image lighter or darker Moving the scroll bar to the left makes your image darker and moving the scroll bar to the right makes your image lighter Contrast Change the contrast of an image Darker sections will be more dark and lighter sections will be more light as you increase the contrast Increase the contrast when...

Страница 125: ...ng the Control Centre eliminates the need to manually launch the specific applications The Brother Control Centre provides three categories of functions 1 Scan directly to a file E mail word processor or graphic application of choice 2 Enhanced copy functions such as Two on One Copying AutoLoad the Brother Control Centre The Control Centre is initially configured to automatically load each time Wi...

Страница 126: ...uired to scan from your PC Using the Control Panel Keys Before you can use the Scan keys on the control panel you must have connected the MFC to your Windows based PC and loaded the appropriate Brother Drivers for your version of Windows When you are ready to use the Scan keys make sure the Brother Control Centre application is running on your PC For details about how to configure the Brother Cont...

Страница 127: ...r or face down on the glass platen 2 Press Scan OCR 3 The MFC will scan the original perform OCR in ScanSoft TextBridge and then display the result in your word processing application for viewing and editing Scan to E mail You can scan either a black and white or a colour original into your E mail application as a file attachment Although the Brother Control Centre can be configured to send only b...

Страница 128: ...Operations Scan to File allows you to scan directly to a disk file with two mouse clicks You can change the file type destination directory and file name as needed Scan to E mail enables you with just two mouse clicks to scan a picture or text document directly into an E mail application as a standard attachment You have the option of selecting the file type and resolution for the attachment Scan ...

Страница 129: ...you to use the Two on One page feature of the Brother printer driver to copy two original pages onto a single output page This feature creates a thumbnail of each page and prints both images on a single page Scanner Settings for Scan and Copy Buttons When the Pop Up screen is displayed you can access the Scanner Settings window Click the Configuration icon at the top right of the Brother Control C...

Страница 130: ... 100 Click OK to save your changes If you make a mistake or later decide to return to the original default setting just click the Restore Defaults button when the scanning mode is displayed To access the Scanner Configurations screen 1 Insert the document in the feeder or on the glass platen 2 Right click the appropriate Control Centre button to display Configurations then click it The configurati...

Страница 131: ...er Settings From the pull down list select the scanning mode that is appropriate for the type of file Filing and Copying Text for OCR Photos Photos High Quality Photos Quick Scan Custom Draft Copy or Fine Copy To change any of the settings for that mode click the Modify Settings button ...

Страница 132: ... MAX Self Viewing Files EXE PaperPort 5 0 Files MAX PaperPort 4 0 Files MAX PaperPort 3 0 Files MAX Windows Bitmap BMP PC Paintbrush PCX Multi page PCX DCX JPEG Image Files JPG TIFF Uncompressed TIF TIFF Group 4 TIF TIFF Class F TIF Multi Page TIFF Uncompressed TIF Multi Page TIFF Group 4 TIF Multi Page TIFF Class F TIF PDF Files PDF Portable Network Graphics PNG FlashPix FPX HFX Fax Files HFX To ...

Страница 133: ...Application Email Package From the pull down list select your E mail application Email Settings Click the EMail Settings button to set up links The Links Preferences window will appear File Attachments Do not convert files Click this checkbox if you do not want to change the file type of attachments The Conversion Options will not be available grayed Convert MAX files only Click this checkbox if y...

Страница 134: ...ose Scan to E mail This feature works only with MAPI type E mail applications such as Microsoft Exchange Microsoft Outlook and Eudora QuickSend List You can create a list of Email names and addresses for quick selection Click the New button to add a name s to your QuickSend list Your Email phone book listing is displayed so you can select stored names or create new ones Highlight the name s you wa...

Страница 135: ...or Scanner Settings From the pull down list select the scanning mode that is appropriate for the type of file Filing and Copying Text for OCR Photos Photos High Quality Photos Quick Scan Custom Draft Copy or Fine Copy To change any of the settings for that mode click the Modify Settings button ...

Страница 136: ...er software Click the OCR Settings button to choose how the OCR application will read the pages you scan into your word processor application The Preferences window will appear Select your setting and click OK Auto Orientation Check this checkbox if you want your word processor application to read the page as it is set up Decolumnized Output Check this checkbox if you want your word processor appl...

Страница 137: ...ile Filing and Copying Text for OCR Photos Photos High Quality Photos Quick Scan Custom Draft Copy or Fine Copy To change any of the settings for that mode click the Modify Settings button Target Application Application From the pull down list select the application you want to add to this Pop Up screen Click the Custom Link Settings button to set up links for your user defined application ...

Страница 138: ...opying Text for OCR Photos Photos High Quality Photos Quick Scan Custom Draft Copy or Fine Copy To change any of the settings for that mode click the Modify Settings button Copy Settings Brother MFC860 Copies Enter the number of copies you want to print To change the copy options click the Copy Options button Click the OK button to save your Copy settings ...

Страница 139: ...t easy to use filing system that will help you organize your graphics and text documents It allows you to combine or stack documents of different formats for printing or filing ScanSoft PaperPort can be accessed through the ScanSoft PaperPort program group See On Line Documentation for Multi Function Link Pro on the CD ROM The complete ScanSoft PaperPort Owner s Manual including ScanSoft TextBridg...

Страница 140: ...er to display it you can also double click a non PaperPort item to open it Organizing Your Items in Folders PaperPort has an easy to use filing system for organizing your items The filing system consists of folders and items that you select to view in Desktop View An item can be a PaperPort item or a non PaperPort item Folders are arranged in a tree structure in the Folder View You use this pane t...

Страница 141: ...PaperPort item which is really just a picture of the text into text that you can edit with a word processing application PaperPort uses the optical character recognition application ScanSoft TextBridge which comes with PaperPort OR PaperPort uses your application if it is already on your computer You can convert the entire item or by using the Copy As Text command you can select only a portion of ...

Страница 142: ...ageMaker CorelDraw and many more To choose Brother Multi Function Link Pro as your scanner driver select it under the Select scanner OR Select source option in your software Accessing the Scanner From the PaperPort window select the Scan or TWAIN button or from the File drop down menu choose Acquire Multi Function Link Pro s TWAIN dialog box will appear Scanning a Document into the PC 1 Place the ...

Страница 143: ...rs Choose either 256 Colour which scans up to 256 colours 24 bit colour which scans up to 16 8 million colours Although using 24 bit colour creates an image with the most accurate colours the image file will be approximately three times larger than a file created with 256 Colour Size Set the Size to one of the following Letter 8 1 2 x 11 in A4 210 x 297 mm Legal 8 1 2 x 14 in A5 148 x 210 mm B5 18...

Страница 144: ...the Adjust section click the Image button The Image screen will appear Use the cursor to drag the indicator buttons to the left or right to adjust the Brightness and the Contrast as needed Paper Check the Photo box if the image is a photograph Video Capture The Video Capture button displays the video frame grabber window See Video Capture from the PC in this Chapter for details ...

Страница 145: ...w to scan the image How to use PreScan to adjust an image 1 Place the original face up in the feeder or face down on the glass platen 2 Select the PreScan button The entire original will be scanned into the PC and will appear in the Scanning Area of the Scanner window 3 To crop a portion of the original to be scanned drag any side or corner of the dotted outline in the Scanning Area with the left ...

Страница 146: ...dia played on video equipment such as a video camera or VCR and then converting that frame into an image file on your PC Once the frame is an image file it can be saved printed faxed and inserted into other files Connecting Your Video Equipment Before you can begin to capture a video frame you must first connect your video equipment to the MFC To connect your video equipment 1 Connect your video c...

Страница 147: ...any application that is compatible with TWAIN scanning devices To capture a frame as an image 1 Connect your video equipment to the MFC 2 From PaperPort select Acquire from the File menu or click on the Scan TWAIN icon Multi Function Link Pro s TWAIN dialog box will appear 3 In the Multi Function Link Pro Setup TWAIN dialog box click the Video Capture button The Video Capture dialog box will appea...

Страница 148: ...ile will be large and take more space on your PC 750 x 562 640 x 480 is suitable for most images 320 x 240 8 Turn on your video equipment and start running the video 9 When you see the frame you want to capture click the Pause button The frame will be displayed in the viewer screen section of Multi Function Link Pro s TWAIN dialog box 10 If you wish to capture the displayed frame click the OK butt...

Страница 149: ... Pro software for your MFC includes ScanSoft PaperPort for Brother and ScanSoft TextBridge See Using ScanSoft PaperPort for Brother TextBridge in Chapter 16 Brother Resource Manager The Brother Resource Manager application must be running for you to use your MFC with your Windows computer Multi Function Link Pro software and the MFL Pro Printer Driver automatically load the Resource Manager as nee...

Страница 150: ...ploading the data to the MFC and exiting the remote setup program If an error message is displayed enter the correct data again then click OK CANCEL This exits the remote setup application without uploading the data to the MFC APPLY This uploads the data to the MFC but does not exit the remote setup application Print This command prints the selected items on the MFC You can not print the data unti...

Страница 151: ...ion to your PC and will work only with Windows 98 98SE and 2000 Professional If both media cards are inserted at the same time the PhotoCapture Centre will read only the card that was installed first To have access to the other card you must first remove both cards then insert the media card you wish to access Do not unplug the power cord USB cable or remove a SmartMedia or CompactFlash card from ...

Страница 152: ...and Scanner Drivers 1 Turn on the power to your Macintosh and wait for the startup process to be completed 2 Insert the Brother CD ROM into your CD ROM drive The window below will appear automatically 3 To install the Printer and Scanner Drivers click MFL Pro Driver Installer 4 After installation is completed connect a standard USB cable to both the MFC and the Macintosh Before you can connect the...

Страница 153: ...u open the Chooser 2 Click the printer driver you installed to highlight it On the right side of the Chooser click the printer to which you want to print Close the Chooser To print the document 3 From application software such as PaperPort click File menu and select Page Setup You can change the settings for Paper Size Paper Thickness Paper Source Orientation and Scaling then click OK ...

Страница 154: ...as PaperPort click File menu and select Print Click Print to start printing If you want to change Copies Pages Quality Media Type and Colour Mono select your settings before clicking Print Set Option allows you to change Document and Printing Options ...

Страница 155: ...upper right hand corner of your screen The first time you use the Brother TWAIN driver set it as the default by choosing the Select Source then click the PaperPort icon Afterward for each original you scan choose Acquire Image by clicking the PaperPort icon The Scanner setup dialog box will appear Scanning a Document into Your Macintosh G3 G4 or iMac 1 Place the original face up in the feeder or f...

Страница 156: ...d for documents that contain photographic images or graphics Error Diffusion is a method for creating simulated grey images by placing black dots in a specific matrix instead of true grey dots True Grey also is used for documents containing photographic images or graphics This mode is more exact because it uses up to 256 shades of grey It requires the most memory and longest transfer time Colours ...

Страница 157: ...ghtness settings to obtain the best image The Brother TWAIN Scanner driver offers 100 brightness settings 50 to 50 The default value is 0 representing an average setting You can set the brightness level by dragging the slidebar to the right to lighten the image or to the left to darken the image You can also type a value in the box to set the setting Click OK If the scanned image is too light set ...

Страница 158: ...portant than its vividness Relative Colourimetric Matching The colours that fall within the gamuts of both devices are left unchanged Some colours in both images will be exactly the same a useful outcome when colours must match quantitatively What that means is that if the colour is inside the gamut it will stay the same colour However if the colour is outside the gamut it will be mapped to the ed...

Страница 159: ...the image 1 Insert the original face up in the feeder or face down on the glass platen 2 Click PreScan The entire original will be scanned into your Macintosh G3 or iMac and will appear in the Scanning Area of the Scanner dialog box 3 To scan a portion of the prescanned image click and drag the mouse to crop it 4 Insert original in the ADF of the Brother MFC again 5 Adjust the settings for Resolut...

Страница 160: ...is not in Polled Waiting mode Verify the other party s polling setup COVER OPEN Scanner cover is not closed completely Press the scanner cover release button and lift the scanner cover then close it DISCONNECTED The other party or other party s fax machine terminated the call Try to transmit calling the other party to see what happened or receive again DOCUMENT JAM Documents were not inserted or f...

Страница 161: ...equirements in Chapter 11 PLS OPEN COVER A page piece of paper or paper clip etc may be jammed inside the MFC Press the Scanner cover release button and lift the scanner cover If you see any jammed paper or other item gently pull it out then close the scanner cover If the error message remains open and close the scanner cover again If the MFC cannot reset itself and return to the date and time pro...

Страница 162: ...nit 1 Remove any paper from the document feeder that is not jammed 2 Lift the ADF cover 3 Pull the jammed document out to the left 4 Close the ADF cover 5 Press Stop Document Jam inside the ADF Unit 1 Open the document cover 2 Remove any paper from the document feeder that is not jammed 3 Lift the ADF unit 4 Pull the jammed document out to the right 5 Close the ADF unit 6 Press Stop ADF Cover ADF ...

Страница 163: ...aintenance 155 MAINTENANCE Paper Jam 1 Remove the paper cassette 2 Press the blue release button and pull the jammed paper out toward you 3 Slide the paper cassette into the MFC until it locks into place Blue Release Button ...

Страница 164: ...ght Make sure your ink cartridges are fresh and within their expiry dates Cartridge expiry dates are printed on the package Make sure the Printer Driver matches the type of paper you are using See The Quality Colour Tab in Chapter 14 Try using recommended special paper See Brother Paper in Chapter 22 The recommended environment for your MFC is between 15 C to 30 C Printing Appears Dirty or Ink See...

Страница 165: ... on a Single Line If you have Caller ID RingMaster Voice Mail an answering machine alarm system or any other on a single phone line with your MFC it may create a problem sending or receiving fax data For example If you are sending or receiving a fax message while a custom feature signal comes through on the line the signal can temporarily interrupt or disrupt the fax data Brother s ECM feature sho...

Страница 166: ...b of the Print dialog box select Auto in the Document section Colour enhance is not working correctly If the image data is not full colour such as 256 colour in your application Colour enhance does not function Please use at least 256 colour data with the Colour enhance feature Unable to write to LPT1 or LPT1 already in use Error Message appears 1 Make sure the MFC is on plugged into the AC outiet...

Страница 167: ...lour using the Ink Management key 1 Press Ink Management 2 Press 1 to choose 1 CLEANING 3 Press or to choose the colour you want to clean 4 Press Set to clean the print head automatically When cleaning is finished the MFC will go back online automatically Video Capture LCD does not show VIDEO PRESS COPY CAPTURE READY Check the video cable connection to the MFC s RCA pin jack Check that the video e...

Страница 168: ...page Study the alignment page and decide which sample numbers show the most evenly printed ink lines for 300 and 600 dpi The screen displays 3 Using the dial pad enter the level of adjustment needed for 300 dpi 1 to 9 4 The screen displays 5 Using the dial pad enter the level of adjustment needed for 600 dpi 1 to 9 6 Print another sample Test Print and check it See Test Print in this Chapter 7 Pre...

Страница 169: ...is on the back left underside of the scanner cover Press it backward to lock it 2 Close the scanner cover 3 Wait until the LCD returns to the date and time display 4 Unplug the MFC from the telephone wall socket 5 Unplug the MFC from the AC outlet 6 Remove the paper cassette and telephone line cord and and place them in original packing materials or protective wrapping Do not unplug the MFC after ...

Страница 170: ...cartridges and replace them with the yellow shipping cover that was part of the original packing materials 8 Wrap the MFC in the plastic bag 9 Place the MFC and paper cassette in the original carton with the original packing material ...

Страница 171: ...rials into the carton 11 Close the carton If you are unable to locate the shipping cover do not remove the ink cartridges before shipping It is essential that either the yellow shipping cover or the ink cartridges be in position during shipment Otherwise the print head will be damaged voiding your warranty ...

Страница 172: ...white film with isopropyl alcohol on a lint free cloth Lift the ADF unit Clean the white roller and the glass strip under the roller with isopropyl alcohol on a lint free cloth If the screen still displays a scanner error please contact your Brother dealer for service Document Cover White Film White Roller Glass Strip ADF Unit ...

Страница 173: ...oller 1 Remove the paper cassette from the MFC 2 Wipe the pick up rollers with a cloth moistened with isopropyl alcohol 3 Slide the paper cassette into the MFC until it locks into place Be careful not to touch the paper feed star wheels and flat cable Be sure to unplug the MFC from the main power outlet before cleaning the printer platen and pick up rollers Flat Cable Paper Feed Star Wheel Printer...

Страница 174: ...e replacement Steps 1 3 If the ink is empty skip to Step 3 1 Press Ink Management 2 Press or to choose 2 REPLACE INK and press Set If one or more ink cartridges are empty for example Black the screen displays INK EMPTY BLACK and PLS OPEN COVER 3 Press the scanner cover release button and lift the scanner cover 4 Remove the ink cartridge by pulling it toward you and lifting it up and then out of th...

Страница 175: ...ink and staining your hands and clothing remove the sealing tape gently If ink gets in your eyes irrigate them with water immediately and consult a doctor if you are concerned DO NOT remove ink cartridges if you do not need to replace them If you do so it may reduce the ink quantity and the printer will not know the quantity of ink left in the cartridge DO NOT shake the ink cartridges because the ...

Страница 176: ... 8 This machine is designed to be used only with a suitable earthed power outlet This product is equipped with a 3 wire earthed plug This plug will fit into only an earthed socket This is a safety feature If you are unable to insert the plug into the outlet contact your electrician to replace your obsolete socket Do not defeat the purpose of an earthed plug 9 Do not allow anything to rest on the p...

Страница 177: ...oduct to normal operation If the product has been dropped or the cabinet has been damaged If the product exhibits a distinct change in performance indicating a need for service 16 We do not advise the use of an extension lead IMPORTANT For Your Safety To ensure safe operation the three pin plug supplied must be inserted only into a standard three pin power point which is effectively grounded throu...

Страница 178: ...n Display LCD 16 characters Polling types Standard Secure Delayed Sequential Contrast control Automatic Super Light Super Dark manual setting Resolution Horizontal 8 dot mm Vertical Standard 3 85 line mm Fine Photo 7 7 line mm Superfine Photo copy 15 4 line mm Memory Capacity 8MB up to 550 pages One Touch Dial 4 x 2 stations Speed Dial 100 stations Automatic redial 4 times at 2 minute intervals Au...

Страница 179: ...e Feeder or manual loading from the Manual Feed Slot Paper type Plain paper coated paper glossy paper transparancies organizer paper and envelopes Paper size A4 A5 B5 Letter Legal Executive envelopes commercial No 10 DL C4 C5 organizer K L Postcard Photo Width 148 216 mm 5 8 8 5 Length 127 356 mm 5 14 Weight 64 120 g m2 17 32 lb Maximum feeder capacity Approx 100 sheets of 75 g m2 plain paper Pape...

Страница 180: ...tered trademarks of Brother Industries Ltd Brother is a registered trademark of Brother Industries Ltd Windows and WindowsNT are registered trademarks of Microsoft in the U S and other countries Microsoft is registered trademark of Microsoft in the U S and other companies Macintosh is a registered trademark and iMac is a trademark of Apple Computer Inc PaperPort and TextBridge are registered trade...

Страница 181: ...ur Ink Jet Glossy Paper superfine mode BPGLA for A4 Brother coated ink jet paper is coated only on one side When loading paper in the paper cassette make sure that the whiter side the coated side is facing down The coated side of glossy paper is shiny Do not touch the shiny side Load glossy paper in the paper cassette with the shiny side facing down DO NOT touch the coated side of the paper or eit...

Страница 182: ...tter 100 Sheets Transparencies A4 Letter 50 Glossy Paper A4 Letter 20 Envelopes DL COM 10 C5 B5 Monarch 10 Organizer K L 10 Photo 127 x 177 8 10 Post Card 106 1 x 152 4 30 Paper Capacity for Paper Cassette Cut Sheet Paper Weight 64 to 120 g m2 Paper Cassette Up to 27 mm Approximately 250 Sheets of 75 g m2 Output Stacker Approximately 75 Sheets of 75 g m2 Transparencies and glossy paper must be pic...

Страница 183: ... 4mm 3 4mm Organizer K L Printer 3mm 11mm 3 4mm 3 4mm Envelopes Printer 10mm 20mm 3 4mm 3 4mm Do not use the following types of paper and envelopes Damaged curled wrinkled or irregularly shaped paper and envelopes Extremely shiny or highly textured paper and envelopes Envelopes with clasps Envelopes of baggy construction Envelopes not sharply creased Embossed envelopes Paper and envelopes already ...

Страница 184: ...nt to change it press to move the cursor after the last correct letter Then press Stop all letters above and to the right of the cursor are deleted Re enter the correct text and or digits You can also back up and type over incorrect letters Repeating letters If you need to enter a character assigned to the same key as the previous character press to move the cursor to the right Special characters ...

Страница 185: ... the volume level of the beeps when you press a key an error occurs or a document is sent or received LOW 1 5 SPEAKER VOLUME Adjust speaker volume LOW 1 6 RING VOLUME Adjust volume of ringer LOW 1 7 PBX Turn on if PABX Private Automatic Branch Exchange is connected to your MFC OFF 1 8 CLOCK CHANGE Adjust the MFC s clock by one hour for summer winter time 1 Function Description Factory Set Chapter ...

Страница 186: ...Set the MFC to send documents later 5 7 POLLED TX Set Polled Transmission for someone to poll your MFC to receive a fax from you STANDARD 7 8 REAL TIME TX When memory is full you can send faxes in real time OFF 2 9 BATCH TX Sends all delayed faxes that are to the same fax number and at the same time as one transmission OFF 5 Function Description Factory Set Chapter Check which jobs are in memory o...

Страница 187: ...s 4 6 MEMORY STATUS Lists information about memory use 4 7 ORDER FORM Print accessories order form to your dealer 4 Function Description Factory Set Chapter 1 FAX FWD Set your fax machine to forward faxes OFF 8 2 FAX STORAGE Store incoming faxes into memory for remote retrieval OFF 8 3 REMOTE ACCESS Set code for retrieving faxes 159 8 4 PRINT DOCUMENT Print incoming faxes stored in the memory 3 Fu...

Страница 188: ... of paper in the cassette PLAIN 10 2 QUALITY Select NORMAL or HIGH print NORMAL 10 3 VIDEO TYPE Select MOVING or STILL video signal MOVING 10 4 PRINT SIZE Select the size you want the captured frame to print 10x7 6 10 5 COLOUR ADJUST Adjust the amount of Red Green or Blue in Copies 10 6 CONTRAST Adjust the contrast 10 Function Description Factory Set Chapter 1 PAPER TYPE Identify the type of paper...

Страница 189: ...or about 40 seconds and the screen continues to display RECEIVE To cancel the receiving mode press Stop The fax handshake is the time in which the sending machine s CNG tones and the receiving machines chirps overlap This must be for at least 2 to 4 seconds so the fax machines can understand how each is sending and receiving the fax The handshake cannot begin until the call is answered and the CNG...

Страница 190: ...able of greater compression method Modified Read MR and Modified Modified Read MMR if the receiving machine has the same capability Compatibility Group The ability of one fax unit to communicate with another Compatibility is assured between ITU T Group Contrast Setting to compensate for dark or light documents by lightening dark documents or darkening light documents Cover Page Prints a page at th...

Страница 191: ...ate the memory One Touch Dial Keys on the MFC control panel where you can store numbers for easy dialling You must use a separate key for each number Out of Paper Reception Receives faxes into the MFC s memory when the machine is out of paper Overseas Mode Makes temporary changes to the fax tones to accommodate noise and static on overseas phone lines Pause Allows you to place a 3 5 second delay i...

Страница 192: ... sender s name and fax number Super fine resolution 392 x 203 dpi Best for very small print and line art System Setup List A printed report that shows the current setting of your machine Temporary Setting You can select certain options for each fax transmission without changing the default settings Timer Not available for Colour fax A feature that lets you program a fax to go out at a certain time...

Страница 193: ...r Enhancement 76 Colour Fax transmission 26 COMM ERROR 152 CompactFlash Card 69 Computer Requirements 79 Connect External Telephone Answering Machine 15 Connect External Telephone 16 Contrast 23 Control Panel Overview 17 Controller 171 Copies 112 Copy 2in1 4in1 Poster 57 58 Copy Enlarging 55 Copy Multiple 53 Copy Quality 58 Copy Reducing 55 Copy Single Colour 61 Copy Brightness 60 Copy Contrast 60...

Страница 194: ...es 176 Installing Brother Drivers for Macintosh G3 G4 or iMac 144 Installing Brother Software Multi Function Link Pro 103 International Calls 36 Interrupting 39 J Job Cancel 38 Job Status 47 JOURNAL 32 Journal Period 33 L Legal Limitations 61 Loading Paper 2 M MACHINE ERROR AF 10 Macintosh G3 G4 or iMac 144 Maintenance 152 164 MANUAL 28 Manual Feed Slot 107 Manual Transmission 25 MEMORY FULL 152 M...

Страница 195: ...LS OPEN COVER 153 Polling Receive 44 Polling Transmit 46 Power Cord 10 Print Fax in Memory 31 Print a Report 33 Print Area 175 Print Media 171 Print Quality 159 Print Size 64 Printer Driver Settings 110 PRINTER JAM 153 Printer Operation Keys 108 Printer Platen 165 Product Description 170 Q Quality Colour Tab 113 QUICK DIAL list 32 R Real Time Transmission 27 Receive Mode 28 Reception into Memory 3...

Страница 196: ...emarks 172 Transmission Verification Xmit Report 32 Transparencies 173 Troubleshooting 152 TWAIN COMPLIANT 134 TX Lock 39 40 U USB Cable 93 User Defined Button 129 V Vertical Black Lines 156 Video Capture 138 Video Printing 62 Video Printing Black White 63 Video Printing Brightness 66 68 Video Printing Changing Default Settings 66 Video Printing Colour Adjustment 68 Video Printing Colour 63 Video ...

Страница 197: ... the kinds of messages received 1 long beep Fax message s No beeps no messages 4 After 2 short beeps enter a command 5 Press 9 0 to reset your machine when you finish 6 Hang up Change Remote Access Code 1 Press Menu 1 7 3 2 Enter the 3 digit number The cannot be changed 3 Press Set 4 Press Stop to exit Change Answer Mode Press 9 8 then for EXT TEL TAD press 1 Fax press 2 Exit Remote Operation Pres...

Страница 198: ...umber of remote fax machine and then to retrieve Memory Status List Turn Fax Storage on press 6 Turn Fax Storage off press 7 Retrieve Fax Press 9 6 Print a Memory Status List press 1 then enter the number of remote fax machine and then After the beep hang up and wait Retrieve all faxes press 2 then enter the number of remote fax machine and then After the beep hang up and wait Erase all fax messag...

Страница 199: ...IND SHENZHEN CO LTD Brother International Europe Ltd Fada Road Wuhe Street Bantian Industry Zone Buji Shenzhen P R China Brother House 1 Tame Street Audenshaw Manchester M34 5JE UK Products description Brother Fax Machines Type Group 3 Ink Jet Model Name MFC 860 Harmonized Safety EN 60950 up to Amd 11 1997 EMC EN55022 1998 Class B EN55024 1998 EN61000 3 2 1995 A2 1998 EN61000 3 3 1995 Year in whic...

Страница 200: ...UK LE3638004 Printed in Malaysia This machine is approved for use in the country of purchase only local Brother companies or their dealers will only support fax machines purchased in their own countries ...

Отзывы: