background image

U S I N G

C O L O R

F A X I N G

W I T H

F A X S P E E D

18-7

Color F

axing

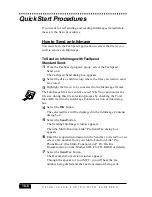
Using the FaxSpeed Macro

To send the current document in your word processor
directly to FaxSpeed:

1

Open your word processor application, and open or create the
required document.

2

Select the Run FaxSpeed option from the File menu.

The current file will be generated into an InfoImage.

Then the FaxSpeed Setup dialog box will appear.

3

Specify the required settings in this dialog box.

4

To change additional settings, select the Fax/Printer… button.
The FaxSpeed Setup dialog box will appear. Select
Brother MFL Pro Fax as the driver.

5

Select OK to send the InfoImage to Multi-Function Link

®

 Pro.

Содержание MFC-7050C

Страница 1: ...MFC7050C OWNER S MANUAL ...

Страница 2: ...ce Model Number MFC 7050C Serial Number __________________________ Date of Purchase __________________________ Place of Purchase __________________________ The serial number is on the back of the unit Retain this Owner sManualwithyour salesreceipt asapermanent record of your purchase in the event of a theft fire or warranty service ...

Страница 3: ...s to receive faxed instructions about using the system and an index of Fax Back subjects USA 1 800 521 2846 From within Canada 1 800 681 9838 The Brother Fax Back System number USA Only has been preprogrammed on One Touch key 01 Brother on the World Wide Web You can find more information about Brother products from product specification sheets to Frequently Asked Questions FAQs on the World Wide W...

Страница 4: ...ridge black LC11BK Ink Cartridge color LC11CL Ink Cartridge photo LC11PH Ink Jet Paper 100 Sheets BPHRL Transparencies 50 Sheets BPTRL Telephone Line Cord For USA UG1570001 For Canada UG3565001 Telephone Handset UF6857003 Handset Curled Cord UF8019009 Document Wire Extension UL6856000 Document Tray Paper Tray UU7114001 IEEE 1284 Bi directional Cable UG4558001 Remote Retrieval Access Card UU1841001...

Страница 5: ... PERMITTED BY SOME STATES IN THE USA AND SOME PROVINCES IN CANADA THE ABOVE EXCLUSION MAY NOT APPLY TO YOU IN NO EVENT WILL BROTHER S LICENSOR S BE LIABLE TO YOU FOR ANY CONSEQUENTIAL INCIDENTAL OR INDIRECT DAMAGES INCLUDING DAMAGES FOR LOSS OF BUSINESS PROFITS BUSINESS INTERRUPTION LOSS OF BUSINESS INFORMATION AND THE LIKE ARISING OUT OF THE USE OR INABILITY TO USE THE SOFTWARE EVEN IF BROTHER S ...

Страница 6: ...achines and multi function centers will function properly after January 1 2000 provided that all non Brother hardware software and firmware used by our customers in connection or combination with Brother fax machines MFCs and bundled software accurately exchange date data with the Brother products Please continue to check our Web page for updates at http www brother com All remedies will be provid...

Страница 7: ...up 2 9 Preserving Ink Cartridges 2 12 Aligning Ink Cartridges 2 13 Photo Printouts 2 14 Cleaning the Ink Cartridges 2 15 Cleaning the Cartridge Carrier 2 17 Connecting an External Telephone Answering Device TAD 2 18 Sequence 2 18 Connections 2 19 Outgoing Message OGM 2 19 Connecting an External Telephone 2 19 Special Line Considerations 2 20 Roll Over Phone Lines 2 20 Two Line Phone System 2 20 Co...

Страница 8: ...eating letters 5 3 Special characters and symbols 5 4 Setting the Beeper Volume 5 5 Choosing the Handset Volume 5 5 Setting Volume Amplify 5 6 Setting the Speaker Volume 5 6 Setting the Ring Volume 5 7 Memory Storage 5 7 Delayed Timer 5 7 6 Setup Receive Basic Receiving Operations 6 1 Setting the Answer Mode 6 1 To select or change your Answer Mode 6 2 Setting Ring Delay 6 3 Setting F T Ring Time ...

Страница 9: ...ext Fax Only 7 6 Always Send Cover Page 7 7 Using a Printed Cover Page 7 8 Cover Page Message 7 8 Composing Your Own Comments 7 8 Contrast 7 9 Advanced Sending Operations 7 9 Overseas Mode 7 9 Delayed Fax 7 10 Broadcasting 7 11 Setting Up for Polling Transmit 7 12 8 Setup Auto Dial Numbers Storing Numbers for Easy Dialing 8 1 Storing One Touch Dial Numbers 8 1 Storing Speed Dial Numbers 8 3 Changi...

Страница 10: ...sage Center Outgoing Message OGM 12 4 Listening to Outgoing Message OGM 12 4 Erasing Outgoing Message OGM 12 4 Step 3 Activating Message Center Mode 12 5 Message Indicators 12 5 Playing Voice Messages 12 5 Printing a Fax Message 12 6 Backup Printing Option 12 6 Erasing Messages 12 6 To erase voice messages individually 12 6 To erase messages all at once 12 7 Setting Maximum Time for Incoming Messa...

Страница 11: ...of Basic Steps 14 4 Choosing the Software to Install 14 5 Install Multi Function Link Pro Software 14 5 Install NetCentric FaxStorm 14 5 Install Automatic E Mail Printing 14 5 Install 3D FaxSpeed 14 5 Install MFC 7050 Series Drivers Only 14 5 Other Options 14 5 View On Line Documentation 14 5 View Product Support Information 14 5 Brother Web Link 14 5 Exit 14 6 Installing the Brother Software 14 6...

Страница 12: ... Color Control 16 10 Halftone Type 16 11 Options Tab 16 12 Layout 16 12 TrueType Options 16 13 Ink Cartridge Maintenance 16 13 Watermarks Tab 16 14 Setting Up Watermarks 16 14 Font 16 15 Position 16 15 Adjustment 16 16 Creating Custom Watermarks 16 16 17 Using the Multi Function Link Pro Software Introduction 17 1 Multi Function Link Pro Fax 17 2 Visioneer PaperPort LE 17 2 Sending a Fax from Your...

Страница 13: ...18 6 How to Send an InfoImage 18 6 Using the FaxSpeed Macro 18 7 To send the current document in your word processor directly to FaxSpeed 18 7 How to Read an InfoImage that Was Printed at Your MFC 18 8 How to Read an InfoImage that Was Received Into Multi Function Link Pro 18 9 To read an InfoImage after viewing it in PaperPort 18 9 If the Recipient Uses Another Fax Application 18 10 FaxSpeed Read...

Страница 14: ...tiple Addresses 19 16 Moving or Copying a Contact to Another Group 19 16 Creating a Group for Broadcasting 19 17 Managing Your Faxes in the Status Manager 19 17 Accessing the Status Manager 19 18 Checking the Status of Sent Faxes Outbox 19 18 Viewing Faxes You Received Inbox 19 18 Managing Faxes from Your Account Page 19 19 Accessing Your Account Page 19 19 Viewing Received Faxes in Your Account P...

Страница 15: ... Percentage 21 7 Auto Dial Tab 21 8 Auto Dial Numbers 21 8 Dial Type 21 8 Name 21 9 ID 21 9 Number 21 9 Type 21 9 Group Numbers For Broadcasting 21 9 Group 21 9 Name 21 9 One Touch ID 21 9 Group List 21 9 Advanced Settings Tab 21 10 Fax Forward Paging 21 11 Remote Retrieval Access Code 21 11 Ink Cartridge Maintenance 21 12 Aligning the Ink Cartridges 21 12 Cleaning the Ink Heads 21 13 Installing o...

Страница 16: ...4 2 Document Jam 24 4 Printer Jam or Paper Jam 24 4 Paper is jammed inside front of MFC 24 5 Paper is jammed inside back of MFC 24 5 If You Are Having Difficulty with Your MFC 24 6 Printing or Receiving Faxes 24 6 Phone Line or Connections 24 7 Sending Faxes 24 7 Handling Incoming Calls 24 7 Printer Difficulties 24 8 Video Capture 24 9 Head Cleaning Page 24 10 Aligning Ink Cartridges 24 10 Packing...

Страница 17: ...ur MFC has a Help Key Press Help Broadcast to print a list of basic operational steps and functions Finding Information All chapter headings and subheadings are listed in the Table of Contents You will be able to find information about a specific feature or function by checking the Index in the back of this manual Also throughout this manual you ll see special symbols alerting you to important inf...

Страница 18: ... calling tones CNG tones soft intermittent beeps at 4 second intervals You ll hear them when you dial and press Start and they continue for about 40 seconds after dialing During that time the sending machine must begin the handshake with the receiving machine Each time you use automatic procedures to send a fax you are sending CNG tones over the phone line You ll soon learn to listen for these sof...

Страница 19: ... for the receiving machine to answer the call in as few rings as possible When you have an external telephone answering device TAD on your MFC line your TAD will determine the number of rings before the call is answered Pay special attention to the directions for connecting a TAD to your MFC in the MFC Setup and Connections chapter ECM Error Correction Mode The Error Correction Mode ECM is a way f...

Страница 20: ...this key to turn the printer online ready to receive PC data and offline not ready to receive PC data alternately Play Message Indicator Lights Notify you that you have voice or fax messages in the memory Erase Lets you delete voice messages and or fax messages from the memory Record Lets you record Outgoing Messages OGM Lets you listen to voice messages and outgoing messages Press this key to rec...

Страница 21: ...fically designed for a wet location 4 Never touch telephone wires or terminals that are not insulated unless the telephone line has been disconnected at the network interface 5 Use caution when installing or modifying telephone lines 6 Avoid using a telephone other than a cordless type during an electrical storm There may be a remote risk of electric shock from lightning 7 Do not use the telephone...

Страница 22: ...ion Remote Retrieval Access Card StartCard Brother MFL Pro CD ROM DocumentTray with Extension Both trays are the same If an item is missing call Brother Customer Service at 1 800 284 4329 USA 1 800 853 6660 from within Canada or 1 514 685 6464 from within Montreal See Ordering Accessories and Supplies on page ii for the correct item numbers Whenever you transport the MFC use the packing materials ...

Страница 23: ...lace near heaters air conditioners water chemicals or refrigerators Do not expose the MFC to direct sunlight excessive heat moisture or dust Do not connect your MFC to electrical outlets controlled by wall switches or automatic timers Disruption of power can wipe out information in the MFC s memory Do not connect your MFC to electrical outlets on the same circuit as large appliances or other equip...

Страница 24: ...and the shorter end to the handset 2 Connect the power cord There is no ON OFF switch When you plug in the power cord the power goes on and the screen alternately displays SET CARTRIDGES PLS OPEN COVER 3 Connect the telephone line cord Connect one end of the telephone line cord to the jack on the MFC and the other end to a modular wall jack ...

Страница 25: ...on when you connect it to a telephone line Similarly when moving your MFC disconnect the telephone line first and then the power cord Caution Lightning and power surges can damage this product We recommend that you use a quality surge protection device on the AC power line as well as on the telephone line or unplug the lines during a lightning storm 4 Attach the document wire extension ...

Страница 26: ...N D C O N N E C T I O N S 2 6 5 Attach the paper tray and pull out the extension Caution Please attach the paper tray to prevent paper jams and maintain print quality 6 Attach the document tray and pull out the extension ...

Страница 27: ...sheets of 20 lb 75 g m plain paper A Pull the paper support up and slide the paper guide to the left Paper Support B Fan the paper well Insert the paper against the right edge with the print side facing you Keep the paper level below the paper guide line and behind the rib Be careful not to force the bottom edge of the paper down into the paper cassette Paper Guide Line ...

Страница 28: ...o the Paper position for plain paper or ink jet paper However before you print on envelopes or other thicker types of print media move the paper thickness lever forward to the Envelopes position Use the Envelopes Use the Paper position for position for Envelopes Plain Paper Glossy Paper Ink Jet Paper Transparencies Greeting Cards Labels Index Cards Postcards See Paper Specifications for Multi purp...

Страница 29: ...tup only If you are replacing ink cartridges then follow the steps in Replacing the Ink Cartridges Routine Maintenance on page 24 16 1 Check that the power is on The screen alternately displays SET CARTRIDGES PLS OPEN COVER 2 Open the cover After a few seconds the ink cartridge carrier will move to its loading position 3 Unpack the Color ink cartridge ...

Страница 30: ...cartridge and the cartridge carrier 5 Insert the new starter Color ink cartridge into the left slot and press backward until it snaps If you have purchased the Photo ink cartridge accessory and want to use it now you can choose to install the Photo ink cartridge in the right slot 6 Repeat Steps 3 5 to install the new starter Black or Photo ink cartridge in the right slot If the ink cartridges move...

Страница 31: ...can warn you when a specific ink cartridge is low or empty DID YOU INSTALL BLACK 1 NEW2 OLD 10 Press 1 if you installed the new starter Black ink cartridge Go to Step 12 DID YOU INSTALL PHOTO 1 NEW2 OLD 11 Press 1 if you installed a new Photo ink cartridge accessory DID YOU CHANGE LEFT 1 YES 2 NO 12 Press 1 that you changed the new starter Color cartridge on the left side DID YOU INSTALL COLOR 1 N...

Страница 32: ...ack or Photo ink cartridge while it is not being used by placing it in the cartridge container that was supplied with the Photo ink cartridge accessory so it will not dry out Leave empty ink cartridges in the MFC until you are ready to replace them Printing with an empty cartridge carrier slot may cause problems Do not refill ink cartridges Refilling empty ink cartridges voids your warranty Incomp...

Страница 33: ...ment 2 Press or to select 2 ALIGNMENT and press Set 2 ALIGNMENT LOAD PAPER AND PRESS START KEY 3 Press Start The MFC prints the Alignment Test Sheet PRINTING Study the alignment page and decide which sample numbers show the most evenly printed ink lines for A B C and D If you are using the Photo ink cartridge only ink lines A and B will be printed 4 Using the dial pad press Set after you enter eac...

Страница 34: ...ll have to remove the Black ink cartridge Store it in the plastic cartridge container that was supplied with the Photo ink cartridge accessory Always store your Black or Photo ink cartridge in this container until you are ready to use it again Caution Do not shake a used ink cartridge the ink will leak Before discarding an empty ink cartridge place it in a leak proof bag While the Photo ink cartri...

Страница 35: ...g correctly 5 Compare the diagonal line above the printed bars to the diagonal line below the printed bars Look for a break in the diagonal lines A broken line indicates clogged nozzles If the bottom line has fewer breaks or better print quality than the top line the quality is improving so run the cleaning two more times If the print quality is satisfactory after running the cleaning three times ...

Страница 36: ...nd check the test patterns again Steps 2 5 If the lines are still broken clean the ink nozzles manually Cleaning Nozzles Manually 14 Repeat Steps 6 9 15 Dampen a clean cloth with water and gently wipe the entire copper colored area including the nozzles and contacts When cleaning the color print cartridge wipe the nozzles in one direction so the colors do not mix To dissolve dried ink hold the dam...

Страница 37: ... MFC s power cord This forces the cartridge carrier to remain in the loading position 5 Remove both ink cartridges press cartridges forward until they snap and lift out 6 Use a clean dry cloth to clean the cartridge carrier contacts inside the MFC Carrier Contacts 7 Reinstall both ink cartridges into their correct slots insert cartridges and press backward until they snap 8 Close the cover 9 Plug ...

Страница 38: ...ller can leave you a voice message The TAD must answer within four rings the recommended setting is two rings The MFC cannot hear CNG tones until the TAD has answered the call and with four rings there are only 8 10 seconds of CNG tones left for the fax handshake Make sure you carefully follow instructions in this manual for recording your outgoing message Do not connect a TAD elsewhere on the sam...

Страница 39: ...d 5 seconds of silence at the beginning of your message This allows your MFC time to listen for the fax CNG tones of automatic transmissions before they stop 2 Limit your speaking to 20 seconds 3 End your 20 second message by giving your Fax Receive Code for people sending manual faxes For example After the beep leave a message or send a fax by pressing 51 and press Start We recommend beginning yo...

Страница 40: ...ug your FAX MFC directly into an RJ14 jack the FAX MFC will not work Your MFC must be plugged into an RJ11 jack RJ11 and RJ14 jacks may be equal in size and appearance and both may contain four wires black red green yellow To test the type of jack plug in a two line phone and see if it can access both lines If it can you must separate the fax line for your MFC by converting the wall outlet Convert...

Страница 41: ...he two line telephone next to your MFC 2 Plug one end of the telephone line cord for your MFC into the L2 jack of the triplex adapter Plug the other end into the LINE jack on the left side of the MFC 3 Plug one end of the first telephone line cord for your TAD into the L1 jack of the triplex adapter Plug the other end into the L1 or L1 L2 jack of the two line TAD 4 Plug one end of the second telep...

Страница 42: ...ated each time a telephone call is received As with all fax units this machine must be connected to a two wire system If your line has more than two wires proper connection of the MFC cannot be made If you are installing the MFC to work with a PBX 1 It is not guaranteed that the unit will operate correctly under all circumstances with a PBX Any cases of difficulty should be reported first to the c...

Страница 43: ...d testing various papers before purchasing large quantities For best results use Brother special ink jet paper and transparencies For information about ordering Brother paper see page ii When you print on ink jet paper transparencies and glossy paper be sure to select the correct media in the Quality Color tab in the printer driver When using glossy paper or transparencies avoid stacking by removi...

Страница 44: ...When loading paper in the paper cassette place the whiter coated side facing up with the diamond on the back side facing away The coated side of glossy paper is shiny Do not touch the shiny coated side Load glossy paper with the shiny side facing up toward you Do not touch either side of transparencies because they absorb water and perspiration easily and may cause decreased output quality Transpa...

Страница 45: ...ies Letter 1 Glossy Paper Letter 1 Envelopes 73 4 9 10 DL 10 C5 C6 B5 Baronial 63 4 Output Tray Approximately 100 Sheets of 20 lb 75 g m2 Transparencies and glossy paper must be picked up from the paper tray one page at a time Curled or damaged paper may cause paper jams and misfeeds If the paper is curled straighten it as much as possible by rolling it in the opposite direction For fax reception ...

Страница 46: ...0 25 inches Do not use the following types of paper and envelopes Damaged curled wrinkled or irregularly shaped paper and envelopes Extremely shiny or highly textured paper and envelopes Paper and envelopes with printing from a laser printer A stack of different sized envelopes or paper Envelopes with nicked edges or bent corners Envelopes with clasps Envelopes of baggy construction Envelopes not ...

Страница 47: ...tion Mode by pressing Function The screen displays 1 FAX 2 VIDEO Then press 1 for Fax Functions OR press 2 for Video Functions When you enter the Function Mode your MFC displays a list of main menu options from which you can choose These menu options appear one after the other on the display Select a menu by pressing Set when the option appears on the LCD The LCD will display the options within th...

Страница 48: ...probably see most often is shown below showing you when you place a document in the feeder that you can dial a number and send a fax or you can make a copy FAX NO START COPY PRESS COPY Function Selection Table You can probably perform most of these programming settings without the Owner s Manuals To help you understand the function selections options and settings that are found in the MFC programs...

Страница 49: ...the hearing impaired OFF 5 6 AMPLIFY you can set the volume to VOL AMPLIFY ON on a temporary or permanent basis 2 SETUP RECEIVE Function Description Factory Set Page 1 RING DELAY Number of rings before MFC RING DELAY 04 6 3 answers in FAX TEL FAX TOLL SAVER OFF 12 7 or MC mode 2 F T RING TIME Sets the time for double ring 20 6 3 in FAX TEL mode 3 REMOTE CODE Enter code to activate or ON 51 51 6 6 ...

Страница 50: ...ns 5 DELAYED FAX Send documents later 7 10 6 POLLED TX Sets up your MFC with a OFF 7 12 document to be retrieved by another fax machine 7 REAL TIME TX When memory is full you can OFF 7 4 send faxes in real time 4 REMAINING JOBS Function Description Factory Set Page Check which jobs are in 7 4 7 5 memory or cancel a delayed fax or polling job 5 SET AUTO DIAL Function Description Factory Set Page 1 ...

Страница 51: ...n Factory Set Page 1 MSG STORAGE Select if memory will store FAX OFF 12 3 fax voice or both VOICE ON 2 BACKUP PRINT Prints copy of faxes received ON 12 6 into memory 3 OGM Record outgoing message 12 4 4 ICM MAX TIME Select maximum length of 30 seconds 12 7 incoming messages 5 ICM REC MONITR Adjust speaker volume for ON 12 8 voice messages as they come in 6 FAX FWD PAGING Set fax to forward fax mes...

Страница 52: ...FC 2 Video Functions Function Description Factory Set Page 1 PAPER TYPE Identify the type of paper in PLAIN PAPER 13 5 the cassette 2 QUALITY Select Normal or High print NORMAL 13 5 3 VIDEO TYPE Select Moving or Still video MOVING 13 5 signal 4 PRINT SIZE Select the size you want the 4 x 3 13 6 captured frame to print 5 COLOR ADJUST Adjust the amount of Red 13 6 Green or Blue in video printing 6 B...

Страница 53: ...ling Mode Tone Pulse Your MFC comes set to accommodate tone multi frequency dialing service If you have pulse rotary dialing service you need to change the dialing mode 1 Press Function 1 1 1 DIALING TONE DIALING PULSE 2 Use or to select TONE or PULSE and press Set 3 Press Stop to exit ...

Страница 54: ... the time in 24 hour format for example enter 15 25 for 3 25 PM and press Set 6 Press Stop The screen now displays the date and time you set and displays it whenever the MFC is standing by Setting Station ID You can store your name fax number and telephone number to be printed on all fax pages that you send 1 Press Function 1 1 3 FAX 2 Enter your fax number up to 20 digits and press Set TEL 3 Ente...

Страница 55: ...s Key One Time Two Times Three Times Four Times 2 A B C 3 D E F 4 G H I 5 J K L 6 M N O 7 P Q R S 8 T U V 9 W X Y Z Inserting spaces If you want to enter a blank space press twice Making corrections If you entered a letter incorrectly and want to change it press to move the cursor after the last correct letter Then press Stop all letters above and to the right of the cursor are deleted Re enter th...

Страница 56: ... is sent and an identification of the business or other entity or other individual sending the message and the telephone number of the sending machines or such business other entity or individual In order to program this information into your MFC you should complete the steps described on page 5 2 and 5 3 The telephone number you enter is used only for the Cover Page feature If you do not enter a ...

Страница 57: ...d the handset volume will remain until you change it again VOLUME AMPLIFY ON TEMPORARY This setting is appropriate if some of the users are hearing impaired During a conversation users can press L or H on the control panel to adjust the volume to LOW HIGH or AMPLIFY When the handset is replaced the handset volume returns to the default setting of LOW VOL AMPLIFY ON PERMANENT Choose VOL AMPLIFY ON ...

Страница 58: ...ting the Speaker Volume You can adjust the volume of the one way speaker when your MFC is on Hook You can turn the speaker off or you can select a speaker volume level The default setting is the lowest volume Press L or H to adjust the volume level The display shows the setting you are choosing Each key press changes the volume to the next setting The new setting will remain until you change it ag...

Страница 59: ...ng The new setting will remain until you change it again Memory Storage In the event of a power failure all settings in the INITIAL SETUP SETUP RECEIVE SET AUTO DIAL SETUP MSG CTR plus the COVERPG SETUP and COVERPAGE MSG from SETUP SEND functions are stored permanently You may have to reset the date and time Delayed Timer You can set up the time of day to send one delayed fax from memory 1 Press F...

Страница 60: ...I N I T I A L S E T U P 5 8 ...

Страница 61: ...ent answer modes for your MFC You may choose the mode that best suits your needs by pressing the Mode button repeatedly until you have changed the FAX and FAX TEL lights to the setting you want to use For more detailed information about a particular mode please refer to the page number in the right column of the following table ...

Страница 62: ...rate wall jack receive the fax on the same line If the call is not a fax it will ring You cannot use double ring the telephone for you to pick company s Voice up the call Mail in this mode 4 MSG CTR MFC answers Use this mode to 12 1 12 14 Message Center every call record voice and Messages 30 fax messages in the minutes or up to MFC s memory 85 pages are stored on a first Select VOICE ON come firs...

Страница 63: ...ly the MFC rings for 20 30 40 or 70 seconds no other phones on that number will ring the special double ring However you can answer the call on any extension phone in a separate wall jack on the same phone number as the MFC 1 Press Function 1 2 2 2 Press or to select how long the MFC will ring to alert you that you have a voice call and press Set RING TIME 20 SEC 3 Press Stop to exit Now when a ca...

Страница 64: ...o select the reduction ratio you want AUTO 100 85 81 or 68 and press Set Choose 100 if you don t want a reduction 3 Press Stop to exit Recommended Reductions If your paper is letter size 8 5 x 11 and the incoming fax is letter size select 85 A4 select 81 legal size select 68 If your paper is legal size 8 5 x 14 and the incoming fax is letter size select 100 A4 select 100 legal size select 85 If yo...

Страница 65: ...etting for paper size so your MFC will know how to fit the incoming fax on the page You can also select the level of page reduction to fit on the paper in your MFC 1 Press Function 1 2 5 5 PAPER 2 Use or to select LETTER LEGAL or A4 and press Set CHANGE REDUCTION 1 YES 2 NO 3 Press 1 if you need to change the reduction setting OR Press 2 to go to Step 5 4 Use or to select AUTO 100 85 81 or 68 and ...

Страница 66: ...connected the screen displays RECEIVING before you hang up Your caller will have to press Start to send the fax For FAX TEL Mode Only When the MFC is in FAX TEL mode it will use the F T Ring Time double ringing to alert you to pick up a voice call If you re at the MFC you can lift the handset to answer If you re at an extension phone you ll need to lift the handset during the F T Ring Time and pre...

Страница 67: ...r machines or you can have someone poll your MFC All parties involved in polling need to set up their fax machines to accommodate polling When someone polls your MFC to receive a fax they pay for the call if you poll someone s fax machine to receive a fax you pay for the call Some fax machines do not respond to the polling function Setting Up Polling Receive Polling Receive is when you call anothe...

Страница 68: ... between each location 4 Press Start ACCEPTED Your MFC will poll each number or group member in turn for a document DIALING Canceling a Scheduled Job You can cancel tasks you ve scheduled such as Delayed Fax or Polling Transmit 1 Press Function 1 4 Any waiting jobs appear on the display If no jobs are waiting the screen displays NO JOB WAITING 4 REMAINING JOBS 2 If you have more than two jobs wait...

Страница 69: ... follow the directions below to register the new Distinctive Ringing pattern that was assigned by the Telephone Company so your MFC can recognize its incoming calls Call your Telephone Company if you don t know your ring pattern You can change or cancel the Distinctive Ring pattern at any time You can switch it off temporarily then turn it back on When you get a new fax number make sure you reset ...

Страница 70: ... DISTINCTIVE SET 5 Press or to select the prestored ring pattern you want to assign and press Set You will hear each pattern as you scroll through the four patterns Be sure to choose the pattern assigned by the Telephone Company Ring Pattern 1 2 3 4 Rings long long short long short short short long very long normal pattern 6 Press Stop to exit Once you ve registered the Distinctive Ring pattern in...

Страница 71: ...ick up the handset the Caller ID information disappears from the screen You will see the first 16 characters of the number or name OUT OF AREA display means call originates outside your Caller ID service area PRIVATE CALL display means the caller has intentionally blocked transmission of information CALL PICKUP display remains on screen when no Caller ID information was transmitted If both the nam...

Страница 72: ...S E T U P R E C E I V E 6 12 ...

Страница 73: ... your document Paper Guides ADF Automatic Document Feeder The automatic document feeder ADF can hold up to 20 pages feeding each one individually through the MFC Use standard 20 lb 75g m2 paper when using the ADF DO NOT use curled wrinkled folded or ripped paper or paper with staples paper clips paste or tape attached DO NOT use cardboard newspaper or fabric Make sure documents written with ink ar...

Страница 74: ...me Both Fine and S Fine lights are on The receiving fax machine must have the same resolution or the transmission will fall back to the next resolution on the receiving machine Manual Transmission Manual transmission lets you hear the dial tone ringing and fax receiving tones before sending the fax 1 Insert the document face down in the feeder 2 Pick up the handset and listen for a dial tone OR pr...

Страница 75: ...f you re sending a fax manually and the line is busy after you disconnect the call you can press Redial Pause to retry the number If you re sending a fax automatically and the line is busy the MFC will automatically redial up to three times at 5 minute intervals Dual Access If the document feeder is empty you can place a document in the feeder dial a number and begin scanning the fax into memory e...

Страница 76: ...ault setting press or to select ON or OFF and press Set Go to Step 5 OR For the next fax transmission only press or to select NEXT FAX ONLY and press Set REALTIME TX OFF SELECT SET 4 For the next fax only press or to select ON or OFF and press Set ACCEPTED OTHER SETTINGS 1 YES 2 NO 5 Press 1 if you want to select additional settings The display returns to the SETUP SEND menu OR Press 2 if you are ...

Страница 77: ...e One Touch or Speed Dial memory If you re dialing manually the name is left blank The cover page indicates your Station ID and the number of pages you re sending If you have Coverpage Setup set to ON Function 1 3 1 the number of pages remains blank Most of the Setup Send functions are temporary settings that allow you to make adjustments for each document you send However so you can set up your c...

Страница 78: ...n the screen displays NEXT FAX ONLY press Set 4 Press or to select ON and press Set 5 Press or to select one of the following comments 1 COMMENT OFF 2 PLEASE CALL 3 URGENT 4 CONFIDENTIAL 5 USER DEFINED 6 USER DEFINED and press Set ACCEPTED OTHER SETTINGS 1 YES 2 NO 6 Press 1 if you want to select additional settings The display returns to the SETUP SEND menu OR Press 2 if you are finished choosing...

Страница 79: ...nction 1 3 1 2 Press or to select COVERPAGE ON and press Set COVERPAGE OFF COVERPAGE ON 3 If you selected ON you must select a comment Use or to select one of the following comments and press Set You can select your custom comment 1 COMMENT OFF 2 PLEASE CALL 3 URGENT 4 CONFIDENTIAL 5 USER DEFINED 6 USER DEFINED ACCEPTED OTHER SETTINGS 1 YES 2 NO 4 Press 1 if you want to select additional settings ...

Страница 80: ...M COMMENT FAX TEL COVER PAGE PAGE S TO FOLLOW Cover Page Message You can set up two custom comments ComposingYour Own Comments 1 Press Function 1 3 2 The screen displays COVERPAGE MSG 2 Use or to choose position 5 or 6 for your customized comment and press Set 3 Use the dial pad to enter your customized comment and press Set ACCEPTED OTHER SETTINGS 1 YES 2 NO 4 Press 1 if you want to select additi...

Страница 81: ...tings The display returns to the SETUP SEND menu OR Press 2 if you are finished choosing settings and go to Step 5 5 Enter a fax number and press Start to send a fax Advanced Sending Operations Overseas Mode After you send a fax using this feature the feature turns itself off 1 Insert document 2 Press Function 1 3 4 4 OVERSEAS MODE 3 Press or to select ON or OFF and press Set ACCEPTED OTHER SETTIN...

Страница 82: ...ED TX OFF SELECT SET 3 Press or to select DELAYED TX ON and press Set ACCEPTED OTHER SETTINGS 1 YES 2 NO 4 Press 1 if you want to select additional settings The display returns to the SETUP SEND menu OR Press 2 if you are finished choosing settings and go to Step 5 ENTER FAX NO PRESS START KEY 5 Enter the fax number 6 Press Start The MFC will wait to send the fax at the time you set up in Delayed ...

Страница 83: ... between each of these locations Use the Telephone Index for convenience After the broadcast is completed a Broadcast Report will be printed automatically to let you know the results To stop the broadcasting in progress press Stop The LCD display asks if you want to cancel all locations or only the location that is being sent Enter the long dialing sequence numbers as you normally would but keep i...

Страница 84: ...e document to be retrieved in the feeder 2 Press Function 1 3 6 POLLED TX OFF SELECT SET 3 Press or to select POLLED TX ON and press Set ACCEPTED OTHER SETTINGS 1 YES 2 NO 4 Press 1 if you want to select additional settings The display returns to the SETUP SEND menu OR Press 2 if you are finished choosing settings and go to Step 5 5 Press Start and wait for the fax to be polled ...

Страница 85: ... 13 24 are accessed by holding down shift while you press the appropriate One Touch key 1 Press Function 1 5 1 2 Press the One Touch key where you want to store a number To store a number in locations 13 24 press shift Shift then press a key One Touch key 01 is pre programmed for Brother Fax Back System USA only You can override it if you wish The screen displays the location you selected 3 Enter ...

Страница 86: ... When you dial an AUTO DIAL number the screen displays the name you ve stored or if you haven t stored a name the number you ve stored You can use two or more One Touch keys to store a long dialing sequence For example to store 9 1 201 555 1234 987 65 4321 divide the number into two parts Store the first part on one key 9 1 201 555 1234 and the last part of the number on another key 987 65 4321 No...

Страница 87: ...r a two digit location 00 99 and press Set 05 ENTER SET 3 Enter the number up to 20 digits and press Set NAME 4 Use the dial pad to enter the name up to 15 characters and press Set You can use the chart on page 5 3 to help you enter letters OR Press Set and go to Step 5 to store the number without a name 5 Use or to select the type of number and press Set FAX a fax only number TEL a telephone voic...

Страница 88: ... Press 1 to change the number stored or press 2 to exit without making a change 2 Enter a new number and press Set If you want to erase the whole number press Stop when the cursor is to the left of the digits The letters above and to the right of the cursor are deleted If you want to change a digit use or to position the cursor under the digit you want to change then type over it 3 Follow the dire...

Страница 89: ...er For example press One Touch key 02 SETUP GROUP GO ENTER SET 3 Use the dial pad to enter the Group number and press Set For example press 1 for Group 1 4 To include One Touch or Speed Dial numbers in the Group enter them as if you were dialing and press Set For example for One Touch number 5 press One Touch key 05 For Speed Dial location 09 press Speed Dial then press 0 9 on the dial pad The LCD...

Страница 90: ...S E T U P A U T O D I A L N U M B E R S 8 6 ...

Страница 91: ...ling Manual dialing is simply pressing all of the digits of the phone number 1 Pick up the handset OR Press Hook 2 When you hear a dial tone dial the call using the dial pad 3 If you pressed Hook when dialing a voice call pick up the handset when the other party answers The speaker works only one way the other party won t be able to hear you unless you pick up the handset 4 To hang up a voice call...

Страница 92: ...s If you are sending a fax press Start after pressing the One Touch key If you picked up the handset press Start when the receiving fax machine answers with fax tones Speed Dialing 1 Pick up the handset OR Press Hook 2 When you hear a dial tone press Speed Dial then press the two digit Speed Dial number 3 If you pressed Hook when dialing a voice call pick up the handset when the other party answer...

Страница 93: ...itute part of the number with manual dialing using the dial pad For example to change the number to 555 7001 you could press One Touch 03 and press 7 0 0 1 using the dialing pad If you must wait for another dial tone at any point in the dialing sequence store a pause at that point in the number by pressing Redial Pause Each key press adds a 3 5 second delay WARNING You can set up phone credit card...

Страница 94: ...o pulse dialing service Searching Telephone Index You can search for names you have stored in One Touch and Speed Dial memories Names are stored alphabetically 1 Press Tel index then enter the first letter of the name you re looking for 2 Press or to search the memory 3 When the screen displays the name you want to call press Hook or for a voice call pick up the handset 4 Press Start to begin dial...

Страница 95: ...T REPORT Activity Report lists information about the last 50 incoming and outgoing faxes TX means Transmit RX means Receive 3 ALL DIAL Lists names and numbers stored in One Touch and Speed Dial memory in numerical order 4 TEL INDEX ALL DIAL list above alphabetically 5 USER SETTINGS Lists settings for INITIAL SETUP SETUP RECEIVE SETUP SEND TEL SERVICE PRINT REPORTS and SETUP MSG CTR 6 MEMORY STATUS...

Страница 96: ...smission If the report indicates NG send the document again When the feature is ON the report is printed with every fax you send 1 Press Function 1 6 1 2 Press or to select ON or OFF and press Set 3 Press Stop to exit Activity Report Interval You can set the MFC to print activity reports at a specific interval 6 12 24 hours 2 4 or 7 days If you set the interval to OFF you can print the report by f...

Страница 97: ...sorted collated or stacked Copy Photo Reduce Sort Enlarge Copy The printable area of your MFC begins at approximately 0 07 inches 1 8 mm from the edge of the paper and ends at approximately 0 5 inch 12 7 mm from the bottom of the paper Unprintable area 0 5 inch 12 7 mm 0 07 inch 1 8 mm 0 25 inch 6 35 mm 0 25 inch 6 35 mm You must install the Black ink cartridge to use your MFC as a copy machine ...

Страница 98: ...age 1 then all copies of page 2 etc or SORTED collated The default resolution for multiple copies is AUTO Stacking Multiple Copies 1 Insert pages to be copied face down in the feeder 2 Press Copy 3 Use the dial pad to enter the number of copies you want up to 99 4 Wait five seconds OR Press Copy again Sorting Multiple Copies Sorting uses more memory than stacking 1 Insert pages to be copied face d...

Страница 99: ...50 4 Press Copy when the screen displays your selection 5 Use the dial pad to enter the number of copies you want up to 99 6 Wait five seconds OR Press Copy again Copying a Photograph You can copy a photograph by pressing Photo without pressing Resolution 1 Insert the photo s face down in the feeder 2 Press Photo 3 Use the dial pad to enter the number of copies you want up to 99 4 Wait five second...

Страница 100: ...M A K I N G C O P I E S 11 4 ...

Страница 101: ...e Fax Message Center Message Center Mode Message Center Mode allows you to store incoming fax and voice messages in a flexible memory The memory stores 30 minutes of voice messages or up to 85 pages of fax memory Any voice or fax message can be retrieved remotely Memory is shared between fax and voice messages which are stored on a first come first served basis You must record an outgoing message ...

Страница 102: ...trieve messages from the external answering machine You cannot use the Paging feature for voice messages with this setting 3 FAX ON VOICE OFF All memory is used to store fax messages no voice messages will be stored 4 FAX OFF VOICE ON All memory is used to store voice messages no fax messages will be stored Incoming faxes will be printed on paper You can use the Paging feature and retrieve voice m...

Страница 103: ...es 12 4 Step 3 Activate Message Center Mode by pressing Mode until both FAX and FAX TEL lights are on See page 12 5 Step 1 Setting Message Storage Read the Flexible Memory settings descriptions on page 12 2 before you select the FAX and VOICE settings below 1 Press Function 1 7 1 FAX OFF SELECT SET 2 Press or to select the FAX setting ON or OFF and press Set VOICE ON SELECT SET 3 Press or to selec...

Страница 104: ... at this time Please leave a message after the signal If you wish to send a fax please press 5 1 wait for fax tones then press Start on your fax machine 3 Replace the handset The Message Center plays your OGM 4 Press Stop to exit Listening to Outgoing Message OGM 1 Press Function 1 7 3 2 Press Play to hear the OGM Adjust volume by pressing Volume L or H 3 Press Stop to exit Erasing Outgoing Messag...

Страница 105: ...s flashing and stays on And once a new fax message is printed the Fax indicator light will turn off Voice Fax The LCD display will indicate the total number of incoming VOICE and or FAX messages stored in Message Center memory VOICE 03 FAX 02 Playing Voice Messages Follow the steps below to listen to voice messages 1 Press Play Adjust Volume by pressing L or H All messages are played in the order ...

Страница 106: ...copies 1 Press Function 1 7 2 BACKUP PRINT ON SELECT SET 2 Press or to display ON or OFF and press Set 3 Press Stop to exit Erasing Messages If you choose to erase all fax messages the MFC will print any previously unprinted fax messages before erasing them from memory Fax messages cannot be erased individually You can erase voice messages individually or all at once To erase voice messages indivi...

Страница 107: ...tion 1 7 4 MESSAGE 30 SEC SELECT SET 2 Press or to select the maximum time for incoming messages and press Set 3 Press Stop to exit Setting Toll Saver When you set the toll saver feature the MFC answers after four rings if you don t have messages and after two rings if you do have messages This way when you call the MFC if it rings three times you know you have no messages and can hang up avoiding...

Страница 108: ... and dials your Personal Identification Number PIN when connected to activate your pager and let you know you have a fax or voice message in the Message Center memory When Fax Forwarding is set to ON your MFC dials the fax number you ve programmed and forwards any faxes you ve received Programming a Fax Forwarding Number 1 Press Function 1 7 6 2 Press or until the screen displays FAX FORWARD and p...

Страница 109: ...is the same as that of your MFC For example 1 8 0 0 5 5 5 1 2 3 4 4 If your pager requires a PIN enter the PIN press press Redial Pause enter your MFC telephone number then press and press Set For example 1 2 3 4 5 Redial Pause 1 8 0 0 5 2 1 2 8 4 6 OR If you do not need a PIN press Redial Pause enter the telephone number of your MFC then press and press Set For example Redial Pause 1 8 0 0 5 2 1 ...

Страница 110: ...4 The MFC then prompts you with two short beeps to enter a command If you wait longer than 30 seconds to enter a command the MFC hangs up If you enter an invalid command the MFC beeps three times 5 Press 9 0 to reset the MFC when you finish 6 Hang up If your MFC is set to MANUAL mode you can access the Message Center by waiting about 2 minutes then entering the Remote Retrieval Access Code within ...

Страница 111: ...sage Stop playing the ICM If you hear one long beep the erase is accepted If you hear three short beeps you cannot erase because all voice messages have not been played or there is no voice message to erase This code erases all recorded messages not one at a time The MFC plays the OGM To stop playing the OGM press 9 After one long beep start recording the OGM Your recorded message will be played w...

Страница 112: ...ax messages will be received See page 12 13 If you hear one long beep you can erase the fax message from the memory You can check whether your MFC has received any FAX or VOICE messages If yes you will hear one long beep If no you will hear three short beeps If you hear one long beep you can change the answer mode If you hear three short beeps you cannot change it For example When there is no MSG ...

Страница 113: ...owever if you want to store a pause press 5 After you hear your MFC beep hang up and wait Your MFC calls the remote fax machine The remote fax machine prints the Memory Status List Retrieving Fax Messages 1 Dial your MFC number 2 When you hear the beep immediately enter your Remote Retrieval Access Code 1 5 9 3 As soon as you hear two short beeps use the dial pad to press 9 6 2 4 Using the dial pa...

Страница 114: ... you want your fax messages forwarded and then press You cannot use and as dial numbers However if you want to store a pause press 5 To retrieve the Memory Status List when you hear two short beeps use the dial pad to press 9 6 1 6 Use the dial pad to enter the number up to 20 digits of the remote fax machine and then press 7 After you hear your MFC beep hang up and wait Your MFC calls the remote ...

Страница 115: ... the output you create are NTSC National Television System Committee This is not compatible with any other standard Getting Started With no documents in the feeder plug the cable from you video camera s Video Out jack into the MFC s RCA pin jack Play the video Some camcorders digital cameras video games or VCRs do not correctly conform with NTSC standards Then you would not be able to capture vide...

Страница 116: ...ct it the Copy key returns to normal copy mode If you have too much in memory you cannot access video printing mode ColorVideo Printing 1 With no documents in the feeder plug the cable from your video camera s Video Out jack into the MFC s RCA pin jack 2 Play the video When the MFC begins receiving the video signals the MFC screen displays VIDEO PRESS COPY 3 Press Copy when you see the picture you...

Страница 117: ...r video printing Default Settings 1 Paper Type PLAIN PAPER 2 Quality NORMAL 3 Video Type MOVING 4 Print Size 4 x 3 5 Color Adjust R G B 6 Brightness By pressing Function 2 and a number you can adjust video printing settings as shown in the following chart Press or to move through the selection for each setting Press Set to save your selection ...

Страница 118: ...ER TYPE Press and PAPER PLAIN QUALITY NORMAL PAPER INK JET PAPER GLOSSY PAPER TRNSPRNCY SIZE 4 X3 SIZE 5 75 X4 25 2 QUALITY VIDEO STILL VIDEO MOVING 3 VIDEO TYPE 4 PRINT SIZE Function 2 COLOR RED COLOR GREEN COLOR BLUE R 5 COLOR ADJUST 6 BRIGHTNESS B G is default ...

Страница 119: ...to exit Setting Video Printing Quality 1 Press Function 2 2 2 Press or to select the video print quality QUALITY NORMAL QUALITY HIGH and press Set 3 Press Stop to exit Setting VideoType Before you turn on the video signal you must set the MFC to receive either a moving or a still image You can watch the video play on the video camera and press Copy when you see the frame you want to print 1 Press ...

Страница 120: ... 75 X4 25 and press Set 3 Press Stop to exit Printed Position 4 x 3 5 75 x 4 25 4 3 5 75 4 25 Video Printing Color Adjustment 1 Press Function 2 5 2 Press or to select RED GREEN or BLUE and press Set R Light Dark B G 3 Press or to adjust the degree of color and press Set 4 Return to Step 2 to select the next color OR Press Stop to exit ...

Страница 121: ... Up Video Printing Video Printing Brightness You can increase or decrease the brightness setting before making a copy 1 Press Function 2 6 2 Press to make a darker copy and press Set OR Press to make a lighter copy and press Set 3 Press Stop to exit ...

Страница 122: ... R I N T I N G 13 8 Video Capture to PC Please see Video Capture to PC page 17 10 or the Multi Function Link Pro On Line Documentation on CD ROM for complete instructions on using your MFC and computer for video frame capture ...

Страница 123: ...ations in your computer In addition the bundled FaxSpeed software enables you to fax color images and files Multi Function Link Pro does all this without taking over your personal computer Multi Function Link Pro operations run in the background of your PC memory keeping your personal computer free for other tasks WARNING It is important that you hook up your MFC to your computer before you instal...

Страница 124: ...9 3232 USA 1 800 668 2768 from within Canada or 1 514 685 6464 from within Montreal Windows NT Workstation 4 0 software and drivers will be available in the late Spring of 1999 Computer Requirements The following are the minimum computer requirements you need to set up and operate the MFC as a printer Use only a shielded interface cable that is IEEE 1284 compliant and that is less than 6 feet 1 8 ...

Страница 125: ...erface cable 2 Make sure the computer is turned off and unplugged from the electrical power before you connect the interface cable 3 Connect the parallel interface cable to the parallel interface port of the MFC and secure the wire clips 4 Connect the interface cable to the printer port of the computer and secure with the two screws For the location of your computer s parallel printer port see the...

Страница 126: ...n Link Pro is installed restart Windows NT a second time and again log in as the Administrator so you can complete the MFC Remote Control Panel application After you have completed Remote Setup log in using your normal User name Overview of Basic Steps 1 Insert the Brother CD ROM into your CD ROM drive 2 Enter the command for your version of Windows if needed 3 Select the software option that suit...

Страница 127: ... on MFC install Install Automatic E Mail Printing Install FaxSpeed If you want to be able to send color files by fax install Install FaxSpeed Install MFC 7050 Series Drivers Only If you only want to print and scan you can install only the Brother MFC drivers Install Brother MFC 7050 Series Drivers Other Options View On Line Documentation All instructions are in the On Line Documentation and Help f...

Страница 128: ...nstallation program If you are using Windows 95 98 or Windows NT Workstation Version 4 0 the Software Installation program appears automatically when you insert the Brother CD ROM For Windows 95 98 and Windows NT Workstation Version 4 0 you can also click on Start at the Desktop select Run and then enter x SETUP EXE The Brother LOGO will be displayed on the screen If you are using Windows NT 3 51 ...

Страница 129: ... application 3 Click on Install Multi function Link Pro Software and follow the prompts on the screen If you are using Windows 95 or 98 after you install the Multi Function Link Pro Software you may see New Hardware Found Brother MFC XXXX during startup You can select Do not install a driver Windows will not prompt you again and click OK so Windows will not display this dialog box again If you see...

Страница 130: ...entation window appears 5 In the On Line Documentation window click on Install Acrobat Reader and follow the prompts on the screen You must install Acrobat Reader before you can view on line documentation You can print the On Line Documentation by selecting Print from the File pull down menu IMPORTANT Please see the README WRI file in the root directory of the CD ROM or disk for last minute import...

Страница 131: ...y C Click the OK button 4 Check that the Multi Function Link Mode is ON see below MF Link Mode You can switch Multi Function Link Pro Mode on and off as needed If you want your fax messages to go directly into your PC make sure the MF Link setting is ON If you want faxes to print on your MFC when they arrive you can switch MF Link mode to OFF 1 Press Function 1 2 7 2 Press or to select ON or OFF a...

Страница 132: ...50 Series Status window will remain on your computer screen If you prefer you can minimize it so it runs in the background All the messages that appear on the MFC 7050C s LCD will be displayed at the same time in this Brother MFC 7050 Series Status window on your computer MFC is in Standby mode The MFC is sending page 1 of a fax The MFC is copying a document ...

Страница 133: ...t 600 x 600 dpi Printing at 600 x 600 dpi resolution on ink jet paper or glossy paper for high resolution Brilliant 4 Color Output at 1200 x 1200 dpi Printing at 1200 x 1200 dpi resolution on ink jet paper or glossy paper for highest resolution Suitable Uses You can print from Windows operating systems Bi directional Parallel Interface The parallel interface allows bi directional IEEE 1284 complia...

Страница 134: ...i purpose Sheet Feeder 1 Select the print command from your PC 2 Your PC sends a print command and data to the MFC The screen displays the date and time and RECEIVING DATA 3 If there are more pages the MFC begins to print the next page automatically 4 When the MFC finishes printing all data it returns to online status You can select paper source paper size and orientation in your application softw...

Страница 135: ...paper Loading Envelopes and Special Print Media You can load up to ten envelopes Load only one glossy or transparency sheet at a time Avoid stacking transparencies by removing each sheet after printing or copying 1 Move the paper adjustment lever forward to the Envelopes position 2 Insert up to 10 envelopes sideways with the print side facing you and the stamp location in the lower right corner OR...

Страница 136: ...rom your computer while sending or receiving a fax or while scanning information into the computer However when the MFC is copying or receiving a fax on paper it pauses the PC printing operation and resumes when copying or fax receiving is complete Fax sending will continue during PC printing ...

Страница 137: ...g in the printer memory by pressing On Off Line then pressing Reset Priority Key When you press Priority the MFC enters printer mode and will not print faxes on paper Instead faxes are stored in the memory until you press Priority again Ink Management Key When you press Ink Management the screen displays 1 HEAD CLEANING 2 ALIGNMENT 3 REPLACE INK If you are having trouble with one of the ink cartri...

Страница 138: ...U S I N G M F C A S A P R I N T E R 15 6 ...

Страница 139: ...rother Printer Driver The Brother printer driver Brother MFC 7050 Series Printer enables you to change settings and override defaults as you change your paper document type and colors for printing In the Brother MFC 7050 Series Printer on LPT 1 Properties dialog box there are five tabs Paper Color Quality Options Watermarks and About so you can change print properties as needed 16 Windows Printing...

Страница 140: ... To access the Brother printer driver select Print from the File menu In the Print dialog box select Brother MFC 7050 Series from the Name drop down list Click the Properties button The Brother MFC 7050 Series on LPT1 Properties dialog box will appear Select the Apply button to apply your settings OR Click Restore Defaults to return to the default settings ...

Страница 141: ...his function takes more time Collate In multiple page jobs that are uncollated several copies of Page 1 are printed followed by several copies of Page 2 followed by several copies of Page 3 etc For example for 2 copies of a 3 page document the MFC prints Page 1 Page 1 Page 2 Page 2 Page 3 and Page 3 in order In multiple page jobs that are collated a complete set of pages in a job are printed follo...

Страница 142: ... 11 7 inches 210 x 297 mm A5 International 5 8 x 8 3 inches 148 x 210 mm A6 4 13 x 5 88 inches 105 x 148 mm B5 JIS 7 16 x 10 21inches 182 x 257 mm Index Card 3 00 x 5 00 inches 76 2 x 127 mm Postcard J Post 4 00 x 6 00 inches 100 x 148 mm Envelopes 10 4 13 x 9 5 inches 104 8 x 241 3 mm DL International envelope 4 3 x 8 7 inches 110 x 220 mm C5 International envelope 6 4 x 9 inches 162 x 229 mm C6 ...

Страница 143: ...the Paper Size Custom Size section scroll right and click the Custom icon to highlight the Custom Size button 3 Click the Custom Size button to display this screen 4 Enter or use the up and down arrows to display the paper Height and Width 5 Click either Inches or Millimeters as desired 6 Click OK Your Windows application software may override this setting Make sure you have set the proper paper s...

Страница 144: ...quality selection to the most suitable one as listed below We recommend printing with the preset quality for best printing result Paper Type Suitable print quality Plain Paper Draft Normal Ink Jet Paper Normal Glossy Paper High Transparency Normal Transparency mirror Normal Paper Source The default setting is Automatic Feeder If you are going to feed the print media one sheet at a time click Manua...

Страница 145: ...Apply button to apply your settings OR Click Restore Defaults to return to the default settings All of the options on this screen can be selected for each object type bitmaps graphics and text Color Options Default When Default is selected default settings will be used for all of the options in the Manual Settings dialog box Default is the default setting Manual Settings Click Manual Settings to a...

Страница 146: ...d than High High 1200 x 1200 dpi Use this mode to print precise images such as photographs Since the print data is much larger than Quick Print mode processing time data transfer time and printing time will be longer Print Quality setting in combination with Media Type setting from Paper tab will determine the print resolution and swathing technique used by the Brother MFC 7050C Series driver An i...

Страница 147: ...9 Windows Printing Manual Settings When you click Manual Settings and Options in the Color Quality tab the Photo tab will appear Select the Apply button to apply your settings OR Click Restore Defaults to return to the default settings ...

Страница 148: ...nd relative color values from the screen to the printed page Presentations Presentations prints with pure bright colors This setting is often desirable when printing text or printing graphics to be used for presentations It is the default setting when media type is transparency 8 Primary Colors 8 Primary Colors prints every color on the page in the closest primary White Black Red Green Blue Cyan Y...

Страница 149: ...lt in an error diffusion halftone The same options will be available for 4 color and 6 color mode The Graphics and Text screens are exactly like the Photos screen except that Halftone Type is not available To display them click either the Graphics or Text tab Select the Apply button to apply your settings OR Click Restore Defaults to return to the default settings ...

Страница 150: ...of pages to print on each sheet 1 2 4 6 9 12 16 or 25 The graphic reflects the current Pages Per Sheet selection It does not reflect the Scaling value Scaling Select from 10 400 reduction or enlargement When a page is printed it will be expanded or shrunk according to this value 100 results in normal unmodified output Note that when a page is enlarged only the upper left portion of the image print...

Страница 151: ...iver as a raster Although the distinction from Rasterize in Driver is arcane it serves a useful purpose to have both options In some unusual situations WYSIWIG can be attained only by having Windows rasterize the fonts and send as a raster For example if a character needs to be clipped this cannot be done when it is generated as a soft font and the character will not be printed In this situation r...

Страница 152: ... None You can modify or delete these or add new watermakes Page From the list box select All But First Page All Pages First Page Only or No Watermark Top To place the watermark on top of all the other data printed on the page click Top Bottom To place the watermark underneath all the other data printed on the page click Bottom Count Select the number of times the watermark will print on each page ...

Страница 153: ...rmark s Size Select a reduction or enlargement ratio for the watermark s font 1 300 Position Watermarks can be positioned on the page either by using the edit controls on the page or through visual editing by clicking and dragging the watermark in the editing window with the mouse Automatically To center the watermark s on the page click Automatically User Defined To move the watermark s where you...

Страница 154: ...f pages is selected in the Options tab Delete Click this button to delete the displayed watermarks from your database Then click YES to delete the watermark named in the window or NO to exit without deleting it Restore Defaults Click this button to erase your Watermark settings The following window appears Click Yes to erase changes made to the displayed watermark since it was saved using Apply OR...

Страница 155: ...ction Link Pro software Detailed installation and setup instructions are in the On Line Documentation section of the Brother CD ROM that is included with your MFC Check the online README WRI file in the root directory of the CD ROM for last minute important information and troubleshooting tips that were not included in the On Line Documentation Multi Function Link Pro software for your MFC include...

Страница 156: ...hrough the Brother Multi Function Link Pro Fax program group Visioneer PaperPort LE Visioneer PaperPort LE for Brother is a document management application You will use PaperPort to view incoming faxes and scanned documents and to scan paper documents into your PC PaperPort has a sophisticated yet easy to use filing system that will help you organize your documents It allows you to combine or stac...

Страница 157: ...u want to fax a quick short message from your PC 1 From the Main Menu select the QuickFax button OR Select QuickFax from the Start pull down menu The QuickFax screen will appear 2 Enter the Fax number Name and Company information in the appropriate fields on the screen OR Select the Open Phone Book button to choose someone from your phone book 3 Complete the Subject and QuickFax note fields 4 Clic...

Страница 158: ...he Subject and Cover page note fields 4 Click on the Attachments button to add any file s you want to fax with it 5 Click the Send Fax button Sending a Fax from a Windows Application You can send a fax directly from any Windows application using the following steps 1 Create the document in a Windows application 2 Select Brother MFL Pro Fax as your printer 3 Select the Print command to begin the fa...

Страница 159: ...ke sure you have properly set up the MFC and PC to work together Checklist for the MFC 1 To make sure the MF Link mode is active press Function 1 2 7 2 Use or to select ON or OFF 3 Press Set Checklist forYour PC 1 In the Main Menu select the Setup pull down menu 2 Select Preferences 3 Under Answer Mode select Fax only 4 Click the OK button 5 Make sure the MFC is connected to the PC 6 Keep the PC a...

Страница 160: ...Main Menu click the Log Manager button OR From the Start pull down menu select Mail Log 1 In the Log Manager select the Fax folder 2 Then select the InBox folder A listing of your incoming messages will appear on the right side of the window 3 Double click on the fax you wish to view The Visioneer PaperPort Viewer will run automatically and the fax you selected from the list will be displayed ...

Страница 161: ...ctly into the PaperPort viewer that Brother included with your MFC but you can also scan images directly into hundreds of other software applications that support TWAIN scanning These applications include popular programs like Adobe Photoshop Adobe PageMaker CorelDraw and many more To choose Brother Multi Function Link Pro as your scanner driver select it under the Select scanner OR Select source ...

Страница 162: ...ss Cancel to go back to the PaperPort window Settings in the Scanner Window Resolution Resolution Select the scanning resolution from the Resolution drop down list Higher resolutions take more memory and transfer time but can achieve a finer scanned image You can choose 100 x 100 dpi 200 x 200 dpi 400 x 400 dpi 600 x 600 dpi Scan Mode Text Line Art For text documents or black and white graphics th...

Страница 163: ...8 5 x 14 A4 210 mm x 297 mm Carrier sheets are available from your Dealer When scanning photographs or other images for use in a word processor or other graphics application you should try different settings for the contrast mode and resolution to see which settings best suit your needs Video Capture Click the Video button to display the video frame grabber window See Capturing an Image p 17 11 ...

Страница 164: ...on your PC Once the frame is an image file it can be saved printed faxed and inserted into other files ConnectingYour Video Equipment Before you can begin to capture a video frame you must first connect your video equipment to the MFC To connect your video equipment 1 Connect your video cable into the jack on your video equipment labeled VIDEO OUT 2 Connect the RCA male plug on the other end of th...

Страница 165: ...om the PaperPort for Brother viewer or from any application that is compatible with Twain scanning devices To capture a frame as an image 1 Connect your video equipment to the MFC 2 In PaperPort select Acquire from File menu or click Scan Twain icon Multi Function Link Pro s Twain dialog box will appear 3 Click the Video button The Video Capture dialog box will appear ...

Страница 166: ...is the best quality The image file will be large and take more space on your PC 750 x 562 640 x 480 is suitable for most images 320 x 240 8 Turn on your video equipment and start running the video 9 When you see the frame you want to capture click the Pause button The frame will be displayed in the viewer screen section of Multi Function Link Pro s Twain dialog box 10 If you wish to capture the di...

Страница 167: ...e to receive faxes and must have the free FaxSpeed Reader program This chapter is only an Introduction to FaxSpeed After you install FaxSpeed on your computer check the README WRI file in the root directory of the CD ROM for last minute important information and troubleshooting tips that were not included in the On Line Documentation Use the Help pull down menu in FaxSpeed to access HELP as needed...

Страница 168: ...eception can be either into your Multi Function Link Pro Log Manager on your computer or on paper on your Brother MFC Receiving parties that do not have an MFC and Multi Function Link Pro software may receive InfoImages from you via their fax modem or fax machine and scanner The maximum InfoImage file size that can be transmitted is 32K Special Coded Format InfoImage A FaxSpeed InfoImage is a grap...

Страница 169: ...me of your company This name will be appended to each InfoImage to identify you as the sender 5 Click the Continue button The second installation window appears with the path displayed as c FaxSpeed 6 Click the Continue button to accept it The third installation window appears with FaxSpeed Standard as the name of the program group 7 Click the Create button to accept it 8 At the end of the install...

Страница 170: ...g Multi Function Link Pro AsYour Fax Application After installation the first time you start the FaxSpeed Send module automatically you will be asked to specify the fax application to which FaxSpeed will send the InfoImages The FaxSpeed Setup window will be displayed listing all the fax applications printers and other output devices found on your disk Select the Brother MFL Pro Fax driver and clic...

Страница 171: ...on disk into drive a or b and press OK 2 Insert your Brother MFL Pro CD ROM into your CD ROM drive 3 Click the OK button The Copy Wizard will not be able to locate the correct files Select the BROWSE button and select the 3dfxspd directory of the CD ROM Select the OK button The following message will be displayed Please insert clean formatted disk in drive a or b and press OK 4 Insert a blank disk...

Страница 172: ...file size can not exceed 32K You can monitor the file size during this file selection process by checking the Total Size KB field in the InfoImage Contents section of this dialog box 4 Select the OK button The selected files will be displayed in the InfoImage Contents dialog box 5 Select the Send button The Sending InfoImage window appears Then the Multi Function Link Pro Send Fax dialog box appea...

Страница 173: ... the required document 2 Select the Run FaxSpeed option from the File menu The current file will be generated into an InfoImage Then the FaxSpeed Setup dialog box will appear 3 Specify the required settings in this dialog box 4 To change additional settings select the Fax Printer button The FaxSpeed Setup dialog box will appear Select Brother MFL Pro Fax as the driver 5 Select OK to send the InfoI...

Страница 174: ... select the Brother MFC 7050 Series Scanner driver to scan the InfoImage into your computer FaxSpeed will run the Multi Function Link Pro Scanner application automatically As each page is scanned FaxSpeed shows you how many InfoImage blocks have been read and how many are still unread FaxSpeed will not accept a page from a different InfoImage 3 After all the pages of the InfoImage have been scanne...

Страница 175: ...Read module The FaxSpeed Read dialog box appears 5 Click the Select button The Select dialog box appears 6 From the File Name list box select the file name that you exported from PaperPort 7 Select the OK button 8 In the FaxSpeed Read dialog box select the Read button The InfoImage Reader will look at the BMP fax file and try to find the InfoImage data If it sees a cover page that is not included ...

Страница 176: ...cation the recipient must save or export the InfoImage into a selected directory as a BMP PCX TIFF or DCX file BMP PCX and TIFF formats save each InfoImage page in a separate file DCX format saves the entire InfoImage in a single file even if it is more than one page 3 Select the FaxSpeed Read icon to open the FaxSpeed Read window 4 Select all the files that belong to a single InfoImage and activa...

Страница 177: ...d automatically will open the scanner application of the recipient s choice As the recipient scans each page FaxSpeed shows how many InfoImage blocks have been read and how many are still unread FaxSpeed will not accept a page from a different InfoImage Low density format If you sent the InfoImage in Low density format the recipient can scan the InfoImage into the computer using a 200x200 or 300x3...

Страница 178: ...U S I N G C O L O R F A X I N G W I T H F A X S P E E D 18 12 ...

Страница 179: ...d to a fax machine using local phone lines or to another computer as an e mail attachment Faxes can be sent to a single recipient or to multiple recipients NetCentric FaxStorm tracks your faxes to their destinations and informs you of their status When servers are down due to Internet outages NetCentric FaxStorm re routes your fax jobs and requests for account status You can access incoming faxes ...

Страница 180: ...s A user account grants you access to many account features accessible from a web browser You will have your own personal accounting and management web pages located on your local POPware server These web pages will help you manage your account view your account balance pay invoices check on the status of your faxes and send faxes directly from a web form Receiving Faxes The Fax Inbox receives fax...

Страница 181: ...ver to which the fax was sent and a unique number that identifies the fax itself Pages Number of pages in the fax Status Final status of the fax job Either DONE or FAILED Creating an Inbound Account 1 Log on to your account home page using a web browser or select Web from the Utilities menu then select Account Home Page 2 Click the Options button on the left hand side of your account home page 3 C...

Страница 182: ...elated utilities to help you manage your faxing activities Contact Manager Use Contact Manager to organize your contacts and import database files of existing address books Cover Page Builder Cover Page Builder is your creative tool to build a personal cover page You can arrange fax merge fields to organize your own cover pages You can build a cover page by using a fax file for a backdrop that you...

Страница 183: ...t from NetCentric FaxStorm You can also view fax files received through your fax account and view other image files on your system You can run ViewFax from Status Manager or as a separate application When you run ViewFax as a separate application you can open any image file on your hard drive and save it on your hard drive as an attachment TIFF image or cover page Accessing NetCentric FaxStorm Sel...

Страница 184: ...ptions Sender tab To access the Send Fax Window in the NetCentric FaxStorm window select Send Fax from the Fax menu OR Click the Send Fax button The Send Fax window appears GeneralTab In the General tab you can address a fax to one or more recipients choose a cover page and determine the method for sending the fax The only information required to address a fax is the destination fax number However...

Страница 185: ... s information in the First Name Last Name or Company Name fields The Contact Manager searches for the contact and fills in the rest of the recipient s information OR If the recipient is not in its database enter the information If you do not want to save this recipient in your contact database click the Add to List button The recipient s name appears in the Recipient List box To delete a recipien...

Страница 186: ... group or to a contact Selecting Fax sends the selected file to the fax number shown in the Fax field For convenience you can use the country code lookup Selecting E mail sends the file to the e mail address shown in the E mail field Saving a New Contact from the Fax Send Window After entering the recipient information for the fax you can add the entry to your Contact Manager database 1 Click on t...

Страница 187: ...th an e mail utility or an external image viewing application The e mail message to which the TIFF files are attached includes a URL to a web page that instructs the recipient how to configure the e mail application to view the TIFF file attachments Most of the steps for sending fax files to an e mail address are the same as for sending fax files to a fax number The main difference is that you cho...

Страница 188: ...wing extensions TIFF ASCII BMP JPEG GIF PCX ICON PDF and PSD 1 Select the Attachments tab from the Send Fax window 2 The Attachments window appears and displays the files that are available 3 To place an Attachment in the selected window click the name the Attachment then click the Add button OR To select an attachment from your hard drive that is not in your Attachment List click Browse to locate...

Страница 189: ...ur computer it will be available in your list of printers to use for faxing from any Windows application IfYou Are UsingWindows 95 98 1 Open the document you wish to fax 2 Select Print from the File menu 3 Select NetCentric FaxStorm from the list of printers 4 Click Properties or click the button that displays the properties of the printer in the application you are using 5 Select Print to Fax and...

Страница 190: ... dialog box The file is now converted to a FAX file and the Send Fax application is launched allowing you to fax the document Setting Up Contacts in the Contact Manager In addition to saving recipient information when you address a fax in the Send Fax window you can add contacts manually in the Contact Manager window When adding a contact you are creating an entry in an existing group in your Cont...

Страница 191: ... Detail window appears 2 Enter additional information about the contact in the Contact Detail window 3 Click the OK button to save the new contact The Contact Manager window appears listing the new contact in the All group You can move the new contact to another group by selecting it and dragging it into that folder 4 Close the Contact Manager window to return to the NetCentric FaxStorm window ...

Страница 192: ...r window appears 2 Click the folder where you want to place the new contact and click the New Contact button The Contact Detail window appears 3 Enter the information about the contact in the Contact Detail window 4 Click the OK button to save the new contact The Contact Manager window appears listing the new contact in the group you selected 5 Close the Contact Manager window to return to the Net...

Страница 193: ...ger window and select Edit View from the Contact menu or click the Edit View button 2 When the Contact Detail window appears enter the additional information and changes as needed If you are ready to accept your changes skip to Step 5 3 To add another location for this contact select the Add button The Add Location window will appear 4 Enter the name of the new location and click the OK button The...

Страница 194: ...ountry codes See the online Help for more information On the Notes tab you can enter personal notes to the contact s record On the User Fields tab you can define user fields for adding additional information about the contact Moving or Copying a Contact to Another Group In the Contact Manager window you can move a contact from one group to another or copy a contact from one group into another grou...

Страница 195: ...us Manager The Status Manager connects to your account retrieves your sent and received faxes and displays their status You can open the Status Manager to check your faxes or you can set the Status Manager s options so that Status Manager checks the status at an interval you choose The Outbox lists the faxes you have sent from your faxing account Each fax is identified by the type fax or broadcast...

Страница 196: ...the Status Manager window 2 Double click the fax to view the Inbox Detail window for status information 3 Click on a fax to select it and click the View button to view the file To delete a fax click the Delete button Viewing FaxesYou Received Inbox 1 Click the Inbox tab at the bottom left hand side of the Status Manager window FaxStorm downloads all faxes that have been sent to your Inbox 2 Click ...

Страница 197: ...etCentric FaxStorm by selecting Account Home Page from the Utilities menu Each time you connect to your account home page you must enter the account name and password Viewing Received Faxes inYour Account Page Inbox Faxes that are sent to your fax Inbox can be viewed from your account home page as well as from NetCentric FaxStorm See online HELP if you need more information 1 Log on to your accoun...

Страница 198: ...rs within the browser 3 Click the Outbox hypertext link Your Account Page Outbox will be displayed listing you sent faxes Customer Support You can select Web Problem Reports from the Utilities menu of the NetCentric FaxStorm window Your web browser will open the problem report page of NetCentric Corporation Use this to send your problem directly to Customer Support at NetCentric Corporation or Con...

Страница 199: ...matic E Mail Printing software is a utility program that reads your E mail messages from a specified POP3 server and automatically prints to a printer Please read this section before using the software Check the online README WRI file in the root directory of the CD ROM for last minute important information and troubleshooting tips that were not included in the On Line Documentation ...

Страница 200: ...ther Automatic E Mail Printing accesses the server to check for new mail Provides an In Memory printer driver You can receive and print e mail data at the same time by searching for a specified character string in the mail header It allows you to see the sender subject and relevant part of the mail content Automatic E Mail Printing is for Windows 95 98 Only Automatic E Mail Printing is a 32 bit so...

Страница 201: ...ting window select Properties from the Mail pull down menu The User Settings window will appear 2 Select the User you want to set up and click the Properties button The Properties of Brother window will appear Setting Up the Server In the Server tab of the Properties of Brother window you must enter your POP3 Server POP3 Port POP3 Account name and Password Check the Delete Function and Print Funct...

Страница 202: ...pecified intervals OR at a specified time OR every time you click the New Mail icon Check the Display mail log checkbox if you want your log to show all new mail Continue to set up the Page Setup Print Filter Correction and Others applications where you want to be able to view new e mail messages as needed Please see Online Documentation and Help files on CD ROM if you need more detailed informati...

Страница 203: ...ng software using the Add Remove Program in Windows 95 98 If the Uninstall Program Displays an Error Message When you install the Automatic E Mail Printing software and create a user a directory name is created for that user The uninstall utility program has no knowledge of this user directory So when you run the uninstall utility program to remove the Automatic E Mail Printing software the uninst...

Страница 204: ...t button in the Taskbar 3 Select Settings then Control Panel The Control Panel window appears 4 Double click the Add Remove Program icon in this window to run the Add Remove Programs Properties utility program 5 In the Install Uninstall tab select Automatic E Mail Printing from the list of programs 6 Click the Add Remove button 7 Then follow the prompts on your computer screen ...

Страница 205: ... be uploaded automatically to your PC and displayed on the screens After you enter the settings you can save them by clicking the Apply button To save your changes and also exit the screen click OK Click Cancel to exit the application without changing the settings you entered These settings affect walk up faxing faxing a document directly from the MFC Brother Control Panel From the Brother MFL Pro...

Страница 206: ...Printing Reports Double click the General Settings icon on the Brother Control Panel screen to display the General Settings screen with the General tab Click the Apply button to save your settings Time Date Set the Time and Date by entering them manually OR Use the settings of your computer by selecting Set from PC Clock ...

Страница 207: ...all Message Center In Message Center Msg Ctr mode the MFC automatically answers every call Select this option to have all calls routed to the Message Center Depending upon the options selected in the Advanced Settings screen the fax and or voices messages will be stored in the MFC s memory forwarded to another fax machine or a message number will be sent to a paging service To set up your outgoing...

Страница 208: ...ing from the list box and then click the Print button to begin printing Activity Report Printing The Activity Report lists the last 50 outgoing and incoming faxes If your Activity Report is not listing all of your transactions select a shorter interval period After the Activity Report prints at the preset interval the information will be deleted automatically and cannot be recovered However you ca...

Страница 209: ...ntains settings for your Station ID fax header Custom Cover Page Fax Receive Code Telephone Answer Code and Speaker Volume Options tab Turns on the Multi Function Link Pro connection between your MFC and computer and contains settings for reduction of incoming faxes Auto Dial tab Provides a quick way to set up Speed Dial One Touch and Group numbers for easy dialing General Tab Click the Apply butt...

Страница 210: ...omment 1 2 You can set up two custom comments up to 27 characters each that you can select when you set up a cover page for fax transmissions Remote Fax Receive Code This is a three digit numeric code to activate your MFC from an extention phone on the fax line Use this code when you answered a fax call at an extension phone The default setting is 51 the extension phone must use touch tone Telepho...

Страница 211: ...on the connection between your MFC and the Brother Multi Function Link Pro software in your computer select On When you want incoming faxes to be received at the MFC select Off See the Owner s Manual for details about Multi Function Link Pro Incoming Fax Reduction Percentage If you want the MFC to automatically fit incoming faxes on the paper in your MFC select Auto To reduce incoming faxes select...

Страница 212: ...a pause in the dialing sequence click the Insert Pause button as many times as needed Each key press stores a 3 5 second pause One Touch You can store 24 fax phone numbers that you can dial by pressing one key and the Start key You also can store names with these numbers One Touch keys are not the dial pad keys Numbers 13 24 are accessed by holding down the Shift key while you press the appropriat...

Страница 213: ...g only one One Touch key Broadcasting First you ll need to store each fax number as a One Touch or Speed Dial number Then you can combine them into a Group Each Group uses up a One Touch key Finally you can have up to six small Groups and you can assign up to 123 numbers to one large Group Group From the list box select the number of the Group G01 G06 Name Enter a 15 character Group Name One Touch...

Страница 214: ...ced Settings Tab This tab allows you to set up the Paging or Fax Forwarding Message Center options in the MFC s database Click the Advanced Settings icon on the Brother Control Panel to display this screen Click the Apply button to save your settings ...

Страница 215: ...r Number Enter your pager phone number up to 20 digits and For example 18005551234 PIN The dash or minus key inserts a pause If your pager requires a PIN Enter the PIN press press the dash or minus key enter your MFC number then press For example 12345 18005212846 OR If your pager does not need a PIN Press the dash or minus key enter your MFC number then press For example 18005212846 Remote Retrie...

Страница 216: ... the Ink Cartridges 1 Click the Print Alignment Page button to print the Alignment Test Sheet 2 Study the Alignment Test Sheet and decide which sample number in each of the patterns A B C and D shows the most evenly printed ink lines 3 In the list boxes for Pattern A B C and D in the Ink Cartridge Maintenance screen select the best pattern number If you are using the Photo ink cartridge only ink p...

Страница 217: ...lity than the top lines repeat Steps 1 and 2 two or more times If the print quality is satisfactory after running the test three times the ink nozzles are clean OR If the print quality is not improved you will have to clean the ink cartridges manually Installing or Replacing Ink Cartridges Each ink cartridge has its own correct position The Color ink cartridge must be in the left slot and the Blac...

Страница 218: ...ly if you just unwrapped the Color cartridge you installed select Brand New Right Cartridge 1 If you are installing or replacing the Black ink cartridge select Black OR If you are installing or replacing the Photo ink cartridge select Photo 2 Follow the prompts on the screen to install the Black or Photo ink Cartridge in the MFC 3 Only if you just unwrapped the Black or Photo cartridge you install...

Страница 219: ... or late evening This equipment complies with Part 68 of FCC Rules On the rear panel of this equipment is a label that contains among other information the FCC Registration Number and Ringer Equivalence Number REN for this equipment You must upon request provide this information to your telephone company You may safely connect this equipment to the telephone line by means of a standard modular jac...

Страница 220: ...ill be notified as soon as possible You will be informed of your right to file a complaint with the FCC Your telephone company may make changes to its facilities equipment operations or procedures that could affect the proper functioning of your equipment If they do you will be notified in advance to give you an opportunity to maintain uninterrupted telephone service If you experience trouble with...

Страница 221: ...es with FCC standards which are applied to the USA only The shielded interface cable supplied with your MFC should be used according to FCC 15 27 C In addition a grounded plug should be plugged into a grounded AC outlet after checking the rating of the local power supply for the printer to operate properly and safely Federal Communications Commission FCC Declaration of Conformity For USA Only Resp...

Страница 222: ... waste officials for the recycling options in your area and proper disposal If you have a problem contact Brother Customer Service at USA 1 800 284 4329 voice 1 908 575 8790 fax From within Canada 1 800 853 6660 voice 1 514 685 4898 fax From within Montreal 1 514 685 6464 voice International ENERGY STAR Compliance Statement The purpose of the International ENERGY STAR Program is to promote the dev...

Страница 223: ...uld never be placed in a built in installation unless proper ventilation is provided 8 This product should be operated from the type of power source indicated on the label If you are not sure of the type of power available consult with your dealer or local power company 9 This product is equipped with a 3 wire grounding type plug a plug having a third grounding pin This plug will fit into only a g...

Страница 224: ...BackSystem From within Montreal 1 514 685 6464 voice 16 This product has no ON OFF switch Therefore it is very important that you have easy access to the main plug and the main socket to which the plug is connected in case the main power to the machine must be disconnected quickly 17 Unplug this product from the wall outlet and refer servicing to Authorized Service Personnel under the following co...

Страница 225: ...rges we recommend the use of a power protection device Surge Protector 19 Avoid using the MFC or any telephone except cordless during an electrical storm There may be a remote risk of electric shock from lightning 20 If you have a gas leak do not use the MFC or report the leak from any telephone in its vicinity ...

Страница 226: ...ight 1999 Brother Industries Ltd All rights reserved Copyright 1999 Smith Micro Software Inc All rights reserved Copyright 1999 Visioneer Inc All rights reserved Windows Windows NT and Microsoft are registered trademarks of Microsoft in the U S and other countries Visioneer PaperPort LE is a registered trademark of Visioneer Inc TextBridge is a trademark of Xerox Imaging Systems Inc FaxSpeed is a ...

Страница 227: ...ure Fax Specifications Compatibility ITU T Group 3 Coding System MH MR MMR Modem Speed 14400 12000 9600 7200 4800 2400 Automatic Fallback Cut Sheet Size Letter Legal A4 Scanning Printing Width 8 2 inches 208 mm 8 inches 203 2 mm Paper Cassette Up to 100 Sheets 20 lbs Printer Type Thermal Ink Jet Gray Scale 256 levels Error Diffusion Display LCD 16 characters Polling Types Standard Sequential Contr...

Страница 228: ...mes at 5 minute intervals Speaker Type Monitor Auto Answer 0 1 2 3 or 4 rings Communication Source Public switched telephone network Operating Environment 50 104 F 10 40 C Best Print Quality 61 90 F 16 32 C Power Source 120V AC 50 60Hz USA Canadian Version Only Power Consumption Standby under 9 watts Operating Copy mode under 35 watts Dimensions 20 9 x 13 0 x 9 3 inches 530 x 331 x 236 mm Weight 1...

Страница 229: ...rmal Ink Jet Resolution 1200 x 1200 dots per inch DPI 600 x 600 dots per inch DPI 300 x 600 dots per inch DPI Print Speed up to 6 pages Mono up to 3 pages Color Print Width 8 inches 203 2 mm Resident Fonts Bitmap fonts Roman 10 12 15 PS Disk based Fonts 35 Controller Interface IEEE 1284 Compliant ...

Страница 230: ... lb 75 g m2 plain paper Paper Output Approximately 100 sheets of plain paper Face up print delivery to the paper output tray It is recommended that printed sheets are taken from the paper output tray immediately after printing Ink Black Color Photo Option ink cartridges Service Life of Approximately 600 pages Black cartridge Ink Cartridge at 5 coverage Starter ink cartridge Approximately 1000 page...

Страница 231: ...u are calling If you can t resolve a difficulty with your MFC using this manual call our Fax Back System and follow the voice prompts to receive faxed instructions about using the system and an index of Fax Back subjects USA 1 800 521 2846 From within Canada 1 800 681 9838 The Brother USA Fax Back System number USA only has been preprogrammed on One Touch key 01 Brother on the World Wide Web You c...

Страница 232: ...ay cause permanent damage Replace the ink cartridges See p 24 16 BLACK NEAR EMPTY One or both ink Order a new ink cartridge COLOR NEAR EMPTY cartridges are running See p ii PHOTO NEAR EMPTY out of ink CHECK PAPER MFC is out of paper or Place paper in cassette OR PRESS START KEY paper is not set properly Remove paper and reinstall it in the cassette correctly Then press Start See p 2 7 COMM ERROR P...

Страница 233: ... If you are using the Photo ink cartridge replace it with the Black cartridge so received faxes will print clearing the memory OR Cancel some jobs For multiple copying see p 11 2 NO RESPONSE The number you dialed does Verify the number and try again BUSY not answer or is busy NOT REGISTERED You tried to access a Set up the One Touch or Speed One Touch or Speed Dial Dial number See p 9 2 number tha...

Страница 234: ...ny paper from the document feeder that is not jammed 2 Lift the control panel 3 Pull the jammed document out toward the front of the MFC 4 Close the control panel 5 Press Stop Printer Jam or Paper Jam Remove the jammed paper depending upon where it is jammed in the MFC Paper is jammed in the multi purpose sheet feeder Pull the jammed paper upward and remove it ...

Страница 235: ... I N T E N A N C E 24 5 Troubleshooting and Maintenance Paper is jammed inside front of MFC Pull the paper toward you Paper is jammed inside back of MFC 1 Open the cover 2 Reach inside the MFC and pull the paper toward you 3 Close the cover ...

Страница 236: ...the Printer Driver matches the type Too Light of paper you are using see Print Media on p 23 4 Try using recommended special paper see Chapter 3 The recommended environment for your MFC is between 61º F and 90º F Printing Appears Dirty or Make sure you are using the recommended paper Ink Seems to Run see Chapter 3 Don t handle the paper until the ink is dry The recommended environment for your MFC...

Страница 237: ...Telephone Company Sending Faxes Difficulty Suggestions Poor Transmitting Quality Try changing your resolution to FINE or SUPERFINE Make a copy to verify your MFC s scanner operation Transmission Verification There is probably temporary noise or static on the line Report Says Result NG Try sending the fax again If the problem continues call the Telephone Company to check your phone line Vertical Bl...

Страница 238: ...g a slight interruption is crucial to your business a separate line with no custom features is recommended Printer Difficulties Difficulty Suggestions Horizontal White Lines Clean the nozzles see Cleaning the Ink Cartridges and Appear in Text or Graphics Cleaning the Cartridge Carrier on p 2 15 2 17 If you cleaned the cartridge carrier and the print has not improved call Brother Customer Service a...

Страница 239: ...acters are missing or from the Start menu Open Brother MFC 7050 some characters are printed properties Click Spool Setting on the Details tab in the same place Select RAW from Spool Data Format Video Capture Difficulty Suggestions LCD does not show Check the video cable connection to the MFC s RCA pin Video Press Copy jack Check that the video equipment is sending a signal video equipment is turne...

Страница 240: ... Management 2 Press or to select 1 HEAD CLEANING and press Set 3 Press Start Aligning Ink Cartridges This feature allows you to check and align the ink cartridges to assure best print quality Make sure there is paper in the cassette before you start the alignment procedure See Cleaning the Ink Cartridges p 2 15 See Aligning Ink Cartridges p 2 13 ...

Страница 241: ...rrectly you could void your warranty 1 Unplug the MFC from the telephone wall socket 2 Unplug the MFC from the AC outlet WARNING Do not unplug the MFC after a print job until you hear the final click 3 Remove the paper tray document tray document wire extension and handset and pack them WARNING Please remove the ink cartridges Damage to your MFC resulting from improper packing will void your warra...

Страница 242: ... T I N G A N D M A I N T E N A N C E 24 12 5 Place the wrapped MFC in the original carton with the original packing material 6 Place additional parts such as cords and trays and documents such as your manual into the carton ...

Страница 243: ...T R O U B L E S H O O T I N G A N D M A I N T E N A N C E 24 13 Troubleshooting and Maintenance 7 Close the carton ...

Страница 244: ...pressure bar and the glass strip under the bar with isopropyl alcohol on a lint free cloth If the screen still displays a scanner error call Brother Customer Service see page i Control Panel Cover Cleaning the MFC Printer Platen When you want to clean the MFC printer platen wipe it with a lint free cloth that is dry or lightly moistened with isopropyl alcohol Printer Platen ...

Страница 245: ...dry out Always store your Black or Photo ink cartridge in the cartridge container until you are ready to use it again Preserving Ink Cartridges For long life and optimum performance Do NOT unpack a new ink cartridge until you are ready to install it Do NOT remove an ink cartridge from the MFC except to clean replace or exchange it Protect the Black or Photo ink cartridge while it is not being used...

Страница 246: ...dge When the counter detects an ink cartridge is running out of ink the MFC will notify you by lighting the Ink Empty LED Ink Empty LED Blinking One or both Ink Cartridges are low Ink Empty LED On One or both Ink Cartridges are empty Caution Continuing to use the MFC when the display shows INK EMPTY may cause permanent damage to your MFC The display shows you which cartridges are low or empty Be s...

Страница 247: ...er print head Do NOT touch or remove the copper contact area Caution Each ink cartridge has its own correct position The Color ink cartridge must be in the left slot and the Black or Photo cartridge must be in the right slot Match the color indicators on the ink cartridge and the cartridge carrier 7 Insert the new ink cartridge into the correct slot and press backward until it snaps If the ink car...

Страница 248: ...ink cartridge OR press 2 if you installed the old Black ink cartridge Go to Step 14 DID YOU INSTALL PHOTO 1 NEW2 OLD 12 Press 1 if you installed a new Photo ink cartridge OR press 2 if you installed the old Photo ink cartridge DID YOU CHANGE LEFT 1 YES 2 NO 13 Press 1 if you replaced the left side cartridge OR press 2 if you did not replace the left side cartridge DID YOU INSTALL COLOR 1 NEW2 OLD ...

Страница 249: ... and Maintenance For Customer Service When calling Customer Service have your model number serial number and date of purchase available USA 1 800 284 4329 voice 1 908 575 8790 fax From within Canada 1 800 853 6660 voice 1 514 685 4898 fax From within Montreal 1 514 685 6464 voice ...

Страница 250: ...T R O U B L E S H O O T I N G A N D M A I N T E N A N C E 24 20 ...

Страница 251: ...t enables your MFC to redial the last fax number if the original fax did not go through because the line was busy or there was no answer Backup Print Sets your MFC to print a copy of faxes that are received and stored in memory beeper The sound the keys make when they are pressed an error occurs or a document has been received or transmitted beeper volume Volume setting for the beep when you press...

Страница 252: ...umber of pages and comment You can generate an electronic cover page at the other end with pre programmed information from memory or you can print a sample cover page to fax with your document Cover Page Message The comment that is on the Cover Page This is a programmable feature Delayed Fax Sends your fax from memory at a later time that day Delayed Timer You can program a certain time each day t...

Страница 253: ...als sent by sending and receiving fax machines while communicating information Fine mode Resolution is 196 x 203 dpi It is used for small print and graphs Function mode The programming mode for changing the settings of your MFC gray scale The shades of gray available for copying and faxing photographs group number A combination of One Touch and or Speed Dial numbers that are stored on a One Touch ...

Страница 254: ... memory when the machine is out of paper Overseas Mode Makes temporary changes to the fax tones to accommodate noise and static on overseas phone lines paper thickness lever A lever on the back right side of the MFC that adjusts the MFC for paper thickness Pause Allows you to place a 3 5 second delay in the dialing sequence stored on One Touch and Speed Dial numbers Photo Mode A resolution setting...

Страница 255: ...he sender s name and fax number super fine resolution 392 x 203 dpi Best for very small print and line art Tel index An electronic alphabetical listing of stored One Touch Speed Dial and Group numbers Temporary Setting You can select certain options for each fax transmission without changing the default settings Toll Saver A Message Center setting that allows the MFC to answer after one ring when ...

Страница 256: ...G L O S S A R Y G 6 ...

Страница 257: ...1 transmission 7 3 B beeper 5 5 bi directional parallel cable 14 3 brightness See video printing walk up broadcasting 7 11 setting up Groups for 8 5 Brother accessories and supplies ii Bulletin Board i contact numbers i Customer Service i Fax Back System i on the World Wide Web i test sheet sending 1 2 warranty Notice Disclaimer of Warranties iii C Caller ID 6 11 canceling fax forwarding 12 8 12 1...

Страница 258: ...ht 7 9 jam 24 4 resolution 7 2 size 7 1 tray 2 6 drivers fax 17 4 installing 14 5 printer 16 1 TWAIN compliant 17 7 dual access 7 3 E E Mail Printing 20 1 ECM Error Correction mode 1 3 emergency numbers 22 1 ENERGY STAR Compliance 22 4 enlarge See copy ies entering text 5 3 envelopes loading 15 3 print area 3 4 printing 15 3 size 3 3 thickness lever setting 2 8 erasing messages See Message Center ...

Страница 259: ...ing 18 1 FCC notices 22 1 22 8 Fine See resolution fixed reduction 6 4 function s mode 4 1 programming at a glance 4 2 4 6 G glossy paper 13 5 15 1 16 6 23 4 gray scale 23 1 Groups dialing 7 11 setting up 8 5 H handset connecting 2 4 volume 5 5 5 6 hearing aid compatible 22 1 Help List printing 1 1 I improving print quality 2 15 2 17 24 10 ink cartridges aligning at MFC 2 13 from PC 21 12 disposin...

Страница 260: ...4 4 installing 14 4 14 8 MF Link mode turning on 14 9 phone book See On Line Documentation printing 16 1 driver 16 1 receiving faxes 17 5 if you are having difficulty 24 6 viewing faxes 17 6 scanning into PC 17 8 accessing 17 7 settings 17 8 TWAIN compliant driver 17 7 sending faxes adding a cover page 17 4 attachment s 17 4 cover page only 17 3 fax driver 17 4 if you are having difficulty 24 7 vi...

Страница 261: ...print 10 2 list of last 50 faxes 10 2 list of your stored numbers 10 1 proof fax was sent 10 2 types of 10 1 requirements See computer Reset key clear printer memory 15 5 resolution fax Standard Fine Super Fine Photo 23 2 printing 23 3 using PC software 16 8 scanning 17 8 setting for next fax 7 2 rings setting the number of 6 3 roll over phone lines 2 20 S safety instructions 22 5 scanning into PC...

Страница 262: ...ting or receiving faxes 24 6 sending faxes 24 7 video capture 24 9 two line phone system 2 20 2 21 converting wall jacks 2 20 U User Settings 10 1 V vertical alignment 24 10 video capture to PC 17 10 capturing an image 17 11 connecting video equipment 17 10 video printing walk up 13 1 brightness adjusting 13 7 changing default settings 13 3 color adjusting 13 6 paper type setting 13 5 print qualit...

Страница 263: ......
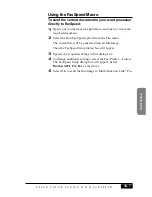
Страница 264: ...ulti Function Center may not be compatible with the power available in foreign countries Using USA or CANADA models overseas is at your own risk and will void your warranty Brother International Corporation 100 Somerset Corporate Boulevard P O Box 6911 Bridgewater NJ 08807 0911 USA Brother International Corporation Canada Ltd 1 rue Hôtel de Ville Dollard des Ormeaux QC CANADA H9B 3H6 Visit us on t...

Отзывы: