background image

13

DE

UT
S

CH

Computer-Systemvoraussetzungen

Bevor Sie den Assistenten zur Erzeugung eines 
Bestätigungsschlüssels starten, vergewissern Sie sich, 
dass der anzuschließende Computer die folgenden 
Systemvoraussetzungen erfüllt.

* „IBM“ ist ein eingetragenes Warenzeichen der IBM Corporation in 

den USA und in anderen Ländern.

* „Windows XP“, „Windows Vista“ und „Windows 7“ sind 

eingetragene Warenzeichen der Microsoft Corporation in den USA 
und in anderen Ländern.

* Jedes Unternehmen, dessen Software in dieser Anleitung erwähnt 

wird, hat eine seinen eigenen Programmen entsprechende 
Softwarelizenzvereinbarung.
Alle anderen in dieser Anleitung erwähnten Marken- und 
Produktnamen sind Warenzeichen der jeweiligen Unternehmen. 
Kennzeichen, wie 

®

 und ™ werden im Text jedoch nicht extra 

hervorgehoben.

Installation

Nachfolgend wird die Prozedur zur Aktualisierung der 
Nähmaschine auf KIT 

II

 beschrieben.

a

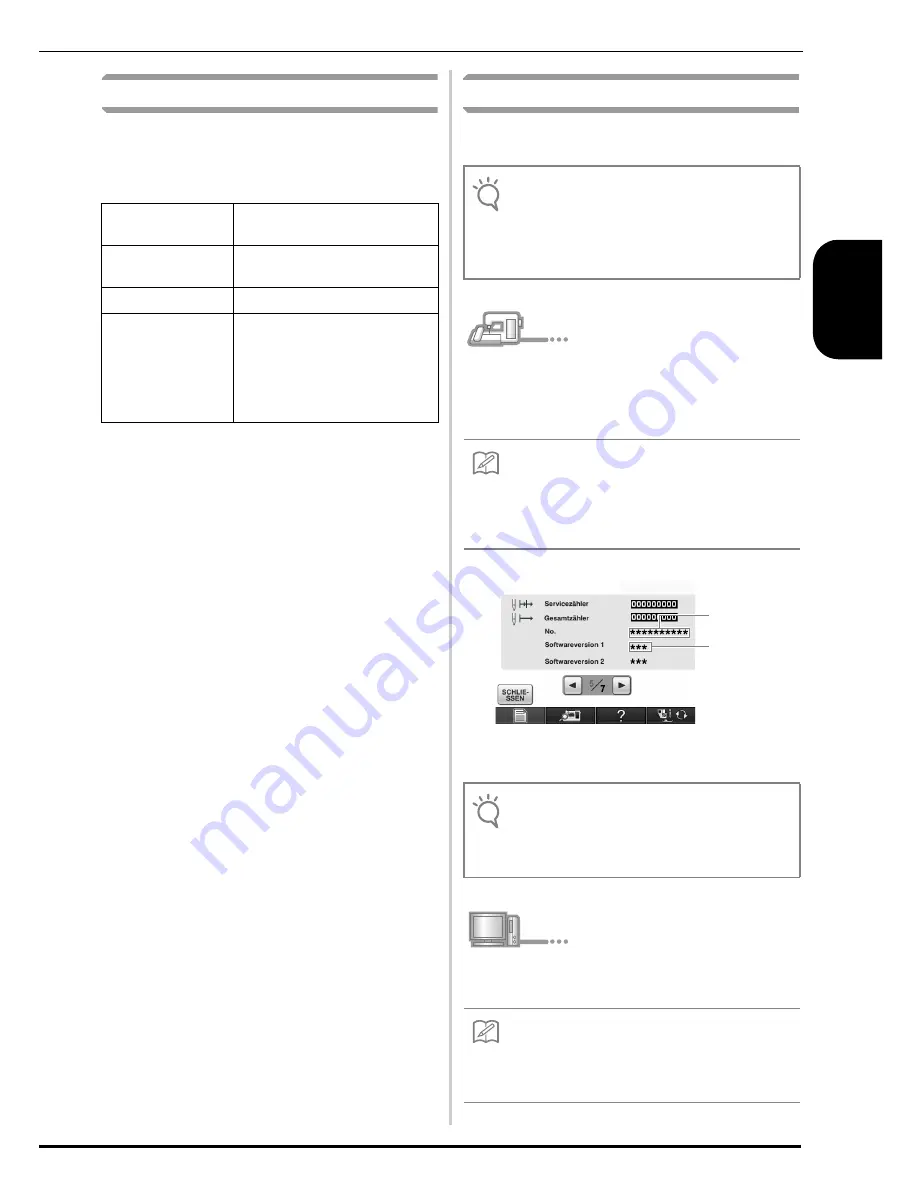
Notieren Sie sich die 10-stellige Nummer 
(interne Maschinennummer), die neben „No.“ 
auf Seite 5 des Einstellungsbildschirms 
angezeigt wird. 

* Die Seitenzahl im Einstellungsbildschirm kann je nach Version 

variieren.

b

Legen Sie die CD-ROM in das CD-ROM-
Laufwerk des Computers ein. 

Computer

IBM-PC oder ein kompatibler 
Computer

Betriebssystem

Windows XP, Windows Vista 
und Windows 7

CD-ROM-Laufwerk Für die Installation erforderlich

Sonstige

Eine verfügbare 
Internetverbindung und ein 
USB-Anschluss (erforderlich für 
das Upgrade der Nähmaschine), 
wenn Sie einen Computer 
verwenden

Hinweis

• Wenn Sie die unten beschriebene Prozedur nicht 

abschließen, kann die Nähmaschine nicht mit dem 
KIT 

II

 aktualisiert werden.

• Der Internetzugang ist erforderlich, damit Sie den 

Bestätigungsschlüssel erhalten.

Anmerkung

• Achten Sie darauf, dass Sie die interne 

Maschinennummer (No.) fehlerfrei notieren, da 
diese Nummer im Assistenten zur Erzeugung eines 
Bestätigungsschlüssels eingegeben werden muss, 
um einen Bestätigungsschlüssel zu erhalten. 


Interne
Maschinennummer
(No.) 

Versions- 
nummer

Hinweis

• Die interne Maschinennummer neben 

No.


unterscheidet sich von der Seriennummer (SER. 
NO.) auf dem Typenschild auf der Rückseite der 
Nähmaschine. 

Anmerkung

• Wenn in Windows 7 oder Windows Vista das 

Dialogfeld 

Automatische Wiedergabe

 erscheint, 

klicken Sie auf 

Ordner zur Anzeige der Dateien 

öffnen

.

Содержание Innov-is

Страница 1: ...resente guida prima dell installazione Antes de instalar lea este guía Перед началом установки прочитайте данное руководство KIT I I Installation Guide ESPAÑOL Guía de instalación del KIT I I NEDERLANDS KIT I I Installatiegids FRANÇAIS Guide d installation du KIT I I DEUTSCH Installationsanleitung für KIT I I ITALIANO Guida all installazione di KIT I I РУССКИЙ КОМПЛЕКТ I I Руководствопоустановке ...

Страница 2: ...e gids was actueel toen deze werd gedrukt Bedenkt dat inhoud van deze gids en de specificaties van dit product zonder kennisgeving kunnen worden gewijzigd Als voorbeeld worden in deze gids schermafbeeldingen van Windows 7 genomen Lees deze gids alvorens te installeren Grazie per aver acquistato il nostro prodotto Per ulteriori informazioni sui prodotti e sugli aggiornamenti visitare il nostro sito...

Страница 3: ...1 ENGLISH CONTENTS Accessories 2 Contents of CD ROM 2 Installation Overview 2 Computer Requirements 3 Installation Procedure 3 ...

Страница 4: ...ures section indicates operations performed with the sewing machine and indicates operations performed with the computer Step 1 Make a note of the internal machine identification number No Step 2 Insert the CD ROM into the computer s CD ROM drive and then start the Certification Key Issuing Wizard Step 3 Follow the wizard instructions for obtaining the Certification Key Step 4 Install the upgrade ...

Страница 5: ... Settings screen The number of pages in the Settings screen may differ depending on the version b Insert the CD ROM into the computer s CD ROM drive Computer IBM PC or compatible computer Operating System Windows XP Windows Vista and Windows 7 CD ROM drive Required for installation Others Internet connection available and one available USB port required to upgrade the sewing machine when using com...

Страница 6: ... is the latest upgrade file the following window appears Click Next If the latest upgrade file is on the web select your model and click Download then save the upgrade program upf on your computer Click Next Memo The following procedure can be used to start the Certification Key Issuing Wizard 1 Click Start 2 Click Run or in the search box type run and then in the list of results click Run The Run...

Страница 7: ...en down in step a and then click Next If the following error message appears Check that symbols or characters other than numbers have not been entered To close the message click OK i Carefully verify that the information has been entered correctly and then click Certify To change the entered information click Back Connect to the certifying server and then obtain the upgrade Certification Key Memo ...

Страница 8: ...d then click Certify again To close the message click OK j Write down the 8 digit Certification Key that appears k Click Finish If the latest program has already been installed in the machine Skip the steps l to q and then start the procedure from step r l While pressing the Automatic Threading button turn the sewing machine on Use USB media or a computer to install the upgrade application for KIT...

Страница 9: ...ctor on the right side of the machine p Press q Remove the USB media Continue with step r on page 9 Note Upgrade application data is contained in the NV6000D USA NV6000D CAN or NV1 folder Select the appropriate folder for your model Copy only the Upgrade application for KIT II to the USB media no other files should be on the media Note When the message Upgrade complete appears installation of the ...

Страница 10: ...e Disk If you downloaded the latest program in step f copy the file upf from your computer p Press Note Upgrade application data is contained in the NV6000D USA NV6000D CAN or NV1 folder Select the appropriate folder for your model The Connected to PC Do not disconnect the USB cable message appears on the sewing machine LCD screen Note When the message Upgrade complete appears installation of the ...

Страница 11: ...able r Turn the sewing machine off then on again s Display page 5 of the Settings screen t Press in the Settings screen u Press in the following screen v Type in the 8 digit Certification Key written down in step j and then press ...

Страница 12: ... screen in step t and then repeat steps b through k to obtain the Certification Key If the Certification Key is lost repeat steps b through k to attain the Certification Key Note For details of the upgraded functions see the Operation Manual viewable from the disc by clicking on the manual folder and selecting your preferred language You may also view the Operation Manual or My Custom Design Opera...

Страница 13: ...11 DEUTSCH INHALT Zubehör 12 Inhalt der CD ROM 12 Installationsübersicht 12 Computer Systemvoraussetzungen 13 Installation 13 ...

Страница 14: ...tivieren Im Prozedurenbereich weist auf Handlungen an der Nähmaschine und auf Handlungen am Computer hin Schritt 1 Notieren Sie die interne Maschinennummer No Schritt 2 Legen Sie die CD ROM in das CD ROM Laufwerk des Computers ein und starten Sie den Assistenten zur Erzeugung eines Bestätigungsschlüssels Schritt 3 Folgen Sie den Hinweisen des Assistenten um den Bestätigungsschlüssel zu erhalten Sc...

Страница 15: ...e Seitenzahl im Einstellungsbildschirm kann je nach Version variieren b Legen Sie die CD ROM in das CD ROM Laufwerk des Computers ein Computer IBM PC oder ein kompatibler Computer Betriebssystem Windows XP Windows Vista und Windows 7 CD ROM Laufwerk Für die Installation erforderlich Sonstige Eine verfügbare Internetverbindung und ein USB Anschluss erforderlich für das Upgrade der Nähmaschine wenn ...

Страница 16: ...f der CD ROM erscheint das folgende Fenster Klicken Sie auf Weiter Ist die neueste Aktualisierungsdatei im Internet wählen Sie Ihr Modell klicken Sie auf Herunterladen und speichern Sie das Aktualisierungsprogramm upf auf dem Computer Klicken Sie auf Weiter Anmerkung Der Assistent zur Erzeugung eines Bestätigungsschlüssels kann wie folgt geöffnet werden 1 Klicken Sie auf Start 2 Klicken Sie auf Au...

Страница 17: ...die folgende Fehlermeldung erscheint Stellen Sie sicher dass Sie nur Ziffern eingegeben haben Zum Schließen der Meldung klicken Sie auf OK i Prüfen Sie sorgfältig dass die Informationen richtig eingegeben worden sind und klicken Sie dann auf Bestätigen Um die eingegebenen Informationen zu ändern klicken Sie auf Zurück Stellen Sie eine Verbindung mit dem Bestätigungs Server her um den Bestätigungss...

Страница 18: ...ließen der Meldung klicken Sie auf OK j Notieren Sie den angezeigten 8 stelligen Bestätigungsschlüssel k Klicken Sie auf Beenden Wenn das neueste Programm bereits in der Maschine installiert ist Überspringen Sie die Schritte l bis q und starten Sie die Prozedur ab Schritt r l Halten Sie die Taste Automatisches Einfädeln gedrückt und schalten Sie die Nähmaschine ein Verwenden Sie danach ein USB Med...

Страница 19: ...ken Sie q Entfernen Sie das USB Medium Fahren Sie mit Schritt r auf Seite 19 fort Hinweis Die Daten des Aktualisierungsprogramms sind im Ordner NV6000D USA NV6000D CAN oder NV1 enthalten Wählen Sie den für Ihr Modell geeigneten Ordner Kopieren Sie nur das Aktualisierungsprogramm für KIT II auf das USB Medium auf dem USB Medium dürfen keine anderen Dateien enthalten sein Hinweis Wenn die Meldung Ak...

Страница 20: ...mm in Schritt f heruntergeladen haben kopieren Sie die Datei upf vom Computer p Drücken Sie Hinweis Die Daten des Aktualisierungsprogramms sind im Ordner NV6000D USA NV6000D CAN oder NV1 enthalten Wählen Sie den für Ihr Modell geeigneten Ordner Die Meldung Aktive PC Verbindung Das USB Kabel nicht trennen erscheint auf dem LCD Bildschirm der Nähmaschine Hinweis Wenn die Meldung Aktualisierung abges...

Страница 21: ...ie die Maschine aus und wieder ein s Rufen Sie Seite 5 des Einstellungsbildschirms auf t Drücken Sie im Einstellungsbildschirm u Drücken Sie auf dem folgenden Bildschirm v Geben Sie den 8 stelligen Bestätigungsschlüssel ein den Sie in Schritt j notiert haben und drücken Sie dann ...

Страница 22: ...rholen Sie die Schritte b bis k um einen Bestätigungsschlüssel zu erhalten Wenn Sie den Bestätigungsschlüssel verlieren wiederholen Sie die Schritte b bis k um den Bestätigungsschlüssel wieder zu erhalten Hinweis Weitere Informationen zu den aktualisierten Funktionen finden Sie in der Bedienungsanleitung die Sie durch Öffnen des Ordners manual und Auswahl der gewüschten Sprache auf der CD anzeigen...

Страница 23: ...21 FRANÇAIS TABLE DES MATIÈRES Accessoires 22 Contenu du CD ROM 22 Vue d ensemble de l installation 22 Configuration requise 23 Procédure d installation 23 ...

Страница 24: ...ran des réglages page 5 Dans les procédures indique les opérations effectuées avec la machine à coudre et indique les opérations effectuées avec l ordinateur Etape 1 Notez le numéro d identification interne de la machine No Etape 2 Insérez le CD ROM dans le lecteur correspondant de l ordinateur puis lancez l assistant de délivrance de code de certification Etape 3 Suivez les instructions de l assi...

Страница 25: ...ut varier en fonction de la version b Insérez le CD ROM dans le lecteur correspondant de l ordinateur Ordinateur PC IBM ou ordinateur compatible Système d exploitation Windows XP Windows Vista et Windows 7 Lecteur de CD ROM Requis pour l installation Autres Connexion Internet et un port USB disponibles nécessaire pour la mise à niveau de la machine à coudre lorsque vous utilisez l ordinateur Remar...

Страница 26: ...er de mise à niveau la fenêtre suivante s affiche Cliquez sur Suivant Si le fichier de la dernière mise à niveau est disponible sur Internet sélectionnez votre modèle et cliquez sur Télécharger puis enregistrez le programme de mise à niveau upf sur votre ordinateur Cliquez sur Suivant Mémo Procédez comme suit pour lancer l Assistant de délivrance de code de certification 1 Cliquez sur Démarrer 2 C...

Страница 27: ...té à l étape a puis cliquez sur Suivant Si le message d erreur suivant s affiche Vérifiez que des symboles ou caractères autres que des numéros n ont pas été entrés Pour fermer le message cliquez sur OK i Vérifiez attentivement que les informations ont été entrées correctement puis cliquez sur Certifier Pour modifier les informations entrées cliquez sur Précédent Connectez vous au serveur de certi...

Страница 28: ...ermer le message cliquez sur OK j Notez le code de certification à 8 chiffres qui apparaît k Cliquez sur Terminer Si le dernier programme a déjà été installé sur la machine Passez les étapes l à q puis recommencez la procédure à partir de l étape r l Mettez la machine à coudre sous tension tout en appuyant sur la touche Enfilage automatique Installez l application de mise à niveau vers le KIT II s...

Страница 29: ...ôté droit de la machine p Appuyez sur q Retirez le support USB Passez à l étape r à la page 29 Remarque Les données d application de la mise à niveau se trouvent dans le dossier NV6000D USA NV6000D CAN ou NV1 Sélectionnez le dossier correspondant à votre modèle Copiez uniquement le fichier Application de mise à niveau vers le KIT II sur le support USB aucun autre fichier ne doit figurer sur le sup...

Страница 30: ... avez téléchargé le dernier programme à l étape f copiez le fichier upf à partir de votre ordinateur p Appuyez sur Remarque Les données d application de la mise à niveau se trouvent dans le dossier NV6000D USA NV6000D CAN ou NV1 Sélectionnez le dossier correspondant à votre modèle Le message Connecté à un PC Ne déconnectez pas le câble USB s affiche sur l écran LCD de la machine à coudre Remarque ...

Страница 31: ...tez la machine à coudre hors puis sous tension s Affichez la page 5 de l écran de réglages t Appuyez sur dans l écran des réglages u Appuyez sur dans l écran suivant v Tapez le code de certification à 8 chiffres noté à l étape j puis appuyez sur ...

Страница 32: ...épétez les étapes b à k pour obtenir le code de certification Si vous avez perdu le code de certification répétez les étapes b et k pour l obtenir de nouveau Remarque Pour plus d informations sur les fonctions mises à niveau reportez vous au Manuel d instructions disponible sur le CD ROM en cliquant sur le dossier manual et en sélectionnant votre langue Vous pouvez également vous reporter au Manue...

Страница 33: ...31 NEDERLANDS INHOUDSOPGAVE Accessoires 32 Inhoud van de cd rom 32 Installatieoverzicht 32 Computervereisten 33 Installatieprocedure 33 ...

Страница 34: ...aan dat bewerkingen worden uitgevoerd met de naaimachine en dat bewerkingen worden uitgevoerd met de computer Stap 1 Noteer het interne machine identificatienummer No Stap 2 Plaats de cd rom in het cd romstation van de computer en start de Wizard uitgifte certificatiesleutel Stap 3 Volg de aanwijzingen van de wizard om de certificatiesleutel op te halen Stap 4 Installeer de upgrade applicatie voor...

Страница 35: ...an het instellingenscherm Het aantal pagina s in het instellingenscherm kan variëren naargelang de versie b Plaats de cd rom in het cd romstation van de computer Computer IBM pc of compatibele computer Besturingssysteem Windows XP Windows Vista en Windows 7 Cd rom station Vereist voor installatie Andere vereisten Internetaansluiting en één beschikbare USB poort vereist voor het upgraden van de naa...

Страница 36: ...radebestand is verschijnt onderstaand venster Klik op Volgende Als het laatste upgradebestand zich op het web bevindt selecteer dan uw model en klik op Laden Sla vervolgens het upgradeprogramma upf op uw computer op Klik op Volgende Memo U kunt de wizard Uitgifte certificatiesleutel als volgt starten 1 Klik op Start 2 Klik op Uitvoeren of typ Uitvoeren in het zoekvenster en klik dan in de lijst re...

Страница 37: ...bt genoteerd en klik op Volgende Als de volgende foutmelding verschijnt Controleer of u andere symbolen of letters hebt getypt in plaats van cijfers Als u het bericht wilt sluiten klikt u op OK i Controleer of u de sleutel juist hebt ingevoerd en klik vervolgens op de toets Certificatie Als u de opgegeven informatie wilt wijzigen klikt u op Vorige Maak verbinding met de certificatieserver en haal ...

Страница 38: ...ificatie Als u het bericht wilt sluiten klikt u op OK j Noteer de 8 cijferige certificatiesleutel die verschijnt k Klik op Voltooien Als het nieuwste programma al is geïnstalleerd op de machine Sla stap l t m q over en start de procedure vanaf stap r l Zet de machine aan terwijl u op de Automatisch inrijgentoets drukt Gebruik een USB medium of een computer om de upgrade applicatie voor KIT II te i...

Страница 39: ...nt van de machine p Druk op q Verwijder het USB medium Ga verder met stap r op pagina 39 Opmerking De data van de upgrade applicatie vindt u in de map NV6000D USA NV6000D CAN of NV1 Selecteer de betreffende map voor uw model Kopieer alleen de Upgrade applicatie voor KIT II naar het USB medium Op dit medium mogen zich geen andere bestanden bevinden Opmerking Wanneer het bericht Upgrade voltooid ver...

Страница 40: ...ste programma hebt gedownload in stap f kopieer dan het bestand upf vanaf uw computer p Druk op Opmerking De data van de upgrade applicatie vindt u in de map NV6000D USA NV6000D CAN of NV1 Selecteer de betreffende map voor uw model Het bericht Aangesloten op pc Maak de USB kabel niet los verschijnt op de display van de naaimachine Opmerking Wanneer het bericht Upgrade voltooid verschijnt is de ins...

Страница 41: ... Zet de naaimachine uit en weer aan s Open pagina 5 van het Instellingenscherm t Druk op in het instellingenscherm u Druk op in het volgende scherm v Typ de 8 cijferige certificatiesleutel die u hebt genoteerd in stap j en druk vervolgens op ...

Страница 42: ...l vervolgens stap b t m k om de certificatiesleutel te verkrijgen Als u de certificatiesleutel kwijt bent herhaalt u stap b t m k om de certificatiesleutel op te halen Opmerking Meer bijzonderheden over verbeterde functies vindt u in de Bedieningshandleiding Deze kunt u op de schijf bekijken door op de map manual te klikken en de taal van uw voorkeur te selecteren U kunt de Bedieningshandleiding o...

Страница 43: ...41 ITALIANO SOMMARIO Accessori 42 Contenuto del CD ROM 42 Panoramica sull installazione 42 Requisiti del computer 43 Procedura d installazione 43 ...

Страница 44: ...il KIT II sulla macchina da cucire Nella sezione delle procedure indica le operazioni eseguite con la macchina da cucire mentre indica le operazioni eseguite con il computer Passaggio 1 Annotare il numero di identificazione interno della macchina No Passaggio 2 Inserire il CD ROM nell unità CD ROM del computer e avviare la Procedura guidata per il rilascio del codice di autenticazione Passaggio 3 ...

Страница 45: ...ine nella schermata Impostazioni varia a seconda della versione b Inserire il CD ROM nell unità CD ROM del computer Computer PC IBM o computer compatibile Sistema operativo Windows XP Windows Vista e Windows 7 Unità CD ROM Necessaria per l installazione Varie Disponibilità di una connessione Internet e di una porta USB libera necessarie per l aggiornamento della macchina da cucire quando si utiliz...

Страница 46: ...to sarà visualizzata la finestra seguente Fare clic su Avanti Se il file più recente è presente sul Web selezionare il proprio modello e fare clic su Download quindi salvare il programma di aggiornamento upf sul computer Fare clic su Avanti Promemoria È possibile utilizzare la seguente procedura per avviare la Procedura guidata per il rilascio del codice di autenticazione 1 Fare clic su Start 2 Fa...

Страница 47: ...passaggio a e fare clic su Avanti Se viene visualizzato il seguente messaggio di errore Controllare di aver inserito solo numeri e non simboli o caratteri diversi Per chiudere il messaggio fare clic su OK i Controllare attentamente le informazioni inserite e fare clic su Autentica Per modificare le informazioni inserite fare clic su Indietro Collegarsi al server di autenticazione per ottenere il c...

Страница 48: ...ic su Autentica Per chiudere il messaggio fare clic su OK j Annotare il codice di autenticazione di 8 cifre visualizzato k Fare clic su Fine Se il programma più recente è già stato installato nella macchina Saltare i passaggi da l a q e iniziare la procedura dal passaggio r l Accendere la macchina da cucire premendo il pulsante Infilatura automatica Utilizzare un supporto USB o un computer per ins...

Страница 49: ...p Premere q Rimuovere il supporto USB Continuare con il passaggio r a pagina 49 Nota I dati dell applicazione di aggiornamento sono contenuti nella cartella NV6000D USA NV6000D CAN o NV1 Selezionare la cartella relativa al modello in uso Copiare solo l Applicazione di aggiornamento per il KIT II al supporto USB sul supporto non deve trovarsi nessun altro file Nota Quando viene visualizzato il mess...

Страница 50: ...rogramma più recente al passaggio f copiare il file upf dal computer p Premere Nota I dati dell applicazione di aggiornamento sono contenuti nella cartella NV6000D USA NV6000D CAN o NV1 Selezionare la cartella relativa al modello in uso Sarà visualizzato il messaggio Connesso al PC Non disconnettere il cavo USB sul display LCD della macchina da cucire Nota Quando viene visualizzato il messaggio Ag...

Страница 51: ...re e riaccendere la macchina da cucire s Visualizzare pag 5 della schermata Impostazioni t Premere nella schermata Impostazioni u Premere nella seguente schermata v Digitare il codice di autenticazione di 8 cifre annotato al passaggio j e premere ...

Страница 52: ...assaggi da b a k per ottenere il codice di autenticazione In caso di smarrimento del codice di autenticazione ripetere i passaggi da b a k per ottenere il codice di autenticazione Nota Per maggiori informazioni sulle funzioni aggiornate fare riferimento al Manuale d istruzioni visualizzabile dal dischetto facendo clic sulla cartella manual e selezionando la lingua desiderata Il Manuale d istruzion...

Страница 53: ...51 ESPAÑOL CONTENIDO Accesorios 52 Contenido del CD ROM 52 Introducción a la instalación 52 Requisitos del ordenador 53 Procedimiento de instalación 53 ...

Страница 54: ...ivar la aplicación de actualización para el KIT II en la máquina de coser En la sección de procedimientos indica las operaciones realizadas con la máquina de coser e indica las operaciones realizadas con el ordenador Paso 1 Anote el número de identificación interna de la máquina No Paso 2 Inserte el CD ROM en la unidad de CD ROM del ordenador y a continuación inicie el Asistente para la emisión de...

Страница 55: ...tes El número de páginas de la pantalla Ajustes puede variar según la versión b Inserte el CD ROM en la unidad de CD ROM del ordenador Ordenador PC IBM u ordenador compatible Sistema operativo Windows XP Windows Vista y Windows 7 Unidad de CD ROM Se necesita para la instalación Otros Conexión a Internet disponible y un puerto USB libre necesario para actualizar la máquina de coser cuando utilice u...

Страница 56: ...ón aparece la siguiente ventana Haga clic en Siguiente Si el archivo de actualización más reciente se encuentra en la web seleccione su modelo haga clic en Descargar y guarde el programa de actualización upf en su ordenador Haga clic en Siguiente Recuerde El procedimiento siguiente se puede utilizar para iniciar el Asistente para la emisión de claves de certificaciones 1 Haga clic en Inicio 2 Haga...

Страница 57: ...aga clic en Siguiente Si aparece el siguiente mensaje de error Compruebe que no haya introducido símbolos o caracteres que no sean números Para cerrar el mensaje haga clic en Aceptar i Compruebe atentamente que haya introducido la información correcta y luego haga clic en Certificar Para cambiar la información introducida haga clic en Atrás Conecte con el servidor de certificaciones y a continuaci...

Страница 58: ...ontinuación haga clic de nuevo en Certificar Para cerrar el mensaje haga clic en Aceptar j Anote la Clave de Certificaciones de 8 dígitos que aparece k Haga clic en Finalizar Si ya ha instalado la última versión del programa en la máquina Omita los pasos l a q e inicie el procedimiento desde el paso r l Active la máquina de coser mientras pulsa el botón de Enhebrado automático Utilice un dispositi...

Страница 59: ...el lado derecho de la máquina p Pulse q Extraiga el dispositivo USB Siga con el paso r de la página 59 Nota Los datos de la aplicación de actualización se encuentran en la carpeta NV6000D USA NV6000D CAN o NV1 Seleccione la carpeta correspondiente a su modelo Copie solo la Aplicación de actualización para KIT II en el dispositivo USB este no debe contener ningún otro archivo Nota Cuando aparece el...

Страница 60: ...rsión del programa en el paso f copie el archivo upf desde el ordenador p Pulse Nota Los datos de la aplicación de actualización se encuentran en la carpeta NV6000D USA NV6000D CAN o NV1 Seleccione la carpeta correspondiente a su modelo Aparece en la pantalla LCD de la máquina de coser el mensaje Conectado al PC No desconecte el cable USB Nota Cuando aparece el mensaje Actualización terminada la i...

Страница 61: ...quina de coser y a continuación actívela de nuevo s Visualice la página 5 de la pantalla Ajustes t Pulse en la pantalla Ajustes u Pulse en la pantalla siguiente v Escriba la Clave de Certificaciones de 8 dígitos anotada en el paso j y a continuación pulse ...

Страница 62: ...uego repita los pasos del b al k para obtener la Clave de Certificaciones Si se ha perdido la Clave de Certificación repita los pasos del b al k para obtenerla Nota Para obtener más información acerca de las funciones actualizadas consulte el Manual de instrucciones desde el disco haciendo clic en la carpeta manual y seleccionando el idioma deseado También puede consultar el Manual de instruccione...

Страница 63: ...61 РУССКИЙ СОДЕРЖАНИЕ Стандартные 62 Содержимое компакт диска 62 Общий обзор установки 62 Требования к компьютеру 63 Процедура установки 63 ...

Страница 64: ...ек чтобы активировать программу обновления для Комплекта II на швейной машине В описании операций значком обозначены действия выполняемые на швейной машине а значком действия выполняемые на компьютере Шаг 1 Запишите внутренний идентификационный номер машины No Шаг 2 Вставьте компакт диск в дисковод для компакт дисков компьютера и запустите программу Certification Key Issuing Wizard Мастер создания...

Страница 65: ...экрана настройки могут различаться в зависимости от версии b Вставьте прилагаемый компакт диск в дисковод компакт дисков компьютера Компьютер Компьютер IBM PC или совместимый Операционная система Windows XP Windows Vista и Windows 7 Дисковод для компакт дисков Требуется для установки Прочее Действующее подключение к Интернету и один свободный USB порт требуется для обновления швейной машины в случ...

Страница 66: ...соответствует последнему обновлению появляется следующее диалоговое окно Нажмите кнопку Next Далее Если файл последнего обновления доступен для загрузки через Интернет выберите свою модель и нажмите кнопку Download Загрузка и сохраните программу обновления upf на компьютере Нажмите кнопку Next Далее Напоминание Программу Certification Key Issuing Wizard Мастер создания ключей сертификации можно за...

Страница 67: ... нажмите кнопку Next Далее Если появляется следующее сообщение об ошибке Проверьте что не вводились никакие другие символы кроме цифр Чтобы закрыть сообщение об ошибке нажмите кнопку OK i Внимательно проверьте что информация введена правильно и нажмите кнопку Certify Сертификация Чтобы изменить введенную информацию нажмите кнопку Back Назад Подключитесь к серверу сертификации и получите ключ серти...

Страница 68: ...ючение к Интернету и снова нажмите кнопку Certify Сертификация Чтобы закрыть сообщение об ошибке нажмите кнопку OK j Запишите отображаемый 8 значный ключ сертификации k Нажмите кнопку Finish Готово Если на машине уже установлена последняя версия программы Пропустите пункты с l до q и затем начните операцию с пункта r l Удерживая нажатой кнопку Автоматическая заправка нити включите швейную машину Д...

Страница 69: ... машины p Нажмите кнопку q Отсоедините USB носитель Перейдите к пункту r на с 69 Примечание Файлы с данными программы обновления содержатся в папке NV6000D USA NV6000D CAN или NV1 Выберите папку соответствующую вашей модели Скопируйте на USB носитель только программу обновления для Комплекта II на носителе не должно быть никаких других файлов Примечание Когда появится сообщение Обновление закончен...

Страница 70: ...ункте f вы загрузили последнюю версию программы скопируйте файл upf с компьютера p Нажмите кнопку Примечание Файлы с данными программы обновления содержатся в папке NV6000D USA NV6000D CAN или NV1 Выберите папку соответствующую вашей модели На ЖК дисплее швейной машины появляется сообщение Подсоединено к PC Не отсоединяйте USB кабель Примечание Когда появится сообщение Обновление закончено установ...

Страница 71: ...B r Выключите и снова включите швейную машину s Откройте страницу 5 экрана настройки t Нажмите кнопку на экране настройки u Нажмите кнопку на следующем экране v Введите 8 значный ключ сертификации записанный в пункте j и нажмите кнопку ...

Страница 72: ...ана в пункте t и затем повторите пункты с b по k чтобы получить ключ сертификации Если ключ сертификации потерян повторите пункты с b по k чтобы снова получить ключ сертификации Примечание Подробное описание обновленных функций см в руководстве пользователя которое можно просмотреть с компакт диска щелкнув папку manual и выбрав нужный язык Руководство пользователя или Руководство пользователя прог...

Страница 73: ......

Страница 74: ......

Страница 75: ......

Страница 76: ...English German French Dutch Italian Spanish Russian 111 001 XF0109 001 Printed in Taiwan ...

Отзывы: