background image

3-51

Confidential

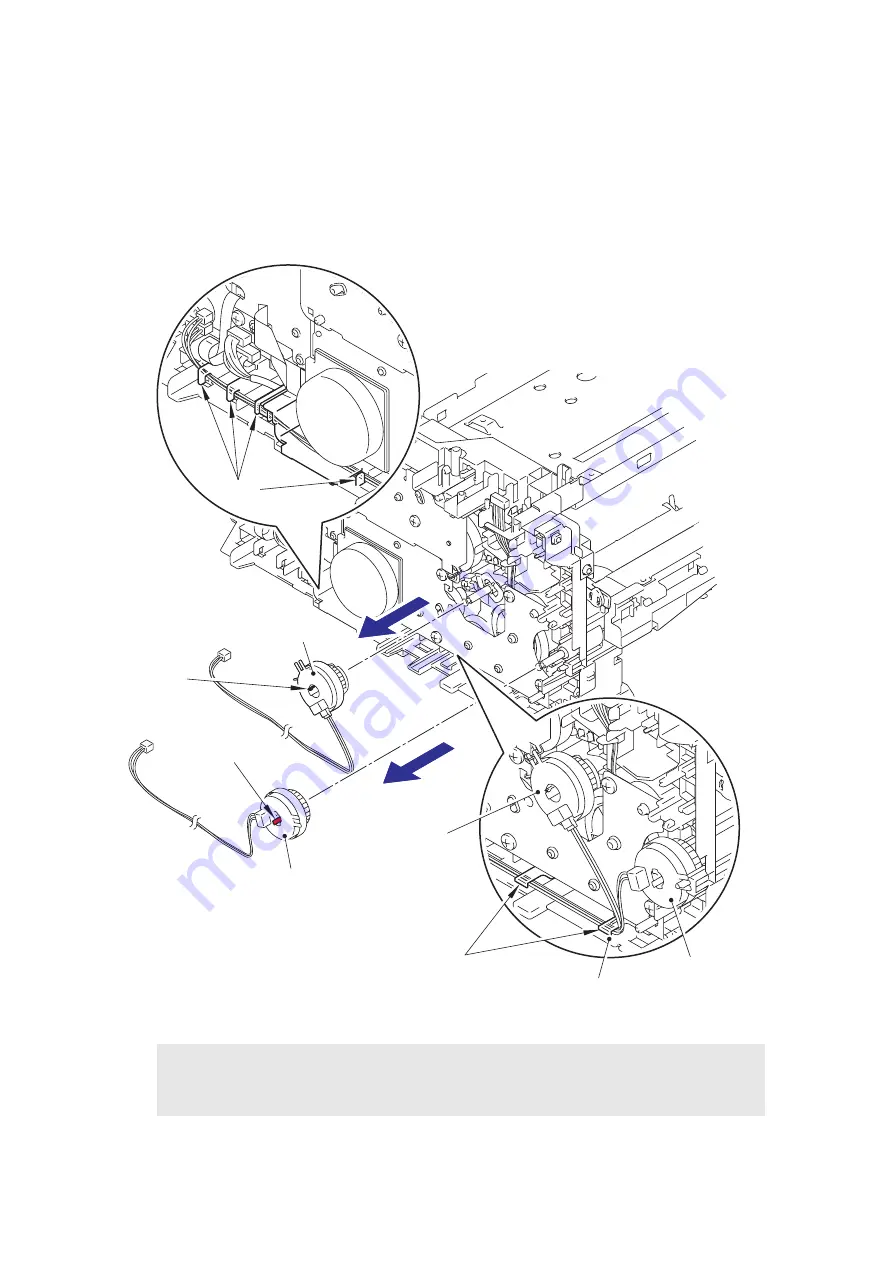
9.21 T1 Clutch ASSY, REG Clutch ASSY

(1) Remove the Harness of the T1 clutch ASSY and the REG clutch ASSY from the Guides 

of the Main frame L ASSY.

(2) Release the Hook to remove the T1 clutch ASSY.

(3) Release the Hook to remove the REG clutch ASSY.

Fig. 3-50

Assembling Note: 

• When wiring the Harnesses of the T1 clutch ASSY and the REG clutch ASSY to the 

Guides of the Main frame L ASSY, check that there is no slack in the Harnesses.

Guides

REG clutch ASSY

T1 clutch ASSY

T1 clutch ASSY

REG clutch ASSY

Guides

Hook

Hook

Main frame L ASSY

Содержание HL HL-2230

Страница 1: ...ter SERVICE MANUAL MODEL HL 2130 2220 2230 2240 2240D 2250DN 2270DW Read this manual thoroughly before maintenance work Keep this manual in a convenient place for quick and easy reference at all times September 2010 SM PRN079 84UC0 1 ...

Страница 2: ...subject to change without notice Brother reserves the right to make changes without notice in the specifications and materials contained herein and shall not be responsible for any damages including consequential caused by reliance on the materials presented including but not limited to typographical and other errors relating to the publication This product is designed for use in a professional en...

Страница 3: ...2 4 2 1 Cross section Drawing 2 4 2 2 Paper Feeding 2 5 2 3 Operation of each part 2 6 2 4 Block Diagram 2 7 2 5 Components 2 8 3 LED ERROR INDICATION AND FAILURES 2 9 3 1 LED indication at Operator Calls 2 9 3 2 LED indication at Service Calls 2 12 3 3 Error messages in the Status Monitor 2 17 3 4 Error indication at Service Calls 2 18 3 5 Image Defect Examples 2 20 4 ERROR SYMPTOM ERROR CAUSE AN...

Страница 4: ...n a light background 2 34 4 2 11 Black horizontal stripes 2 35 4 2 12 White vertical streaks 2 36 4 2 13 White horizontal streaks 2 36 4 2 14 Faint print 2 36 4 2 15 White spots 2 37 4 2 16 Black spots 2 37 4 2 17 Black band 2 38 4 2 18 Downward fogging of solid black 2 38 4 2 19 Horizontal lines 2 38 4 2 20 Ghost 2 39 4 2 21 Fogging 2 39 4 3 Software Setting Problems 2 40 4 3 1 Cannot print data ...

Страница 5: ...open 2 47 CHAPTER 3 DISASSEMBLY AND ASSEMBLY 3 1 1 SAFETY PRECAUTIONS 3 1 2 PACKING 3 2 3 SCREW CATALOGUE 3 3 4 SCREW TORQUE LIST 3 4 5 LUBRICATION 3 5 6 OVERVIEW OF GEARS 3 6 7 HARNESS ROUTING 3 9 8 DISASSEMBLY FLOW 3 17 9 DISASSEMBLY PROCEDURE 3 18 9 1 Paper Tray 3 19 9 2 Back Cover 3 22 9 3 Outer Chute ASSY 3 24 9 4 Fuser Cover 3 25 9 5 Inner Chute ASSY Eject Pinch Roller R ASSY and Eject Pinch...

Страница 6: ... 4 5 2 1 Inputting the adjusted value of the laser unit 4 5 3 IF THE IRREGULAR POWER SUPPLY DETECTION ERROR IS DETECTED AND THE LOW VOLTAGE POWER SUPPLY PCB ASSY IS REPLACED 4 6 3 1 Reset of Irregular Power Supply Detection Counter 4 6 3 1 1 Reset of irregular power supply detection counter using the PJL file 4 6 3 1 2 Reset of irregular power supply detection counter using the maintenance tool 4 ...

Страница 7: ...T DIAGRAMS WIRING DIAGRAM 6 1 CHAPTER 7 PERIODICAL MAINTENANCE 7 1 1 PERIODICAL PEPLACEMENT PARTS 7 1 APPENDIX 1 SERIAL NUMBERING SYSTEM App 1 1 APPENDIX 2 DELETION OF USER SETTING INFORMATION App 2 1 APPENDIX 3 INSTALLING THE MAINTENANCE PRINTER DRIVER App 3 1 APPENDIX 4 HOW TO MAKE PROTECTIVE MATERIAL OF DRUM UNIT App 4 1 ...

Страница 8: ...t open the laser unit under any circumstances Caution Use of controls or adjustments or performance of procedures other than those specified in this manual may result in hazardous radiation exposure For Finland and Sweden LUOKAN 1 LASERLAITE KLASS 1 LASER APPARAT Varoitus Laitteen käyttäminen muulla kuin tässä käyttöohjeessa mainitulla tavalla saattaa altistaa käyttäjän turvallisuusluokan 1 ylittä...

Страница 9: ...EC and EN50419 European Union only This equipment is marked with the recycling symbol below It means that at the end of the life of the equipment you must dispose of it separately at an appropriate collection point and not place it in the normal domestic unsorted waste stream This will benefit the environment for all European Union only ...

Страница 10: ... a residential installation This equipment generates uses and can radiate radio frequency energy and if not installed and used in accordance with the instructions may cause harmful interference to radio communications However there is no guarantee that interference will not occur in a particular installation If this equipment does cause harmful interference to radio or television reception which c...

Страница 11: ...al covers the laser beam cannot escape from the printer during any phase of user operation FDA Regulations 110 to 120 volt model only The U S Food and Drug Administration FDA has implemented regulations for laser products manufactured on and after August 2 1976 Compliance is mandatory for products marketed in the United States The following label on the back of the printer indicates compliance wit...

Страница 12: ...ACHTUNG Im Falle von Störungen der Lasereinheit muß diese ersetzt werden Das Gehäuse der Lasereinheit darf nicht geöffnet werden da sonst Laserstrahlen austreten können Additional Information When servicing the optical system of the printer be careful not to place a screwdriver or other reflective object in the path of the laser beam Be sure to take off any personal accessories such as watches and...

Страница 13: ...onal injury Electrical Hazard icons alert you to a possible electrical shock Hot Surface icons warn you not to touch printer parts that are hot Cautions specify procedures you must follow or avoid to prevent possible damage to the printer or other objects Note Notes tell you useful tips when servicing the printer Memo Memo tells you bits of knowledge to help understand the printer ...

Страница 14: ...printer or replace parts make sure that you have turned off the power switch and unplugged the printer from the AC power outlet DO NOT handle the plug with wet hands Doing this might cause an electrical shock The fuser unit becomes extremely hot during operation Wait until it has cooled down sufficiently before replacing consumable items DO NOT remove or damage the caution label located on or arou...

Страница 15: ...such as alcohol benzine thinner or any type of spray to clean the inside or outside of the printer Doing this may cause a fire or electrical shock If the printer becomes hot blows smoke or generates obscure odor immediately turn off the power switch and unplug the printer from the AC power outlet If metal objects water or other liquids get inside the printer immediately turn off the power switch a...

Страница 16: ...than 17 secs Less than 16 5 secs CPU ARM9 200MHz Memory 8 MB Interface USB Hi Speed 2 0 Power Consumption Printing Average Approx 400 W Average Approx 495 W Ready Average Approx 80 W Average Approx 65 W Sleep WLAN On N A Deep Sleep Average Approx 1 W Average Approx 0 9 W Noise level Sound pressure Printing LpAm 53 dB A Ready LpAm 31 dB A Sound power Printing LWAd 6 6 B A LWAd 6 7 B A Ready LWAd 4 ...

Страница 17: ...ce USB Hi Speed 2 0 USB Hi Speed 2 0 10 100 BASE TX USB Hi Speed 2 0 10 100 BASE TX IEEE 802 11b g InfrastructureMode Adhoc Mode Power Consumption Printing Average Approx 495 W Ready Average Approx 65 W Sleep WLAN On N A Average Approx 2 8 W Deep Sleep Average Approx 0 9 W Noise level Sound pressure Printing LpAm 53 dB A Ready LpAm 31 dB A Sound power Printing LWAd 6 7 B A Ready LWAd 4 6 B A Tempe...

Страница 18: ...a Intel Pentium 4 or equivalent 64 bit Intel 64 or AMD 64 supported CPU 512 MB 1 GB Windows 7 Intel Pentium 4 or equivalent 64 bit Intel 64 or AMD 64 supported CPU 1 GB 32 bit 2 GB 64 bit 1 GB 32 bit 2 GB 64 bit Windows Server 2003 Intel Pentium III or equivalent 256 MB 512 MB Windows Server 2003 x64 Edition 64 bit Intel 64 or AMD 64 supported CPU Windows Server 2008 Intel Pentium 4 or equivalent ...

Страница 19: ...ireless network Network node type N A Network type N A Network security N A Model HL 2240D HL 2250DN HL 2270DW Wired network Network node type N A NC 8200h Network type N A 10 100BASE TX Wireless network Network node type N A NC 7800w Network type N A IEEE 802 11b g Infrastructure Mode Adhoc Mode Network security N A WEP 64 128 bit WPA PSK TKIP AES WPA2 PSK AES APOP POP before SMTP SMTP AUTH ...

Страница 20: ...e and humidity MTBF 4 000 hours MTTR 0 5 hours Maximum monthly volume Up to 8 000 pages Up to 10 000 pages Parts life Fusing Unit 50 000 pages Laser Unit PF kit Model HL 2240D HL 2250DN HL 2270DW Printer life 50 000 pages A4 LTR or 5 years in accordance with ISO IEC 19752 under normal use at normal temperature and humidity MTBF 4 000 hours MTTR 0 5 hours Maximum monthly volume Up to 10 000 pages P...

Страница 21: ...nths after opening Approx 1 200 pages in accordance with ISO IEC 19752 Shelf life 2 years 6 months after opening High Capacity Toner N A Approx 2 600 pages in accordance with ISO IEC 19752 Shelf life 2 years 6 months after opening Drum unit Approx 12 000 pages 1 page job Shelf life 2 years Model HL 2240D HL 2250DN HL 2270DW Toner cartridge Starter Toner Approx 700 pages in accordance with ISO IEC ...

Страница 22: ... Slot 60 163 g m2 16 43 lb Duplex printing N A Media size Paper tray A4 Letter B5 ISO JIS A5 A5 Long Edge B6 ISO A6 Executive Legal Folio North America Asia Oceania 16K China Manual Feed Slot Width 76 2 to 216 mm Length 116 to 406 4 mm Width 3 0 to 8 5 Length 4 6 to 16 Duplex printing N A Model HL 2240D HL 2250DN HL 2270DW Media type Paper tray Plain Paper Thin Paper Recycled Paper Manual Feed Slo...

Страница 23: ...n 4 23 mm 0 16 in 4 23 mm 0 16 in 4 23 mm 0 16 in 4 23 mm 0 16 in 4 6 01 mm 0 24 in 6 35 mm 0 25 in 6 35 mm 0 25 in 6 01 mm 0 24 in 6 35 mm 0 25 in 6 01 mm 0 24 in 6 01 mm 0 24 in 6 01 mm 0 24 in A4 Letter Legal B5 ISO Executive A5 A6 B6 ISO 1 4 23 mm 0 16 in 4 23 mm 0 16 in 4 23 mm 0 16 in 4 23 mm 0 16 in 4 23 mm 0 16 in 4 23 mm 0 16 in 4 23 mm 0 16 in 4 23 mm 0 16 in 2 5 0 mm 0 19 in 5 08 mm 0 2...

Страница 24: ...to receive an electric shock 2 When connecting or disconnecting cable connectors make sure that you hold the connector body and not the cables 3 Static electricity charged in your body may damage electronic parts Before handling the PCBs touch a metal portion of the printer to discharge static electricity charged in your body When transporting PCBs be sure to wrap them in conductive sheets When re...

Страница 25: ...he printer is not exposed to direct sunlight excessive heat moisture or dust 4 Keep the printer horizontal when you carry it Power Supply 1 The AC input power supply described on the rating plate of the printer should be within 10 of the rated voltage 2 The AC input power supply is within the regulated value 3 The cables and harnesses are connected correctly 4 The fuses are not blown Paper 1 A rec...

Страница 26: ...s If condensation has occurred leave the printer for at least two hours to allow it to reach room temperature If the drum unit is unpacked soon after it is moved from a cold place to a warm room condensation may occur inside the unit which may cause incorrect images Instruct the user to allow the unit to come to room temperature before unpacking it This will take one or two hours 2 Low temperature...

Страница 27: ... unit Manual paper tray cover Regist roller Registration front actuator Registration rear actuator Paper edge actuator Paper tray Separation pad Separation roller Pick up roller DX feed roller DX feed roller Duplex Tray Transfer roller Plate Halogen heater Pressure roller Back cover Front side Back side Eject actuator Eject roller 1 Heat roller ...

Страница 28: ...2 5 Confidential 2 2 Paper Feeding Fig 2 2 Rear paper eject path Manual feed slot path Paper tray path Duplex path ...

Страница 29: ... on a sheet of paper When the duplex printing detect the rear edge of paper and adjust the timing of eject roller 2 switching Transfer roller By applying a minus charge to the transfer roller the toner adhered to the exposure drum is transferred to paper and feed the paper to the fuser unit Heat roller and Pressure roller The toner transferred on paper being fused by heat and pressure and feed the...

Страница 30: ...Ready LED Go Key T1 clutch ASSY REG clutch ASSY Main motor Fuser Unit Center thermistor Side thermistor Low voltage power supply PCB Heater Switch Paper Edge Sensor PCB HL 2250DN 2270DW only Paper Edge Sensor New toner sensor Polygon motor Laser unit Fuser FAN Back cover DX High voltage power supply PCB Front cover sensor Paper eject sensor PCB Paper eject sensor LD control PCB ASSY BD sensor ...

Страница 31: ...age power supply PCB ASSY Fuser gear 28 34 Develop drive sub ASSY Fuser unit Develop joint Develop gear joint 52 Rubber foot Fan motor 60 ASSY Hight voltage power supply PCB ASSY Wireless LAN PCB ASSY Pick up roller holder ASSY Paper tray Front cover ASSY Duplex tray Side cover L Side cover R Inner chute ASSY Fuser cover Support flap 2 SW key REG clutch ASSY T1 clutch ASSY Conductive bushing 5 ...

Страница 32: ...r LED is ON or blinking to indicate it the printer automatically recovers from most errors But some of errors are necessary to reset the printer by holding down the Go button LED indication of the following table is that LED is OFF LED is ON and LED is blinking LED Type of error Refer to JOB CANCELING TONER LOW 4 5 3 REPLACE TONER 4 5 4 CARTRIDGE ERROR 4 5 2 NO TONER 4 5 6 Turn on alternately for ...

Страница 33: ...9 5 JAM TRAY1 JAM INSIDE 4 1 5 JAM REAR 4 1 5 JAM DUPLEX 4 1 5 MEMORY FULL 4 8 2 PRINT OVERRUN 4 8 3 SIZE ERROR DX 4 1 13 DUPLEX DISABLED 4 1 11 NO PAPER T1 4 1 2 MANUAL FEED 4 1 3 LED Type of error Refer to Drum LED On for 2 seconds Off for 3 seconds Error LED On for 0 5 seconds Off for 0 5 seconds ...

Страница 34: ...2 11 Confidential TONER ENDED 4 5 5 DRUM ERROR 4 5 8 DRUM STOP 4 5 9 LED Type of error Refer to Drum LED and Error LED On for 0 5 seconds Off for 0 5 seconds ...

Страница 35: ...n entering this state instruct the end user to turn off the power switch once and wait a few seconds Then turn on the power switch again However if the error is not cleared and the service call is appeared see the reference page to take the corrective action LED Pressing one time of the Go button Pressing two times of the Go button Type of error Refer to Fuser unit failure 4 6 1 All LEDs On for 0 ...

Страница 36: ...3 Confidential Fuser unit failure 4 6 1 LED Pressing one time of the Go button Pressing two times of the Go button Type of error Refer to All LEDs On for 0 5 seconds Off for 0 5 seconds Fuser Unit Failure ...

Страница 37: ...4 7 1 Polygon motor failure 4 7 1 Main PCB failure 4 8 1 LED Pressing one time of the Go button Pressing two times of the Go button Type of error Refer to All LEDs On for 0 5 seconds Off for 0 5 seconds Laser Unit Failure Main PCB Failure ...

Страница 38: ... 15 Confidential Main PCB failure 4 8 1 LED Pressing one time of the Go button Pressing two times of the Go button Type of error Refer to All LEDs On for 0 5 seconds Off for 0 5 seconds Main PCB Failure ...

Страница 39: ... Fan motor 60 ASSY failure or Harness connection failure of T1 clutch ASSY 4 9 2 Irregular power supply detection error 4 8 5 LED Pressing one time of the Go button Pressing two times of the Go button Type of error Refer to All LEDs On for 0 5 seconds Off for 0 5 seconds High Voltage Failure ...

Страница 40: ...ssage Refer to CANNOT DETECT TONER 4 5 2 DRUM END SOON 4 5 7 DRUM ERROR 4 5 8 DRUM STOP 4 5 9 DUPLEX DISABLED 4 1 11 FRONT COVER OPEN 4 9 4 FUSER COVER OPEN 4 9 5 FUSER ERROR 4 6 1 JAM TRAY1 JAM INSIDE JAM REAR JAM DUPLEX 4 1 5 MANUAL FEED 4 1 3 MEMORY FULL 4 8 2 NO PAPER T1 4 1 2 NO TONER 4 5 6 PRINT OVERRUN 4 8 3 REPLACE DRUM 4 5 9 REPLACE TONER 4 5 4 Service call error SIZE ERROR DX 4 1 13 TONE...

Страница 41: ...7 ERROR S08 ERROR S08 ERROR S09 ERROR S09 ERROR S10 ERROR S10 ERROR S11 ERROR S11 ERROR S12 ERROR S12 ERROR S13 ERROR S13 ERROR E49 FUSER MALF 2 Fuser unit failure 4 6 1 ERROR E50 FUSER MALF FUSER ERROR FUSER ERROR ERROR E51 LASER BD MALF Laser unit failure Laser beam detection error 4 7 1 ERROR E52 SCANNER MALF Laser unit failure Scanner motor failure 4 7 1 ERROR E54 MOTOR MALF Main motor failure...

Страница 42: ...ff 3 Press the Go button for over 2 seconds and the Error LED light up And then the printer goes into the PIT3 mode 4 Connect the printer to PC with USB cable 5 Start the Maintenance tool in the PC 6 Select the Get Information from Menu of the Maintenance tool 7 Select the applicable model name 8 Check the port USB that the printer is connected through 9 Click the Ok button 10 Appear the Printer I...

Страница 43: ...ck spots 4 2 18 Downward fogging of solid black 4 2 19 Horizontal lines 4 2 20 Ghost 4 2 21 Fogging 4 2 17 Black band 4 2 15 White spots 4 2 13 White horizontal streaks 4 2 9 Vertical streaks 4 2 10 Black vertical streaks in a light background 4 2 11 Black horizontal stripes 4 2 5 Completely blank 4 2 6 Image distortion 4 2 7 All black 4 2 2 Faulty registration 4 2 3 Dark ...

Страница 44: ...f the paper is loaded into the paper tray correctly Then press the Go button Adjust the paper guide corresponding to the position of paper guide Check if too much paper is loaded in the tray Clean the surface of the separation pad or pick up roller Step Cause Remedy 1 Lift arm and pick up roller holder ASSY not assembled correctly Re assemble the lift arm and pick up roller holder ASSY 2 Harness c...

Страница 45: ... it 2 Low voltage power supply PCB ASSY failure Replace the low voltage power supply PCB ASSY 3 Main PCB failure Replace the main PCB ASSY 4 Registration front rear sensor failure Check the sensor performance following the procedure in Operational Check of Sensors Chapter 5 If any problem occurs replace the regist frame ASSY User Check Check if the paper is loaded into the paper tray correctly Che...

Страница 46: ...me position Correct catching of the paper edge actuator or registration front actuator 2 Harness connection failure of registration front rear sensor PCB ASSY Check the harness connection of the registration front rear sensor PCB ASSY and reconnect it 3 Paper feeding kit worn out Replace the paper feeding kit 4 Low voltage power supply PCB ASSY failure Replace the low voltage power supply PCB ASSY...

Страница 47: ...nnection of the registration front rear sensor PCB ASSY or paper eject sensor PCB ASSY and reconnect it 4 REG clutch ASSY failure Replace the REG clutch ASSY 5 Paper eject sensor PCB ASSY failure Check the sensor performance following the procedure in Operational Check of Sensors Chapter 5 If any problem occurs replace the paper eject sensor PCB ASSY 6 Low voltage power supply PCB ASSY failure Rep...

Страница 48: ... frame L ASSY User Check Check if the paper is loaded into the paper tray correctly Replace the toner cartridge with a new one Step Cause Remedy 1 Fuser unit dirty Clean the entrance of the fuser unit or clean the pressure roller User Check Check if the paper is loaded into the paper tray correctly Adjust the paper guide corresponding to the paper size Check if too much paper is loaded in the tray...

Страница 49: ...regular thickness is loaded Turn over the stack of paper in the paper tray or try rotating the paper 180 in the paper tray Turn the green envelope levers to the direction of the black arrow Refer to Fig 2 6 Step Cause Remedy 1 Foreign object inside fuser unit Remove the foreign object inside of the eject roller 2 Fuser unit failure Replace the fuser unit ...

Страница 50: ...Fig 2 7 User Check Choose Reduce Paper Curl mode in the driver Turn the anti curl levers to the direction of the black arrow Refer to Fig 2 7 Lift up the support flap2 and then print Step Cause Remedy 1 Fuser unit failure Replace the fuser unit ...

Страница 51: ... connection of the paper eject sensor PCB ASSY and reconnect it 2 Duplex tray failure Replace the duplex tray 3 Back cover sensor failure Replace the paper eject sensor PCB ASSY 4 Main PCB failure Replace the main PCB ASSY 5 DX gears damaged Replace the main frame L ASSY User Check Load the specified paper size into the tray Step Cause Remedy 1 Registration front actuator catching on some position...

Страница 52: ...e mode may be on Off the toner save mode Adjust the density by the Density Adjustment Replace the drum unit with a new one Replace the toner cartridge with a new one If remove the used toner cartridge and replace a relatively new used toner cartridge this case is caused Step Cause Remedy 1 Dirt on electrodes of the drum unit and printer body Clean the electrodes of the drum unit and printer body R...

Страница 53: ... the printer Fig 2 9 How to clean the electrodes Turn off the power switch Unplug the printer from the AC power outlet and leave the printer for a few minutes Then wipe the electrodes above carefully with a dry lint free cloth Be careful not to change the shapes of the electrodes Side surface of Drum unit ...

Страница 54: ...gh humidity or low temperature and low humidity conditions can cause this problem Adjust the density by the Density Adjustment Clean the corona wire of drum unit Replace the drum unit with a new one Replace the toner cartridge with a new one If remove the used toner cartridge and replace a relatively new used toner cartridge this case is caused Step Cause Remedy 1 Dirt on the electrodes of the dru...

Страница 55: ...Main PCB failure Replace the main PCB ASSY User Check Check the printer s environment High temperature and high humidity or low temperature and low humidity conditions can cause this problem Clean the corona wire of drum unit Replace the drum unit with a new one Replace the toner cartridge with a new one Remove the elastic band from the drum unit Step Cause Remedy 1 Dirt on the electrodes of the d...

Страница 56: ...t and printer body Refer to Fig 2 8 Fig 2 9 2 Scanner harness of the laser unit connection failure Reconnect the scanner harness of the laser unit 3 FG plate connection failure Reconnect the FG plate between the laser unit and develop drive sub ASSY securely and secure the screw 4 High voltage power supply PCB ASSY failure Replace the high voltage power supply PCB ASSY 5 Main PCB failure Replace t...

Страница 57: ...lean the corona wire If the same problem occurs after printing a few pages the adhesive of the label or the like paper powder or dirt may be attached on the surface of the exposure drum Wipe off the dirt on the exposure drum Refer to User s guide and perform the Drum Cleaning Replace the drum unit with a new one Replace the toner cartridge with a new one Step Cause Remedy 1 Dirt in the paper feed ...

Страница 58: ...ripes at 32 5 mm This problem will disappear by printing approximate 10 pages If the same problem occurs replace the toner cartridge 4 Scratch and Dirt on the heat roller horizontal stripes at 53 4 mm Replace the fuser unit 5 High voltage power supply PCB ASSY failure Replace the high voltage power supply PCB ASSY 6 Main PCB failure Replace the main PCB ASSY CAUTION Image defects which appear peri...

Страница 59: ...emains ON Step Cause Remedy 1 Laser unit failure Replace the laser unit User Check This problem may disappear If print several sheets of page Print several sheets of page if the printer has not been used for a long time Replace the drum unit with a new one Replace the toner cartridge with a new one Step Cause Remedy 1 Dirt on the electrodes of the drum unit and the printer body Clean the electrode...

Страница 60: ...n PCB failure Replace the main PCB ASSY User Check When the black spots at 32 5 mm are intervals replace the toner cartridge with a new one If the same problem occurs after printing a few pages the adhesive of the label or the like paper powder or dirt may be attached on the surface of the exposure drum Wipe off the dirt on the exposure drum Refer to User s guide and perform the Drum Cleaning When...

Страница 61: ...Cause Remedy 1 High voltage power supply PCB ASSY failure Replace the high voltage power supply PCB ASSY 2 Main PCB failure Replace the main PCB ASSY User Check The paper tray ground terminal provided in the printer body may be dirty Clean the contact with a dry cloth Replace the drum unit with a new one Replace the toner cartridge with a new one Step Cause Remedy 1 Dirt on the electrodes of the d...

Страница 62: ...ace the high voltage power supply PCB ASSY 2 Main PCB failure Replace the main PCB ASSY User Check This problem may disappear after printing approximately 10 pages of completely blank sheets Replace the drum unit with a new one Replace the toner cartridge with a new one Do not use acid paper Step Cause Remedy 1 High voltage power supply PCB ASSY failure Replace the high voltage power supply PCB AS...

Страница 63: ...This Mac dialogue 3 Select the USB at the bottom of Hardware in left side Content 4 Select the HL XXXX in the USB Device Tree 5 Check the Product ID in the HL XXXX Product ID Hexadecimal HL 2130 003Fh HL 2220 0046h HL 2230 0044h HL 2240 0045h HL 2240D 0040h HL 2250DN 0041h HL 2270DW 0042h User Check Check that the USB cable or LAN cable is not damaged Check that the correct printer is selected if ...

Страница 64: ...ork user s guide Reset the printer back to its default printer settings Refer to Settings Reset in Chapter 5 Step Cause Remedy 1 Harness connection failure of wireless LAN PCB HL 2270DW only Reconnect the harness of the wireless LAN PCB 2 Wireless LAN PCB failure HL 2270DW only Replace the wireless LAN PCB ASSY 3 Main PCB failure Replace the main PCB ASSY ...

Страница 65: ...e new toner actuator 2 Harness connection failure of Panel PCB Reconnect the harness of the Panel PCB 3 Panel PCB failure Replace the panel PCB ASSY 4 Main PCB failure Replace the main PCB ASSY Step Cause Remedy 1 Power off or front cover opened while detecting a new toner cartridge Reset the developing bias voltage and develop roller counter 2 New toner actuator loose Re assemble the new toner ac...

Страница 66: ...ectrodes of the drum unit and the printer body Clean the electrodes of the drum unit and printer body Refer to Fig 2 8 Fig 2 9 2 High voltage power supply PCB ASSY failure Replace the high voltage power supply PCB ASSY 3 Main PCB failure Replace the main PCB ASSY User Check Prepare a new drum unit User Check Clean the corona wire in the drum unit Replace the drum unit with a new one and reset the ...

Страница 67: ...SSY 5 Low voltage power supply PCB ASSY failure Replace the low voltage power supply PCB ASSY 6 Main PCB failure Replace the main PCB ASSY 7 Fuser unit failure Replace the fuser unit CAUTION Turn off the power switch once and after checking that the fuser unit sufficiently cools down turn on the power switch again and leave the printer for ten minutes Then this problem may be cleared Turn the powe...

Страница 68: ... Cause Remedy 1 Main PCB failure Replace the main PCB ASSY User Check Reduce the data capacity or reduce the print resolution Step Cause Remedy 1 Main PCB failure Replace the main PCB ASSY Step Cause Remedy 1 Harness connection failure of high voltage power supply PCB ASSY Check the harness connection between the high voltage power supply PCB ASSY and main PCB and reconnect it 2 High voltage power...

Страница 69: ...rum Error LED light up by pressing the Go button once occurs when there is a large fluctuation in the power supply voltage supplied to the printer In this case if the same power supply is used the same error might occur again even if the low voltage power supply PCB ASSY is replaced User Check Replace the AC power cord Step Cause Remedy 1 Harness connection failure of panel PCB ASSY Reconnect the ...

Страница 70: ... is broken which is provided at inside of front cover Replace the front cover ASSY 3 Front cover sensor failure Check the registration front sensor and registration rear sensor performance following the procedure in Operational Check of Sensors Chapter 5 If any problem occurs replace the high voltage power supply PCB ASSY 4 Main PCB failure Replace the main PCB ASSY User Check Check if the back co...

Страница 71: ...e harness When connecting or disconnecting cable connectors hold the connector body not the cables If the connector has a lock release the connector lock first to release it After a repair check not only the repaired portion but also all connectors Also check that other related portions are functioning properly before operational checks After disconnecting flat cables check that each cable is not ...

Страница 72: ...3 2 Confidential 2 PACKING Fig 3 1 DEMO Insertion Set guide Printed bag ASSY USB IF cable Pad Pad Carton Option carton Printer AC cord ...

Страница 73: ...ind M3x4 Screw pan S P washer Taptite flat B Taptite bind B Taptite pan B Taptite cup S Screw bind B Screw pan S P washer M3x12DB Taptite pan B M4x14 Taptite cup B Screw pan S P washer M3 5x6 Taptite flat B M3x10 Taptite cup S M3x6 SR Taptite cup S M3x8 SR Taptite cup B M3x8 Taptite pan B M3x8 ...

Страница 74: ...0 1 0 45 0 05 4 5 0 5 Taptite bind B M4x12 1 0 8 0 1 8 1 High voltage power supply PCB ASSY Taptite bind B M4x12 1 0 8 0 05 8 0 5 Laser unit Taptite cup S M3x8 SR 4 0 8 0 05 8 0 5 Main PCB ASSY Taptite cup S M3x6 SR 4 0 6 0 1 6 1 Front chute ASSY Taptite bind B M4x12 2 0 8 0 1 8 1 Under bar Taptite bind B M4x12 1 0 8 0 1 8 1 Chute ground plate Taptite bind B M3x10 1 0 55 0 05 5 5 0 5 PF frame ASSY...

Страница 75: ...Confidential 5 LUBRICATION Fig 3 3 The kind of the lubricating oil Maker name Lubrication point Quantity of lubrication BG 10KS Kanto Kasei Dev gear joint 52 2mm dia ball BG2 Dev gear joint 52 BG2 4 places ...

Страница 76: ... prior notice 1 LY2584 Feeder gear 17 4 LY2046 Feeder gear idle 65 2 LY2047 Feeder gear 5 LY2045 Feeder gear 21 30 17 LY2581 Feeder gear holder 6 LY2044 Feeder gear 41 LY2582 Feeder gear spring 7 LY2043 Feeder gear 31 pendulum LY2583 Feeder holder spring 8 LY2042 Feeder gear 26 52R 3 LY2048 Feeder gear 24 27 8 7 6 5 4 3 2 1 8 7 6 5 4 3 2 1 2 1 3 5 4 6 7 8 ...

Страница 77: ... view Fig 3 7 Name of gears These parts are subject to change without prior notice 9 LY2064 Develop joint link 12 LY2063 DEV gear 33 10 LY2458 Develop joint lift cam 13 LY2062 DEV gear 21 45R 11 LU2041 Develop joint lift disk 9 11 10 12 13 9 11 10 12 13 10 11 9 12 13 ...

Страница 78: ...DX gear 16 20 15 LY2012 Ejector gear 22 21 LY2016 DX gear 19 16 LY2013 Ejector gear 40 22 LY2454 DX gear 21M1 21M0 8 17 LY2010 Fuser gear 28 34 23 LY2038 DX gear 18 pendulum 18 LY2066 Fuser gear 20 54R pendulum 24 LY2037 DX pendulum gear spring 19 LY2014 Ejector gear 29 25 LY2036 DX pendulum holder 14 15 16 17 18 19 20 21 22 23 14 15 16 17 18 19 20 21 22 23 22 23 24 25 21 20 19 17 16 15 14 18 ...

Страница 79: ...3 9 Confidential 7 HARNESS ROUTING 1 Paper edge sensor PCB ASSY HL 2250DN 2270DW only Printer top side Panel PCB ASSY Paper edge sensor harness ASSY Paper edge sensor PCB ASSY Guide ...

Страница 80: ...gistration front rear sensor PCB ASSY 3 Panel PCB ASSY Low voltage power supply PCB ASSY Guide Registration F R sensor harness ASSY Registration front rear sensor PCB ASSY Printer top side Panel PCB ASSY Main PCB ASSY Guide ...

Страница 81: ...3 11 Confidential 4 T1 Clutch ASSY REG Clutch ASSY Main PCB ASSY REG clutch ASSY T1 clutch ASSY Guide Guide Guide ...

Страница 82: ...idential 5 Paper eject sensor PCB ASSY Back cover sensor Back cover sensor harness Main eject sensor FFC harness Main PCB sheet Main shield Main frame L ASSY Main PCB ASSY Paper eject sensor PCB ASSY Guide Hooks ...

Страница 83: ...3 13 Confidential 6 Main Motor 7 Laser Unit Main PCB ASSY Main motor Main PCB ASSY Main scanner FFC Harness Laser unit Guide Hole of guide ...

Страница 84: ...s LAN PCB ASSY Wireless network model only 9 Fan motor 60 ASSY Main PCB ASSY Wireless LAN PCB ASSY Wireless PCB harness ASSY Guide Guide High voltage power supply PCB ASSY Fan motor 60 ASSY Guide Hole of guide Hole of guide Tape ...

Страница 85: ...3 15 Confidential 10 Low voltage power supply PCB ASSY Low voltage power supply PCB ASSY Right side Left side Main PCB ASSY LVPS harness ASSY Guide ...

Страница 86: ...CB ASSY 12 Fuser Unit Main HVPS FFC harness High voltage power supply PCB ASSY Main PCB ASSY Guide Guide Guide Guide Fuser unit Heater harness Center thermistor harness ASSY Side thermistor harness ASSY Main frame L ASSY Main frame R ASSY Guide Guide ...

Страница 87: ...Ring E3 9 21 FG Spring Regist 5 5 9 24 Motor Drive Sub ASSY Main Motor 40 45 9 25 Eject Sensor PCB ASSY 20 25 9 26 Ejector Gear 40 9 26 Fuser Gear 28 34 10 10 10 10 10 10 10 10 10 10 10 10 10 10 10 10 10 10 9 2 Back Cover 9 3 Outer Chute ASSY 9 4 Fuser Cover 15 10 9 5 Inner Chute ASSY 9 5 Eject Pinch Roller L R ASSY 15 20 9 10 Fuser Unit 40 50 9 15 Filter 9 9 Top Cover ASSY 9 8 Side Cover R 9 12 F...

Страница 88: ...g the AC cord the USB cable if connected the LAN cable if connected 2 Remove the Paper tray the Toner cartridge and Drum unit the Duplex tray HL 2240D 2250DN 2270DW only the LAN port cap Fig 3 11 LAN port cap Duplex tray HL 2240D 2250DN 2270DW only Toner cartridge Drum unit Paper tray AC cord USB cable LAN cable ...

Страница 89: ...3 19 Confidential 9 1 Paper Tray 1 Remove the two Taptite bind B M4x12 screws to remove the Tray cover from the Paper tray Fig 3 12 Tray cover Taptite bind B M4x12 Paper tray ...

Страница 90: ...th side Arms of the Separation pad ASSY to remove the Bosses and remove the Separation pad ASSY from the Paper tray 4 Remove the Separation pad spring from the Separation pad ASSY Fig 3 13 Separation pad ASSY Paper tray Separation pad ASSY Boss Hook Hook Arms Boss 3b 4 3a 3a Separation pad spring ...

Страница 91: ...f the Lift gear 46 while pushing up the Plate up plate and remove the Lift gear 46 Fig 3 14 6 Remove the Gear Z23M10Z14M75 and the Gear Z19M10 Fig 3 15 Hook Paper tray Plate up plate Lift gear 46 Gear Z19M10 Gear Z23M10Z14M75 Paper tray ...

Страница 92: ...lease the Boss of the Main body while pulling the Back cover to the direction of the arrow 3a and remove the Back cover Fig 3 16 Assembling Note When assembling the Back cover close the Back cover with aligning the Boss of the Outer chute ASSY with the groove of both side Ribs of the Back cover Main body Outer chute ASSY Boss main body Back cover Back cover Rib Rib Rib Boss outer chute ASSY 3b 3a ...

Страница 93: ...Back cover to the direction of the arrow 3a and remove the Back cover 4 Remove the Back cover actuator from the Back cover Fig 3 17 Assembling Note When assembling the Back cover close the Back cover with aligning the Boss of the Outer chute ASSY with the groove of both side Ribs of the Back cover 3b 3a 2 2 1 Main body Outer chute ASSY Boss main body Rear cover Hook Back cover Backcover actuator B...

Страница 94: ...Chute ASSY 1 Pull the Outer chute ASSY to the direction of the 1a and release the Boss of the Outer chute ASSY from the Main frame L ASSY and remove the Outer chute ASSY Fig 3 18 Outer chute ASSY Main frame L ASSY Boss Boss 1b 1a ...

Страница 95: ...ss of the main body while pulling the Fuser cover to the direction of the arrow 2a and remove Fuser cover Fig 3 19 Assembling Note When assembling the Fuser cover Check that only one of roller does not lift up Check the position of the Anti curl levers Refer to Fig 2 7 in Chapter 2 Fuser cover Fuser cover Knob Knob 2a ...

Страница 96: ...ws to remove the Inner chute ASSY Fig 3 20 Assembling Note When assembling the Inner chute ASSY align the Hooks of the Inner chute ASSY with the Positioning holes of the Top cover ASSY Pull up both side Green levers of the Fuser unit after assembling the Inner chute ASSY Green envelope lever L Fuser unit Fuser unit Green envelope lever R Inner chute ASSY Taptite bind B M4x12 Positioning holes Hook...

Страница 97: ...h roller R ASSY from the Inner chute ASSY 4 Remove the four Exit pinch roller springs from the Eject pinch roller L ASSY and the Eject pinch roller R ASSY Fig 3 21 Eject pinch roller R ASSY Eject pinch roller L ASSY Exit pinch roller springs Exit pinch roller springs Inner chute ASSY ...

Страница 98: ...int link from the Front cover ASSY 3 Pull up the Rib of the Front chute ASSY and remove the Front cover ASSY to the direction of the arrow 3b Fig 3 22 4 Remove the Support flap 1 from the Front cover ASSY Fig 3 23 Front cover ASSY Develop joint link Front cover ASSY Front chute ASSY Front chute ASSY Rib Hook 3c 3b 1 2 3a Support flap 1 Front cover ASSY ...

Страница 99: ...3 29 Confidential 9 7 Side Cover L 1 Release the Hooks in the order of 1a 1b and 1c and remove the Side cover L Fig 3 24 Side cover L Hooks Hook Hook Hook 1a 1c 1b ...

Страница 100: ...3 30 Confidential 9 8 Side Cover R 1 Release the Hooks in the order of 1a 1b and 1c and remove the Side cover R Fig 3 25 Side cover R Hook Hook Hook Hooks Hooks 1b 1c 1a ...

Страница 101: ...Y 1 Release the Hooks of the Top cover ASSY from A to F 2 Pull the Top cover ASSY to the direction of the arrow 2a and remove it from the Main body Fig 3 26 Main body Top cover ASSY Hook Hook F Hook B Hook C Hook D Hook E Hook A Hook 2a ...

Страница 102: ...ve the Support flap 2 from the Top cover ASSY Fig 3 27 4 Turn the Top cover ASSY upside down 5 Remove the two Paper stack levers from the Top cover ASSY Fig 3 28 Top cover ASSY Support flap 2 Paper stack levers Top cover ASSY ...

Страница 103: ...nd remove the Top cover base from the Top cover ASSY 8 Remove the SW key from the Top cover ASSY Fig 3 29 Assembling Note When assembling the Top cover ASSY and the Top cover base check that the Claws of the Top cover base is inserted into the positioning holes of the Top cover ASSY Hook SW key Hook Claw Hooks Taptite bind B M4x12 Ribs Top cover ASSY Top cover base 7a 7b Claw ...

Страница 104: ... Confidential In the case of HL 2130 6 Remove the Taptite pan B M3x8 screw and remove the SW key holder and the SW key from the Top cover ASSY Fig 3 30 SW key SW key holder Top cover ASSY Taptite pan B M3x8 ...

Страница 105: ...er supply PCB ASSY while pushing the Hook of the Connector of the Fuser unit Fig 3 31 3 Put the Connector of the Fuser unit through the Hole of the Main frame R ASSY Fig 3 32 Guide Guides Connector low voltage power supply PCB ASSY Main frame R ASSY Connector low voltage power supply PCB ASSY Connector fuser unit Connector fuser unit Hook Connector fuser unit Hole ...

Страница 106: ... sensor PCB ASSY 5 Release the harnesses of the center thermistor harness ASSY and the side thermistor harness ASSY from the Guides of the Main frame L ASSY Fig 3 33 Guide Guides Center thermistor harness ASSY Side thermistor harness ASSY Center thermistor harness ASSY Main frame L ASSY Paper eject sensor PCB ASSY Paper eject sensor PCB ASSY ...

Страница 107: ...3 37 Confidential 6 Remove the two Taptite pan B M4x14 screws to remove the Fuser unit Fig 3 34 Taptite pan B M4X14 Fuser unit ...

Страница 108: ...ve the three Taptite bind B M4x12 screws the Screw pan S P washer M3 5x6 screw and the Screw pan S P washer M3x12DB screw to remove the LV shield plate cover Fig 3 35 Assembling Note Hang the FG spring front chute on the Guide of the Main frame R ASSY Taptite bind B M4x12 FG wire under R Taptite bind B M4x12 Screw pan S P washer M3 5x6 Screw pan S P washer M3x12DB FG spring front chute LV shield p...

Страница 109: ...he Low voltage power supply PCB ASSY 7 Remove the Taptite bind B M4x12 screw 8 Release the harness of the Low voltage power supply PCB ASSY from the Guide of the Main frame R ASSY Fig 3 36 Fig 3 37 Assembling Note When assembling the Inlet attach as shown in the figure below Inlet Low voltage power supply PCB ASSY Low voltage power supply PCB ASSY Guide Power switch FG harness Taptite flat B M3x10...

Страница 110: ...tial 9 Remove the Low voltage power supply PCB ASSY and disconnect the three connectors from the rear side 10 Remove the LV insulation sheet Fig 3 38 Low voltage power supply PCB ASSY LV insulation sheet Connectors ...

Страница 111: ...60 ASSY Fig 3 39 Assembling Note When assembling the Fan motor 60 ASSY attach the Fan motor 60 ASSY after inserting the Harness into the Guides of the Main frame R ASSY When assembling the Fan motor 60 ASSY place it so that the attached label faces outwards When assembling the Fan motor 60 ASSY secure the harness to the position of figure above with the Tape Main frame R ASSY Fan motor 60 ASSY Lab...

Страница 112: ... supply PCB ASSY 2 Remove the Taptite bind B M4x12 screw 3 Release the Hooks to remove the High voltage power supply PCB ASSY Fig 3 40 Assembling Note Assemble the Front cover sensor lever after assembling the High voltage power supply PCB ASSY Guide Guide Main frame R ASSY Front cover sensor lever FFC FFC High voltage power supply PCB ASSY Hook Hooks Taptite bind B M4x12 ...

Страница 113: ... PCB ASSY from the Main PCB ASSY and remove the FFC of the Panel PCB ASSY from the Guide of the Main frame L ASSY 3 Release the Hooks to remove the Panel PCB ASSY 4 Disconnect the Connector from the bottom side of the Panel PCB ASSY Fig 3 41 FFC Main PCB ASSY Guide Connector Main frame L ASSY Panel PCB ASSY Panel PCB ASSY Hook Hook ...

Страница 114: ...ull the Rib of the Air duct to the direction of the arrow 2a and remove the Filter Fig 3 42 Assembling Note When assembling the Air duct align the notch part of the Air duct with the Pins of the main body Hooks Rib Pins Pins Pins Filter Air duct Air duct Air duct 1a 1a 1b 1c 2a ...

Страница 115: ...Laser unit from the Main PCB ASSY and remove the FFC of the Laser unit from the Guide of the Main frame L ASSY 3 Remove the four Taptite cup S M3x8 SR screws and remove the Laser unit Fig 3 43 Fig 3 44 Assembling Note Do not touch the Lens of the Laser unit directly Main PCB ASSY Guide Laser unit FFC high voltage power supply PCB ASSY FFC high voltage power supply PCB ASSY FFC laser unit Taptite c...

Страница 116: ...3 46 Confidential Fig 3 45 Assembling Note Attach the Laser serial label as shown in the figure on laser plate below after replacing the laser unit Laser unit Laser serial label Laser plate ...

Страница 117: ...Wireless LAN PCB ASSY from the Guides of the Main frame L ASSY 2 Disconnect the Connector of the Wireless LAN PCB ASSY from the Main PCB ASSY 3 Release the Hooks to remove the Wireless LAN PCB ASSY Fig 3 46 Hooks Main frame L ASSY Guides Guides Wireless LAN PCB ASSY Wireless LAN PCB ASSY Main PCB ASSY ...

Страница 118: ...direction of the arrow 2 and turn the Pick up roller holder ASSY to release the boss 3 Slide the Pick up roller holder ASSY to the direction of the arrow 3 to release it from the shaft and remove the Pick up roller holder ASSY from the Main body Fig 3 47 Pick up roller holder ASSY Boss Main body Link arm 3 2 ...

Страница 119: ...3 49 Confidential 9 19 Rubber Foot 1 Remove the two Rubber foots from the Main body Fig 3 48 Rubber foot Rubber foot Main body ...

Страница 120: ...SY 3 Remove the four Taptite cup S M3x6 SR screws 4 Release the Hook to remove the Main PCB ASSY and the Main PCB sheet Fig 3 49 Connectors Connectors FFC FFC Main PCB sheet Main PCB ASSY Connector T1 clutch ASSY Connector LVPS harness ASSY FFC main motor FFC paper eject sensor PCB ASSY Connector REG clutch ASSY Taptite cup S M3x6 SR Hook ...

Страница 121: ... the Hook to remove the T1 clutch ASSY 3 Release the Hook to remove the REG clutch ASSY Fig 3 50 Assembling Note When wiring the Harnesses of the T1 clutch ASSY and the REG clutch ASSY to the Guides of the Main frame L ASSY check that there is no slack in the Harnesses Guides REG clutch ASSY T1 clutch ASSY T1 clutch ASSY REG clutch ASSY Guides Hook Hook Main frame L ASSY ...

Страница 122: ...ng 5 from the Pin of the Main frame L ASSY and turn it to the direction of the arrow 5a until the releasing position and pull out the Conductive bearing 5 from the Registration roller shaft 2 6 Pull out the Registration roller shaft 2 Fig 3 51 Motor drive sub ASSY FG spring regist Conductive bearing 5 Registration roller shaft 2 Pin 5a ...

Страница 123: ...o Taptite bind B M4x12 screws to remove the Front chute ASSY 2 Remove the Paper edge sensor harness ASSY from the Guides of the Main frame L ASSY Fig 3 52 Taptite bind B M4x12 Guides Guide Front chute ASSY Paper edge sensor harness ASSY HL 2250DN 2270DW only ...

Страница 124: ...ection of the arrow and remove the Taptite bind B M4x12 screw 8 9 Remove the Taptite bind B M4x12 screw 9a and the two Taptite cup S M3x6 SR screws 9b to remove the Main frame L ASSY Fig 3 53 Assembling Note When assembling the Main frame L ASSY check that there is the Chute ground plate on the upper side of the FG plate MAIN PCB Feeder gear 17 Main frame L ASSY Taptite bind B M4x12 8 Feeder cam l...

Страница 125: ...M4x12 screws to remove the Develop drive sub ASSY Fig 3 54 Assembling Note When assembling the Develop drive sub ASSY tighten the three Taptite bind B M4x12 screws in numerical order written in the plate Be careful not to bent the FG plate laser L Develop drive sub ASSY FG plate laser L Taptite bind B M4x12 1 3 2 Taptite cup S M3X6 SR ...

Страница 126: ...elow 3 Be careful not to damage the Hooks of the Develop joint and release the Hooks to remove the Develop joint and then remove the Develop joint spring and the Develop gear joint 52 Fig 3 55 Develop drive sub ASSY Develop joint Develop joint spring Develop gear joint 52 Hooks ...

Страница 127: ...x12 screws to remove the Stopper and Motor drive sub ASSY Fig 3 56 Assembling Note When assembling the Motor drive sub ASSY tighten the six Taptite bind B M4x12 screws in numerical order written in the plate Stopper Motor drive sub ASSY Taptite bind B M4x12 Taptite bind B M4x12 1 2 3 4 6 5 ...

Страница 128: ...r drive sub ASSY as shown in the figure below 3 Remove the Drum gear 26L 131L 4 Remove the three Screw bind M3x4 screws to remove the Main motor Fig 3 57 Main motor Motor drive sub ASSY Drum gear 26L 131L Screw bind M3x4 Screw bind M3x4 ...

Страница 129: ...e the Main PCB shield Fig 3 58 Assembling Note When assembling the Main PCB shield insert the FFC of the Paper eject sensor PCB ASSY into the hole of the Main PCB shield When assembling the Main PCB shield tighten the two Taptite bind B M4x12 screws in numerical order written in the plate Main PCB shield Hook Hook Taptite bind B M4x12 Taptite cup S M3X6 SR 1 2 ...

Страница 130: ...eject sensor PCB ASSY from the Guides of the Main frame L ASSY 5 Release the Hooks to remove the Back cover sensor Fig 3 59 Assembling Note When assembling the Back cover sensor attach it while pushing the center of the rear side of the Back cover sensor Back cover sensor Main frame L ASSY Paper eject sensor PCB ASSY Harness Guides Pin Hook Hook Hook ...

Страница 131: ...3 61 Confidential 9 26 Fuser Gear 28 34 1 Remove the Ejector gear 40 2 Remove the Fuser gear 28 34 Fig 3 60 Ejector gear 40 Fuser gear 28 34 ...

Страница 132: ...opy it into the hl2200 folder that has been created on the C drive Extract the copied file and run brmainte exe file by double clicking 4 Download Utility FILEDG32 EXE Copy it into the hl2200 folder that has been created on the C drive 5 Maintenance Driver MaintenanceDriver zip If Maintenance Printer Driver is not installed to your PC copy it into the hl2200 folder that has been created on the C d...

Страница 133: ... Toner Drum Error LED once and check that all LEDs light off And then the printer shift to the Rewrite firmware mode 5 Turn on your PC 6 Open the hl2200 folder and Double click the FILEDG32 EXE to start The following screen appears Select the Brother Maintenance USB Printer 7 Drag the firmware LZXXXX_ blf and drop it onto the Brother Maintenance USB Printer icon The firmware files are sent to the ...

Страница 134: ...e click the brmainte exe file maintenance utility which has been copied in the hl2200 folder to start 5 Select Input Information from Menu 6 Select the applicable model name 7 Check the port USB which the printer is connected through 8 Click Serial No in the lower box Enter the serial number the fifteen digits of the printer into the box at the right hand side and click the OK button The serial nu...

Страница 135: ...nu 2 Select the applicable model name 3 Select Adjust Scanner from Menu 4 Check the port USB that the printer is connected through 5 Enter the figures the last five digits shown on the laser serial label attached on the figure below 6 Click the OK button Fig 4 1 Laser unit Laser serial label Laser plate ...

Страница 136: ...for over 2 seconds and the Error LED light up And then the printer goes into the PIT3 mode 4 Connect the printer to PC with USB cable 5 Double click the brmainte exe file maintenance utility to start 6 Select Input Information from Menu 7 Select the applicable model name 8 Select Adjust Scanner from Menu 9 Check the port USB that the printer is connected through 10 Enter the figures the last five ...

Страница 137: ...ection counter using the PJL file 1 Open the front cover and turn the power supply of the printer on while pressing down the Go button Make sure that the Toner Drum Error LED light up 2 Release the Go button and then make sure that all LEDs light off 3 Press the Go button for over 2 seconds and the Error LED light up And then the printer goes into the PIT3 mode 4 Connect the printer to PC with USB...

Страница 138: ...the Go button and then make sure that all LEDs light off 3 Press the Go button for over 2 seconds and the Error LED light up And then the printer goes into the PIT3 mode 4 Connect the printer to PC with USB cable 5 Start the Maintenance tool 6 Click the About 7 Appear the About screen Double click anywhere on the desktop while pressing the Shift Note The maintenance driver must have been installed...

Страница 139: ...utton Close the Password screen 9 Select Input information from Menu 10 Appear the Printer Information screen 11 Select the applicable model name 12 Check the port USB that the printer is connected through 13 Select the Clear SQ Wave Detected Count 14 Click in the ON box 15 Click the OK button ...

Страница 140: ...while the Go button is held There are two types of modes End user accessible maintenance mode and Service personnel accessible maintenance mode Three types of LED display are used to indicate that present state LED indication Contents Toner Drum Error LEDs light up at the same time Show that transfer to the specified mode is completed Ready LED lights up Show that the Go button is held when the mo...

Страница 141: ...t off and then press the Go button depending on the necessary number of times 1 2 How to Enter the Service Personnel accessible Maintenance Mode This mode function should be accessed by service personnel only for the checking and setting of the printer Procedure 1 Check that the front cover is opened 2 Turn ON the power switch while holding down the Go button Check that the Ready LED lights off af...

Страница 142: ...et 5 6 Nine times 1 Test Sample Page 5 5 Ten times 7 Settings Reset 5 6 Eleven times 1 Test Sample Page 5 5 Twelve times 8 Engine Error Ignoring Mode 5 6 Thirteen times 9 One Push Printing Recovery Function 5 6 More than fourteen times 1 Test Sample Page 5 5 Front cover Press the Go button when sifting the mode Press the Go button when selecting the function Function Refer to Open Once Once 10 Ope...

Страница 143: ...not used Four times Factory use not used Five times Factory use not used Six times Factory use not used Seven times Factory use not used Eight times Invalidity Nine times 27 Inspection Mode Unlock 5 12 Ten times Factory use not used Eleven times Invalidity Twelve times Factory use not used More than thirteen times Shift to ready state Four times None 28 Rewrite Firmware Mode 5 12 Five times Once F...

Страница 144: ... USB device To avoid this the return value of ID can be locked to 0 It is switched to a set value opposite to a current set value whenever switching The setting change of return value is distinguished by the LED display when the Go button is released The printer returns to the ready state after the setting is completed 4 Hex Dump Mode This mode is printed as Hex data without emulation processing t...

Страница 145: ...ton which is mainly used for sales promotion at the shop It is disabled if printing from a computer even once This mode enables to recover One Push Printing However the design of printing is not demo page printing but test printing after the recovery Data item Network default settings Factory reset Settings reset Printer switch Counter information Error history MAC address Worker switch User switc...

Страница 146: ...ate the sensors listed below and verify that the Ready LED is lit When the state is changed continuously the Ready LED keeps blinking When the verification of all the sensors is completed the Toner LED becomes lit The sensors are as shown below Front cover sensor New toner sensor Registration front sensor Registration rear sensor Eject sensor Back cover sensor Duplex tray sensor Paper edge sensor ...

Страница 147: ...ate unless the power is turned off and on 12 Fuser Unit Test Print This is to print the following three patterns to check the fuser unit Grid pattern Gray pattern Black pattern When this operation is completed the printer automatically return to the ready state 13 EEPROM Value Dump Mode This is to collectively print the present state of the EEPROM of all printers When this operation is completed t...

Страница 148: ...ing of paper size Toner LED and Drum LED light for one second A4 LETTER Not light LETTER A4 Series Name Model name of printer Serial Number Serial number of printer Count Rom Version Rom version of printer Device Status Page Count Drum Count Average Coverage The maximum count for each item is 1 million times Drum Information Estimated Pages Remaining of Life Remaining Total Pages Printed 1 Previou...

Страница 149: ...of the error message CAUTION Some margin of error must be taken into consideration because coverage for the printable area of A4 size paper is calculated using printing image signals 0 1 0 8 0 2 X X A H 3 0 0 0 0 0 1 0 3 E U 0 F 6 E Number of Electrical Discharge Error Occurrence Number of Fixing Error Occurrence Number of Polygon Motor Lock Error Occurrence PCB Inspection 0 OK X NG High Voltage I...

Страница 150: ...rtridge so it needs to be reset when the toner cartridge is replaced Usually it is reset automatically At that time the develop roller counter reading is also reset This mode is to enable to execute these operations equivalent to those done when the toner cartridge is replaced manually from the service mode 25 USB Speed Fix Mode Switch the setting of USB FULL Fixing Automatic switching High FULL W...

Страница 151: ... Mode To identify terminals connected via USB interface the PC requires the corresponding virtual USB devices to be implemented by driver If you connect any number of the printer to your PC therefore the same number of virtual USB devices will be automatically configured on your PC To prevent virtual USB devices from being configured limitlessly enables your PC to identify terminals via single vir...

Страница 152: ...ve following items in common Title Model name Serial number Procedure 1 The printer prints the Printer Settings by pressing the Go button three times when the printer is in the ready state 2 Upon completion of printing the printer returns to the ready state HL 2130 2220 2230 2240 2240D Fig 5 2 HL 2250DN 2270DW Fig 5 3 ...

Страница 153: ...ller firmware version 2 NET ROM Version Network model only 3 RAM Size MB 2 Maintenance information 1 Consumable information The percentage of life remained over the total printable pages is indicated in numerical value and bar graph A sample indication Drum unit is as follows From the top left the parts name the number of printable pages remained and the percentage of life remained are indicated T...

Страница 154: ...ccording to the average number of print pages per job See the table below The number of printable pages is larger when making continuous prints in one job because deterioration of the develop roller is low Relationship between average print page per 1 job and life of toner cartridges 26 27ppm model 24ppm model 20 21ppm model The develop roller also rotates for the warm up operation when the power ...

Страница 155: ...r 380 640 850 2100 Cartridge life Standard 650 1100 1500 3600 Cartridge life High capacity 1400 2400 3100 7800 Page Average print page page job 1 2 3 Continuance Cartridge life Starter 380 630 820 2000 Cartridge life Standard 640 1100 1400 3400 Cartridge life High capacity 1400 2400 3000 7400 Page Average print page page job 1 2 3 Continuance Cartridge life Starter 310 540 710 2000 Cartridge life ...

Страница 156: ...er 4500 6700 8100 14000 Cartridge life Standard 4500 6700 8100 14000 Cartridge life High capacity 4500 6700 8100 14000 Page Average print page page job 1 2 3 Continuance Cartridge life Starter 4500 6700 8100 15000 Cartridge life Standard 4500 6700 8100 15000 Cartridge life High capacity 4500 6700 8100 15000 Page Average print page page job 1 2 3 Continuance Cartridge life Starter 2700 4600 6000 15...

Страница 157: ...closed Therefore when these operations are frequently performed the life of drum unit is shortened The table below shows the worst case in which the warm up operation is performed when the power is turned ON Life of the drum unit in the case that the power is turned OFF ON for every print job 26 27ppm model 24ppm model The numeral values provided in this page are as of June 2010 These values are s...

Страница 158: ...m count for each item is 1 million times Total Paper Jams The number of paper jam occurrence in each of the Tray1 Inside Rear and Duplex The paper jam occurs when the printer is turned ON is not counted The maximum count for each item is 65 535 times Total number of jam occurrences is printed after Total Paper Jams Error History The error history including the latest 10 errors and the number of pa...

Страница 159: ...umber of times of pushing and perform the Reprint The maximum printing is 999 times 4 When the printing is completed the printer return to the ready state 3 2 Job Cancel Function When there is no Receiving Processing data in the printer perform the Job Cancel by pressing Go button for four seconds Also press the Go button during the Job Cancel and start the multiple Job Cancel Procedure 1 Keep the...

Страница 160: ...tton 3 It is switched to a set value opposite to a current set value whenever switching and then the wireless network information Network Configuration printing is implement Check that which of wireless LAN or wired LAN became effective Judge by the Active or Inactive from Node Type which is mentioned in Network Configuration of Printer Settings 3 4 Wireless Connecting Diagnostic Report Print Wire...

Страница 161: ... the printer return to the ready state 3 6 Drum Cleaning Function Procedure 1 Check that the front cover and Back cover are opened in the ready state and press the Go button five times Shift to the Drum Cleaning mode 2 Close the front cover Install the plain paper in the manual feed slot to start the paper feeding and perform the Drum Cleaning When the cleaning is completed the printer automatical...

Страница 162: ...6 1 Confidential CHAPTER 6 CIRCUIT DIAGRAMS WIRING DIAGRAM High Voltage Power Supply PCB Circuit Diagram MURATA ...

Страница 163: ...6 2 Confidential High Voltage Power Supply PCB Circuit Diagram Panasonic ...

Страница 164: ...ow Voltage Power Supply PCB Circuit Diagram 115V EDPS 52AF A Delta 3 1 D 1 T 2 L D4 1 F C10 C9 3 F 2 L F 1 1 D 2 1 D 0 1 D C1 D3 1 3 D 2 D C3 C4 C2 C152 1 Q C104 1 0 1 L C103 4 F C107 1 Y C 1 C T N 2 F 1 L F 2 0 1 D 5 F ...

Страница 165: ...6 4 Confidential Low Voltage Power Supply PCB Circuit Diagram 115V MPW3052 MURATA ...

Страница 166: ...tage Power Supply PCB Circuit Diagram 230V EDPS 52BF A Delta C1 ZD1 C104 C107 3 1 D 2 L D4 1 F C10 C9 3 F 2 L F 1 1 D 2 1 D 0 1 D 1 3 D 2 D C3 C2 C152 1 0 1 L C103 4 F D3 C4 1 Y C 1 C T N 2 F 1 L F 1 Q 2 0 1 D 5 F 1 T 1 0 1 D ...

Страница 167: ...6 6 Confidential Low Voltage Power Supply PCB Circuit Diagram 230V MPW3053 MURATA ...

Страница 168: ...e Ready Green Go key B512318 PANEL PCB 10 FFC 1 9615S 18C PP A 2 CN2 TNR_SEN 1 GND B2B PH BL 1 FAN CN1 CN2 FUSER FAN CHG 1 HVPS DEV 3 PGND FUSER_FAN_SEN TRCC TRCV GRID FUSER_FAN_VCC 20 S3B PH K S L SR COVER OPEN SW SAFETY INTERLOCK SW 3 3V 3VI 1 CN1 20 GND FB_GRID FB_DEV FUSER_FAN_SEN HV_ENABLE FB_TRCC PWM_DEV PWM_TRCC PGND FUSER_FAN PWM_TRCV 24V 3VI GRIDC DISCHG PRE PWM_CHG 3 3V 9615S 20A PP A 1m...

Страница 169: ...7 1 Confidential CHAPTER 7 PERIODICAL MAINTENANCE 1 PERIODICAL PEPLACEMENT PARTS There are no parts to be replaced periodically ...

Страница 170: ...abels for the printer itself How to Read Fig App 1 1 Location Fig App 1 2 Serial number Serial number 6 digit Manufacturing factory No A January B February C March D April Year of manufacture 0 2010 1 2011 Month of manufacture A 0 J 1 1 1 1 0 1 Product identification code E May F June G July H August J September K October L November M December Serial label The back surface of the printer ...

Страница 171: ...default printer settings in the following procedures 1 Close the front cover and turn the power supply of the printer on while pressing down the Go button Make sure that all LEDs light up 2 Release the Go button and then make sure that all LEDs light off 3 Press the Go button ten times 4 When this operation is completed the printer automatically return to the ready state ...

Страница 172: ... PC to identify terminals via single virtual USB device 1 Check that the power switch of the printer is turned off Disconnect the USB cable that connects the printer with PC 2 Turn on your PC 3 Open the front cover and turn the power supply of the printer on while holding down the Go button Make sure that the Toner Drum Error LED lights up 4 Release the Go button and then make sure that all LEDs a...

Страница 173: ...mes Click Continue Anyway to proceed 9 If the device driver is successfully installed the following message screen appears Click Finish to return 10 Connect the printer to your PC using the USB cable 11 Select Install the software automatically Recommended and click Next ...

Страница 174: ...ential 12 Alert warning message of WHQL appears Click Continue Anyway to proceed 13 If the Brother Maintenance USB Printer driver is successfully installed the following message screen appears Click Finish to return ...

Страница 175: ...ecure it with the Staple Fig APP 4 1 In the case of new type Paper strip Procedure 1 Pass the Paper strip through the hole of Protective material The white surface of Paper strip is the upper side 2 Pass the end of Paper strip through the hole of Paper strip and then pull the end of Paper strip to the direction of the arrow Fig APP 4 2 Protective material Paper strip Old type New type Old type New...

Отзывы: