background image

7. Troubleshooting

93


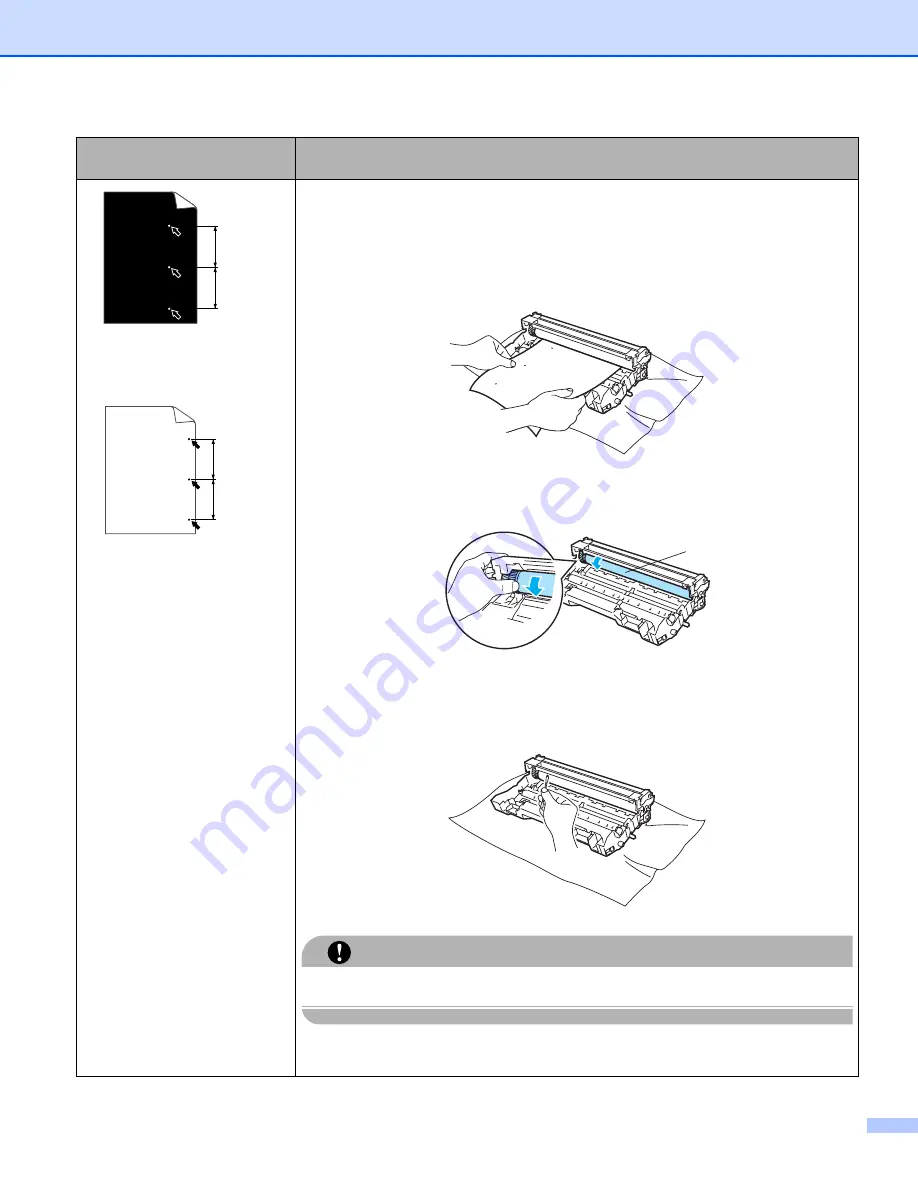
White Spots on black text 

and graphics at 94 mm 

(3.7 in.) intervals


Black Spots at 94 mm 

(3.7 in.) intervals

„

If the problem is not solved after printing a few pages, the drum unit may have 
glue from the label stuck on the OPC drum surface.

Clean the drum unit as follows:

a

Put the print sample in front of the drum unit, and find the exact position of 
the poor print.


b

Turn the drum unit gear by hand while looking at the surface of the OPC 
drum (1).


c

When you have found the mark on the drum that matches the print sample, 
wipe the surface of the OPC drum with a cotton swab until the dust or paper 
powder on the surface comes off.


CAUTION


DO NOT clean the surface of the photosensitive drum with a sharp object.


„

The drum unit may be damaged. Put in a new drum unit. See 

Replacing the drum 

unit

 on page 68.

Examples of poor print 
quality

Recommendation

94 mm
(3.7 in.)
94 mm
(3.7 in.)

94 mm
(3.7 in.)
94 mm
(3.7 in.)

1

Содержание HL-5250DN series

Страница 1: ...d copy in the box Please read this User s Guide thoroughly before you use the printer Keep the CD ROM in a convenient place so you can use it quickly if you need to You can also read the User s Guide in HTML format by visiting our web site at http solutions brother com or accessing it from the CD ROM directly Please visit us at http solutions brother com where you can get product support the lates...

Страница 2: ...trical shock Hot Surface icons warn you not to touch machine parts that are hot Cautions specify procedures you must follow or avoid to prevent possible damage to the printer or other objects Improper Setup icons alert you to devices and operations that are not compatible with the printer Notes tell you how you should respond to a situation that may arise or give tips about how the operation works...

Страница 3: ...witch and unplugged the printer from the AC power outlet DO NOT handle the plug with wet hands Doing this might cause an electrical shock After you have just used the printer some internal parts of the printer will be extremely hot When you open the front or back cover of the printer DO NOT touch the shaded parts shown in the illustration Inside the printer Front View Open the back cover Back View...

Страница 4: ...with a dry lint free cloth and dispose of it according to local regulations DO NOT use flammable substances near the printer Doing this might cause a fire or electrical shock CAUTION Cleaning the outside of the printer Make sure that you have unplugged the printer from the AC power outlet Use neutral detergents Cleaning with volatile liquids such as thinner or benzine will damage the outside surfa...

Страница 5: ...ration AMD AMD Athlon AMD Opteron and combinations thereof are trademarks of Advanced Micro Devices Inc Java and all Java based trademarks and logos are trademarks or registered trademarks of Sun Microsystems Inc in the United States and other countries All other terms and brand and product names mentioned in this User s Guide are registered trademarks of their respective companies Compilation and...

Страница 6: ...For Windows printer driver 23 3 Driver and Software Printer driver 24 Features in the printer driver For Windows 26 Features in the BR Script PostScript 3 language emulation printer driver For Windows 34 Features in the printer driver For Macintosh 37 Uninstalling the printer driver 40 Software 42 Software for networks For HL 5250DN only 42 About emulation modes 43 Automatic emulation selection 43...

Страница 7: ...in the Status Monitor 80 Error message printout 82 Paper handling 83 Paper jams and how to clear them 84 Improving the print quality 91 Solving print problems 97 Network problems 98 Other problems 98 For Macintosh with USB 98 Printing from DOS 98 BR Script 3 99 A Appendix Printer specifications 100 Engine 100 Controller 101 Software 102 Control panel 102 Paper handling 102 Media specifications 103...

Страница 8: ...laser radiation 121 EU Directive 2002 96 EC and EN50419 121 IMPORTANT For Your Safety 122 EC Declaration of Conformity 123 C Appendix For USA and Canada Brother Numbers 124 Important information Regulations 126 Federal Communications Commission FCC Declaration of Conformity For USA 126 Industry Canada Compliance Statement For Canada 127 Laser Notices 128 Laser Safety 110 to 120 volt model only 128...

Страница 9: ...e to a non powered hub or a Macintosh keyboard Make sure that you connect it to the USB connector of your PC USB is not supported under Windows 95 or Windows NT 4 0 Parallel interface Do not use a parallel interface cable that is longer than 6 feet 2 0 meters Use a shielded interface cable that is IEEE 1284 compliant Network cable For HL 5250DN Use a straight through Category5 or greater twisted p...

Страница 10: ...r 2 Front view 1 Front cover release button 2 Control panel 3 Face down output tray support flap support flap 4 Front cover 5 Paper tray 6 Power switch 7 Face down output tray 8 Multi purpose Tray MP Tray 5 6 7 8 2 3 4 1 ...

Страница 11: ...y For HL 5250DN 3 AC power connector 4 HL 5250DN Network status LEDs Light Emitting Diodes 5 HL 5250DN 10 100BASE TX port 6 USB interface connector 7 DIMM cover 8 Parallel interface connector Note The printer illustration is based on HL 5250DN 1 2 3 5 4 7 6 8 ...

Страница 12: ...sily unplugged from the AC power outlet if there is an emergency Only use the printer within the following ranges of temperature and humidity Temperature 10 C to 32 5 C 50 F to 90 5 F Humidity 20 to 80 without condensation Use the printer in a well ventilated room DO NOT put the printer where the ventilation hole of the printer is blocked Keep a gap of roughly 100 mm 4 in between the ventilation h...

Страница 13: ... 5250DN DX Media type Tray 1 Tray 2 3 MP Tray DX Choose the media type from the printer driver Plain paper 75 g m2 to 105 g m2 20 to 28 lb p p p p Plain Paper Recycled paper p p p p Recycled Paper Bond paper Rough paper 60 g m2 to 161 g m2 16 to 43 lb p 60 g m2 to 105 g m2 16 to 28 lb p 60 g m2 to 105 g m2 16 to 28 lb p 60 g m2 to 161 g m2 16 to 43 lb Bond Paper Thin paper 60 g m2 to 75 g m2 16 to...

Страница 14: ...inter Note If you use paper that is not recommended a paper jam or misfeed may occur in the printer To help you choose which paper to use with this printer see Important information for choosing your paper on page 106 MP Tray Tray 1 Tray 2 Tray 3 DX Paper size Width 69 9 to 215 9 mm 2 75 to 8 5 in Length 116 to 406 4 mm 4 57 to 16 in A4 Letter Legal 1 B5 ISO Executive A5 A6 B6 ISO A4 Letter Legal ...

Страница 15: ...d extremely shiny or textured envelopes Do not use envelopes with clasps snaps tie strings self adhesive components windows holes cutouts or perforations Do not use envelopes that are of a baggy construction not sharply creased embossed have raised writing on them or pre printed on the inside Do not use envelopes that were previously printed by a laser printer Do not use envelopes that cannot be a...

Страница 16: ... 23 mm 0 16 in 4 23 mm 0 16 in 4 23 mm 0 16 in 4 23 mm 0 16 in 4 23 mm 0 16 in 4 23 mm 0 16 in 4 23 mm 0 16 in 4 6 01 mm 0 24 in 6 35 mm 0 25 in 6 35 mm 0 25 in 6 01 mm 0 24 in 6 35 mm 0 25 in 6 01 mm 0 24 in 6 01 mm 0 24 in 6 01 mm 0 24 in A4 Letter Legal B5 ISO Executive A5 A6 B6 1 4 23 mm 0 16 in 4 23 mm 0 16 in 4 23 mm 0 16 in 4 23 mm 0 16 in 4 23 mm 0 16 in 4 23 mm 0 16 in 4 23 mm 0 16 in 4 2...

Страница 17: ...rinting on plain paper bond paper or transparencies from Tray 1 2 or 3 For the proper paper to use see About paper on page 5 a Choose the following from the printer driver Paper Size 1 Media Type 2 Paper Source 3 and any other settings Windows printer driver BR Script printer driver 1 2 3 3 1 2 ...

Страница 18: ...de the paper guides to fit the paper size Make sure that the guides are firmly in the slots For legal size paper 1 press in the paper guide release lever and pull out the back of the paper tray 1 Legal size paper is not available in some regions outside the USA and Canada d Put paper in the tray and below the maximum paper mark b ...

Страница 19: ...ent paper from sliding off the face down output tray or remove each page as soon as it comes out of the printer g Send the print data to the printer Note The side to be printed on must be face down When printing on transparencies remove each transparency at once after printing Stacking the printed transparencies may cause a paper jam or the transparency to curl ...

Страница 20: ... mode is automatically turned on when paper is put in the multi purpose tray For the proper paper to use see About paper on page 5 a Choose the following from the printer driver Paper Size 1 Media Type 2 Paper Source 3 and any other settings Windows printer driver BR Script printer driver 1 2 3 3 1 2 ...

Страница 21: ...b Open the MP tray and lower it gently c Pull out the MP tray support flap 1 d Lift up the support flap to prevent paper from sliding off the face down output tray or remove each page as soon as it comes out of the printer 1 ...

Страница 22: ...r guide release lever slide the paper guide to fit the paper size g Send the print data to the printer Note The side to be printed on must be face up with the leading edge top of the paper in first When printing on transparencies remove each transparency at once after printing Stacking the printed transparencies may cause a paper jam or the transparency to curl ...

Страница 23: ...es on page 7 a Choose the following from the printer driver Paper Size 1 Media Type 2 Paper Source 3 and any other settings Windows printer driver BR Script printer driver Note When you use Envelope 10 choose Com 10 in Paper Size For other envelopes which are not listed in the printer driver such as Envelope 9 or Envelope C6 choose User Defined For more information on the envelope size see Paper s...

Страница 24: ...b Open the MP tray and lower it gently c Pull out the MP tray support flap 1 d Lift up the support flap to prevent paper from sliding off the face down output tray or remove each page as soon as it comes out of the printer 1 ...

Страница 25: ...he paper guide release lever slide the paper guide to fit the paper size g Send the print data to the printer Note Remove each sheet or envelope at once after printing Stacking the sheets or envelopes may cause the paper to jam or curl If envelopes get smudged during printing set the Media Type to Thick Paper or Thicker Paper to increase the fixing temperature To adjust the print density setting s...

Страница 26: ... the MP tray with the longest edge of the envelope in first then print again When you put paper in the MP tray remember the following Put the leading edge top of the paper in first and push it gently into the tray Make sure that the paper is straight and in the proper position in the MP tray If it is not the paper may not be fed properly resulting in a skewed printout or a paper jam ...

Страница 27: ...and how to clear them on page 84 If you have a print quality problem see Improving the print quality on page 91 Manual duplex printing The BR Script printer driver PostScript 3 emulation does not support manual duplex printing Use plain paper or recycled paper Do not use bond paper Manual duplex printing from the paper tray a In the printer driver choose the Advanced tab then choose the Manual Dup...

Страница 28: ...ou may get paper jams a From the Advanced tab choose the Manual Duplex printing mode and from the Basic tab choose the Paper Source to be MP Tray b Put the paper in the MP tray with the side to be printed on first facing up Follow the instructions on the PC screen Repeat this step until you have printed all the even numbered pages c Remove the printed even numbered pages from the output tray and t...

Страница 29: ...he leading edge top of the paper at the front of the tray To print on the second side put the paper face up with the leading edge top of the paper at the front of the tray If letterhead paper is used put the paper in the tray with the heading face up at the front of the tray To print on the second side put the heading face down at the front of the tray For the multi purpose tray MP tray Put the si...

Страница 30: ...ou should use regular paper Do not use bond paper or thin paper a Put paper in the paper tray or MP tray b For the Windows printer driver 1 Open the Properties dialog box in the printer driver 2 From the General tab click the Printing Preferences icon 3 From the Advanced tab click the Duplex icon 4 Make sure that Use Duplex Unit has been chosen 5 Click OK The printer will print on both sides of th...

Страница 31: ...ter driver a Put paper in the paper tray or MP tray b Open the Properties dialog box in the printer driver c From the General tab choose the Printing Preferences icon d From the Advanced tab choose Duplex and Use Duplex Unit or Manual Duplex and then choose Booklet Printing e Click OK The printer will print a booklet automatically ...

Страница 32: ... Citrix MetaFrame Windows Terminal Server environments and other Windows NT 4 0 and Windows 2000 XP network shared environments we recommend the use of our generic PCL Driver This driver only supports basic printing functions For Macintosh Brother Laser driver for Macintosh BR Script PostScript 3 language emulation printer driver For Linux LPR printer driver CUPS printer driver Note For more infom...

Страница 33: ... Quick Print Setup 1 3 Sleep Time Status Monitor 1 Macro 1 3 Administrator 1 2 3 Insert Command File 1 2 3 Page Protection 1 3 Print Date Time 1 3 Density adjustment 1 3 Error Message Printout 1 3 1 These settings are not available with the BR script printer driver for Windows 2 These settings are not available with Windows NT 4 0 and Windows 2000 XP 3 These settings are not available with Brother...

Страница 34: ...ing Windows NT 4 0 you can access the Printing Preferences dialog box by clicking Document Defaults from the File menu of the Printers folder Basic tab You can also change some of the settings by clicking the illustrations on the left hand side a Choose the Paper Size Multiple Page Orientation and other settings 1 b Choose the Duplex Booklet setting from None Duplex or Booklet 2 Note You can choos...

Страница 35: ...wing icons Print Quality 1 Duplex Printing 2 Watermark 3 Page Setting 4 Device Options 5 Print Quality Resolution You can change the resolution as follows 1200 dpi HQ 1200 600 dpi 300 dpi Note If you use the high quality 1200 dpi setting 1200 1200 dpi the print speed will be slower 1 2 3 4 5 ...

Страница 36: ...rientation automatically Manual Duplex If you choose Manual Duplex button the dialog box for the manual duplex settings will appear There are six types of manual duplex binding directions available for each orientation Booklet Printing When you want to print a booklet use this function To make the Booklet fold the printed pages down the middle when using the booklet printing function Binding Offse...

Страница 37: ...on by choosing the function name in the list below Job Spooling Quick Print Setup Sleep Time Status Monitor Macro Administrator For Windows 95 98 Me only Insert Command File For Windows 95 98 Me only Page Protection Print Date Time Density adjustment Error Message Printout Note The Printer Function list may vary depending on the model ...

Страница 38: ...ut setting will be 5 minutes Intelligent Sleep Mode automatically adjusts to the most suitable timeout setting depending on the frequency of your printer use While the printer is in sleep mode all the LEDs are off but the printer can still receive data Receiving a print file or document or pressing Go will automatically wake up the printer to start printing To turn sleep mode off from the Advanced...

Страница 39: ... saved in printer memory into a print job Page Protection Page Protection refers to a setting that reserves extra memory for the creation of full page images Selections are AUTO OFF and Printer Default The page protection feature allows the printer to create the full page image to be printed in memory before physically moving the paper through the printer Use this function when the image is compli...

Страница 40: ...tting to the tray When using more than one paper size you must define the paper size for each tray so the paper is pulled from the correct tray Default Source This setting allows you to choose the default paper source that your document will be printed from Choose the Default Source from the pull down menu and click Update to save your setting The Auto Select setting will automatically pull paper ...

Страница 41: ...tp solutions brother com is a web site offering information about your Brother product including FAQs Frequently Asked Questions User s Guides driver updates and tips for using your printer Print Settings 4 This will print the pages that show how the internal settings of the printer have been configured Print Fonts 5 This will print the pages that show all the internal fonts of the printer Check S...

Страница 42: ...ver For Windows For more information see the Help text in the printer driver Note The screens in this section are based on HL 5250DN with Windows XP The screens on your PC may vary depending on the printer model and your operating system Device Settings tab Choose the options you have installed ...

Страница 43: ...ng Preferences dialog box by clicking Printing Preferences in the General tab of the Brother HL 5240 HL 5250DN BR Script3 Properties dialog box Layout tab You can change the layout setting by choosing the settings for Orientation Print on Both Sides Duplex Page Order and Pages Per Sheet Paper Quality tab Choose the Paper Source ...

Страница 44: ...eType Font settings 2 c You can change settings by choosing the setting in the Printer Features list 3 Print Quality Media Type Toner Save You can save running costs by turning on the Toner Save which reduces the print density Sleep Time See Device Options on page 29 Halftone Screen Lock BR Script Level 1 2 3 ...

Страница 45: ...n your Macintosh will vary depending on your operating system Page Setup You can set the Paper Size Orientation and Scale Layout Set the Pages per Sheet Layout direction and Border Pages per Sheet Choose how many pages will appear on each side of the paper Layout Direction When you specify the pages per sheet you can also specify the direction of the layout Border If you want to add a border use t...

Страница 46: ... 1200 1200 dpi the print speed will be slower Media Type You can change the media type as follows Plain Paper Thin Paper Thick Paper Thicker Paper Bond Paper Transparencies Envelopes Env Thick Env Thin Recycled Paper Toner Save Mode You can save running costs by turning on Toner save which reduces the print density Note We do not recommend Toner Save for printing Photo or Gray Scale images Toner S...

Страница 47: ...nting text documents the print speed will be faster Use this mode for Mac s that have less memory Sleep Time When the printer does not receive data for a certain period of time timeout it enters sleep mode In sleep mode the printer acts as though it were turned off The default timeout is 5 minutes While the printer is in sleep mode all the LEDs are off but the printer can still receive data Receiv...

Страница 48: ...lling we recommend that you restart your computer to remove files that were in use during the uninstall Printer driver for Windows For Windows XP a Click the Start button point to All Programs and then to your printer name b Click UnInstall c Follow the instructions on the screen For Windows 95 98 Me 2000 and Windows NT 4 0 a Click the Start button point to Programs and then to your printer name b...

Страница 49: ...tosh HD Startup Disk choose Library Printers Brother into the Trash and then empty the Trash f Restart the Macintosh 1 Print Center for Mac OS X 10 2 users For Mac OS 9 1 to 9 2 a Open the Extensions folder located in the System Folder on the Macintosh HD b Drag all these following files in the Extensions folder to the trash BR_PrintMonitor laser Brother Laser Brother Laser IP Note There may be se...

Страница 50: ...e the printer driver port driver IP address and so on automatically copied to their PC Network Print Software For Windows This installer includes the port monitors Peer to Peer Printing software They allow you to print through the network LAN under Windows Web BRAdmin For Windows The Web BRAdmin is designed to manage all LAN WAN Brother network connected devices By installing the Web BRAdmin serve...

Страница 51: ...ley Professional 1999 ISBN 0 201 37922 8 Adobe Systems Incorporated PostScript Language Program Design Addison Wesley Professional 1988 ISBN 0 201 14396 8 Adobe Systems Incorporated PostScript Language Tutorial and Cookbook Addison Wesley Professional 1985 ISBN 0 201 10179 3 EPSON FX 850 and IBM Proprinter XL Mode The EPSON FX 850 and IBM Proprinter XL modes are the emulation modes that this print...

Страница 52: ...e we recommend that you choose that interface using Remote Printer Console See Remote Printer Console on this page If only one interface is chosen the printer will allocate the entire input buffer to that interface Remote Printer Console Remote Printer Console is software to change many of the printer settings independently of your application For example you can change the settings for printer ma...

Страница 53: ...s and two buttons Go and Job Cancel on the control panel The LED indications shown in the table below are used in the illustrations in this chapter Note When the power switch is off or the printer is in sleep mode all the LEDs are off Control Panel LED is off or or LED is on or or LED is blinking ...

Страница 54: ...r from sleep mode to ready mode Ready to print The printer is ready to print Warming up The printer is warming up Cooling down The printer is cooling down Wait for a few seconds until inside of the printer has cooled down Receiving data The printer is either receiving data from the computer processing data in memory or printing the data ...

Страница 55: ...ated The Toner LED will turn on for 2 seconds and off for 3 seconds Toner life end Replace the toner cartridge with a new one See Replacing the toner cartridge on page 63 Cartridge position error The drum unit assembly is not installed correctly Take the drum unit out of the machine and put it back in Drum life end soon The drum unit is near the end of its life We recommend that you get a new drum...

Страница 56: ...the front cover of the printer Fuser cover is open Close the fuser cover which can be found behind the back cover of the printer Dust on drum The corona wire needs to be cleaned See Cleaning the corona wire on page 77 Too many trays Maximum number of optional trays is two Remove additional trays Buffer error Check the cable connection between the PC and printer Memory full The printer memory is fu...

Страница 57: ...ed service representative When you press Go and Job Cancel buttons together the LEDs will light up as shown in the table below to identify the error 1 If this error occurs turn off the printer power switch wait a few seconds and then turn it on again Leave the printer for 10 minutes with the power on If the error occurs again call your dealer or Brother authorized service representative 2 If this ...

Страница 58: ... a fuser unit failure Make a note of the indication and report the error status to your dealer or a Brother authorized service representative by referring to the above table Note Make sure that the front cover is completely closed before you report a service call ...

Страница 59: ...ter will recover automatically from some errors If an error is not automatically cleared press Go to clear the error and then continue to use the printer Form feed If the yellow Status LED is on for a long time press Go The printer will print any remaining data in the printer memory Reprint To reprint the last document press Go and hold it down for about 4 seconds until all the LEDs light up in or...

Страница 60: ... power cord is plugged in c Hold down Go as you turn on the power switch First all the LEDs will light up and then the Status LED will turn off Release Go Make sure that all the LEDs have turned off d Press Go again The printer will print a test page Using the printer driver If you are using Brother s Windows printer driver click the Print Test Page button in the General tab of the Windows printer...

Страница 61: ...ver is closed and the power cord is plugged in b Turn on the printer and wait until the printer is in the ready state c Press Go three times within 2 seconds The printer will print the current printer settings page Using the printer driver If you are using Brother s Windows printer driver you can print the current printer settings page by clicking the Print Settings button in the Support tab ...

Страница 62: ...r cord is plugged in c Hold down Go as you turn on the power switch First all the LEDs will light up and then the Status LED will turn off Release Go Make sure that all the LEDs have turned off d Press Go twice The printer will print a list of the internal fonts Using the printer driver If you are using Brother s Windows printer driver you can print a list of the internal fonts by clicking the Pri...

Страница 63: ... reset to its default settings Network default setting with APIPA protocol disabled For HL 5250DN If you want to reset the print server back to its default settings with APIPA protocol disabled follow these steps a Turn off the printer b Make sure that the front cover is closed and the power cord is plugged in c Hold down Go as you turn on the power switch First all the LEDs will light up and then...

Страница 64: ...al trays are installed the printer can hold up to 800 sheets of plain paper If you want to buy an optional lower tray unit call the dealer you bought the printer from For setup see the User s Guide that we have supplied with the lower tray unit Options Lower tray unit DIMM memory Print server For HL 5240 HL 5240L LT 5300 NC 2100p See Lower tray unit LT 5300 on this page See DIMM on page 57 And See...

Страница 65: ...alo Technology VN133 D256 512 MB Buffalo Technology VN133 D512 64 MB TechWorks 12165 0004 128 MB TechWorks 12462 0001 256 MB TechWorks 12485 0001 512 MB TechWorks 12475 0001 Note For more information visit the Buffalo Techonology site at http www buffalotech com For more information visit the Techworks web site at http www techworks com In general the DIMM must have the following specifications Ty...

Страница 66: ...ou install or remove the DIMM b Remove the DIMM cover c Unpack the DIMM and hold it by its edges CAUTION To prevent damage to the printer from static electricity DO NOT touch the memory chips or the board surface d Hold the DIMM by the edges and align the notches in the DIMM with the protrusions in the slot Insert the DIMM diagonally 1 then tilt it toward the interface board until it click into pl...

Страница 67: ...face cable to your printer Plug the printer back in and then turn on the power switch Note To make sure that you have installed the DIMM properly you can print the printer settings page that shows the current memory size See Print a Printer Settings page on page 53 ...

Страница 68: ...rallel interface Note HL 5250DN already has a built in 10 100BASE TX Ethernet Print Server Network interface 10 100BASE TX Ethernet Printer interface Parallel Support protocol TCP IP NetBEUI Management features Embedded web server support SNMP MIB support TELNET remote console BRAdmin Professional compatible Flash memory for easy updating of firmware ...

Страница 69: ...eful not to inhale toner After you have just used the printer some internal parts of the printer will be extremely hot When you open the front cover or back cover of the printer DO NOT touch the shaded parts shown in the illustration Replacing the consumable items You will need to replace the consumable items regularly Note These instructions are also included in Improving the print quality on pag...

Страница 70: ...r used will change Wait to unpack the toner cartridge until immediately before you put it into the printer Toner Low message The Toner LED will turn on for 2 seconds and off for 3 seconds If the LED shows this message the printer has nearly run out of toner Buy a new toner cartridge and have it ready before you get a Toner Life End message To replace the toner cartridge see Replacing the toner car...

Страница 71: ...t you clean the printer when you replace the toner cartridge See Cleaning on page 73 a Press the front cover release button and then open the front cover b Take out the drum unit and toner cartridge assembly CAUTION We recommend that you put the drum unit and toner cartridge assembly on a piece of disposable paper or cloth in case you accidentally spill or scatter toner To prevent damage to the pr...

Страница 72: ...t quality problems DO NOT touch the shaded parts shown in the illustrations Note Be sure to seal up the toner cartridge tightly in a bag so that toner powder does not spill out of the cartridge Discard the used toner cartridge according to local regulations keeping it separate from domestic waste If you have questions call your local waste disposal office d Unpack the new toner cartridge Hold the ...

Страница 73: ... machine may cause damage to the machine and or may result in unsatisfactory print quality Our warranty coverage does not apply to any problem that is caused by the use of unauthorized third party toner and or cartridges To protect your investment and obtain premium performance from the Brother machine we strongly recommend the use of genuine Brother supplies CAUTION For UK and other countries Bro...

Страница 74: ... lever will lift automatically CAUTION Make sure that you put in the toner cartridge properly or it may separate from the drum unit g Clean the primary corona wire inside the drum unit by gently sliding the blue tab from right to left and left to right several times CAUTION Be sure to return the tab to the home position a 1 If you do not printed pages may have a vertical stripe 1 ...

Страница 75: ...6 Routine Maintenance 67 h Put the drum unit and toner cartridge assembly back in the printer Close the front cover ...

Страница 76: ...at will be printed by your drum For best performance use only genuine Brother toner The printer should be used only in a clean dust free environment with adequate ventilation Printing with a third party drum unit may reduce not only the print quality but also the quality and life of the printer itself Warranty coverage does not apply to problems caused by the use of a third party drum unit Change ...

Страница 77: ...nter is turned on and the Drum LED is blinking Press the front cover release button and then open the front cover b Press and hold down Go for about 4 seconds until all the LEDs light up Once all four LEDs are lit release Go Improper Setup Do not reset the drum counter when you only replace the toner cartridge c Take out the drum unit and toner cartridge assembly ...

Страница 78: ...and take the toner cartridge out of the drum unit CAUTION Handle the toner cartridge carefully If toner scatters on your hands or clothes wipe or wash it off with cold water at once To avoid print quality problems DO NOT touch the shaded parts shown in the illustrations Note Be sure to seal up the drum unit tightly in a bag so that toner powder does not spill out of the unit Discard the used drum ...

Страница 79: ... f Put the toner cartridge firmly into the new drum unit until you hear it lock into place If you put the cartridge in properly the blue lock lever will lift automatically CAUTION Make sure that you put in the toner cartridge properly or it may separate from the drum unit g Put the drum unit and toner cartridge assembly back in the printer h Close the front cover i Make sure that the Drum LED is n...

Страница 80: ...es 1 At 5 print coverage A4 or Letter size The actual number of printed pages will vary depending on the print jobs and paper you use Item Approximate Life To Buy Replacement Separator pad holder assembly 100 000 pages 1 Call Brother Customer Service Pick up roller assembly 100 000 pages 1 Call Brother Customer Service Laser unit 100 000 pages 1 Call Brother Customer Service Fuser unit 100 000 pag...

Страница 81: ...rinted pages are stained with toner clean the inside of the printer with a dry lint free cloth Cleaning the outside of the printer CAUTION Use neutral detergents Cleaning with volatile liquids such as thinner or benzine will damage the surface of the printer DO NOT use cleaning materials that contain ammonia a Turn off the printer power switch and then unplug the printer b Pull the paper tray comp...

Страница 82: ...ng that is stuck inside the paper tray e Wipe the inside of the paper tray with a dry lint free cloth to remove dust f Put the paper tray back in the printer g Plug the printer back in and then turn on the power switch Cleaning the inside of the printer a Turn off the printer power switch and then unplug the printer ...

Страница 83: ...rts of the printer will be extremely hot Wait for the printer to cool down before you touch the internal parts of the printer CAUTION We recommend that you put the drum unit and toner cartridge assembly on a piece of disposable paper or cloth in case you accidentally spill or scatter toner Handle the toner cartridge carefully If toner scatters on your hands or clothes wipe or wash it off with cold...

Страница 84: ...electricity DO NOT touch the electrodes shown in the illustration d Wipe the scanner window with a dry lint free cloth e Put the drum unit and toner cartridge assembly back in the printer f Close the front cover g Plug the printer back in and then turn on the power switch ...

Страница 85: ...and then open the front cover b Take out the drum unit and toner cartridge assembly CAUTION We recommend that you put the drum unit and toner cartridge assembly on a piece of disposable paper or cloth in case you accidentally spill or scatter toner To prevent damage to the printer from static electricity DO NOT touch the electrodes shown in the illustration ...

Страница 86: ...ently sliding the blue tab from right to left and left to right several times CAUTION Be sure to return the tab to the home position a 1 If you do not printed pages may have a vertical stripe d Put the drum unit and toner cartridge assembly back in the printer Close the front cover 1 ...

Страница 87: ...ver for the printer has been chosen and is installed The PC is set up to connect to the correct printer port Printer does not print If you did not solve your problem with the above checks identify your problem and then go to the page suggested below Printer LED is blinking See LEDs Light Emitting Diodes on page 45 Status Monitor Error Message appears See Error messages in the Status Monitor on pag...

Страница 88: ... properly installed If it is empty put a new stack of paper in the paper tray and then press Go If there is paper in the paper tray make sure it is straight If the paper is curled straighten it before printing Sometimes it is helpful to remove the paper turn the stack over and put it back in the paper tray Cut the amount of paper in the paper tray and then try again Make sure you use paper that me...

Страница 89: ...f you want to delete the remaining data in the printer memory See Control panel buttons on page 51 If this does not clear the error reduce the complexity of your document or cut the print resolution Add more memory See Installing extra memory on page 58 Set page protection to AUTO by using the supplied Windows driver or Remote Printer Console program Change the following settings in the supplied W...

Страница 90: ...ncel the print job if you want to delete the remaining data in the printer memory See Control panel buttons on page 51 If this does not clear the error reduce the complexity of your document or cut the print resolution Add more memory See Installing extra memory on page 58 Set page protection to AUTO by using the supplied Windows driver or Remote Printer Console program Change the following settin...

Страница 91: ... sure that you have chosen the MP Tray in the Paper Source of the printer driver The printer does not feed envelopes The printer can feed envelopes from the multi purpose tray You must set up your application to print on the size of envelopes you are using This is usually done in the page setup or document setup menu of your software See your application manual A paper jam has occurred Clear the j...

Страница 92: ...ammed paper is removed completely by following the steps below you can install the paper tray first and then close the front cover The printer will resume printing automatically If the printer does not start printing automatically press Go If the printer still does not start printing check that all the remaining jammed paper has been removed from the printer Then try printing again Note Always rem...

Страница 93: ...nt cover b Slowly take out the drum unit and toner cartridge assembly The jammed paper will be pulled out with the drum unit and toner cartridge assembly CAUTION To prevent damage to the printer caused by static electricity DO NOT touch the electrodes shown in the illustration ...

Страница 94: ...7 Troubleshooting 86 c Pull the paper tray completely out of the printer d Close the front cover e Pull the jammed paper up and out of the printer f Open the front cover again ...

Страница 95: ...7 Troubleshooting 87 g Open the back cover h Pull the tabs at the left and right hand sides toward you to open the fuser cover 1 i Using both hands gently pull the jammed paper out of the fuser unit 1 ...

Страница 96: ...inter will be extremely hot Wait for the printer to cool down before you touch the internal parts of the printer j Fully close the back cover k Pull the duplex tray completely out of the printer l Pull the the jammed paper out of the printer or the duplex tray Put the duplex tray back in the printer ...

Страница 97: ...ndle the toner cartridge carefully If toner scatters on your hands or clothes wipe or wash it off with cold water at once To avoid print quality problems DO NOT touch the shaded parts shown in the illustrations n Put the toner cartridge back into the drum unit until you hear it lock into place If you put the cartridge in properly the blue lock lever will lift automatically ...

Страница 98: ...ting 90 o Put the drum unit and toner cartridge assembly back in the printer p Put the paper tray firmly back in the printer q Close the front cover r Make sure that the Paper LED is now off and the printer is ready ...

Страница 99: ... See About paper on page 5 Check the printer s environment Conditions such as high temperatures and high humidity can increase the amount of background shading See Positioning the printer on page 4 Put in a new toner cartridge See Replacing the toner cartridge on page 63 Put in a new drum unit See Replacing the drum unit on page 68 Ghost Make sure that you use paper that meets our specifications R...

Страница 100: ...a type in the printer driver The problem may disappear by itself Print multiple pages to clear this problem especially if the printer has not been used for a long time The drum unit may be damaged Put in a new drum unit See Replacing the toner cartridge on page 63 Lines across the page Clean the inside of the printer and the primary corona wire in the drum unit See Cleaning on page 73 The drum uni...

Страница 101: ...ition of the poor print b Turn the drum unit gear by hand while looking at the surface of the OPC drum 1 c When you have found the mark on the drum that matches the print sample wipe the surface of the OPC drum with a cotton swab until the dust or paper powder on the surface comes off CAUTION DO NOT clean the surface of the photosensitive drum with a sharp object The drum unit may be damaged Put i...

Страница 102: ...the toner cartridge on page 63 The fuser unit may be smudged Call your dealer or Brother Customer Service Page skewed Make sure that the paper or other print media is loaded properly in the paper tray and that the guides are not too tight or too loose against the paper stack Set the paper guides correctly See Printing on plain paper bond paper or transparencies from Tray 1 2 or 3 on page 9 If you ...

Страница 103: ...put tray Wrinkles or creases a Open the back cover b Press against the 1 on the blue levers on either side of the printer as shown below c As the top of the lever rotates backward lift the bottom portion of the lever from below until it stops d Close the back cover and resend the print job Note When you have finished printing open the back cover and reset the two blue levers back to their original...

Страница 104: ...6 Poor Fixing Open the back cover and make sure that the two blue levers on the left and right hand sides are in the down position Examples of poor print quality Recommendation ABCDEFGH abcdefghijk A B C D abcde 0 1 2 3 4 ...

Страница 105: ...rinter memory Cancel the print job if you want to delete the remaining data in the printer memory See Control panel buttons on page 51 Reduce the complexity of your document or cut the print resolution Add more memory See Installing extra memory on page 58 The printer cannot print full pages of a document An error message PRINT OVERRUN is printed out Press Go to print the remaining data in the pri...

Страница 106: ...ter is turned on Make sure that the USB interface cable is connected correctly Make sure the printer driver is installed correctly Unable to print from the application Make sure that the supplied Macintosh printer driver is installed in the Hard Disk and that it is chosen with Chooser Mac OS 9 1 to 9 2 Print Center Mac OS X 10 2 or Print Setup Utility Mac OS X 10 3 or greater Problem Recommendatio...

Страница 107: ...lling extra memory on page 58 The printer cannot print EPS data that includes binary You need the following settings to print EPS data a From the Start menu select Control Panel and then Printer 1 1 Printers and Faxes for Windows XP users b Right click the Brother HL 5240 5250DN BR_Script3 series icon and select Properties c From the Device Settings tab Choose TBCP Tagged binary communication prot...

Страница 108: ...e slower Appendix Model HL 5240L HL 5240 HL 5250DN Technology Electrophotographic Print speed Up to 24 ppm A4 size 1 Up to 30 ppm Letter size 1 Up to 28 ppm A4 size 1 First print time Less than 8 5 sec Resolution Windows 95 98 Me Windows NT 4 0 and Windows 2000 XP 1200 dpi 2 HQ1200 600 dpi 300 dpi DOS 600 dpi Mac OS 1200 dpi 2 HQ1200 600 dpi 300 dpi Linux 600 dpi 300 dpi ...

Страница 109: ... HL 5240L HL 5240 HL 5250DN Processor 266MHz Memory Standard 16 MB 32 MB Option 1 DIMM slot expandable up to 528 MB 1 DIMM slot expandable up to 544 MB Interface Standard Hi Speed USB 2 0 1 IEEE 1284 Parallel Hi Speed USB 2 0 1 IEEE 1284 Parallel 10 100BASE TX Ethernet Option 10 100BASE TX Ethernet NC 2100p N A Network Connectivity Protocols TCP IP NetBEUI Optional NC 2100p TCP IP Standard 10 100B...

Страница 110: ...P 1 Windows NT 4 0 Generic PCL Driver for Windows NT 4 0 Windows 2000 XP BR Script 3 PPD file for Windows 95 98 Me 2000 XP 1 Windows NT 4 0 Macintosh Brother Laser Driver for Mac OS 9 1 to 9 2 and Mac OS 10 2 4 or greater BR Script 3 PPD file for Mac OS 9 1 to 9 2 and Mac OS 10 2 4 or greater Linux LPR driver for Linux 2 CUPS driver for Linux 2 Utilities Interactive Help 3 Interactive Help 3 Drive...

Страница 111: ... 60 to 161 g m2 16 to 43 lb Paper tray 60 to 105 g m2 16 to 28 lb Lower tray unit Option LT 5300 60 to 105 g m2 16 to 28 lb Automatic duplex printing N A 60 to 105 g m2 16 to 28 lb Media sizes Multi purpose tray Width 69 9 to 215 9 mm 2 75 to 8 5 in Length 116 to 406 4 mm 4 57 to 16 in Paper tray Standard A4 Letter Legal 2 B5 ISO Executive A5 A6 B6 ISO Lower tray unit Option LT 5300 A4 Letter Lega...

Страница 112: ...and toner cartridge Approx 8 6 kg 19 0 lb not including the drum unit and toner cartridge Approx 9 8 kg 21 6 lb including the drum unit and toner cartridge Model HL 5240L HL 5240 HL 5250DN Power consumption Printing Average 610 W at 25 C 77 F Average 610 W at 25 C 77 F Standby Average 80 W at 25 C 77 F Average 80 W at 25 C 77 F Sleep Average 8 W Average 9 W Noise level Sound Pressure Printing 53 d...

Страница 113: ...rd Disk Space Windows 95 1 98 98SE 486 66 MHz 8 MB 16 MB 40 MB NT Workstation 4 0 1 Intel Pentium 75 MHz 16 MB 32 MB 50 MB 2000 Professional Intel Pentium 133 MHz 64 MB 128 MB 50 MB Me Intel Pentium 150 MHz 32 MB 64 MB 50 MB XP Home Edition Intel Pentium 300 MHz 128 MB 128 MB 50 MB XP Professional XP Professional x64 Edition 2 AMD Opteron AMD Athlon 64 Intel Xeon with Intel EM64T Intel Pentium 4 w...

Страница 114: ... Long grain and short grain The pulp fiber of the paper is aligned during paper manufacturing And paper can be classified into two types long grain and short grain Long grain paper s fiber direction is parallel to the carriage direction of the paper in the printer Short grain paper s fiber direction is vertical to the carriage direction of the paper in the printer Though most plain paper for copyi...

Страница 115: ...acteristics of the paper This can change greatly depending on the storage environment although usually paper contains about 5 water by weight Because paper often absorbs water the amount of water can sometimes be about 10 in a high humidity environment When the amount of water increases the characteristics of the paper changes greatly The fixing of the toner may become worse For storage of the pap...

Страница 116: ...5 10 5 in A4 210 297 mm A5 148 210 mm A6 105 148 mm Envelope Monarch 3 875 7 5 in Envelope 9 3 875 8 9 in Envelope 10 4 12 9 5 in Envelope 11 4 5 10 375 in Envelope DL 110 220 mm Envelope C5 162 229 mm Envelope C6 114 162 mm B5 JIS 182 257 mm B5 ISO 176 250 mm B6 125 176 mm Folio 8 5 13 in ...

Страница 117: ...d Click OK e Choose the HP LaserJet IBM Proprinter XL or EPSON FX 850 tab and click Font Setup Choose a symbol set you want to use from the Symbol Set list box How to use the Remote Printer Console To use the Remote Printer Console software follow the steps below For Windows a Put the CD ROM into your CD ROM drive and close the opening screen when it appears b Open Windows Explorer and choose the ...

Страница 118: ... French 0F ISO57 Chinese 2K ISO60 Norwegian1 0D ISO61 Norwegian2 1D ISO69 French 1F ISO84 Portuguese 5S ISO85 Spanish 6S ISO8859 7 Latin Greek 12N ISO8859 15 Latin 9N ISO8859 15 Latin Cyrillic 10N Legal 1U Math 8 8M MC Text 12J MS Publishing 6J PC8 10U PC8 Bulgarian 13R PC8 D N 11U PC8 Greek Alternate 437G 14G PC8 Latin Greek 12G PC8 PC Nova 27Q PC8 Turkish 9T PC775 26U PC850 Multilingual 12U PC85...

Страница 119: ...in2 9E Windows Latin5 5T Wingdings 579L IBM mode PC8 PC8 D N PC8 Turkish PC850 Multilingual PC852 East Europe PC860 Portugal PC863 Canadian French PC865 Nordic Epson mode Danish I Danish II Dutch French I French II German Italian Norwegian Japanese PC8 PC8 D N PC8 Turkish PC850 Multilingual PC852 East Europe PC860 Portugal PC863 Canadian French PC865 Nordic South African Spanish Swedish UK ASCII I...

Страница 120: ...do not apply in the bar code commands If certain parameters are not given they take the preset settings The last parameter must be the bar code data start b or B or the expanded character data start l or L Other parameters can be given in any sequence Each parameter can start with a lower case or upper case character for example t0 or T0 s3 or S3 and so one Bar code mode Code ESC i Dec 27 105 Hex ...

Страница 121: ...mode is chosen this bar code style parameter is ignored Expanded Character S 0 White 1 Black 2 Vertical stripes 3 Horizontal stripes 4 Cross hatch For example S n1 n2 n1 Background fill pattern n2 Foreground fill pattern If S is followed by only one parameter the parameter is a foreground fill pattern Line block drawing box drawing S 1 Black 2 Vertical stripes 3 Horizontal stripes 4 Cross hatch Ba...

Страница 122: ...h Bar code expanded character unit line block drawing and box drawing This parameter shows the measurement units of X axis offset Y axis offset and bar code height Bar code expanded character line block drawing and box drawing offset in X axis n xnnn or Xnnn This parameter shows the offset from the left margin in the u or U specified unit Bar code expanded character offset in Y axis n ynnn or Ynnn...

Страница 123: ...Bar code data must end with the code 5CH which also ends this command The acceptable bar code data is determined by the bar code mode selected by t or T When CODE 39 is chosen with the parameter t0 or T0 Forty three characters 0 to 9 A to Z space and can be accepted as bar code data Other characters will cause a data error The number of characters for bar codes is not limited The bar code data aut...

Страница 124: ...ode data 1 can be used instead of a check digit 2 Adding and two digit or five digit number after the data creates an add on code When Codebar is chosen with the parameter t9 or T9 Characters 0 to 9 can be printed Characters A to D can be printed as a start stop code which can be upper case or lower case If there is no start stop code errors will happen A check digit cannot be added and using caus...

Страница 125: ...ing data Expanded character data must end with the code 5CH which also ends this command Example Program Listings WIDTH LPT1 255 CODE 39 LPRINT CHR 27 it0r1s0o0x00y00bCODE39 Interleaved 2 of 5 LPRINT CHR 27 it1r1s0o0x00y20b123456 FIM LPRINT CHR 27 it3r1o0x00y40bA Post Net LPRINT CHR 27 it4r1o0x00y60b1234567890 EAN 8 LPRINT CHR 27 it5r1o0x00y70b1234567 UPC A LPRINT CHR 27 it5r1o0x50y70b12345678901 ...

Страница 126: ...PRINT CHR 27 it13r1o0x00y140bCODE128B12345 Code 128 set C LPRINT CHR 27 it14r1o0x00y160b CHR 1 CHR 2 ISBN EAN LPRINTCHR 27 it130r1o0x00y180b123456789012 12345 EAN 128 set A LPRINT CHR 27 it132r1o0x00y210b1234567890 LPRINT CHR 12 END ...

Страница 127: ...t http www brother com registration Frequently asked questions FAQs The Brother Solutions Center is our one stop resource for all your printer needs You can download the latest drivers software and utilities read FAQs and troubleshooting tips to learn how to get the most from your Brother product http solutions brother com You can check here for Brother driver updates Customer Service Visit http w...

Страница 128: ... where it is needed This printer has a Class 3B laser diode which produces invisible laser radiation in the laser unit You should not open the laser unit under any circumstances Caution Use of controls or adjustments or performance of procedures other than those specified in this User s Guide may result in hazardous radiation exposure For Finland and Sweden LUOKAN 1 LASERLAITE KLASS 1 LASER APPARA...

Страница 129: ... with the above recycling symbol It means that at the end of the life of the equipment you must dispose of it separately at an appropriate collection point and not place it in the normal domestic unsorted waste stream This will benefit the environment for all European Union only Maximum radiation power 5 mW Wave length 770 810 nm Laser class Class 3B ...

Страница 130: ... label DO NOT connect it to a DC power source If you are not sure contact a qualified electrician Disconnect device You must install this printer near a power outlet that is easily accessible In case of an emergency you must disconnect the power cord from the power outlet to shut off the power completely Caution for LAN connection For model HL 5250DN Connect this product to a LAN connection that i...

Страница 131: ...B Appendix For Europe and Other Countries 123 EC Declaration of Conformity ...

Страница 132: ... you in the event of product loss covered by insurance and will help us notify you of enhancements to your product and special offers Please complete the Brother Warranty Registration or for your convenience and most efficient way to register your new product register on line at http www brother com registration FAQs Frequently asked questions The Brother Solutions Center is our one stop resource ...

Страница 133: ... selection of the Brother accessories and supplies that are available for purchase In USA 1 800 276 7746 In Canada 1 877 BROTHER In USA Printer Customer Support Brother International Corporation 15 Musick Irvine CA 92618 In Canada Brother International Corporation Canada Ltd Marketing Dept 1 rue Hotel de Ville Dollard des Ormeaux PQ Canada H9B 3H6 Internet Addresses Brother Global Web Site http ww...

Страница 134: ...antee that interference will not occur in a particular installation If this equipment does cause harmful interference to radio or television reception which can be determined by turning the equipment off and on the user is encouraged to try to correct the interference by one or more of the following measures Reorient or relocate the receiving antenna Increase the separation between the equipment a...

Страница 135: ...For USA and Canada 127 Industry Canada Compliance Statement For Canada This Class B digital apparatus complies with Canadian ICES 003 Cet appareil numérique de la classe B est conforme à la norme NMB 003 du Canada ...

Страница 136: ...ducts marketed in the United States One of the following labels on the back of the printer indicates compliance with the FDA regulations and must be attached to laser products marketed in the United States Caution Use of controls adjustments or performance of procedures other than those specified in this User s Guide may result in hazardous radiation exposure Internal laser radiation MANUFACTURED ...

Страница 137: ...at the power is grounded and that the installation is completely safe For your safety if in any doubt about the effective grounding of the power call a qualified electrician This product should be connected to an AC power source within the range indicated on the rating label DO NOT connect it to a DC power source If you are not sure contact a qualified electrician Disconnect device You must instal...

Страница 138: ...7 78 Cover open 48 D Device options 29 Dimensions 104 Dimm 57 DOS 98 Download full 48 Driver Deployment Wizard 42 Drum life end soon 47 Drum unit 68 103 Duplex disabled 48 Duplex printing 19 Dust on drum 48 E Emulation 101 Emulation modes 43 Envelopes 7 15 EPSON FX 850 mode 43 Error messages 80 82 F Font full 48 Fonts 54 101 Front view 2 H HP LaserJet mode 43 I Incorrect paper size for DX 48 Inter...

Страница 139: ...inter settings 53 Processor 101 Proprinter XL mode 43 R Register your product 119 124 Remote Printer Console 44 109 Reprint 30 51 S Scanner window 76 Service call 49 Service centers USA Canada 125 Service centres Europe and other countries 119 Software 42 Specifications 100 Support tab 33 Symbol 109 System requirements 105 T Toner cartridge 62 103 Toner life end 47 62 Toner low 47 Too many trays 4...

Отзывы: