background image

16

Windows

®

Wired Network

c

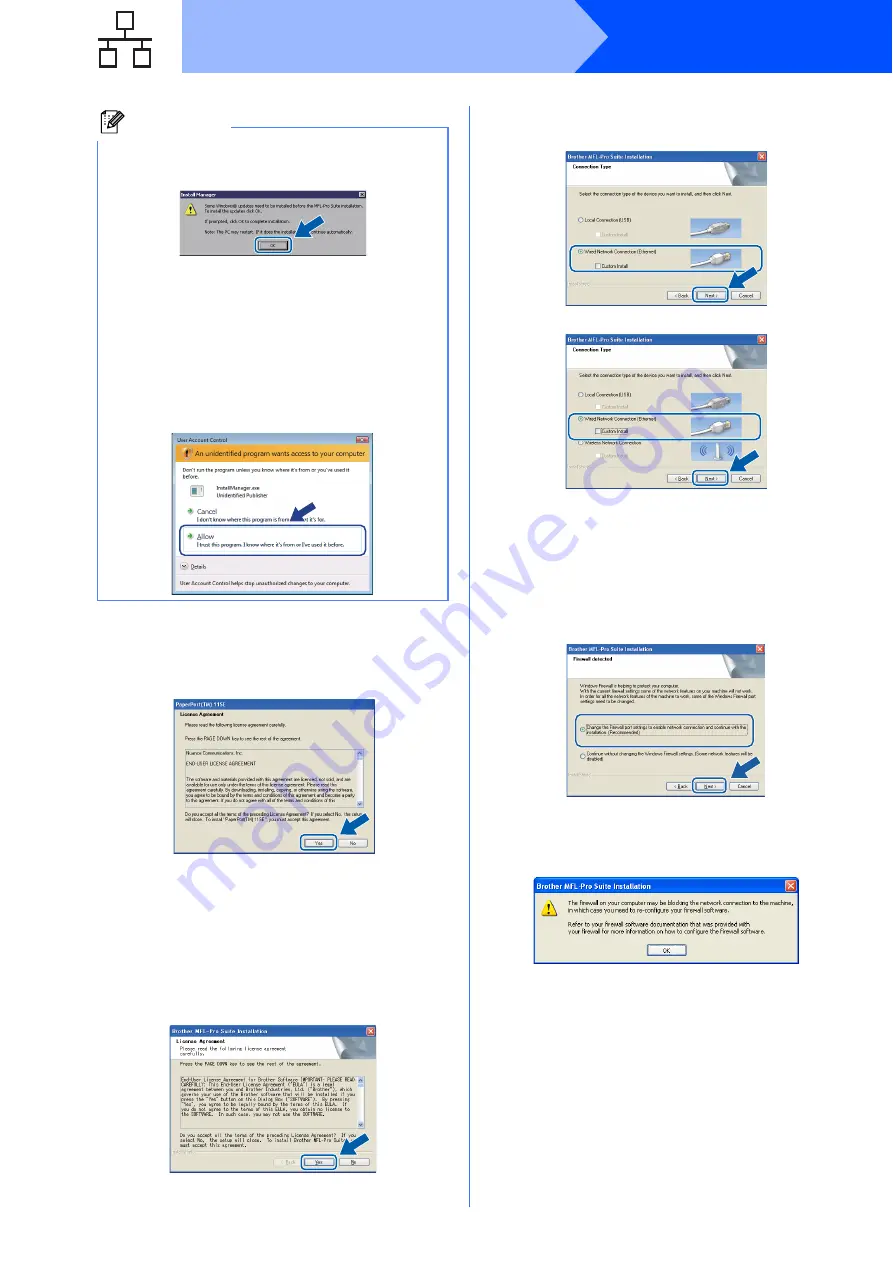
When the ScanSoft

 PaperPort

 11SE 

License Agreement

 window appears, click 

Yes

 if you agree to the Software 

License 

Agreement

.

d

The installation of ScanSoft

 PaperPort


11SE will automatically start and is followed by 
the installation of MFL-Pro Suite.

e

When the Brother MFL-Pro Suite Software 

License Agreement

 window appears, click 

Yes

 if you agree to the Software 

License 

Agreement

.

f

Choose 

Wired Network Connection

, and 

then click 

Next

.

g

For Windows

®

 XP SP2 or greater/XP 

Professional x64 Edition/Windows Vista

®


users, when this screen appears, choose 

Change the Firewall port settings to enable 
network connection and continue with the 
installation. (Recommended)

 and click 

Next

.

If you are using a firewall other than Windows

®


Firewall or Windows

®

 Firewall is off, this screen 

may appear.

See the instructions provided with your firewall 
software for information on how to add the 
following network ports.

„

For network scanning, add UDP port 54925.

„

If you still have trouble with your network 
connection, add UDP port 137.

Note

• If this screen appears, click 

OK

 and restart 

your computer.

• If the installation does not continue 

automatically, open the top menu again by 
ejecting and then reinserting the CD-ROM or 
double-click the 

start.exe

 program from the 

root folder, and continue from

b

 to install 

MFL-Pro Suite.

• For Windows Vista

®

, when the 

User Account 

Control

 screen appears, click 

Allow

.

(DCP-365CN)

(DCP-373CW/375CW/377CW)

Содержание DCP-365CN

Страница 1: ...personal injury CAUTION Cautions specify procedures you must follow or avoid to prevent possible minor injuries IMPORTANT DO NOT connect the USB cable yet if you are using a USB cable Inbox Ink Cartridges x4 Black Yellow Cyan Magenta Approx 65 yield of the replacement cartridge For details see Consumable items in the User s Guide Quick Setup Guide User s Guide CD ROM Power Cord Note The components...

Страница 2: ...r length guide b line up with the mark for the paper size you are using d Fan the stack of paper well to avoid paper jams and misfeeds e Gently put the paper into the paper tray print side down and top edge first Check that the paper is flat in the tray f Gently adjust the paper side guides to the paper with both hands Make sure that the paper side guides touch the edges of the paper g Close the o...

Страница 3: ...ss OK Select Language q Press OK Key b Press a or b to choose your language and press OK English e q Select ab OK c Press a Yes to confirm the language setting IMPORTANT DO NOT connect the USB cable yet if you are using a USB cable Note The Warning LED on the control panel will stay on until you have installed the ink cartridges 2 1 If you set the wrong language you can change the language after s...

Страница 4: ...een protective part a d Unpack the ink cartridge e Turn the green knob on the protective yellow cap clockwise until it clicks to release the vacuum seal then remove the cap a f Take care to match the colour of the lever a with the cartridge colour b as shown in the diagram below g Install each ink cartridge in the direction of the arrow on the label Note Do not throw away the green protective part...

Страница 5: ...o to step 7 If you can see missing short lines press b No and go to d d The LCD asks you if the print quality is OK for black and colour Press a Yes or b No Black OK q a Yes b No Color OK q a Yes b No After pressing a Yes or b No for both black and colour the LCD shows Start Cleaning q a Yes b No e Press a Yes the machine will then start cleaning the colours f After cleaning is finished press Colo...

Страница 6: ...Stop Exit 8 Set the date and time Setting the date and time allows the machine to clean the print head regularly and maintain optimum print quality It also allows the machine to name files created when using the Scan to Media feature a Press Menu b Press a or b to choose 0 Initial Setup Press OK c Press a or b to choose 1 Date Time Press OK d Press a or b to enter the last two digits of the year a...

Страница 7: ... type For USB interface cable Windows go to page 8 Macintosh go to page 12 For Wired Network Windows go to page 14 Macintosh go to page 19 For Wireless Network DCP 373CW 375CW 377CW only Windows and Macintosh go to page 22 Note For Windows Server 2003 2008 see the Network User s Guide on the CD ROM ...

Страница 8: ...all MFL Pro Suite IMPORTANT DO NOT connect the USB cable yet If there are any programs running close them Make sure there are no memory cards or a USB Flash memory drive inserted into the machine The screens may differ depending on your operating system The supplied CD ROM includes ScanSoft PaperPort 11SE This software supports Windows 2000 SP4 or greater XP SP2 or greater XP Professional x64 Edit...

Страница 9: ...k Yes if you agree to the Software License Agreement f Choose Local Connection and then click Next The installation continues g When this screen appears go to the next step Note If this screen appears click OK and restart your computer If the installation does not continue automatically open the top menu again by ejecting and then reinserting the CD ROM or double click the start exe program from t...

Страница 10: ...Lift the scanner cover to release the lock a Gently push the scanner cover support down b and close the scanner cover c e The installation will continue automatically The installation screens appear one after another f When the On Line Registration screen is displayed make your selection and follow the on screen instructions IMPORTANT DO NOT connect the machine to a USB port on a keyboard or a non...

Страница 11: ... software installation run the Installation Diagnostics located in Start All Programs Brother DCP XXXX where DCP XXXX is your model name Note Internet access is required for the firmware update Finish The installation is now complete Note XML Paper Specification Printer Driver The XML Paper Specification Printer Driver is the most suitable driver when printing from applications that use the XML Pa...

Страница 12: ...ight as shown below c Carefully guide the USB cable through the trench as shown below following the trench around and toward the back of the machine Then connect the cable to your Macintosh IMPORTANT For the latest drivers and information on the Mac OS X you are using visit http solutions brother com For Mac OS X 10 3 0 to 10 3 8 users upgrade to Mac OS X 10 3 9 10 5 x Make sure there are no memor...

Страница 13: ...allation click Restart to finish installing the software e The Brother software will search for the Brother device f Choose the machine from the list and then click OK g When this screen appears click OK The installation of MFL Pro Suite is now complete Go to step 13 on page 13 13 Install Presto PageManager When Presto PageManager is installed OCR capability is added to Brother ControlCenter2 You ...

Страница 14: ...u will find the LAN socket inside the machine on the left as shown below IMPORTANT If there are any programs running close them Make sure there are no memory cards or a USB Flash memory drive inserted into the machine The screens may differ depending on your operating system The supplied CD ROM includes ScanSoft PaperPort 11SE This software supports Windows 2000 SP4 or greater XP SP2 or greater XP...

Страница 15: ... LAN cables are being used guide both cables through the trench with one on top of the other IMPORTANT Make sure that the cable does not restrict the cover from closing or an error may occur IMPORTANT If you have previously set up your machine for a wireless network and then want to set it up on a wired network you should check that the machine s Network I F is set to Wired LAN The wireless networ...

Страница 16: ...able network connection and continue with the installation Recommended and click Next If you are using a firewall other than Windows Firewall or Windows Firewall is off this screen may appear See the instructions provided with your firewall software for information on how to add the following network ports For network scanning add UDP port 54925 If you still have trouble with your network connecti...

Страница 17: ...rk it will be chosen automatically If your machine is not found over the network the following screen will appear Confirm your settings by following the on screen instructions If the IP address of the machine is not yet configured for use on your network the following screen appears Click OK and then click Configure IP Address Enter an IP address for your machine that is suitable for your network ...

Страница 18: ... name Note Internet access is required for the firmware update Note Network license Windows This product includes a PC license for up to 2 Users This license supports the installation of the MFL Pro Suite including ScanSoft PaperPort 11SE on up to 2 PCs on the network If you want to use more than 2 PCs with ScanSoft PaperPort 11SE installed please purchase the Brother NL 5 pack which is a multiple...

Страница 19: ... left as shown below IMPORTANT For the latest drivers and information on the Mac OS X you are using visit http solutions brother com For Mac OS X 10 3 0 to 10 3 8 users upgrade to Mac OS X 10 3 9 10 5 x Make sure there are no memory cards or a USB Flash memory drive inserted into the machine If you have previously set up your machine for a wireless network and then want to set it up on a wired net...

Страница 20: ... b Double click the Start Here OSX icon to install c Choose Wired Network Connection and then click Next Follow the on screen instructions d Please wait it will take a few seconds for the software to install After the installation click Restart to finish installing the software e The Brother software will search for the Brother device IMPORTANT Make sure that the cable does not restrict the cover ...

Страница 21: ...nd follow the on screen instructions 14 Install MFL Pro Suite on additional computers if needed If you want to use your machine with multiple computers on the network install MFL Pro Suite on each computer Go to step 12 on page 20 Also see step 10 a on page 19 before you install Note If your machine is not found over the network confirm your network settings If this screen appears click OK Enter a...

Страница 22: ...CW 377CW can be used in both a wired and wireless network only one of the connection methods can be used at a time The following instructions are for infrastructure mode connected to a computer through an access point router Infrastructure Mode a Access point router b Wireless Network machine your machine c Wireless capable computer connected to the access point router d Wired computer connected t...

Страница 23: ...ettings of your wireless access point router in the area below IMPORTANT If you do not know this information Network Name SSID ESSID and Password you cannot continue the wireless setup You should see the documentation provided with your wireless access point router consult the router manufacturer or your system administrator Item Record the current wireless network settings Network Name SSID ESSID...

Страница 24: ...letters For more information see Entering Text for Wireless Settings DCP 373CW 375CW 377CW only on page 37 Press OK when you have entered all the characters then press a Yes to apply your settings Go to d d Your machine will now try to connect to your wireless network using the information you have entered If successful Connected will appear for 60 seconds on the LCD It may take a few minutes to c...

Страница 25: ...mode or AOSS mode enabled Make sure that only one wireless access point router has one of these modes enabled and try starting from c again If the LCD shows Setting WLAN then No Access Point the machine has not detected the access point router on your network with the SecureEasySetup Wi Fi Protected Setup or AOSS mode enabled Move your machine close to the access point router and try starting from...

Страница 26: ...26 For Wireless Network Users Wireless setup is now complete To install MFL Pro Suite continue to step 13 For Windows Users Now go to Page 27 For Macintosh Users Now go to Page 31 ...

Страница 27: ...T If there are any programs running close them Make sure there are no memory cards or a USB Flash memory drive inserted into the machine The screens may differ depending on your operating system The supplied CD ROM includes ScanSoft PaperPort 11SE This software supports Windows 2000 SP4 or greater XP SP2 or greater XP Professional x64 Edition and Windows Vista Update to the latest Windows Service ...

Страница 28: ...reen appears choose Change the Firewall port settings to enable network connection and continue with the installation Recommended and click Next If you are using a firewall other than Windows Firewall or Windows Firewall is off this screen may appear See the instructions provided with your firewall software for information on how to add the following network ports For network scanning add UDP port...

Страница 29: ...n will be terminated Confirm your settings by following the on screen instructions If you encounter this failure go to step 11 a on page 23 and setup the wireless connection again If you are using WEP and the LCD displayed Connected but your machine is not found make sure you entered the WEP key correctly The WEP key is case sensitive If the IP address of the machine is not yet configured for use ...

Страница 30: ...ess is required for the firmware update Note Network license Windows This product includes a PC license for up to 2 Users This license supports the installation of the MFL Pro Suite including ScanSoft PaperPort 11SE on up to 2 PCs on the network If you want to use more than 2 PCs with ScanSoft PaperPort 11SE installed please purchase the Brother NL 5 pack which is a multiple PC license agreement p...

Страница 31: ... the Wireless settings checked and confirmed check box and then click Next Follow the on screen instructions e Please wait it will take a few seconds for the software to install After the installation click Restart to finish installing the software f The Brother software will search for the Brother device g If the machine is configured for your network choose the machine from the list and then cli...

Страница 32: ... use your machine with multiple computers on the network install MFL Pro Suite on each computer Go to step 13 on page 31 Note If your wireless settings fail the installation of the MFL Pro software will be terminated Confirm your network settings If you encounter this failure go to step 11 a on page 23 and setup the wireless connection again If this screen appears click OK Enter a name for your Ma...

Страница 33: ...ceFilter Studio Help a To run FaceFilter Studio go to Start All Programs Reallusion FaceFilter Studio on your computer b Click the button on the upper right corner of the screen c Click Check for updates to go to the Reallusion update web page d Click the Download button and choose a folder to save the file in e Close FaceFilter Studio before you start the installer for FaceFilter Studio Help Doub...

Страница 34: ...d Internet access required a Open the top menu again by ejecting and then reinserting the CD ROM or by double clicking the start exe program from the root folder b The CD ROM Top Menu will appear Choose your language and then click Additional Applications c Click the BookScan Whiteboard Suite button to install IMPORTANT The machine must be ON and connected to the computer The computer must be conn...

Страница 35: ...ow the on screen instructions Set your IP address Subnet Mask and Gateway using BRAdmin Light a Start BRAdmin Light It will search for new devices automatically b Double click the unconfigured device c Choose STATIC for the Boot Method Enter the IP Address Subnet Mask and Gateway and then click OK d The address information will be saved to the machine Note If you require more advanced printer mana...

Страница 36: ...tp solutions brother com Set your IP address Subnet Mask and Gateway using BRAdmin Light a Double click the Macintosh HD icon on your desktop b Choose Library Printers Brother and then Utilities c Double click the file BRAdmin Light jar and run the software BRAdmin Light will then search for new devices automatically d Double click the unconfigured device e Choose STATIC for the Boot Method Enter ...

Страница 37: ...is complete Entering Text for Wireless Settings DCP 373CW 375CW 377CW only Press a or b repeatedly to select a character from the list below abcdefghijklmnopqrstuvwxyzABCDEFGHIJKLMNOPQRSTUVWXYZ0123456789 space _ Press Enlarge Reduce key or Number of Copies key repeatedly to move the cursor Note Making corrections If you entered an incorrect letter and want to change it press Enlarge Reduce key or ...

Страница 38: ...ss and Wi Fi Protected Setup are either trademarks or registered trademarks of Wi Fi Alliance in the United States and or other countries Each company whose software title is mentioned in this manual has a Software License Agreement specific to its proprietary programs All other trademarks are the property of their respective owners Compilation and Publication Under the supervision of Brother Indu...

Отзывы: