background image

- 11 - 


Replacing the Built-In Grill’s Orifices (BCP500S/BCP500L/BCP600S/BCP600L): 

Main Burner Valve Assembly 

1. Remove the Cooking Grids and Upper Flame Tamers. 

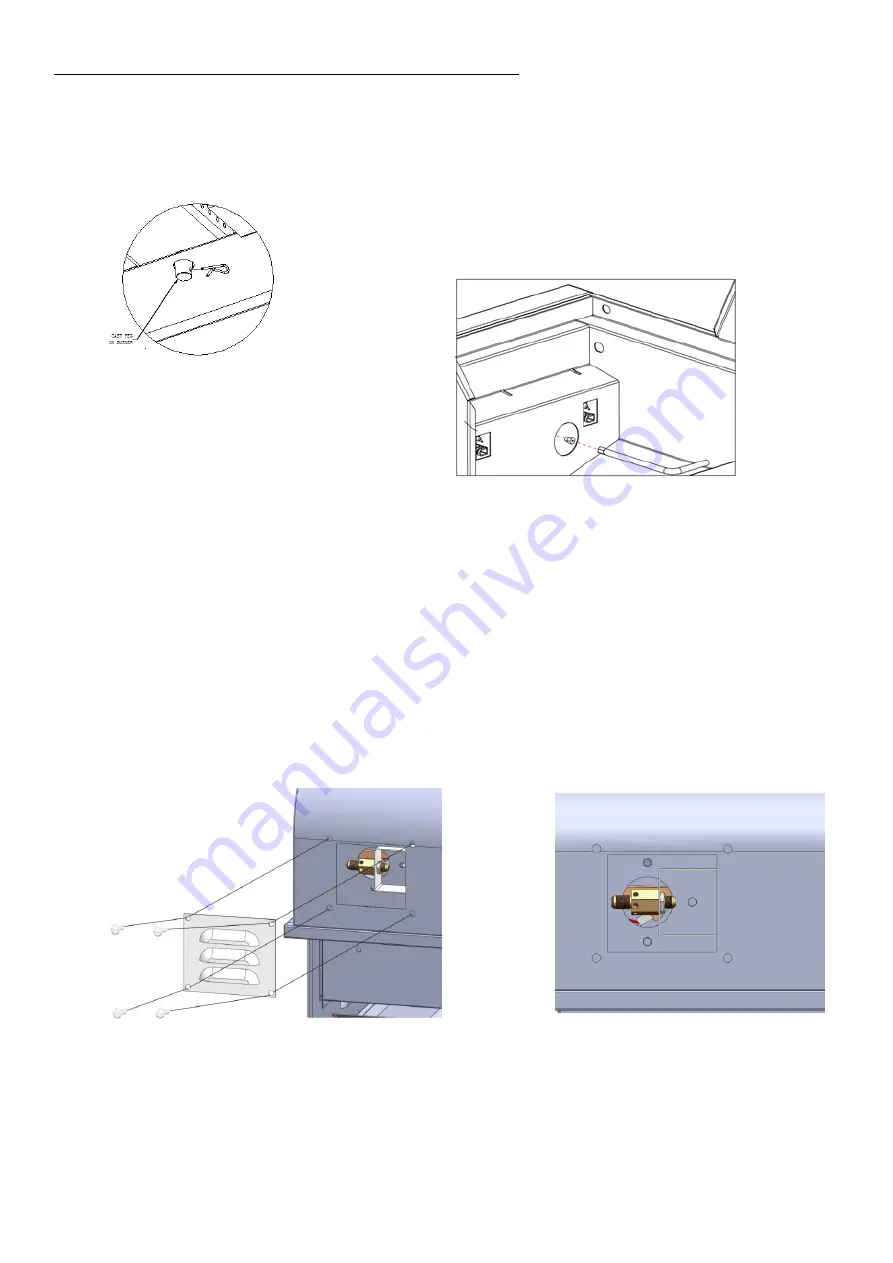
2. Remove the Cotter Pins that holds the burners at the back of the grill by using a screwdriver or needle nose pliers.

 (

See 

illustration below left).                                                     

3. Remove burners from the grill insert.                                                     

4. Using a 6mm socket wrench undo all of the main burner orifices from the 

underside of the Control Panel. (See illustration below). 


5. After all the Propane orifices are removed from the main burner valve, place them in a safe spot away from your work area. 

This will ensure that you do not re-install the Propane orifices. 

6. Replace the Main Burner Orifices with the New Natural Gas Orifices supplied. 

7. Re-install the Main Burners. Ensure that each burner is properly placed over the Main Burner orifice. 

8. Re-install the Hair Pins that holds the burners at the back of the grill. 

9. Re-install the Cooking Grids and Upper Flame Tamers.


Rear Burner:


1. Using a #2 Phillips Screwdriver undo the 4 screws that hold the Back Cover Plate to the Inner Hood. (See illustration below 

left). 


2. Once the cover has been removed use a 10mm Open Wrench to remove the Rear Burner Orifice from the Rear Burner (See 

illustration above right).Place the Propane Rear Orifice with the propane orifices you removed previously. 

3. Install the New Natural Gas Orifices supplied using the Open Wrench. 


4. Re-install the Rear Burner Cover using the 4 screws previously removed. 


Содержание PREMIUM BCP-400S

Страница 1: ...1 FOR CUSTOMER SERVICE CALL 1 877 885 8227 TOLL FREE 10 00 A M 7 00 P M EST MONDAY FRIDAY User Manual GAS GRILLS BCP 400S...

Страница 2: ...grease fire and cover your grill to prevent rust Please refer to the owner s manual for details Always read and understand the WARNINGS and INSTRUCTIONS that are contained in this manual before attem...

Страница 3: ...nd 7 Installation Method 8 Conversion from LP to NG Grill 10 Operating Your Grill 12 Connecting Disconnecting Gas Cylinder 13 Checking for Leaks 13 Lighting Your Grill 13 Flame Adjustment 14 Excess fl...

Страница 4: ...and marked in accordance with the specifications for LP gas cylinders of the National Standard of the Transportation of Dangerous Goods Commission of Canada for Cylinders Spheres and Tubes CAN CSA B1...

Страница 5: ...this grill conforms to the requirements of all local codes or in the absence of applicable local codes with the Canadian Standards Association s Natural Gas and Propane Installation Code CSA B149 1 Al...

Страница 6: ...N A Cooking Grid Dimensions 22 X 18 Total Cooking Area 610sq in includes warming rack Flame Tamer Flame Stabilizer Grid Rotisserie Kit Motor Forks Optional Burner Commercial Quality Cast Steel Gas Ty...

Страница 7: ...installed support the appliance above counter level and attach the gas line to the appliance When the gas connection is made slide the appliance into the cut out If the gas line connection is accessib...

Страница 8: ...3 4 8 1 4 INSTALLATION METHOD Installation Method for Propane for BCP 400S NOTE You will need to use a gas rated sealer on gas connectors that are not flared Note the vents should be within 5 inches o...

Страница 9: ...pproved for use on LP gas Install the pipe tee assembly to the grill intake pipe 3 Tighten assembly and align the branch opening of the tee with the hole of the cabinet Connect the flexible hose male...

Страница 10: ...must have an authorized service technician perform this procedure If these instructions are not followed exactly a fire or explosion may result causing property damage personal injury or loss of life...

Страница 11: ...the Propane orifices 6 Replace the Main Burner Orifices with the New Natural Gas Orifices supplied 7 Re install the Main Burners Ensure that each burner is properly placed over the Main Burner orifice...

Страница 12: ...compatible with the connection for outdoor cooking appliances Only the pressure regulator and hose assembly supplied with the outdoor cooking gas appliance must be used Replacement pressure regulators...

Страница 13: ...is not in use Install only the type of dust cap on cylinder valve outlet that is provided with the cylinder valve Other types of caps or plugs may result in leakage of propane DANGER To prevent fire o...

Страница 14: ...water solution never with a flame With the cooking grids and flame tamers removed light the main burners and run them on the high setting Inspect burners for proper flame appearance The ideal flame ap...

Страница 15: ...rner control knobs is in an open position when opening the LP tank valve This procedure is effective with all sizes of LP tank To ensure the procedure is safely and successfully performed please caref...

Страница 16: ...th the lid closed This allows any food particles or grease drippings to burn away Brush components to remove any remaining charred materials The appliance must be completely cooled before proceeding M...

Страница 17: ...ction of burner and valve Reconnect Spider webs or insect nest in venturi Clean venturi Burner ports clogged or blocked Clean burner ports Sudden drop in gas flow or reduced flame height Out of gas Re...

Страница 18: ...f inside lid appears to be peeling away The lid is stainless steel and is not painted Baked on grease fill up has turned to carbon and is flaking off Clean thoroughly Irregular flame Air flow is not c...

Страница 19: ...abor costs This warranty does not cover chips and scratches of porcelain or painted surfaces nor does it cover corrosion or discoloration due to misuse lack of maintenance hostile environment accident...

Страница 20: ...20 Broilchef Premium Built in Accessories Manufactured by Broilchef Premium...

Отзывы: