background image

9

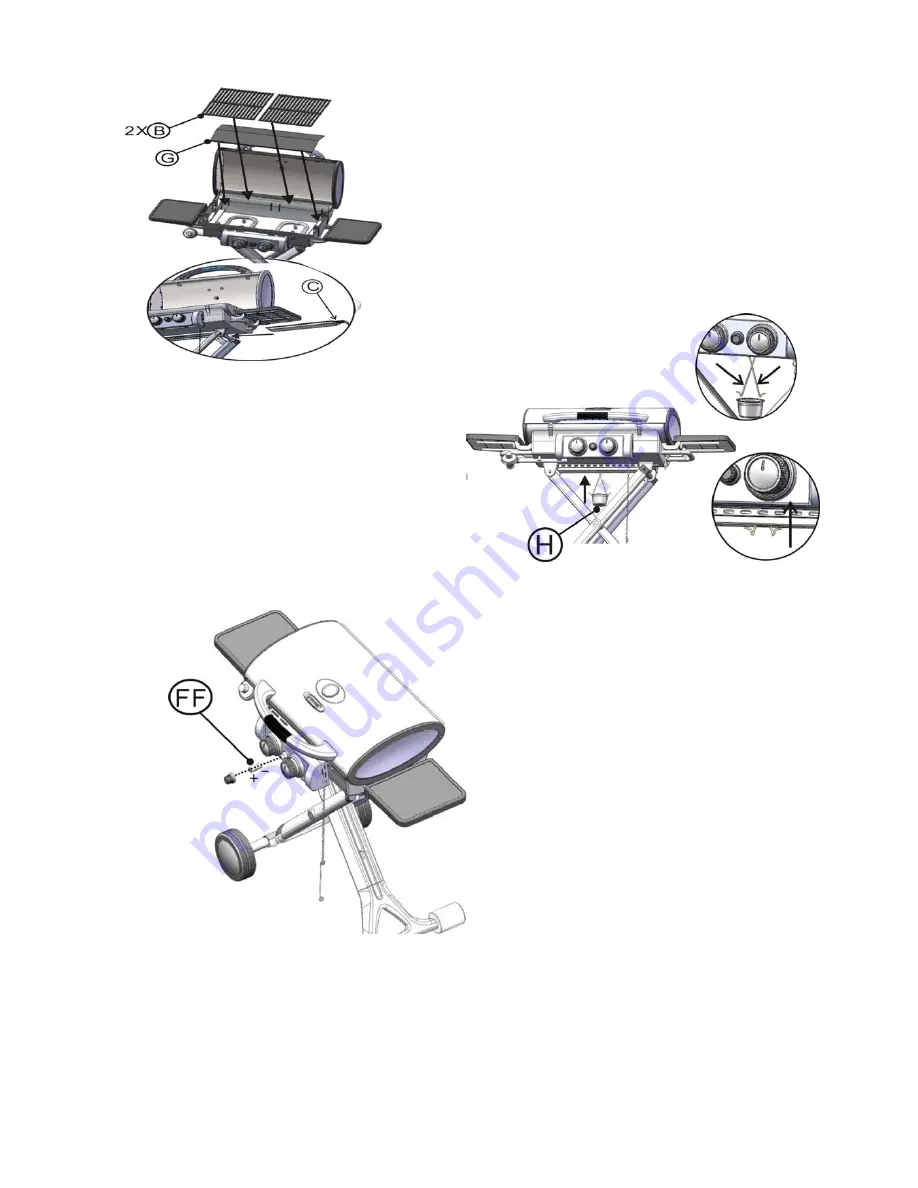
Step 6

a) Put the heat shield (G) onto the heat shield

support in the body assembly (A).

b) Put the two cooking grids (B) on the support

of the body assembly (A).

c) Slide the grease cup (C) into the guide

underneath the body assembly (A).

Step 7

Hook the grease cup (H) under the grill body.

Step 8

a) Rotate the igniter cap anticlockwise until it is open.
b) Put one battery (FF) into the battery box, and make

sure the positive pole is towards outside as the
illustration.

c) Close the igniter cap by rotating it clockwise until it

is tight.

Содержание 10107997

Страница 1: ...perty damage personal injury or death DANGER DO NOT use gas grill for indoor cooking or heating TOXIC fumes can accumulate and cause asphyxiation DO NOT use in or on boats or recreational vehicles WAR...

Страница 2: ...structions before assembling and using the appliance Follow all warnings and instructions when using the appliance NOTE This grill must be used with propane gas only propane gas cylinder not included...

Страница 3: ...al 3 Table of Contents For Your Safty 4 Illustrated Part List 7 Assembly Instructions 7 Operating the Grill 10 Checking for Leaks 11 Lighting the Grill 11 Care and Maintenance 14 Troubleshooting 15 Wa...

Страница 4: ...pane system of a camper trailer motor home or house 11 Do not use charcoal or lighter fluid 12 Do not use gasoline kerosene or alcohol for lighting The LP gas supply cylinder must be constructed and m...

Страница 5: ...er store or use gasoline or other flammable or volatile substances in the vicinity of this grill or in the vicinity of any other heat generating appliance because of the danger of starting a fire Alwa...

Страница 6: ...mmercial use 3 Don t obstruct the ventilation opening of the cylinder enclosure 4 The precaution to be taken in the case of blockage of the Venturi s Illustrated Parts List A Body Assembly 1PC B Cooki...

Страница 7: ...1PC Nut Spanner Battery Assembly Instructions Remove all contents from the carton packaging Make sure all parts are present before attempting assembly Once the grill is fully assembled go back and che...

Страница 8: ...d left handle of the body assembly A down as shown in the illustration Step 3 a Unlock the hasp on the body assembly A and leg as shown in the illustration Step 4 a Fix leg handle D by foot and raise...

Страница 9: ...de the grease cup C into the guide underneath the body assembly A Step 7 Hook the grease cup H under the grill body Step 8 a Rotate the igniter cap anticlockwise until it is open b Put one battery FF...

Страница 10: ...re regulator supplied with the outdoor cooking gas appliance must be used Replacement pressure regulators must be those specified by the outdoor cooking gas appliance manufacturer Use only 1 pound pro...

Страница 11: ...n in the area while conducting a leak test 3 Conduct the leak test outdoors in a well ventilated area 4 Do not use matches lighters or a flame to check for leaks 5 Do not use the grill until all leaks...

Страница 12: ...valve knob and rotate it counterclockwise to the HIGH position The burner should light immediately If more than one burner is to be used repeat the steps 2 and 3 until each burner is lit 4 Adjust the...

Страница 13: ...position when opening the LP cylinder valve This procedure is effective with all sizes of LP cylinder To ensure the procedure is safely and successfully performed please carefully follow these instru...

Страница 14: ...g paint baked on grease has turned to carbon and is flaking off Clean thoroughly with a strong solution of detergent and hot water Rinse with water and allow it to completely dry Interior of grill bot...

Страница 15: ...urner venturi is properly engaged with valve Sudden drop in gas flow or heat High or gusting winds Turn front of grill to face wind Low on propane gas Replace propane cylinder Flare up Grease buildup...

Страница 16: ...e lack of maintenance hostile environment accidents alterations abuse or neglect This warranty does not cover damage caused by heat abrasive and chemical cleaners resulting in chipped porcelain enamel...

Отзывы: