Brocade Communications Systems FCX 648S Скачать руководство пользователя страница 5

DATA CENTER 


CONFIGURATION GUIDE 


Configuring an iSCSI SAN Using Brocade FCX Switches 


The site should meet the following requirements: 


Maintain temperatures within 0 to 40

ο

C (32 to 104

ο

F) and humidity levels within 5% to 95%, non-

condensing. 


Allow a minimum of 3 in. of space between the sides and the back of the device and walls or other 

obstructions for proper air flow. 


Allow at least 3 in. of space at the front and back of the device for the twisted-pair, fiber-optic, and 

power cabling. 


Allow accessibility for installing, cabling, and maintaining the devices. 


Allow the status LEDs to be clearly visible. 


Allow for twisted-pair Ethernet cables to always be routed away from power lines, fluorescent lighting 

fixtures, and other sources of electrical interference, such as radios and transmitters. 


Allow for the unit to be connected to a separate grounded power outlet that provides 110 to 240 VAC, 

50 to 60 Hz, is within 2 m (6.6 feet) of each device, and is powered from an independent circuit 

breaker. As with any equipment, a filter or surge suppressor is recommended. 
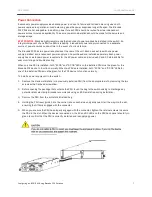
Rack Installation 

As noted in the previous section, Brocade FCX switches can be installed on a desktop or in an equipment 

rack. Due to the density of devices and associated power, cooling, and safety requirements, Brocade 

recommends installing the switches in a rack. Follow the step-by-step instructions in this section for proper 

rack installation. 

Before mounting a switch in a rack, pay particular attention to the following factors: 


Temperature.  

Since the temperature within a rack assembly may be higher than the ambient room 

temperature, ensure that the rack-environment temperature is within the specified operating 

temperature range. For details, refer to the “Operating Environment” section in the 

Brocade FCX 

Installation Guide


Mechanical loading.  

Do not place any equipment on top of a rack-mounted unit. 


Circuit overloading.  

Ensure that the supply circuit to the rack assembly is not overloaded. 


Grounding.  

Rack-mounted equipment must be properly grounded. Particular attention should be given 

to supply connections rather than direct connections to the mains. 


Содержание FCX 648S

Страница 1: ...DATA CENTER Configuring an iSCSI Storage Area Network Using Brocade FCX Switches A step by step guide describing how to install and configure Brocade FCX Switches in an iSCSI Storage Area Network SAN...

Страница 2: ...tack 8 Cabling requirements for redundancy 10 Basic Switch Setup andConfiguration 11 Powering On the System 11 Connecting to a PC or Terminal 11 Using the CLI 12 Configuring IP Addresses 12 Assigning...

Страница 3: ...d support designating one or more through Link Aggregation Groups ports for inter switch links Brocade FCX stand alone switches provide up to 40Gbps full duplex bandwidth for ISL For stacking switches...

Страница 4: ...one cable is required per switch or one per stack in a Brocade FCX stack The Ethernet cable must be connected to a corporate or data center network that allows the administrator to manage the switch r...

Страница 5: ...om an independent circuit breaker As with any equipment a filter or surge suppressor is recommended Rack Installation As noted in the previous section Brocade FCX switches can be installed on a deskto...

Страница 6: ...Remove the rack mount kit from the shipping carton The kit contains two L shaped mounting brackets and mounting screws 3 Attach the mounting brackets to the each side of the device using the provided...

Страница 7: ...er cable and includes AC and DC status LEDs for easy monitoring and troubleshooting When only one PSU is installed both AC OK and DC OK LEDs on the installed PSU must be green for the Brocade FCX devi...

Страница 8: ...the stack link so if one link fails stack communications can be maintained Figure 1 illustrates a ring topology stacking configuration In a redundant iSCSI deployment of stacked Brocade FCX switches...

Страница 9: ...of an LC LC MM Fiber cable into one of the top unit s SFP stacking ports 2 Plug the other end of the cable into one of the stacking ports of the next unit 3 Repeat steps 1 and 2 for each unit in the s...

Страница 10: ...managed as a logical switch with one active management node Each switch in the stack should have two PSUs and each PSU should be supplied by a separate power source Ensure there are two separate power...

Страница 11: ...tlet Connecting to a PC or Terminal To manage the switch connect the console serial port on the switch to a management station such as a PC running a terminal emulation application for example HyperTe...

Страница 12: ...r commands or options the CLI understands what you are typing Configuring IP Addresses At least one IP address must be configured using the serial connection to the CLI before you can manage each swit...

Страница 13: ...mand to save changes FCX648S Switch config ip address 192 168 1 252 255 255 255 0 FCX648S Switch config write memory Syntax ip address ip address sub net mask 5 Set a default gateway address for the s...

Страница 14: ...ecure to avoid allowing access to the SAN from the LAN The management port is an out of band port that customers can use to manage their switches without interfering with the in band ports The managem...

Страница 15: ...mands to configure the stack on a Brocade FCX 648 S FCX648S Switch config t FCX648S Switch config stack enable FCX648S Switch config write mem Enter these commands to configure the stack on an Brocade...

Страница 16: ...to enter unit ID for the unit in the stack being configured There are two ways to find the unit ID Every Brocade FCX switch has stack indicators in front of the switch as shown below These indicators...

Страница 17: ...rnet 1 3 2 FCX648S Switch config if e10000 1 3 2 link aggregate active Syntax interface ethernet stack unit slotnum portnum link aggregate active To configure link aggregation on a Brocade FCX 648 E u...

Страница 18: ...02 1w FCX648S Switch config write mem Syntax spanning tree 802 1w BEST PRACTICE For iSCSI deployments Brocade recommends that spanning tree be disabled on all access ports Access ports are the switch...

Страница 19: ...unit 1 FCX648S Switch config symmetric flow control enable unit 2 FCX648S Switch config write mem Syntax no symmetric flow control enable unit unit_ID NOTE Refer to the section on stack configuration...

Страница 20: ...maximum frame size of 1 500 bytes so most devices use 1 500 as their default MTU Jumbo frames are Ethernet frames with more than 1 500 bytes MTU Conventionally jumbo frames can carry up to 9 000 bytes...

Страница 21: ...connection and click View Status The Local Area Connection X Status displays 3 Click Properties 4 Click Configure 5 Click the Advanced tab 6 From the Property list select Jumbo Packet 7 From the Valu...

Страница 22: ...ibuting the load across different switches and different switch ports SWITCH CONFIGURATION DUMP This section shows a sample output of the running config from a Brocade FCX stack configured per the ins...

Страница 23: ...e ethernet 2 1 15 flow control neg on interface ethernet 2 1 16 flow control neg on interface ethernet 2 2 3 link aggregate active interface ethernet 2 2 4 link aggregate active end telnet STACK1 conf...

Страница 24: ...tems Inc All Rights Reserved 06 10 GA CG 285 00 Brocade the B wing symbol BigIron DCFM DCX Fabric OS FastIron IronView NetIron SAN Health ServerIron TurboIron and Wingspan are registered trademarks an...

Отзывы: