background image

e-mail: 

[email protected]   

voice: 

360.854.9559   

fax: 

866.783.1742 

9

SS 16.16 Installation and Operation Manual

OPERATION

Front Panel Controls:

Selecting an Input/Output channel:

1. Turn the “Output Select” encoder knob until the flashing asterisk is at the

desired output channel. 

2. Turn the “Input Select” encoder knob until the desired input channel is dis-

played.

3. When ready to select, press the “TAKE” button.
4. The display will stop flashing, indicating the selection has been made.

Power-Up Feature, user programmable:

1. Verify that dipswitch SW1-7 is OFF.
2. Select the desired input/output channel configuration.
3. Press the hidden “PGM” button with a non-metallic object.  Macro number

will be displayed in the output-1 slot on the LCD.

4. Rotate the “INPUT SELECT” encoder knob until macro number 0 displayed.
5. Press the “TAKE” button to save.
6. Your power up configuration is saved. 

Power-Up Feature, last source selected: 

1. Verify that dipswitch SW1-7 is ON.
2. The SS 16.16 will power up with whatever channel configuration was present

at power off.

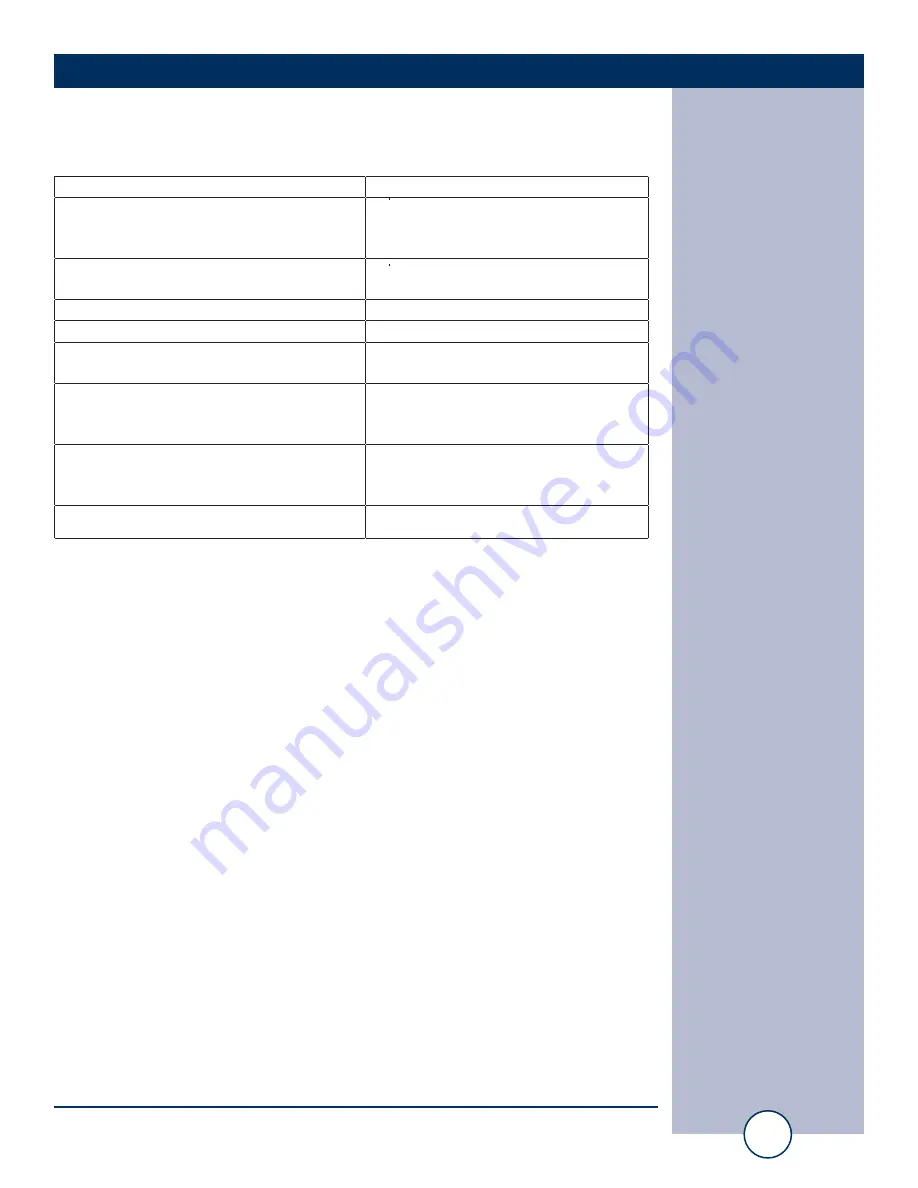
Controls:

Function:

Input Encoder

By turning this control, each input

description is displayed on the

LCD at the desired output channel.

Output Encoder

By turning this knob, the cursor will

move through the output channels.

Take Switch

Stores your selection

Mute Switch

Mutes the selected output

Macro

Either selects a macro or allows

the programming of a macro

Hidden “PGM”

Note: This switch (hole) is between

the Macro switch and PGM LED

Special programming functions

Monitor/Headphone control

Used to adjust the level of the

headphones and/or monitor

speaker

Speaker switch

Turns the monitor speaker on/off

Содержание SS 16.16

Страница 1: ...s information or new editions may be issued to incorporate such changes Broadcast Tools is a registered trademark of Broadcast Tools Inc Copyright 1989 2008 by Broadcast Tools Inc All rights reserved No part of this document may be reproduced or distributed without permission Visit www broadcasttools com for important product update information Firmware Version 1 1 or greater Manual Revised 03 25 ...

Страница 2: ...ion 5 Product Features 5 Product Description 6 Front Panel 6 Rear Panel 6 Switches 6 LED Indicators 6 Controls 6 Audio Inputs 6 Audio Outputs 6 ACT Audio Activity Sensor 7 PIP Input 7 Open Collector Outputs 7 Serial Communication 7 User Programming 7 Operation Guidelines 8 Front Panel Indicators 8 Front Panel Controls 9 Selecting Input Output channel 9 Power Up Feature 10 Macro Feature 10 Monitori...

Страница 3: ...Outputs Open Collectors 13 Adjusting Input and Output Levels 13 Remote Control 13 Connecting the RS 232 Serial Port 14 Connecting Two Units 14 Serial Control 15 Menu Mode 15 Serial Burst Mode Commands 16 Set up Commands 16 Real Time Control Commands 16 Open Collector Output Port Control 17 Audio Switch Control Commands 17 Information Retrieval Commands 17 Open Collector Status Outputs 18 PIP with ...

Страница 4: ...HELP If you have any questions regarding your product or you need assistance please con tact your distributor from whom you purchased this equipment If you would like more information about Broadcast Tools products you may reach us at Broadcast Tools Inc 131 State Street Sedro Woolley WA 98284 USA Voice 360 854 9559 Fax 866 783 1742 Internet Home Page www broadcasttools com E mail support broadcas...

Страница 5: ...anel monitor speaker with mute switch and level control 40 x 4 LED back lit LCD display with user programmable nine character input descriptions Internal audio activity silence sensor monitors output channel sixteen A front panel ACT indicator and rear panel open collector are provided Trigger set at 30dbu Two front panel encoder controls are provided One each for input output channel selection Po...

Страница 6: ...s active Macro indicator will light when in macro record or recall mode PIP Parallel Input Port LED will flash indicating any change with the 16 input Pulse Stretcher GPI ports One audio activity LED Monitors output channel sixteen and lights when lev els are above 30dbu Controls Audio Inputs Each of the 16 stereo inputs are balanced bridging 20KΩ at a nominal line level of 4dBu Multi turn level c...

Страница 7: ...computer more time to detect an input change Open Collector Outputs The SS 16 16 provides sixteen open collector status outputs The status outputs may be configured to operate in one of three modes 1 The status output follows the associated channel 2 The status outputs a one second pulse when the associated channel is selected 3 Software burst mode control Serial Communication The SS 16 16 s seria...

Страница 8: ...l LED s Number Of LED s Activation Event Mode Activation Behavior Pwr Ser 1 Green Valid Power or serial data activity On with power or flashing with serial data activity PGM 1 Red Menu mode On if in program or menu mode Macro 1 Green Macro selection On if active PIP Active 1 Yellow Any valid PIP input Blinking if active ACT 1 Yellow Audio Activity for OP 16 On if active audio PGM and MACRO Red Gre...

Страница 9: ...t on the LCD 4 Rotate the INPUT SELECT encoder knob until macro number 0 displayed 5 Press the TAKE button to save 6 Your power up configuration is saved Power Up Feature last source selected 1 Verify that dipswitch SW1 7 is ON 2 The SS 16 16 will power up with whatever channel configuration was present at power off Controls Function Input Encoder By turning this control each input description is ...

Страница 10: ...l the desired macro number is displayed 4 Press the TAKE button to save Macro RECALL Feature 1 Press the macro button Macro number will be displayed in the output 1 slot on the LCD 2 Rotate the INPUT SELECT encoder knob until the desired macro number is displayed 3 Press the TAKE button To monitor audio with the headphone or Monitor amplifier 1 Select output 16 and the desired input 2 Press the SP...

Страница 11: ...ies 3 bit unit ID baud rate power up modes remote control and other features listed below The dipswitch SW1 is located on the rear panel WEBSITE Visit our web site for product updates and additional information DIP SW1 Switch Functions SW1 Switch Number Default Setting Function 1 OFF Add 1 to Address base address is 0 2 OFF Add 2 to Address base address is 0 3 OFF Add 4 to Address base address is ...

Страница 12: ...ar with the operation of the unit Power Supply Connection Install the 5 pin DIN connector into the DIN receptacle on the SS 16 16 Mount the power supply in a convenient location When ready plug the cord into the appropriate AC receptacle NOTE Only use IPS model HUP45 32 Baud Rate DIP Switches SW1 4 Baud Rate OFF 9600 ON 38400 Open Collector Follow Mode DIP Switches SW1 6 Mode OFF OC Follow ON OC P...

Страница 13: ...y UPS will provide back up in case of power out ages Check out our web site for lightning protection links Adjusting Input and Output Levels Once the input and output connections have been made the input levels can be set The switcher is factory set for unity Maximum input levels should be limited to 27dbu Should input levels need to be changed they are accessible from the rear panel Each input tr...

Страница 14: ...rotocol of 9600 N 8 1 Set the mode to DIRECT Flow Control to NONE and emulation to ANSI Connecting Two SS 16 16 s to a Single Computer s Serial Port Multiple SS 16 16 s may be cascaded serially to operate from the same serial port The first step is to assign unit ID s to each SS 16 16 One sug gestion is to assign 1 to the first SS 16 16 and 2 to the second switcher The second step is to parallel t...

Страница 15: ...th an asterisk followed by the device ID address as a single decimal digit and then MM The menu mode displays certain parameters and allows the set ting of these parameters In both cases device ID address 0 7 is specified with the on board dipswitches Menu Mode Type 0MM follow the prompts on the pop up menu The command to enter menu mode starts with an asterisk followed by the device ID address as...

Страница 16: ...mand exactly as it should be sent except that lower case characters repre sent values that should be substituted Glossary Of Command Notation Character String Meaning Allowable Values u Unit ID 0 7 ii Input Number 01 16 oo Output Number 01 16 rr Open Collectors 01 16 Set up Commands uCEx Enable Error and Good Responses Where x Y to enable and N disable In this mode when a command is sent that is i...

Страница 17: ...time slot If there are multiple units on the line each will respond with a different delay after receipt of this command uSL Send Audio Status SuLo xx xx xx xx xx xx xx xx xx xx xx xx xx xx xx xx CR LF u is unit ID xx is the output selection for each input Inputs are 01 to 16 left to right Example S0L1 16 00 00 00 00 00 00 00 00 00 00 00 00 00 00 00 CR LF indicates that unit 0 Input 01 is connecte...

Страница 18: ... The status outputs a one second pulse when the associated channel is select ed SW1 6 ON 3 SW1 8 OFF enables SW1 6 SW1 8 ON disables SW1 6 and allows soft ware control PIP with Programmable Pulse Stretcher PIP is always active Minimum input pulse width must be 50ms The Programmable Pulse Stretcher PIP provides 16 PIP GPI inputs The Programmable Pulse Stretcher Duration may be globally set from non...

Страница 19: ...ocessor with non volatile memory Operation Control Front Panel Momentary switches and rotary encoders PIP 16 Momentary closures to ground 50ms 5 volt though 20 k pull up RS 232 Multi drop Serial 9600 or 38 400 K baud 8N1 Status Control Front Panel 40 x 4 LED back lit LCD display and LED indicators Remote 16 Open collector outputs 5 volt 100ma per output RS 232 Multi drop Serial 9600 or 38 400 baud...

Страница 20: ...O OTHER WARRANTIES OR REMEDIES TO THE MAXIMUM EXTENT PERMITTED BYAPPLICABLE LAW BROADCAST TOOLSAND ITS SUPPLIERS DISCLAIMALL OTHER WARRANTIES EITHER EXPRESS OR IMPLIED INCLUDING BUT NOT LIMITED TO IMPLIED WARRANTIES OF MERCHANTABIL ITY OR FITNESS FOR A PARTICULAR PURPOSE AND THE FOREGOING ALTERNATIVE REMEDIES SHALL BE EXCLUSIVE OF ALL OTHER REMEDIES THIS LIMITED WARRANTY GIVES YOU SPECIFIC LEGAL R...

Страница 21: ...t Output Stereo Audio Router Switcher Broadcast Tools ESS 1 Ethernet to Serial Server FREE Windows NetSwitch NetSwitch II Control Software SS16 16 Sixteen Input Output Stereo Audio Router Switcher Remote Control Studio PC s running FREE Windows NetSwitch or NetSwitch II software via USB Serial LAN WAN Studio 1 PC Studio 16 PC Studio 2 PC LAN WAN 1 2 3 4 5 6 7 8 9 10 11 12 13 14 15 16 STEREO OUTPUT...

Страница 22: ... 14L EGND 14R 14R 16L 16L EGND 16R 16R Input 2 1L 1L EGND 1R 1R 2L 2L EGND 2R 2R Input 4 3L 3L EGND 3R 3R 4L 4L EGND 4R 4R Input 6 5L 5L EGND 5R 5R 6L 6L EGND 6R 6R Input 8 7L 7L EGND 7R 7R 8L 8L EGND 8R 8R Input 10 9L 9L EGND 9R 9R 10L 10L EGND 10R 10R Input 12 11L 11L EGND 11R 11R 12L 12L EGND 12R 12R Input 14 13L 13L EGND 13R 13R 14L 14L EGND 14R 14R Input 16 15L 15L EGND 15R 15R 16L 16L EGND 1...

Отзывы: