


2 INSTALLATION
7
2008.8.13
2.4
SETTING UP WITH A DMX512
CONTROLLER
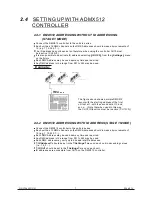
2.4-1 DMX512 ADDRESSING WITHOUT ID ADDRESSING
(STAGE 1 MODE)
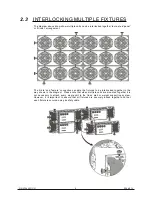
The figure above shows a simple DMX512
layout with the starting address of the first
unit set at 1, with the second set at 13 and
so on... (Note that when used in this way,
the CH10 ID function must be inactive (CH10=0))
............
DMX512
CONTROLLER
DMX Addr.1
DMX Addr.13
DMX Addr.25
Connect the DMX512 controller to the units in series.
Each unit has 12 DMX channels so the DMX Addresses should increase by increments of
12 (e.g. 1,13,25,37...)
The ID address has not been set so therefore when using the controller CH10 must
be inactive ( CH10=0 ).
It is also possible to deactivate ID address selecting
ID OFF
from the
Settings
menu.
on the fixture
Each DMX Address may be used as many times as required.
Any DMX address in the range from 001 to 245 may be used.
2.4-2 DMX512 ADDRESSING WITH ID ADDRESS(STAGE 1 MODE)
Connect the DMX512 controller to the units in series
Each unit has 12 DMX channels so the DMX Addresses should increase by increments of
12 (e.g. 1,13,25,37...)
Each DMX Address may be used as many times as required.
Any DMX address in the range from 001 to 245 may be used.
Each DMX address may carry up to 66 separate ID addresses.
ID Address
should be set in the
Settings
menu on each unit in ascending values
(i.e. 1,2,3...)
ID On
should be set in the
Settings
menu on each unit.
ID addresses are accessible from CH10 on the DMX512 controller.
Example:
Содержание LED Blaster 108
Страница 1: ...USER MANUAL Ver 1 0 WWW BRITEQ LIGHTING COM...
Страница 2: ......


