


ENGLISH
USER MANUAL
BRITEQ
®
7/41
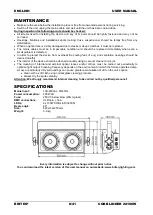
COB BLINDER 2X100W
OPERATING INSTRUCTIONS
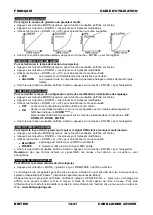
IMPORTANT: This projector is an effect projector (Blinder). It is NOT supposed to be used
CONTINUOUSLY at full power like a normal projector. If you want to use it continuously on without
flashing, please set the dimmer level at 60%.
A. Standalone 1unit:
Just connect the projector to the mains.
Set the intensity of both o the flashrate for your standalone mode.
Refer to chapter HOW TO SETUP to learn how to make the previous settings.
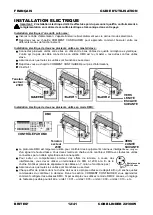
B. Two or more units in master/slave setup:
Connect the
units together. Refer to the chapter “electrical installation” to learn how to do this.
Set the intensity of both o the flashrate on the master (the first projector in the DMX chain)
Set all the other projectors in SLAVE mode.
The projectors will now follow the program of the master projector so they all work synchronously.
C. Controlled by universal DMX-controller:
Connect all
units together. Refer to the chapter “Electrical installation for two or more units in DMX-
mode” to learn how to do this (don’t forget to address all units properly!)
Connect all units to the mains and turn on the DMX controller.
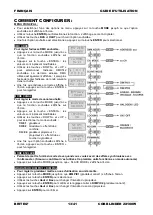
Since each unit has its own DMX-address, you can control them individually. Remember that each unit
uses 1, 2 or 4 DMX-channels, depending on the DMX-mode you have selected in the menu. See the
different DMX charts below:
DMX Chart for the 1 channel DMX-Mode
Channel 1
Dimmer
000-255
0-100%
DMX Chart for the 2 channel DMX-Mode
Channel 1
Dimmer
000-255
0-100%
Channel 2
Strobe
000-255
Flash speed
DMX Chart for the 4 channel DMX-Mode
Channel 1
Dimmer left side
000-255
0-100%
Channel 2
Dimmer right side
000-255
0-100%
Channel 3
Strobe
000-255
Flash speed
Channel 4
Dimmer curve
000-015
dimmer curve selected on the fixture itself
016-135
Linear dimmer
136-255
Square dimmer