Bristan QD 1/2 C Скачать руководство пользователя страница 7

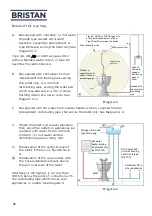
The method of supplying water to
an  ascending spray and /  or hose 
and  spray bidet is illustrated in
Diagram 3 and which is described
in the formal  guidance, is difficult 
to achieve in  practice. The air gap 
should be located  above the fully
extended hose and spray,  or zone
of backflow risk, and this height  
may need to be increased to
provide  sufficient water pressure, 
to overcome  friction loss in the 
pipes and fittings, in  order to 
operate the ascending spray  and 
hose spray effectively. This method 
of supplying blended water to a 
bidet  involves complicated control
methods  as the control of water
to the bidet itself has to be linked
with the control

D

D

D

Diiiiaaaaggggrrrraaaam

m

m

m 5555

SgV

SgV

SgV

The bidet must be located  

below the spillover lever of the 

lowest sanitary fitting and 

below any hot water storage 

vessel or ancillary pipework

Not less  

than 

300mm

Bidet with

ascending

spray only

Not less  

than 

300mm

Mixing  

valve

Bath

Washbasin

FL

Diagram 5

Cold water  

storage 

cistern

of water flow, and temperature, upstream of the air 
gap,  blended water cistern or DC device.

Installation - Basin / Bath taps

1.

Identify all components are present prior to 
starting  installation.

2.

Install the taps to the basin / bath, ensuring the plinth  
is fitted between the tap body and the basin / bath. 
Slide
the washer (6) onto the threaded tail of the tap and 
screw  the backnut (7) onto the tail until tight to 
secure the taps  in place.

Note: Supplied with plastic backnuts which
must be  tightened fully using a suitable 
spanner.

3.

Connect the hot and cold water supplies to 
the  threaded tails.

4.

Turn on the water supplies. Operate both taps,

letting the water flow for a few minutes to check all
joints and connections for any leaks.

07

Содержание QD 1/2 C

Страница 1: ...Installation Instructions User Guide Please keep these instructions for future reference and request of replacement parts Quadrato Basin Bath Tap Range Installation Instructions User Guide...

Страница 2: ...d to give you all of the information you need and if you need any further help please do not hesitate to give us a call on 0330 026 6273 Important Safety Information 03 General Specifications 03 Insta...

Страница 3: ...is product must not be modified in any way as this will invalidate the guarantee These fittings need to be installed in accordance with and meet the requirements of the Water Supply Water Fittings Reg...

Страница 4: ...against a backflow risk up to a Fluid Category 5 incorporating a self cancelling diverter acceptable as a backflow prevention device HC only and having an AUK2 or AUK3 air gap shall be installed in ac...

Страница 5: ...providing that a Type AUK3 air gap is provided between the outlet of the water fitting and the spillover level of the bidet as a above and shall also comply with c below c In case of a bidet equipped...

Страница 6: ...gap with or without blended water cistern or Type DC backflow prevention device Zone of backflow risk 300mm minimum Hot and cold water supply or distributing pipes to mixer Blended cold and hot water...

Страница 7: ...r lever of the lowest sanitary fitting and below any hot water storage vessel or ancillary pipework Not less than 300mm Bidet with ascending spray only Not less than 300mm Mixing valve Bath Washbasin...

Страница 8: ...pipes 14 into the bottom of the mixer body 7 4 Slide the C shape rubber washer 10 and C shaped metal washer 11 onto the threaded rods 12 up to the underside of the basin 5 Secure the mixer body 7 to...

Страница 9: ...ting and connect the hot and cold supplies using washers 14 and suitable fittings Not Supplied See ADDITIONAL SAFETY FEATURE 4 Fit the pop up waste if applicable washer 16 above and washer 18 below th...

Страница 10: ...mixer body 7 DO NOT attempt to remove them as this could cause a leak from the connection 4 Slide the C shaped rubber washer 10 and C shaped metal washer 11 onto the threaded rods 12 up to the undersi...

Страница 11: ...to the underside of the bidet 5 To secure the mixer in place tighten the fixing nuts 12 onto the threaded rods 11 until they are fully tightened against the C shaped metal washer 10 6 Screw in the fl...

Страница 12: ...nto the bath using the provided washers 6 above and below the bath and back nuts 7 below the bath 3 Connect the hot and cold water supplies 4 Fit the hose to the mixer 11 and the handset using the sma...

Страница 13: ...eaning Simply rub your fingers across the rubber spray jets regularly and before you turn the shower on to remove any scale or debris The hardness of the water in your area will determine how often yo...

Страница 14: ...ater that drips out Constant dripping leaking when the tap is not in use Cartridge Valve not fully shutting off Service fitting and replace cartridge valve Refer to maintenance section on page 13 Fitt...

Страница 15: ...15...

Страница 16: ...s QD C QD C QD SMBAS C QD EBAS C QD EBASNW C QD TBAS C QD BID C QD BF C QD BSM C FI QUADRATO REV D7 Bristan Group Limited UK Bristan Group B78 1SG EU Masco Group S r l 14 Rue Strachen 6933 Mensdorf Lu...

Отзывы: