background image

BitPipe™Cellular Dev

-Kit 

User Guide


www.briowireless.com


Copyright 2017 Briowireless Inc.


27 


7.5


SMS 

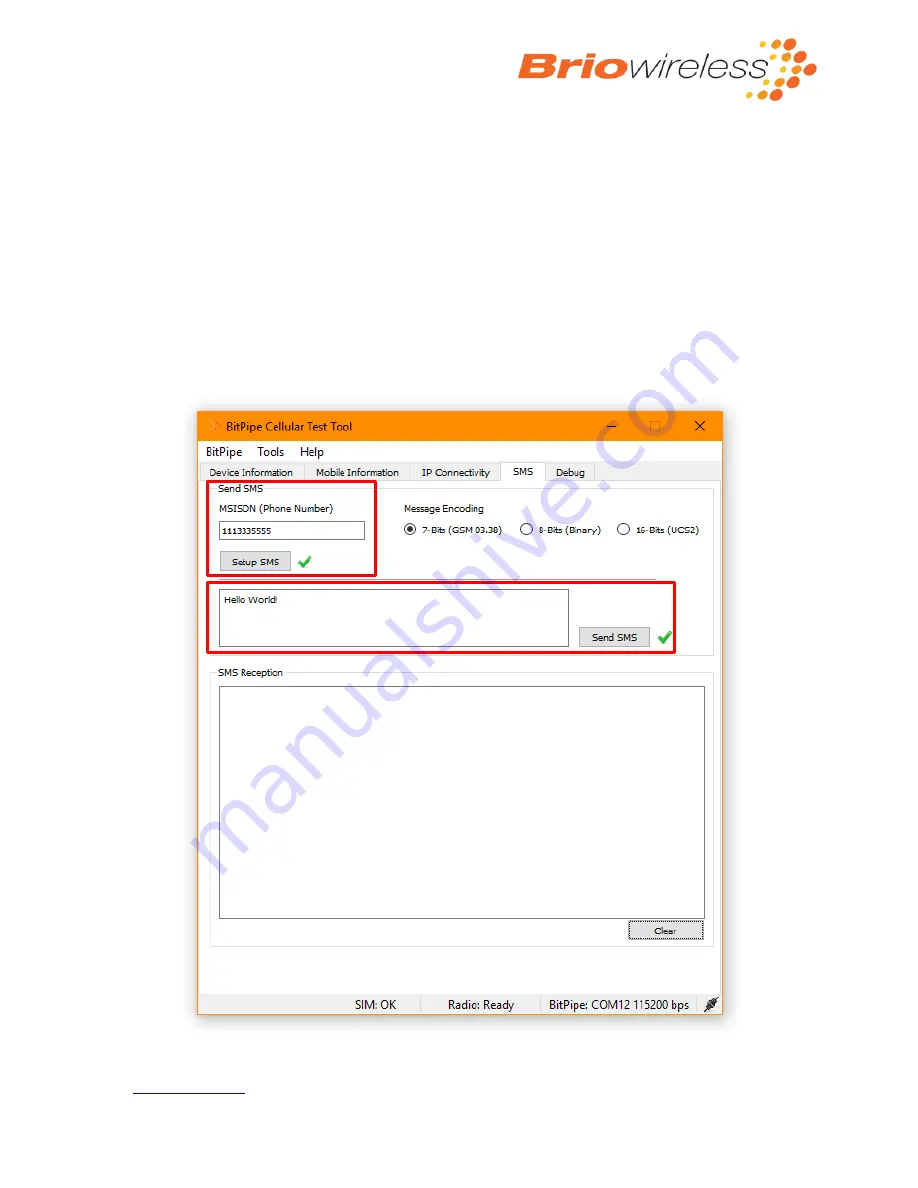
This section provides the steps to send and receive text messages (SMS) with the BitPipe

 modem. 

*Make sure to follow the steps in section 7.1 to power on the radio and connect to a mobile network. 

1-


Select the “SMS” tab

 (see Figure 27)

2-


To send a message, enter the  destination phone  number  in the 

MSISDN (international  Phone 

Number) 

text box. 

3-


Select the message encoding. 

4-


Click on the 

“Setup SMS”

 button. A green check should appear next to the button. 

5-


Enter the message content 

in the text box below the “Setup SMS” button

6-


Click on the 

“Send SMS”

 button. A green check should appear next the message content. 


Figure 27 SMS Tab 

Содержание BitPipe Cellular DevKit

Страница 1: ...www briowireless com Copyright 2017 Briowireless Inc BitPipe Cellular Dev Kit User Guide Rev 1 2 2018 03 19...

Страница 2: ...election 10 6 Getting started with Modem in USB mode 10 7 Getting started with Modem in UART mode 11 7 1 Quick Start 11 7 1 1 BitPipe Cellular Test Tool 11 7 1 2 Install PC driver for the FTDI communi...

Страница 3: ...Communication successfully established 14 Figure 12 Power On Radio 15 Figure 13 DC DC Warning 15 Figure 14 Radio status 15 Figure 15 Mobile Information tab 16 Figure 16 Configure APN 17 Figure 17 Est...

Страница 4: ...ment Kit provides an easy way to test the BitPipe cellular modules This guide guides through configuring and using the different modes exposed by the Bitpipe cellular module It also introduces the Bit...

Страница 5: ...BitPipe Cellular Dev Kit User Guide www briowireless com Copyright 2017 Briowireless Inc 5 Figure 1 BitPipe Development Kit...

Страница 6: ...tPipe Each one is described below The demo board is mainly used to do a quick demonstration of all the BitPipe features Figure 2 identifies various elements on the board Each section is listed below 1...

Страница 7: ...de an easy connectivity to the BitPipe Cellular modem connector when prototyping Two 100 mils headers are available on the bottom side spaced to fit most breadboards Figure 3 provides the pinout of th...

Страница 8: ...the default Modem mode Please refer to the BitPipe Cellular modem datasheet for more information about its operating modes Figure 4 Modem secured with screw 5 2 SIM card insertion Insert a Micro SIM...

Страница 9: ...tall the provided antenna e in the modem SMA or UFL connector of the BitPipe module Note The number of antenna e will depend on the BitPipe model On some models 2 antennas are needed The first antenna...

Страница 10: ...ection to your host through the USB interface The following protocols are exposed depending on the BitPipe model PPP ECM and NCM For each protocol we provide you Linux scripts to easily establish conn...

Страница 11: ...th different message encoding Establish IP connectivity with a remote server through HTTP MQTT and TCP Test serial API commands available on the module Update the BitPipe firmware You can find the lat...

Страница 12: ...cable TTL 232R 3V3 2MM in the FTDI Connector box 5 in Figure 2 Configure the dipswitches in modem UART mode SW1 1 OFF SW1 2 OFF SW1 3 OFF See section 5 4 for details Connect the Wall adaptor in a powe...

Страница 13: ...e setup and installation steps in section 5 before proceeding 1 Launch the BP C TestTool exe application Refer to section 7 1 1 if it has not been installed yet Figure 9 contains a screenshot of the a...

Страница 14: ...nected the status bar at the bottom will display the COM port and the baud rate used see Figure 11 Figure 10 Communication port selection Figure 11 Communication successfully established 5 Select the...

Страница 15: ...more information on the power modes Figure 13 DC DC Warning 9 The status bar will show when the radio is ready see Figure 14 The radio will automatically connect to the mobile network upon power up an...

Страница 16: ...BitPipe Cellular Dev Kit User Guide www briowireless com Copyright 2017 Briowireless Inc 16 Figure 15 Mobile Information tab...

Страница 17: ...APN User Name and APN Password text fields blank Then click on Configure Figure 16 Configure APN 7 2 TCP IP Protocol The BitPipe modem can open sockets using the TCP IP protocol Make sure to follow t...

Страница 18: ...r the desired URL or IP address in the Hostname or IP address text box ex www google com 3 Enter the port number to access the contents of the web page most web pages use port 80 4 Click on Initiate C...

Страница 19: ...The example uses a public TCP echo server on the internet 1 Select the IP Connectivity tab and then select the TCP tab 2 Enter the desired URL or IP address in the Hostname or IP address text box u bl...

Страница 20: ...r Dev Kit User Guide www briowireless com Copyright 2017 Briowireless Inc 20 You can use your own TCP echo server if you do not have one contact us we can provide you access to our TCP Echo server Fig...

Страница 21: ...uests Make sure to follow the steps in section 7 1 to power on the radio and connect to a mobile network Figure 20 HTTP GET example 7 3 1 HTTP GET request Below are the steps required to download the...

Страница 22: ...a section containing both hex values and ASCII characters see Figure 20 7 3 2 HTTP POST request Below are the steps required to send data to a server using an HTTP POST request using the HTTP interfac...

Страница 23: ...and client are required for the steps in this section The steps use the Briowireless MQTT broker A list of available MQTT clients can be found on the official MQTT website http mqtt org Make sure to f...

Страница 24: ...text box will display Connection Established as shown in Figure 22 Figure 22 MQTT connection example 8 To receive publications from the MQTT broker enter the name in the Topic Subscriptions text box...

Страница 25: ...gure 23 MQTT Topic subscription example 12 Any publication received from the broker can be seen by selecting the Received Publications tab see Figure 24 Figure 24 MQTT Received Publications 13 To publ...

Страница 26: ...nowledge is received the sender will delete the message otherwise the message will be stored to be resent 16 Enter the content of the message in the Payload text box 17 Check the Retained checkbox for...

Страница 27: ...io and connect to a mobile network 1 Select the SMS tab see Figure 27 2 To send a message enter the destination phone number in the MSISDN international Phone Number text box 3 Select the message enco...

Страница 28: ...by the device specified by the phone number in step 2 8 To test the reception of messages send a message back to the BitPipe using the device that received the text message in the previous steps 9 On...

Страница 29: ...he BitPipe firmware version Here are the steps 1 In the Input Command Data field enter the following hexadecimal string 11 01 00 2 Click Generate Message a The message is displayed in the Generated Me...

Страница 30: ...BitPipe Cellular Dev Kit User Guide www briowireless com Copyright 2017 Briowireless Inc 30 Figure 29 Debug tab...

Страница 31: ...the BitPipe s IOs To set up your BitPipe for this demo it must be configured with Briowireless server information This includes setting the MQTT Hostname MQTT Port and Keep Alive Interval For your con...

Страница 32: ...n to the demo servers The APN must be configured and an activated SIM with a data plan must be inserted in the BitPipe See sections 5 2 and 7 1 From the Autonomous Mode Configuration dialog press Open...

Страница 33: ...BitPipe Cellular Dev Kit User Guide www briowireless com Copyright 2017 Briowireless Inc 33 Figure 31 BitPipe Dev Kit Demo Website...

Отзывы: