background image


Page 7 


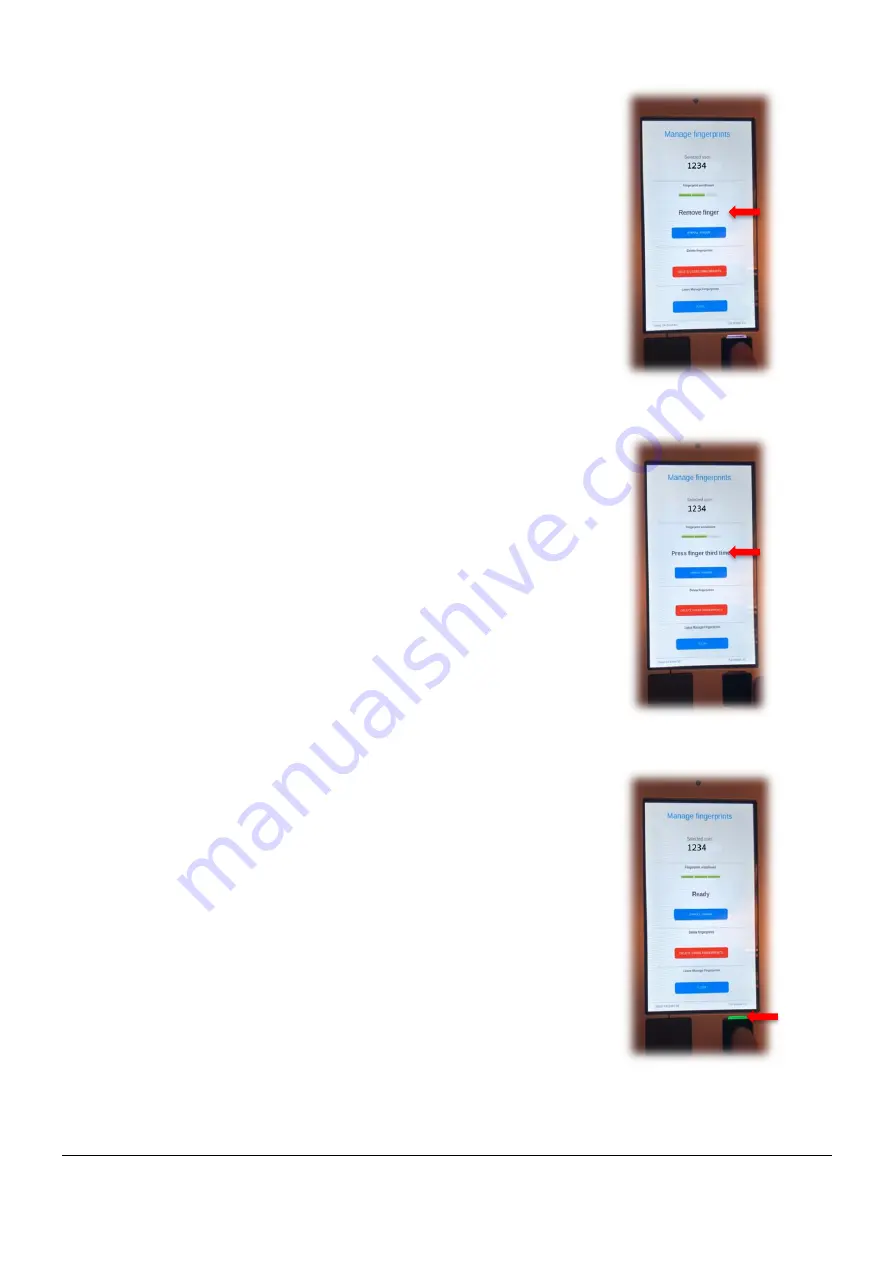
g) 

Second scan finger press


Now firmly press down the same 
finger on the glass surface to repeat 
step (d) above. 


h) 

Remove finger second time


When “Remove finger” is shown move 
the finger away from fingerprint sensor 
for a second time to repeat step (e) 
above. 


i) 

Third scan


Wait for the message 

“Press finger 

third time

”. 


j) 

Press finger third time


Press finger firmly for a third time 
down on the glass surface again to 
repeat step (d) and (g) above.  


k) 

Remove finger third time


When UI “Remove finger third time” is 
shown, move the finger away from the 
fingerprint sensor as described in 
steps (e) and (h) above.  


l) 

Successful enrolment


A successful enrolment sequence is 
always confirmed by a solid green light 
indicator. 


m)  An unsuccessful enrolment sequence 

is indicated by a solid red-light 
indicator. 


(h)


(j)


(l)


Содержание TS 3807

Страница 1: ...Page 1 USER GUIDE FOR FINGERPRINT ENROLLMENT This guide refers to terminal TS 3807 equipped with an optical Fingerprint sensor ...

Страница 2: ...he fingerprint solution 3 2 Operating modes 3 3 Identification mode 3 4 Enrol mode 4 5 Manage Fingerprint View 4 5 1 Identify Mode in Manage Fingerprint View 4 5 2 Delete users fingerprint templates 5 5 3 Enroll Mode in Manage Fingerprint View 5 ...

Страница 3: ... described below It is important to note that a short time after the enrolment process has been completed the fingerprint sensor automatically changes to Identify mode 3 Identification mode Identify mode is the normal mode of the terminal It means that the fingerprint sensor is ready to scan any finger index that is placed on the fingerprint sensor The scan starts automatically when a finger has b...

Страница 4: ...delete users fingerprint templates and to test identification of a finger which will tell if the scanned finger is linked to an enrolled user How a user s Global ID value is entered depends on the implementation Either it can be done from a scroll list before entering the Manage Fingerprint View or by using a virtual keypad 5 1 Identify Mode in Manage Fingerprint View It is possible to identify a ...

Страница 5: ...deletion has been completed Note that all Fingerprint templates for the user will be deleted 5 3 Enrol Mode in Manage Fingerprint View A new user finger is enrolled by the following steps a Global ID value Double check that the Global ID value is correct b Start enrollment process Start the enrollment process by clicking Enroll Finger button c First scan Wait until the message Please wait changes ...

Страница 6: ...ver as large area of the glass surface as possible The fingerprint sensor will blink during the scan e Remove finger first time Keep pressing the finger firmly until message says Remove finger Remove the finger away from the fingerprint sensor so the finger is no longer on above or inside the fingerprint sensor area f Second scan Wait until the message appears Press finger second time d e f ...

Страница 7: ...ress finger third time j Press finger third time Press finger firmly for a third time down on the glass surface again to repeat step d and g above k Remove finger third time When UI Remove finger third time is shown move the finger away from the fingerprint sensor as described in steps e and h above l Successful enrolment A successful enrolment sequence is always confirmed by a solid green light i...

Страница 8: ...ite light indication from the fingerprint sensor See item 5 3 d above NOTE 2 The light indicator should not turn red during the enrolment process If it does turn red just cancel the enrolment process by waiting for the sequence to end itself Frequently asked questions Are fingerprints sent to a cloud server No The fingerprint templates are only stored locally How many fingers can be enrolled by a ...

Отзывы: