Thank you for your purchase of the Jointmaker Pro!
Your experience with this innovative new tool should be
nothing but positive. Towards that objective we are asking you to
contact us with any questions regarding assembly or use of the
Jointmaker Pro. We can be reached by either phone or email:
1.800.253.3332
John Economaki: [email protected]
(JM-P inventor)
Michael Berg: [email protected]
(Production Manager/Designer/Woodworker)
We have also created a forum dedicated to the Jointmaker Pro
for fellow owners to share and exchange ideas;
http://www.bridgecitytools.com/discussion/
We recommend you visit this forum periodically for exciting new
ideas, tips and tricks. NOTE: This is a moderated forum and
we will do our best to keep it positive, exciting and a useful re-
source.
OVERVIEW
The Jointmaker Pro is the world’s first stationary hand cross
-
cut saw and will accurately allow you to make most of the cuts
required in wood joinery plus a myriad of other sawing applica-
tions.
Consisting primarily of two independent linear tables mounted
over specially designed, fine-toothed saw blades, the Jointmak
-
er Pro redefines the meaning of “cut by hand.” Using no electri
-
cal power, the Jointmaker Pro is designed specifically to make
precision cuts for the most demanding craftspeople with as little
noise as possible, and without the need for dust collection. Un-
derstanding how this tool works—what it can and cannot do—is
your key to a successful and fruitful experience.
Cutting wood accurately by hand requires a great deal of prac-
tice and is difficult for many, particularly those new to the craft.
With the Jointmaker Pro, people of all ages and experience lev-
els can achieve results that are MORE ACCURATE than cuts
made with power equipment. Furthermore, the cuts are unparal-
leled in quality creating opportunities for new and exciting ideas
not possible with traditional techniques.
At this time, please take a few minutes and peruse the assembly
section of this guide to become familiar with the nomenclature of
the Jointmaker Pro. This will make the remainder of this section
much easier to understand.
SAFETY
Your Jointmaker Pro is no different than any other sharp tool—
use common sense!
Although it may seem safe to take risks because the saw blade
is stationary—and the only motion is provided by YOU—safety
should never be taken for granted.
Etched on the top of each sliding table is a graphic element that
is designed to remind you of the risk to your fingers. It may seem
obvious, but we strongly recommend keeping your fingers out of
this zone, especially when the blade is tilted.
After you have spent an hour or two using the Jointmaker Pro
we hope you share your new found ability with other members of
your family—this tool can be enjoyed by many who like making
gallery quality cuts in a noise free environment!
SAW RIGIDITY AND ERGONOMICS
Under all circumstances, the Jointmaker Pro needs to be firmly
anchored to a work surface or attached to a stand. If the saw
moves while cutting your accuracy and enjoyment of the tool will
be less than optimal.
The front table height of the Jointmaker Pro should be an inch
or so below your belt line. At this height, you will be able to make
a full stroke without undue stress on your back or arms. If pos-
sible, we recommend that the rear of the Jointmaker Pro be
approximately three inches higher than the front. This incline
shortens the stroke of your arms, increases your ability to see
your work and reduces strain on your lower back during long
work sessions.
WORK HOLDING REQUIREMENTS
Traditionally when cutting wood with a hand saw you clamp the
material to be cut to a workbench or hold your stock in a vise.
With either method, the stock should always be firmly anchored
in order to achieve optimal, and accurate, results.
The same work holding requirements are true when making most
cuts with the Jointmaker Pro. The sliding table is analogous to
a workbench surface and the angled trap clamps act as a vise.
These elements become particularly crucial with the Jointmaker
Pro because unlike any other hand sawing experience, you are
cutting from the bottom up as opposed to top down. Without
your stock firmly anchored to the sliding tables, the negative
feed (the tendency of the wood to ride up over the top of the
blade) becomes difficult to manage with hand strength alone. In
almost all cases, we strongly recommend that you utilize these
work holding aids for accuracy and blade longevity. When using
the blade in a tilted position, trap clamping is mandatory.
I M P O R T A N T : R E A D F I R S T !
1
Содержание Jointmaker Pro Signature Series
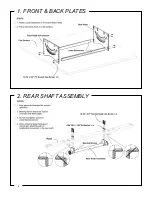
Страница 6: ...1 FRONT BACK PLATES 2 REAR SHAFT ASSEMBLY 5 ...
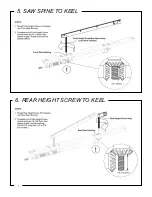
Страница 7: ...6 3 FRONT SHAFT TO KEEL 4 FRONT HEIGHT SHAFT TO SPINE ...
Страница 8: ...7 5 SAW SPINE TO KEEL 6 REAR HEIGHT SCREW TO KEEL ...
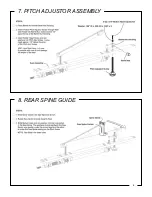
Страница 9: ...7 PITCH ADJUSTOR ASSEMBLY 8 REAR SPINE GUIDE 8 ...
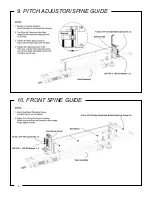
Страница 10: ...9 PITCH ADJUSTOR SPINE GUIDE 9 10 FRONT SPINE GUIDE ...
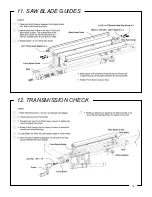
Страница 11: ...11 SAW BLADE GUIDES 12 TRANSMISSION CHECK 10 ...
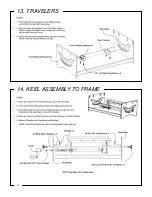
Страница 12: ...13 TRAVELERS 14 KEEL ASSEMBLY TO FRAME 11 ...
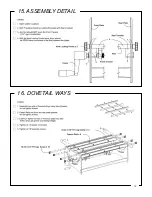
Страница 13: ...15 ASSEMBLY DETAIL 16 DOVETAIL WAYS 12 ...
Страница 14: ...17 INSIDE DOVETAIL SLIDERS 18 TABLE BUMPERS 13 ...
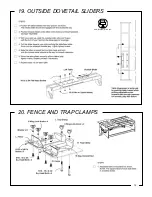
Страница 15: ...19 OUTSIDE DOVETAIL SLIDERS 20 FENCE AND TRAP CLAMPS 14 www BridgeCityTools com ...
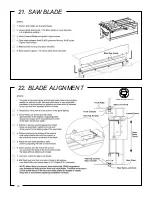
Страница 16: ...15 21 SAW BLADE 22 BLADE ALIGNMENT www BridgeCityTools com ...
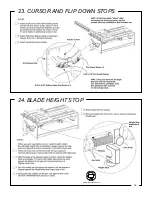
Страница 17: ...16 24 BLADE HEIGHT STOP 23 CURSOR AND FLIP DOWN STOPS www BridgeCityTools com ...
Страница 18: ...25 OPTIONAL STAND 17 ...
Страница 19: ...26 STAND CORNER KEY 18 ...
Страница 20: ...NOTES tm tm tm 27 LUBRICATION GUIDE 19 ...
Страница 21: ...N NOTES CUTTING GUIDE 20 ...
Страница 22: ...NOTES 21 ...


