DE
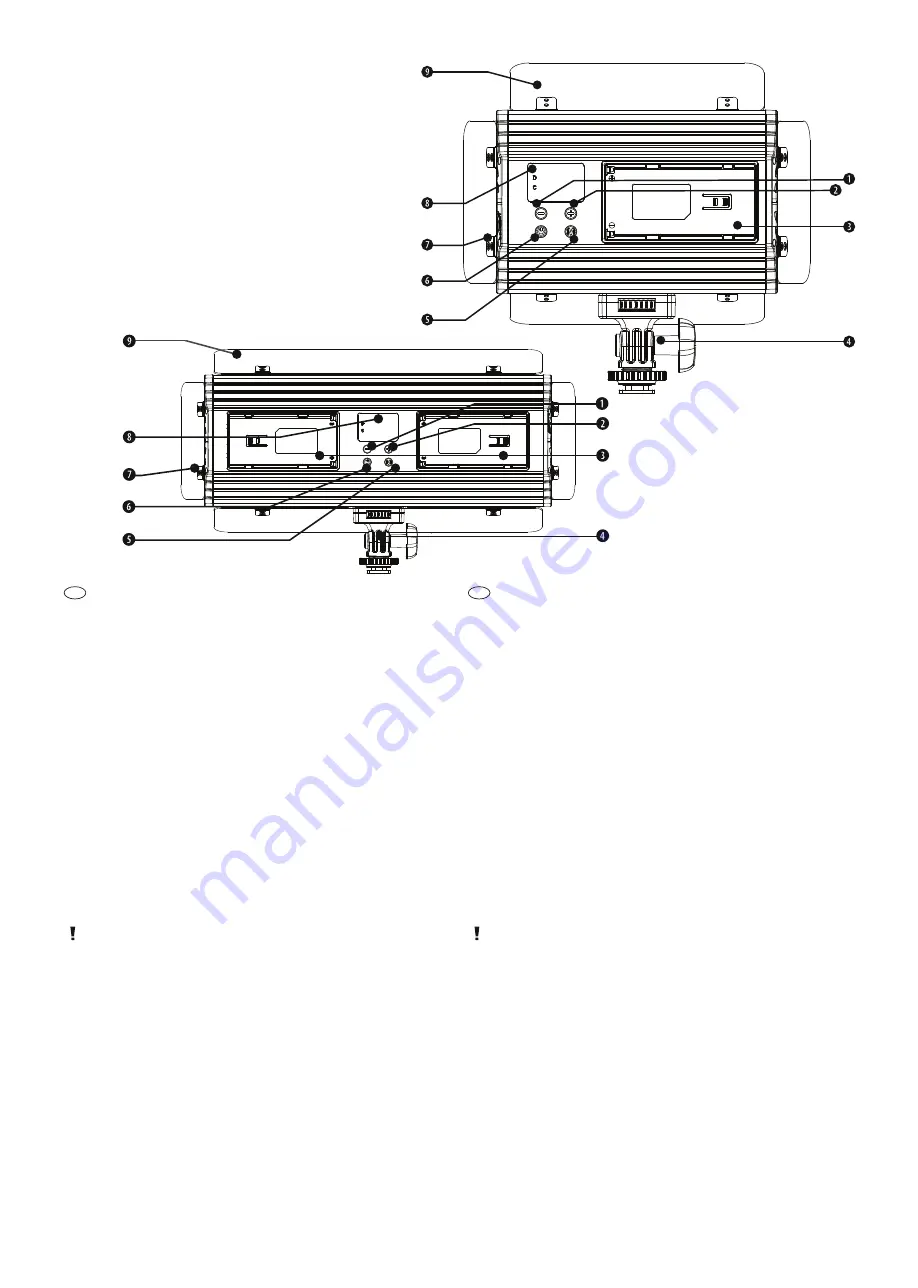
TEILEÜBERSICHT
LED Leuchten
(Fig. 1 + 2)
1 DOWN-Taste
2 UP-Tate
3 Akkuhalterung
4 Blitzschuh-Adapterkopf
5 Mode-Taste
6 Ein/Aus-Taste
7 Anschlussbuchse für Spannungsaversorgung 13-17V DC
8 Display
9 Blendklappen (modellabhängiges Zubehör)
INBETRIEBNAHME
Stromversorgung über DC-Stromanschluss
2. DC-Stecker in den Anschlussbuchse (7) stecken.
3. Netzstecker in die Steckdose stecken.
Stromversorgung mittels Akku
(modellabh. Zubehör)
HINWEIS!
Betreiben Sie das Gerät niemals mit Akkus und dem DC-
Stromanschluss gemeinsam, um Schäden an der Elektronik zu
vermeiden. Es besteht die Gefahr eines Kurzschlusses!
Betreiben Sie das Gerät stets mit zwei Akkus, um eine volle und
gleichmäßige Stromversorgung zu gewährleisten.
Abhängig vom jeweiligen Modell ist die jeweilige LED-Leuchte mit
einer (Fig. 1) oder zwei Akkuhalterungen (Fig. 2) ausgestattet.
1. Akku von der Seite langsam in die Halterung schieben bis dieser
einrastet.
Gerät ein-/ausschalten
1.
Ein/Aus-Taste (6) etwa 1 Sekunde drücken, um Gerät
einzuschalten. Die Anzeige leuchtet auf.
2. Ein/Aus-Taste (6) in erneut etwa 1 Sekunde drücken, um Gerät
auszuschalten.
3. Ein/Aus-Taste (6) kurz drücken, um die Restkapazität des Akkus
anzuzeigen.
GB
PARTS OVERVIEW
LED Lights
(Fig. 1 + 2)
1 DOWN key
2 UP key
3 Battery holder
4 Hot shoe adapter
5 Mode key
6 On/Off key
7 Connection socket fore power supply
8 Display
9 Barn doors
STARTING UP
Power supply with DC power connection
1. Put the connector in the connection socket (7).
3. Put the power plug in the power outlet.
Power supply with battery
(accessory depends on model)
NOTE!
Never operate this device with accumulators and DC power supply
simultaneously to avoid any damages to the electronical parts.
There is a risk of a short circuit!
Always operate the device with two accumulators to ensure a full
and uniform power supply.
Depending on the respective model, the LED light can be equipped
with one (Fig. 1) or two battery holders (Fig. 2).
1. Slowly slide the battery from the side into the holder until it snaps
into place.
Turn on/off the device
1. To turn on the device, press the On/Off key (6) for approx. 1
second. The display will light up.
2. To turn off the device, press On/Off key (6) for approx. 1 second.
3. Shortly press the On / Off key (6) to display the remaining capacity
of the battery.
Fig. 1
Fig. 2


