Niemals mit dem Teleskop in oder in die Nähe der Sonne blicken:
E
rblindungsgEfahr
!
12
Use accessories
Eyepieces
The main function of a telescope eyepiece is to magnify the image pro-
duced by the main optics of the telescope. Each eyepiece has a specific
focal length, which is specified in millimetres (mm). The smaller the focal
length, the greater the magnification. Thus, an eyepiece with a focal length
of 10mm produces a higher magnification than an eyepiece with 25mm.
Long focal length eyepieces provide a wide field of view, bright high con-
trast images and reduce eye fatigue during long periods of observation.
If you are looking for an object with a telescope, you should always start
with a lower magnification eyepiece (e.g. 25mm). Then, when the object is
found and is in the center of your eyepiece, you can use a higher magnifi-
cation eyepiece and enlarge the image as much as the prevailing weather
conditions will allow.
The magnification of a telescope is determined by the focal length of the
telescope itself and the focal length of the eyepiece used. To calculate the
power of the eyepiece, divide the focal length of the telescope by the focal
length of the eyepiece. Here is an example using a 25 mm eyepiece. (see
"
Technical data
" from page 20).
Telescope focal length / focal length of the eyepiece = magnification of the
eyepiece
Telescope focal length
Focal length of the eyepiece = 25 mm
Telescope focal length
1400 mm
Magnification =
=
= 56
Eyepiece focal length
25 mm
The magnification is therefore 56x.
Smartphone adaptor
With this adaptor, a smartphone can be mounted to the telescope to cap-
ture bright, flat objects (e.g. the moon) or - depending on the sensor sensi-
tivity of the smartphone - also planets.
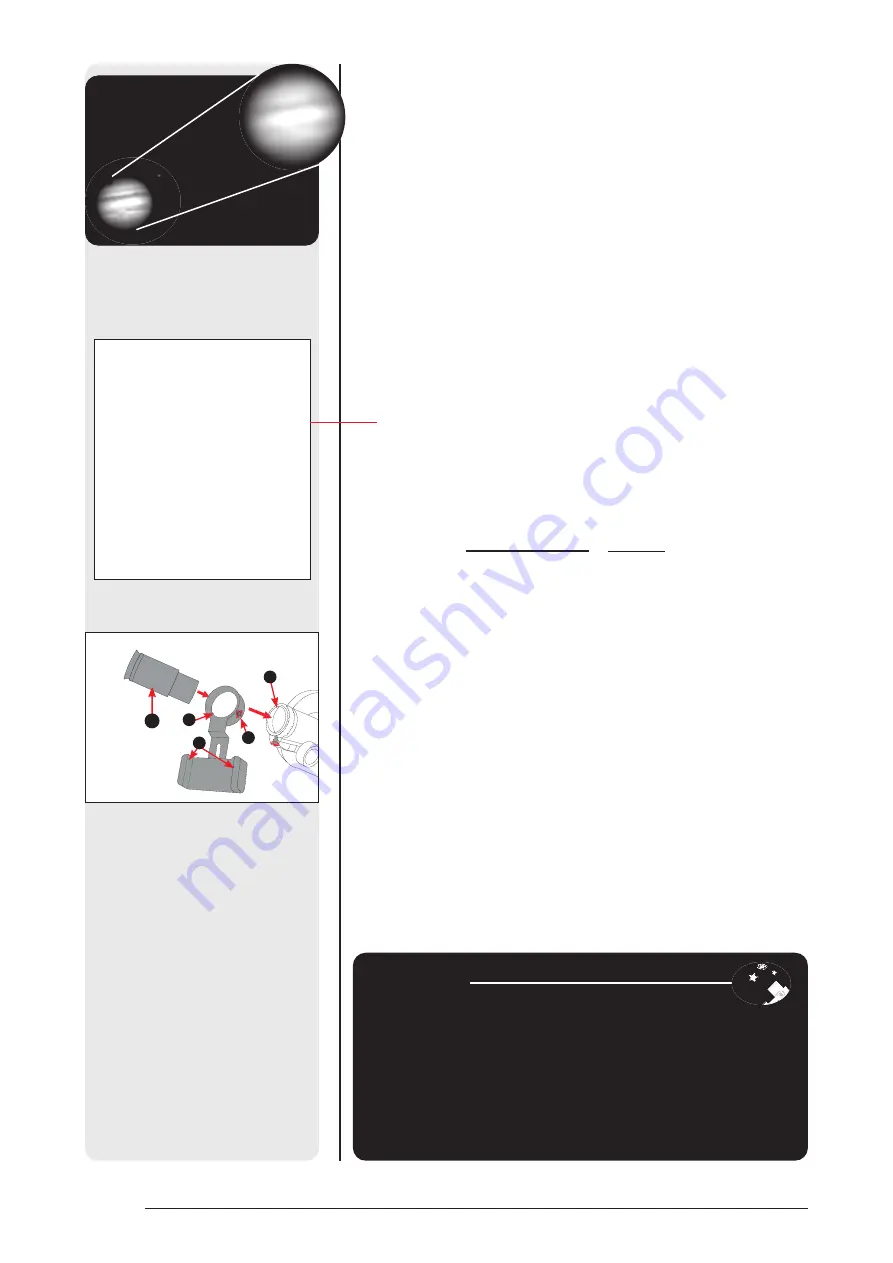
For mounting, insert the eyepiece (A, Fig 17) through the retaining ring (B,
Fig 17) of the smartphone adapter and fix it with the knurled screw (X, Fig
17). Insert the eyepiece with the attached smartphone adaptor into the
eyepiece socket (C, Fig 17) and clamp it there as well.
Clamp the smartphone between the two holding jaws (Y, Fig 17) of the
smartphone adaptor so that the camera lens is directly and centrally above
the eyepiece lens.
GETTING STARTED
Fig 15a: The planet Jupiter. An
example of correct (left) and too
much magnification (right)
Visibility conditions vary greatly
from night to night and depend
largely on the observation site.
Air turbulence also occurs during
apparently clear nights and dis-
torts the image of objects. If an
object appears blurry and poor-
ly defined, go back to a lower
magnification eyepiece. This will
give you a sharper, better defined
image (Fig 15a).
ASTRO TIPS
Is it even possible to choose a magnification that is "too high"?
Yes, you can! The most common mistake made by beginners is to over-
magnify the image produced by the telescope. A very high magnification is selected, which
the telescope cannot provide due to construction, weather or light conditions. Therefore,
always keep in mind that a sharp but low magnification image (Fig 15a, bottom left) is much
nicer to look at than a high magnification but completely blurry image (Fig 15a, right), which
you will definitely not enjoy. Magnifications above 200x should only be selected when the
air is absolutely calm and clear. Most observers should have three or four extra eyepieces
on hand to take advantage of the full range of magnifications possible with the telescope.
B
C
Y
X
A
Fig 17 Attaching the smartphone
adaptor to the eyepiece socket.
Содержание First Light MAK
Страница 1: ...Instruction manual First Light MAK 100 1400 EQ Maksutov telescope Art No 9621802...
Страница 18: ...NOTES...
Страница 19: ...NOTES...


