brennenstuhl 1294720 Скачать руководство пользователя страница 12

12


EN

Wireless flush-mount ON / OFF actuator 868.3 MHz

Wireless flush-mount ON / OFF actuator 868.3 MHz

Installation

Note:

 Check before installation whether the product is located within 

the range of the Gateway.

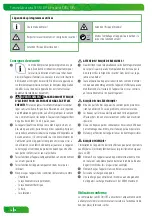
  CAUTION! DANGER OF ELECTRIC SHOCK!


Only install the device in a de-energised state! Disconnect the 
electrical mains supply line by switching off the circuit breakers 
connected to it or unscrewing the fuse. Prevent this from being 
unintentionally re-started e.g. with a warning sign.


Before installation, check the mains supply line with a suitable 
measuring device to see that it is de-energised.


The mains voltage on site must correspond with the technical 
data of the device (see “Technical data“).


Check the power input of the consumer you intend to connect to 
the device prior to installation. The maximum load is max. 1000 W.


The device must be operated in a suitable flush-mounted box or 
surface mount box or assembled in another suitable casing to 
guarantee the necessary electric shock protection.

  Only operate the device when it is stationary.


N
PE

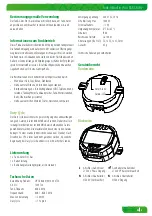
   Connect the supply voltage cable to the screw terminals L and N 

(N = neutral conductor, L = phase) (see Fig.).

   Connect the consumer to both of the centre screw terminals 

(see Fig.).

   For consumers with a PE / ground conductor connection, the 

ground conductor must be connected.

   Attach the wireless flush-mount ON / OFF actuator to the  

flush-mounted box using screws (hole spacing for mounting 
eyes = 60 mm).

   Ensure during installation that the pair button on the housing 

front is not covered and that it is not pressed by accident.

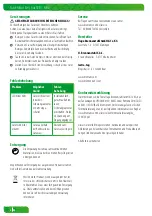
Download app / PC software BrematicPRO

The Brennenstuhl Home Automation Systems BrematicPRO is controlled 
via the BrematicPRO app / PC software. The app can be downloaded 
for free from the App Store and Google Play. The PC software is available 
for download at www.brematic.com/en/service. 
Please follow the on-screen instructions for download and installation.

For more information about the app and how to use it, please visit 
www.brematic.com/en/service.

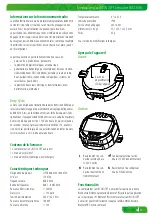
Pairing the Wireless flush-mount ON / OFF 

actuator with the BrematicPRO Wireless 

Remote Control

The wireless flush-mount ON / OFF actuator can be paired directly 
with the BrematicPRO wireless remote control. For further options, 
see the compatibility list at: www.brematic.com/en/service.

   Press and hold the pair button for 3 seconds.


The LED will flash red. 

   Whilst the LED is flashing, 

press a button on the left of 
the BrematicPRO wireless 
remote control you wish to 
programme for the device.


 Once both the devices have 
been paired, the LED will light 
up green and the wireless 
actuator will be switched on. 
This completes the pairing 
process.

Содержание 1294720

Страница 1: ...sanleitung CommutateursansfilON OFF encastrer Mode d emploi AttuatoreON OFFsotto intonacoviaradio Manuale di istruzioni Wireless Flush Mount ON OFF Actuator Instructions for use Draadloze actor AAN UI...

Страница 2: ...DE Bedienungsanleitung Seite 3 EN Instruction Page 9 FR Mode d emploi Page 15 NL Gebruiksaanwijzing Pagina 21 IT Manuale di istruzioni Pagina 27...

Страница 3: ...ite 5 Ger te bersicht Seite 5 Vorderseite Seite 5 R ckseite Seite 5 Funktion Seite 6 Montage Seite 6 App PC Software BrematicPRO herunterladen Seite 6 Funk Aktor Ein Aus an BrematicPRO Funk Fernbedien...

Страница 4: ...er t nur in trockener und staubfreier Umgebung Betreiben Sie das Ger t nur in Innenr umen Setzen Sie das Ger t keinen ung nstigen Einfl ssen aus wie Feuchtigkeit st ndiges Sonnenlicht W rmeeinstrahlun...

Страница 5: ...le Der Duty Cycle bezeichnet eine gesetzlich geregelte Sendezeitbegren zung von Ger ten die im 868 MHz Bereich senden Dadurch soll ein reibungsloser Betrieb der im 868 MHz Bereich arbeitenden Ger te g...

Страница 6: ...e des Verbrauchers den Sie an das Ger t anschlie en wollen Die maximale Belastbarkeit betr gt max 1000W Das Ger t zwingend in einer geeigneten Unterputz bzw Aufputzdose betreiben oder in einem anderen...

Страница 7: ...en W hlen Sie den Raum in dem Sie das Ger t nutzen wollen Frequenzband ausw hlen 868 MHz W hlen Sie Ger t hinzuf gen aus W hlenSieunter NeuesGer t denPunkt Schalter Steckdose aus und best tigen Sie di...

Страница 8: ...t aus umweltfreundlichen Materialien die Sie ber die rtlichen Recyclingstellen entsorgen k nnen M glichkeiten zur Entsorgung des ausgedienten Produkts erfahren Sie bei Ihrer Gemeinde oder Stadtverwalt...

Страница 9: ...Page 11 Technical data Page 11 Device overview Page 11 Front Page 11 Back Page 11 Function Page 11 Installation Page 12 Download app PC software BrematicPRO Page 12 Pairing theWireless flush mount ON...

Страница 10: ...te this device indoors Do not expose the device to adverse conditions such as moisture continuous sunlight heat radiation cold vibrations CAUTION RISK OF INJURY We assume no liability for property dam...

Страница 11: ...download Technical data Product designation UPOS 868 01W1000 3726 Item no 1294720 Radio frequency 868 3 MHz Frequency 868 1 868 5 MHz Max transmitting power 20 mW Duty cycle 1 per h Supply voltage 23...

Страница 12: ...E ground conductor connection the ground conductor must be connected Attach the wireless flush mount ON OFF actuator to the flush mounted box using screws hole spacing for mounting eyes 60mm Ensure du...

Страница 13: ...dd to assign the device to the room First tap Back to leave the room then Done to complete the pairing process The wireless flush mount ON OFF actuator is now connected to the Home Automation Systems...

Страница 14: ...l life not in the household waste Please contact your municipality for information on collection facilities and their opening hours Service For questions related to the product please contact us at ww...

Страница 15: ...s techniques Page 17 Aper u de l appareil Page 17 Avant Page 17 Arri re Page 17 Fonctionnalit Page 17 Montage Page 18 T l charger l application le logiciel pour PC BrematicPRO Page 18 Programmer le co...

Страница 16: ...ment sec et sans poussi res Faites fonctionner l appareil uniquement dans des espaces int rieurs N exposez pas l appareil des conditions d favorables comme l humidit le rayonnement solaire permanent l...

Страница 17: ...r emaximale d mission d un appareil est de 1 d une heure ce qui correspond 36secondes heure Apr savoiratteintcettelimitede1 une mis sion n est plus possible jusqu ce que la limitation de temps du Duty...

Страница 18: ...n castr ou apparent appropri ou bien le monter dans un autre bo tier appropri Faireuniquementfonctionnerl appareildemani restationnaire L N PE Branchez les c bles de tension secteur aux pinces vis L e...

Страница 19: ...Choisissezlapi cedanslaquellevoussouhaitezutiliserl appareil S lectionner la bande de fr quences 868 MHz Choisissez Ajouter un appareil Au point Nouvel appareil choisissez le point Interrupteur Prise...

Страница 20: ...mises au rebut dans les d chetteries locales Renseignez vous aupr s de votre commune ou de votre ville sur les possibilit s de mise au rebut du produit usag Afin de contribuer la protection de l envir...

Страница 21: ...gegevens Pagina 23 Apparaatoverzicht Pagina 23 Voorkant Pagina 23 Achterkant Pagina 23 Functie Pagina 23 Montage Pagina 24 App pc software BrematicPRO downloaden Pagina 24 Draadloze actor AAN UIT verz...

Страница 22: ...et apparaat niet bloot aan ongunstige invloeden zoals vocht voortdurend zonlicht warmtebronnen kou trillingen VOORZICHTIG KANS OP VERWONDING Wijzijnnietaansprakelijkvoormateri leschadeofpersoonlijklet...

Страница 23: ...igitaal als download Technische gegevens Product aanduiding UPOS 868 01W1000 3726 Art nr 1294720 Draadloze frequentie 868 3 MHz Frequentieband 868 1 868 5 MHz Max zendvermogen 20mW Duty cycle 1 per uu...

Страница 24: ...an zie afb BijverbruikersmeteenPE aarde aansluitingmoetdeaardedraad worden aangesloten Bevestig de draadloze Aan Uit schakelactor met schroeven aan deinbouwdoos afstandtussendebevestigingsgaten 60mm L...

Страница 25: ...op Gereed klikken om het leerproces af te sluiten DedraadlozeactorAAN UITverzonkeninbouwisnuopgenomen in het Home Automation Systems BrematicPRO ControleerhetcorrectfunctionerenvandedraadlozeactorAAN...

Страница 26: ...s en hun openingstijden kunt u zich bij de desbetreffende be voegde instanties informeren Service Bij vragen over het product kunt u contact met ons opnemen via www brematic com nl service Tel 0080048...

Страница 27: ...ecchio Pagina 29 Lato anteriore Pagina 29 Lato posteriore Pagina 29 Funzionamento Pagina 29 Montaggio Pagina 30 Scaricare la app il software per PC BrematicPRO Pagina 30 Configurazione dell attuatore...

Страница 28: ...tilizzare l apparecchio solamente in un ambiente asciutto e privo di polvere Utilizzare l apparecchio solamente in ambienti interni Non esporre l apparecchio a condizioni sfavorevoli quali umidit luce...

Страница 29: ...invio non possibile fino al termine del limite temporale del Duty Cycle ossia dopo un ora Contenuto della confezione 1x attuatore ON OFF sotto intonaco via radio 1x guida rapida 1x manuale di istruzio...

Страница 30: ...eo Utilizzare l apparecchio in un solo posto fisso L N PE Collegare il cavo della tensione di rete ai morsetti a vite L e N N conduttore di neutro L fase vedi fig Collegare il dispositivo in uso ad en...

Страница 31: ...ale in cui si desidera utilizzare l apparecchio Selezionare la banda di frequenza 868 MHz Selezionare Aggiungi dispositivo Selezionarelavoce Interruttore Presa sotto Nuovoapparecchio e confermare con...

Страница 32: ...aggio composto da materiali ecologici che possono essere smaltiti presso i siti di raccolta locali per il riciclo Informarsipressol amministrazionecomunaleolocalecircalepossibilit di smaltimento del p...

Страница 33: ...33...

Страница 34: ...34...

Страница 35: ...up your home Hugo Brennenstuhl GmbH Co KG Seestra e 1 3 D 72074T bingen H Brennenstuhl S A S 4 rue de Bruxelles F 67170 Bernolsheim lectra t AG Blegistrasse 13 CH 6340 Baar www brematic com www brenne...

Отзывы: