background image

10

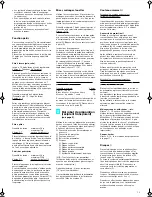
Our products are engineered to meet the 
highest standards of quality, functionality and 
design. We hope you thoroughly enjoy your 
new Braun appliance.

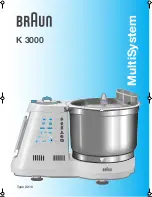
The Braun K 3000 is a kitchen machine system 
which fulfils highest demands for kneading, 
mixing, stirring, whipping, chopping, slicing, 
shredding and grating, simply and quickly.

Read all instructions carefully before using 
this product.

Important

The blades 

o

 and 

s

 are very sharp! Take 

hold of the blades by the knob only. After use, 
always first remove the blade from the bowl 
before removing the processes food.

Keep the appliance out of the reach of 
children.

This appliance was constructed for 
household use only to process the listed 
quantities.

Do not use any part in the microwave oven.

Do not allow the appliance to operate 
unsupervised.

Braun electric appliances meet applicable 
safety standards. Repairs or the replace-
ment of the mains cord must only be done by 
authorised service personnel. Faulty, 
unqualified repair work may cause 
considerable hazards to the user.

Switch the appliance off and disconnect from 
the mains before storing.

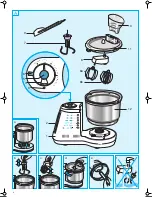
Basic unit  

(see page 4)

1

Motor block

2

Cord store

3

Control lamp for safety fuse

4

Motor switch (constant operation/ 
on: «I/on», off: «off/0», 
automatic pulse: «auto.pulse»)

5

Press button for manual pulse

6

Electronic speed regulator 
(variable 2 –14, also with pulse mode)

7

Kneading attachment

8

Drive arm

H

Mixing attachment

h

Whisk attachment

9

Spatula

j

Filling tube
Lid

l

Dough bowl (stainless steel)

Safety fuse

The control lamp 

3

 flashes to indicate that the 

motor is overloaded and will soon switch  off. 
As soon as the safety fuse has switched off the 
motor, the control lamp 

3

 is constantly lit up. 

Turn the appliance off with the motor switch 

4


(switch position «off/0»). Wait approximately 
15 minutes to allow the motor to cool off. Then 
switch the appliance on again using the motor 
switch 

4

 (position «I/on»). If the control lamp 

3


should light up again and the motor does not 
start, repeat the cooling procedure as 
described above.
Important: lf the motor has automatically 
switched itself off because of an overload, the 
appliance can only be switched back on with 

the motor switch 

4

 if it had been switched off 

(position «off/0») with this switch before.

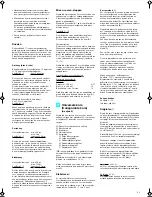
Speed regulator

It is recommended to select the speed first with 
the variable, electronic speed regulator 

6

 and 

then switch on the appliance in order to work 
with the desired speed right from the beginning. 

Recommended

Attachment

speed range*

—————————————————————
Dough bowl

Whisk attachment

7 ... 14

Mixing attachment

5 ... 14

Kneading attachment

2 ... 7

Food processor bowl

Blade

7 ... 14

-

Discs

2 ... 14

Glass liquidiser goblet

7 ... 14

* see table on front panel of housing

Pulse mode

The pulse mode is useful for the following 
applications:

Carefully adding flour to doughs so as not to 
affect their creaminess.

Adding whipped eggs or cream to more solid 
food.

Chopping delicate and soft food, e.g. eggs, 
onions.

Turn the motor switch 

4

 to the «auto.pulse» 

position in order to start the automatic pulse 
mode. This causes short bursts of operation 
of identical length at the chosen speed. The 
function «auto.pulse» is switched off by 
switching the appliance off (motor switch 

4


at «off/0»).

The manual pulse mode «pulse•» is operated 
by pressing the button 

5

 when the appliance is 

switched off (motor switch on «off/0»). Using 
the manual pulse mode, you can vary the length 
of the pulses. The appliance operates at the 
chosen speed as long as the button 

5

 is 

pressed down. When the button is released, the 
motor will stop.

Caution: max. 15 pulses per minute

Attaching and removing the dough 
bowl and the lid

Please clean all parts before using for the first 
time (see paragraph «Cleaning»).
For safety reasons, always carry or lift the 
appliance with both hands.

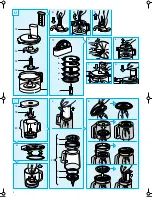
Ö

Place the bowl 

l

 onto the motor block 

1

 so 

that the markings on the bowl match those 
on the motor block. Turn the bowl clockwise 
until it clicks.

Ü

/

á

 Push the attachment needed as far as 

possible onto the drive shaft in the bowl.

à

Place the lid 

 on the bowl so that the arrow 

on the lid matches the arrow on the bowl 

l

Then turn the lid clockwise until the nozzle 
(lug) on the lid enters the safety lock on the 
motor block and audibly snaps into place. 
To remove, turn the lid anti-clockwise.

The filling tube 

has to be inserted into the 

lid’s opening so that the higher rim is facing the 
inside. It allows more convenient adding of 
ingredients while processing.

Double safety lock: The motor can only be 
started if both the bowl 

l

 and the lid  

 are 

locked into place. The lid can only be removed 
from the bowl, if the motor is switched off.

When the appliance is switched off, turn the lid  

 anti-clockwise and lift it off. Take out the 

attachment. Turn the bowl 

l

 anti-clockwise to 

lift it off.

Cleaning

Always switch off the motor first and then 
unplug the appliance before cleaning.
Clean the motor block 

1

 with a damp cloth 

only.
Some types of food (e.g., carrots) can lead to 
discolouration; wipe off first with cooking oil 
before washing.
The kneading attachment 

7

 and the drive arm 

8

 should only be cleaned manually. Do not 

immerse in water. All other parts can be washed 
in the dishwasher at a maximum temperature of 
65 °C.
Parts which are difficult to reach, e.g., the 
indentation on the inside of the lid  

 should be 

well cleaned with the spatula 

9

(e) and a brush 

if necessary.
Do not use sharp objects for cleaning.

Care and cleaning instructions for 
the stainless steel dough bowl

Rinse in hot soapy water before first use.

Rinse in hot soapy water as soon as possible 
after use, especially after processing very 
salty food.

Stubborn food residues should be soaked 
and removed with a sponge (do not use a 
scouring pad) or brush.

When cleaning in a dishwasher, remove the 
stainless steel bowl from the dishwasher as 
soon as the cleaning program is finished in 
order to prevent stains from remaining water 
drops. Be carefully to avoid an overdose of 
cleaner and decalcifier.

Carefully dry the bowl before storing it away. 

Kneading

The kneading attachment 

7

 is specially 

designed for making yeast dough, pasta and 
pastries. It is not suitable for making cake 
dough. For cake dough, use the mixing 
attachment 

H

.

Place all ingredients into the dough bowl 

l


after the kneading attachment has been 
assembled.

Yeast dough (bread, cake)

Up to 1.5 kg flour plus ingredients:
Speed 2–7

3 to 5 minutes

First, place the flour and then all other 
ingredients – except milk – into the dough bowl, 
including raisins, candied peel and almonds. 
Put on the lid and choose speed 2 to 7. Then 
set the motor switch on constant operation 
(position «l/on»). Add liquids through the filling 
tube 

j

 while the motor is running.

Maximum quantity 2 kg flour):
(Processing of 1.5 – 2 kg flour)
Speed 3–4

A

11

11

11

11

11

English

3211351_K3000_S_6-64  Seite 10  Montag, 23. April 2007  2:26 14

Содержание K 3000

Страница 1: ...Type 3210 K 3000 4 6 8 1 0 1 2 1 4 MultiSystem...

Страница 2: ...61476 Kronberg Germany 3 211 351 00 IV 07 M D GB F I NL DK N S FIN GR RUS UA Arab Printed in Germany Braun Infolines 00 800 27 28 64 63 00 800 BRAUNINFOLINE 08 44 88 40 10 0800 783 70 10 1 800 509 448...

Страница 3: ...4 4 2 1 3 5 6 9 11 8 7 8a 8b 12 10 A a b c d e off 0 2 4 6 8 10 12 14 on auto pulse pulse f...

Страница 4: ...5 A B C 13 14 15 16 D E F G H I a b c d e f e c a b d d d b c e d c b a 20 17 J a b c d e K f f n e n o u v r i r B C 18 19 20...

Страница 5: ...ges Einschalten des Motors bei gleichbleibenden Einschaltphasen mit der eingestellten Geschwindigkeit Die Funktion auto pulse wird abgeschaltet wenn Sie das Ger t ausschalten d h den Motorschalter 4 a...

Страница 6: ...kel auf der R hrsch ssel befestigen D Universalsch ssel klarsichtiger Beh lter siehe S 5 zum Mixen Hacken Zerkleinern mit dem Messer o zum Schneiden Raspeln Reiben mit den Scheiben q m Deckel mit Einf...

Страница 7: ...kel r Nehmen Sie die Dichtung auf der Unterseite des Deckels zum Reinigen heraus Setzen Sie bitte die trockene Dichtung wieder so ein dass die Kunststoffhaltezapfen des Deckels in die Nut der Dichtung...

Страница 8: ...langsam zuflie en lassen 14 I on 75 90 Sek Rezeptbeispiel Honigkonfekt Zubereitung Einstellung Schalter Zeit 200 g Zitronat und 100 g Haseln sse zerkleinern 14 I on 45 Sek 180 g Mehl 6 g Backpulver z...

Страница 9: ...the appliance is switched off motor switch on off 0 Using the manual pulse mode you can vary the length of the pulses The appliance operates at the chosen speed as long as the button 5 is pressed dow...

Страница 10: ...e use remove the plastic cover by standing the universal blade with the cover on the table and pressing the knob downwards until the protective cover loosens A The universal blade can only be placed i...

Страница 11: ...de into the goblet press it onto the drive shaft until it clicks Glass liquidiser goblet t Remove the blade as described above To disassemble the goblet J first turn it upside down reach into it with...

Страница 12: ...e eggs oil vinegar seasoning mustard 1 5 litre room temperature add oil slowly 14 I on 75 90 secs Recipe example Gingerbread Preparation Speed Switch Time 200 g candied lemon peel 100 g hazelnuts chop...

Страница 13: ...pulse ou vitesse instantan est utile dans les cas suivants Ajout d licat de farine la p te avec pour intention de ne pas affecter son aspect cr meux Ajout d oeufs battus ou de cr me des aliments solid...

Страница 14: ...ouet en place N utilisez en aucun cas l attachement fouet pour les m langes pour cake Quantit maximale Vitesse Cr me 700 ml 9 11 Blanc d oeufs 8 environ 240 ml 14 Mousse partir de 7 oeufs 14 Poussez l...

Страница 15: ...extr mement r sistant si ce dernier a t au pr alable r chauff avec de l eau chaude Hacher Vitesse 2 14 auto pulse Persil ail oignons ou noix ne peuvent pas tre hach s de m me que les petits pains durs...

Страница 16: ...lentement 14 I on 75 90 secondes Exemple de recette Pain d pices Pr paration Vitesse Position de l interrupteur Dur e 200 gr zeste de citron confit 100 gr noisettes Hacher le zeste de citron confit e...

Страница 17: ...frullatore e tritatutto 7 14 vedere il pannello sull apparecchio Intermittenza Questo tipo di funzione si utilizza per Aggiungere farina all impasto senza intac carne la cremosit Aggiungere uova sbat...

Страница 18: ...disco q per affettare sminuzzare grattugiare m Coperchio con tubo di alimentazione e pressino n Coprilama per blocco coltelli o Blocco coltelli p Recipiente universale q Dischi Lama per patate a bast...

Страница 19: ...no essere tritate come anche pane secco per il pane grattugiato e carne Cioccolato parmigiano ghiaccio spezie dure o caffe non possono essere tritati Montaggio e smontaggio del vaso Coperchio r Toglie...

Страница 20: ...Temperatura ambiente aggiungete piano l olio 14 I on 75 90 sec Esempi di ricette Pane allo zenzero Preparazione Velocit Posizione interruttore Tempo 200 g scorza di limone candita 100 g nocciole Pezzi...

Страница 21: ...an bloem aan beslag om de luchtigheid niet te beinvloeden toevoegen van geklopt eiwit of room aan een stevige massa hakken van delicaat en zacht voedsel bijv gekookte eieren uieu Zet de schakelaar 4 o...

Страница 22: ...Snelheid Slagroom 700 ml 9 11 Eiwit 8 240 ml 14 Biscuitdeeg van 7 eieren 14 Druk de garde op de as van de aandrijfarm en plaats beiden op de aandrijfas in de kom C Doe vervolgens de deksel op de kom D...

Страница 23: ...antevoren verwarmt met heet water Hakken Snelheid 2 14 auto pulse Voor het hakken van peterselie uien noten broodjes en vlees Chocolade Parmesaanse kaas ijsblokjes koffie en andere harde ingredi nten...

Страница 24: ...it mix 14 8 I on 60 sec Mayonaise hele eieren olie azijn mosterd 1 5 L Kamertemp 14 I on 75 90 sec Voorbeeld recept Gemberkoek Voorbewerking Snelheid Schakelaar Tijd 200 g geconfijte citroenrasp 100 g...

Страница 25: ...ng af mel i dej s den ikke bliver kl g Tils tning af sammenpisket g eller fl de til mere faste ingredienser Hakning af sarte eller bl de ingredienser f eks g log Automatisk momentindstilling auto puls...

Страница 26: ...neplade Dobbeltsidet snitteplade Dobbeltsidet riveplade Raspeplade Knivholder N B Alle tilbeh rsdele som bruges i univer salsk len sammen med den gr knivholder er gr Max kapacitet 2 l v ske til milksh...

Страница 27: ...og samling L g r Fjern gummiringen p undersiden af l get f r reng ring Den t rre gummiring s ttes atter p plads De sm takker i l get skal gribe fast om gummiringen H Blenderknivene s Advarsel Knivene...

Страница 28: ...rydderier sennep 1 5 l Stuetemp tils t olien lidt efter lidt 14 I on 75 90 sek Opskriftseksempel Honningkage Tilberedning Hastighed Program v lger Tid 200 g syltet citronskal 100 g hasseln dder Hak sy...

Страница 29: ...innet Dette gj r at maskinen arbeider i korte intervaller av identisk varighet i valgt hastighet Funksjonen auto pulse stoppes ved sl av maskinen bryter 4 i posisjon off 0 Det manuelle momenttrinnet p...

Страница 30: ...l miksing hakking kutting men ogs til elting av deig f eks gj rdeig maks 1 kg mel pluss ingredienser hastighet 2 7 ca 3 min Beskyttelsesdeksel n F r bruk tas beskyttelsesdekselet i plast av ved sette...

Страница 31: ...Advarsel Kniven er meget skarp Kniven tas ut av glassbollen ved holde i h nd taket mens du presser ned med tommelfinge ren og trekker den av drivakselen I Kniven settes tilbake i glassbollen igjen ve...

Страница 32: ...eddik krydder sennep 1 5 l Romtemperatur oljen tilsettes sakte 14 I on 75 90 sek Oppskrifts eksempel Honningkake Forberedelser Hastighet Bryter Tid 200 g kandisert sitronskall 100 g hasseln tter Hakk...

Страница 33: ...amv ljaren 4 st r p auto pulse D startar motorn med korta intervaller i den hastighet som r vald Den automatiska pulsinst llningen st ngs av genom att du st nger av apparaten programv ljaren 4 i l ge...

Страница 34: ...redienser hastighet 2 7 ca 3 min Skyddsk pa n F re anv ndning ta bort skyddsk pan i plast genom att st lla kniven med skyddet p bordet och trycka plastdelen ned t tills knivskyddet lossnar A Kniven ka...

Страница 35: ...den trycks p drivaxeln tills det klickar Mixerkannan t Ta bort kniven som beskrivet F r att frig ra mixerkannan J v nd den upp och ned och ta d refter tag om drivaxeln med den ena handen V nd sedan ka...

Страница 36: ...tika kryddor senap 1 5 l Rumstemp tills tt oljan lite i taget 14 I on 75 90 sek Tillagningsexempel Honungskaka F rberedelse Hastighet Startreglage Tid 200 g syltade citronskal 100 g hasseln tter Hacka...

Страница 37: ...sin v liajoin valitulla nopeudella Toiminto lakkaa kun laite kytket n pois p lt k ytt kytkin 4 asentoon off 0 Painettava pitokytkin pulse Kun painat pitokytkint 5 laite toimii valitulla nopeudella sen...

Страница 38: ...kki osat joita k ytet n peruskulhon harmaalla vetoakselilla ovat harmaita Enimm ism r 2 l nestett pirtel iss 1 5 l Pienet m r t on hyv tehd tehosekoittimessa t ter n s kanssa Leikkuuter o Varoitus Lei...

Страница 39: ...te kannen sis puolelta puhdistusta varten Paina puhdas ja kuiva tiiviste paikoilleen niin ett kannen muoviset pidikkeet asettuvat tiivisteen uraan H Ter s Varoitus Ter on eritt in ter v Irrota ter kul...

Страница 40: ...etikka mausteet sinappi 1 5 l Huoneenl mp isin lis ljy nauhana 14 I on 75 90 sek Esimerkkiohje Inkiv rileip Valmistus Nopeus K ytt kytkimen asento Aika 200 g sokeroitua sitruunankuorta 100 g hasselp h...

Страница 41: ...s Braun 4 1 M 2 3 4 I on 0 off auto pulse 5 pulse 6 2 14 7 8 H h 9 j l 3 3 4 off 0 15 4 I on 3 4 off 0 6 7 14 5 14 2 7 7 14 2 14 7 14 auto pulse 4 auto pulse 4 off 0 pulse 5 5 15 l 1 l j l l 1 7 8 65...

Страница 42: ...kg 1 5 2 kg 3 4 1 3 7 1 15 3 5 250 g 1 kg 2 7 3 5 j 250 g 750 g 5 7 2 5 2 5 H 1 kg 5 14 C D 5 7 1 j 11 13 h 700 ml 9 11 8 240 ml 14 7 14 C D 5 o q m n o p q Julienne 2 1 5 t s o 1 kg 2 7 3 n p C 7 14...

Страница 43: ...44 G 2 7 4 5 Julienne 2 7 2 7 2 14 2 7 14 7 14 5 r s t 1 750 ml 1 s 49 2 14 1 750 ml 2 14 r s t J a b c e d b O EMC 89 336 O 2006 95 O BPQRS Braun Braun Braun 01 9478700 Braun C...

Страница 44: ...on 30 400 g 14 I on 30 45 1 5 14 8 8 I on 60 1 5 14 I on 75 90 200 g 100 g 14 I on 45 180 g 6 g 1 14 I on 5 1000 g 14 I on 15 150 C 50 60 1 150 g 9 14 I on 15 25 1 1 14 14 auto pulse I on 3 4 60 90 1...

Страница 45: ...o s Braun 4 1 2 3 4 I on off 0 auto pulse 5 pulse 6 2 14 7 8 H h 9 j k l 3 off 0 15 I on off 0 6 7 14 5 14 2 7 7 14 2 14 7 14 auto pulse 4 auto pulse auto pulse 4 off 0 pulse 5 off 0 5 15 l 1 k l j l...

Страница 46: ...2 7 l on j 2 1 5 2 3 4 1 3 7 1 15 3 4 5 250 1 2 7 3 5 j 250 750 5 7 2 5 2 5 H 1 5 14 D 5 7 1 10 11 13 h 700 9 11 8 240 14 7 14 C D 5 o q m n o p q 2 1 5 t s o 1 2 7 3 n A p B C 7 14 30 2 8 1 5 14 7 2...

Страница 47: ...48 G 2 7 4 5 2 7 2 7 2 14 2 7 14 7 14 Parmigiano 5 t r s t 1 750 p o 1 s 9 2 14 1 750 2 14 pulse Parmigiano r H s I t J b d K b a 950 Videoton Holding RT Izzo u 3 H 7400 KAPOSVAR C...

Страница 48: ...60 500 3 14 I on 30 400 14 I on 30 45 1 5 14 8 8 I on 60 1 5 t 14 I on 75 90 200 100 14 I on 45 180 6 14 I on 5 1 000 14 I on 15 150 50 60 1 150 9 14 I on 15 25 1 14 14 auto pulse I on 3 4 x 60 90 1 1...

Страница 49: ...50 BRAUN BRAUN BRAUN BRAUN BRAUN 2300 1 7 02 1992 9 01 1996 BRAUN BRAUN BRAUN BRAUN 7 495 258 62 70...

Страница 50: ...aun Braun 4 1 2 3 4 I on off 0 auto pulse 5 pulse 6 2 14 7 8 H h 9 j q l 3 off 0 15 I on off 0 6 7 14 5 14 2 7 7 14 2 14 7 14 auto pulse 4 auto pulse auto pulse 4 off 0 pulse 5 off 0 5 15 a l 1 b d q...

Страница 51: ...5 2 7 I on j 2 1 5 2 3 4 1 3 7 1 15 3 4 5 250 1 2 7 3 5 j 250 750 5 7 2 5 2 5 8 1 5 14 D 5 7 1 j 11 13 h 700 9 11 8 240 14 7 14 D 5 o q m n o p q 2 1 5 t s o 1 2 7 3 14 p 7 14 30 2 8 1 5 14 7 2 14 49...

Страница 52: ...3 2 7 4 5 2 7 2 7 2 14 2 7 14 2 7 Parmigiano 5 r s t 1 750 16 15 1 s 9 2 14 1 750 2 14 pulse Parmigiano r s t J b d b Braun 3135 7 96 30345 7 96 335 2 14 94 23511 79 1 30320 95 001 96 239 96 3677 84 C...

Страница 53: ...60 500 3 14 I on 30 400 14 I on 30 45 1 5 14 8 8 I on 60 1 5 1 5 14 I on 75 90 200 100 14 I on 45 180 6 14 I on 5 1000 14 I on 15 150 50 60 1 150 9 14 I on 15 25 1 14 14 auto pulse I on 3 4 x 60 90 1...

Страница 54: ...55 raun i i i aun r un i r un i i i i i i i i r un i i r un i i i i i i r un...

Страница 55: ...56...

Страница 56: ...57...

Страница 57: ...58...

Страница 58: ...59...

Страница 59: ...60...

Страница 60: ...61...

Страница 61: ...62...

Отзывы: