background image


5


English

H Mögliche Probleme 

und deren Behebung


Problem

Hilfe


––––––––––––––––––––––––––––––––––––––
Tropfen treten

Dampfmengenregler zu- 

aus der Bügel- rückdrehen oder Dampf
sohle aus

ausschalten durch 
Eindrücken des Dampf-
knopfes.
Power shot-Knopf in 
größeren Abständen 
betätigen.
Höhere Temperaturein-
stellung wählen.

Kein Dampf

Dampfknopf drücken, 
obere Position = Dampf 
ein.

Dampfbildung

Wasserfüllstand prüfen,

läßt nach; kein

Anti-Kalk-Ventil reinigen. 

Dampf mehr

Kalkpartikel Entkalken 

der 

Dampf- 

treten aus der

kammer, Power shot-  

Bügelsohle aus

Knopf 5-10mal drücken.

––––––––––––––––––––––––––––––––––––––

Änderungen vorbehalten.

Dieses Gerät entspricht dem EMV-
Gesetz (EG-Richtlinie 89/336/EWG)
sowie der Niederspannungsricht-
linie (73/23 EWG).

Weitere Informationen zur Kleiderpflege 
können Sie auf unserer Internet-Seite 
finden: www.braun.com


Garantie


Als Hersteller übernehmen wir für dieses 
Gerät 


– nach Wahl des Käufers zusätzlich 

zu den gesetzlichen Gewährleistungs-
ansprüchen gegen den Verkäufer –


 eine 

Garantie von 1 Jahr ab Kaufdatum.

Innerhalb dieser Garantiezeit beseitigen wir 
nach unserer Wahl durch Reparatur oder 
Austausch des Gerätes unentgeltlich alle 
Mängel, die auf Material- oder Herstellungs-
fehlern beruhen.

Von der Garantie sind ausgenommen: 
Schäden, die auf unsachgemäßen Ge-
brauch oder Lagerung (Betrieb mit falscher 
Stromart/Spannung, Anschlüsse an unge-
eignete Stromquelle, Bruch, Verwendung 
von handelsüblichen Entkalkungsmitteln, 
feuchte Lagerung auf der Bügelsohle) zu-
rückzuführen sind, normaler Verschleiß und 
Mängel, die den Wert oder die Gebrauchs-
tauglichkeit des Gerätes nur unwesentlich 
beeinträchtigen.

Bei Eingriffen nicht von uns autorisierter 
Stellen oder bei Verwendung anderer als 
original Braun Ersatzteile erlischt die 
Garantie.

Die Garantie tritt nur in Kraft, wenn das 
Kaufdatum durch Stempel und Unterschrift 
des Händlers auf der Garantiekarte und der 
Registrierkarte bestätigt ist. Sie kann in 
allen Ländern in Anspruch genommen 
werden, in denen dieses Gerät von Braun 
oder ihren autorisierten Händlern verkauft 
wird.

Im Garantiefall senden Sie bitte das voll-
ständige Gerät mit der ausgefüllten 
Garantiekarte einem unserer autorisierten 
Servicehändler oder an eine Braun Kunden-
dienststelle. Die Anschrift für Deutschland 
können Sie zum Nulltarif unter der Ruf-
nummer 00800/27286463 erfragen.
Wir stehen Ihnen hier mit unserer Braun 
Infoline auch für weitere Fragen zu unseren 
Produkten gern zur Verfügung.  

Our products are engineered to meet the 
highest standards of quality, functionality and 
design. We hope you enjoy your new Braun 
FreeStyle.

Notice: Remove the sole plate label, if any, 
before first use.

–––––––––––––––––––––––––––––––––––––––––


Important safeguards


Before using the iron, read the use instruc-
tions completely. Keep the use instructions 
during the entire life of the iron.

Make sure your voltage corresponds to the 
voltage printed on the iron. Connect the 
iron to alternating current only.

Always unplug the iron before filling with 
water and make sure the steam button is 
in its lower position (steam off). Always pull 
the plug, not the cord. The cord should 
never come in contact with hot objects or 
with the hot sole plate. 

Never immerse the iron in water or other 
liquids.

During ironing pauses, always place the 
iron upright on its heel rest. Unplug it when 
leaving the room, even if only for a short 
time. 

Never pull out the steam button (3) during 
ironing.

Keep the iron away from children. Electric 
irons combine high temperatures and hot 
steam that could lead to burns.  

Check the cord regularly for possible 
damage.

If the appliance (including cord) shows any 
defect, stop using it and take it to a Braun 
Service Centre for repair. 

Faulty or unqualified repair work may 
cause accidents or injury to the user.

–––––––––––––––––––––––––––––––––––––––––


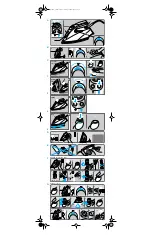
A Description


1 Spray nozzle 
2 Water tank opening 
3 Steam button
3a Steam regulator
4 Spray button  
5 Power shot button
6 Temperature selector
7 Temperature pilot light


B Before starting off


This iron is designed for tap water. If you 
have extremely hard water, we recommend 
to use a mixture of 50% tap water and 
50% distilled water. Fill the water tank to 
«max» marking. Never use distilled water 
exclusively. Do not add any additives 
(e.g. starch). 

Keep the iron in the upright position and 
connect it to the mains. Select the tem-
perature according to the ironing guide on 
the heel rest of the iron or on the label in 
your garments.

The temperature pilot light (7) goes off, 
when the desired temperature is reached 
(after approx. 1 minute).


C Ironing 


 1  Steam on/off 


For steam ironing, the temperature selector 
(6) must be set within the red range. 
Press the steam button (3) to start the 
steam mode.

steam on  


  steam off

With the steam button in its upper position, 
turn the steam regulator (3a) to adjust the 
steam quantity.

Preconditioning
(not with models SI 6210, SI 6510)
Steam develops also horizontally at the 
front area of the sole plate. This pre-
conditions the textiles by «pre-steaming», 
thus making ironing easier. 
Be careful – steam comes out laterally.


 2  Power shot 


Prior to use, press the power shot button 
(5) 3 to 4 times to activate it. Press the 
power shot button in intervals of at least 
5 seconds. 
Power shot can be activated when dry 
ironing. However, the temperature selector 
has to be set in the range between «•••» 
and «max». The power shot function can 
also be used in the vertical position for 
steaming hanging clothes.


 3 Spray function 


Press the spray button (4). 


  4 Dry ironing 


Turn the steam mode off by pressing the 
steam button (3) so that it catches in the 
lower position.

pre

ss

pre

ss


SI 6530_MN_4694450  Seite 5  Freitag, 10. März 2000  3:56 15

Содержание Freestyle saphir Series

Страница 1: ... diesem Produkt Rufen Sie an in Deutschland und Österreich zum Nulltarif 00 800 27 28 64 63 00 800 BRAUNINFOLINE 08 44 88 40 10 Servicio al consumidor para España 901 116184 Serviço ao Consummidor para Portugal 0808200033 Servizio consumatori 02 66781 o 02 6678623 Heeft u vragen over dit produkt Bel Braun Consumenten infolijn 070 4 13 16 58 Vous avez des questions sur ce produit Appelez Braun Belg...

Страница 2: ... press 6 press press m ax min j e t vinegar or lemon juice 7 9 1 5 6 2 3 8 4 1 3 2 4 5 7 8 10 11 12 13 4x 9 100 C p r e s s 6 p r e s s p r e s s p r e s s p r e s s m ax min j e t m ax min j e t m ax min j e t p r e s s p r e s s p r e s s p r e s s max max m ax min j e t max m i n jet p r e s s press SI 6530_MN_4694450 Seite 3 Freitag 10 März 2000 3 56 15 ...

Страница 3: ...ann in Abständen von nicht weniger als 5 Sekunden gedrückt werden Power shot kann auch beim Bügeln ohne Dampf eingesetzt werden Dabei muß der Temperaturregler allerdings im Bereich von bis max eingestellt sein Die Power shot Funktion kann auch zum Bedampfen hängender Textilien eingesetzt werden 3 Sprühfunktion Sprühknopf 4 drücken 4 Trockenbügeln Dampfknopf nach unten drücken um den Dampf auszusch...

Страница 4: ...ns completely Keep the use instructions during the entire life of the iron Make sure your voltage corresponds to the voltage printed on the iron Connect the iron to alternating current only Always unplug the iron before filling with water and make sure the steam button is in its lower position steam off Always pull the plug not the cord The cord should never come in contact with hot objects or wit...

Страница 5: ...activate the anticalc system Never pull out the steam button when ironing H Trouble shooting guide Problem Remedy Drops Turn the steam regulator coming out anti clockwise to reduce of the steam the steam or press the vents steam button to turn the steam off Take longer intervals when pressing the power shot button Select a higher tempera ture setting No steam Press the steam button at all so that ...

Страница 6: ... pré repasse les tissus par humidification ce qui permet un repassage plus facile Faites attention de la vapeur est diffusé latéralement 2 Fonction pressing Avant utilisation pressez le bouton de la fonction pressing 5 3 à 4 fois de manière à l activer Appuyez le bouton de la fonction pressing par intervalle d au moins 5 secondes La fonction pressing peut être activée durant le repassage à sec san...

Страница 7: ...lique en tout état de cause la garantie légale qui oblige le vendeur professionnel à garantir l acheteur contre toutes les conséquences des défauts ou vices cachés de la chose vendue ou du service rendu dans les conditions des articles 1641 et suivants du Code civil Nuestros productos están desarrollados para alcanzar los más altos estándares de calidad funcionalidad y diseño Esperamos que disfrut...

Страница 8: ...jo hasta donde pueda Presiónelo de forma que se sitúe en la posición inferior presionado Llene el depósito de agua deje que la plancha se caliente y presione el botón de super vapor a presión 4 veces para preparar la plancha para el planchado Importante Sólo tire del botón de vapor cuando quiera activar el sistema anti cal No tire nunca del botón cuando esté planchando H Problemas y soluciones Pro...

Страница 9: ... inferiores a 5 segundos O super vapor a pressão pode activar se para o engomar a seco Contudo o selector de temperatura deverá estar dentro da escala compreendido entre e max A função de super vapor a pressão pode ser usada também para engomar peças de roupa na vertical 3 Função de spray Pressione o botão de spray 4 4 Engomar a seco Desligue o modo de vapor pressionando o botão de vapor 3 de form...

Страница 10: ...ro Conservate le istruzioni per tutto il periodo di utilizzo del ferro Assicuratevi che la tensione del Vostro impianto elettrico corrisponda a quella riportata sul ferro Collegate il ferro esclusivamente ad una presa di corrente alternata Staccate sempre la spina dalla presa prima di procedere al rifornimento di acqua e assicurarsi che il tasto vapore è nella posizione bassa vapore spento Staccat...

Страница 11: ...r verificarne il funzionamento Riempite il serbatoio e premete il pulsante colpo di vapore per 4 volte per pulire il ferro prima di iniziare a stirare Importante Estraete il tasto vapore quando si vuole attivare il sistema anticalcare Non estrarlo quando si sta stirando H Guida ad eventuali guasti Problema Rimedio Gocce d acqua Ruotate il regolatore escono dai fori di vapore in senso della piastra...

Страница 12: ...t tussenpozen van minimaal 5 seconden De stoomstoot kan worden gebruikt bij droog strijken maar de temperatuur regelaar moet in het gebied tussen en max worden gezet De stoomstoot functie kan ook worden gebruikt in verticale positie voor het stomen van hangende kleding 3 Spray functie Druk de spray knop 4 in 4 Droog strijken Zet de stoom doseerknop 3 uit door deze in te drukken in de lagere positi...

Страница 13: ...vender strygejernet Behold instruktionsbogen i hele strygejernets levetid Det skal sikres at voltspændingen i Deres elstik svarer til voltspændingen som er trykt på strygejernet Forbind kun strygejernet til vekselstrøm Fjern altid stikket fra kontakten før De fylder vand på strygejernet og vær sikker på at dampknappen er i sin lave position damp fra Træk altid i stikket ikke i ledningen Ledningen ...

Страница 14: ... Forsigtighed Når dampknappen er oppe vil der komme damp og varmet vand ud af strygesålen Vent indtil strygesålen er kølet af og rens den derefter som beskrevet ovenfor Sæt damp til fra knappen tilbage og tryk den ned så langt som den kan Tryk den ned så den forbliver i laveste stilling Fyld atter tanken op med vand opvarm strygejernet og tryk på dampskuds knappen 4 gange for at rense strygejernet...

Страница 15: ...ir aktivert Knappen for ekstra kraftig dampstøt trykkes ned i intervaller på minst 5 sekunder Det ekstra kraftige dampstøtet kan aktiveres ved tørrstryking men temperatur velgeren må være innenfor området og max Funksjonen for ekstra kraftige dampstøt kan også brukes i vertikal stilling for damping av klær som henger 3 Dynkefunksjon Trykk ned knappen for dynkespray 4 4 Tørrstryking Slå av dampfunk...

Страница 16: ...med den spänning som anges på strykjärnet Anslut endast strykjärnet till växelström Dra ur kontakten ur vägguttaget innan du fyller på vatten och försäkra dig om att ångknappen är inställd i det lägsta läget ånga av Dra alltid i kontakten inte i sladden Sladden får aldrig komma i kontakt med heta föremål eller med stryksulan Doppa aldrig strykjärnet i vatten eller i andra vätskor Placera alltid st...

Страница 17: ...dfat Tryck på ångknappen så att den lyfts upp Dra sedan försiktigt upp ångknappen och vrid den så att den stannar i detta läge Viktigt när ångknappen är i detta läge kommer hett vatten och ånga att komma ut ur stryksulan Vänta tills dess att stryksulan svalnat och rengör den som beskrivs ovan Sätt tillbaka ångknappen och tryck ner den så långt det går Tryck fast den i lägsta läge Fyll åter vattent...

Страница 18: ...ertaa aktivoidaksesi sen Painallusten välissä tulisi olla vähintään 5 sekuntia Tehohöyry voidaan aktivoida kuivasilityksessäkin Tällöin lämpötilan valitsimen tulee olla merkkien ja max välillä Tehohöyryä voidaan käyttää myös pystyasennossa roikkuvien vaatteiden höyryttämiseen 3 Vesisuihke Paina vesisuihkepainiketta 4 4 Kuivasilitys Paina höyrypainike 3 alas niin että se jää ala asentoon D Silityks...

Страница 19: ...του ατµο ε ναι π ντα στο χαµηλ θ ση steam off Να τραβ τε π ντα την πρ ζα και χι το καλ διο Το καλ διο δεν πρ πει ποτ να ρθει σε επαφ µε ζεστ αντικε µενα µε την πλ κα σιδερ µατος Μη βυθ ζετε ποτ το σ δερο σε νερ λλο υγρ 2ταν κ νετε µια πα ση στο σιδ ρωµα να τοποθετε τε το σ δερο ρθιο στη β ση του Να το βγ ζετε απ τη πρ ζα ταν βγα νετε απ το δωµ τιο ακ µη και για µικρ χρονικ δι στηµα Μην τραβ τε ποτ...

Страница 20: ...µ στε το δοχε ο συνδ στε το σ δερο µε το δ κτυο ηλεκτρικο ρε µατος επιλ χτε τη θερµοκρασ α και περιµ νετε µ χρι η φωτειν νδειξη θερµοκρασ ας σβ σει Αποσυνδ στε το σ δερο απ το δ κτυο ηλεκτρικο ρε µατος και κρατε στε το π νω απ το νεροχ τη Πι στε το κουµπ ατµο 3 τσι στε να ανασηκωθε Μετ ανασηκ στε προσεκτικ το κουµπ ατµο και γυρ στε το τσι στε να εφαρµ σει στη θ ση αυτ Προσοχ Οταν το κουµπ λειτουργ...

Страница 21: ... Sol BP 1941 L 1019 Luxembourg 4 00 50 51 Malaysia Braun Malaysia c o Gillette 11 A Persian Selangor P O B 7013 409991 Shah Alam Selangor Darul Ehsan 35 59 21 16 Malta D I N K Ltd Kind s Mosta Road Lija Bzn 09 24 71 18 Maroc Gillette Morocco S A Braun Division Espace Porte d Anfa No 17 Rue Bab El Mansour Bat B BP 2554 Casablanca 212 2 95 09 75 Martinique Decius Absalon 23 Rue du Vieux Chemin P O B...

Отзывы: