27
Description
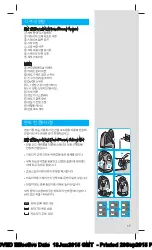
Clean&Renew station
1
Cleaning
fl
uid display
2
Lift button for cartridge exchange
3
Station-to-shaver contacts
4
Start button
D
Fast clean button
5
Cleaning program indicators
6
Station power socket
7
Cleaning cartridge
Shaver
8
Foil & Cutter cassette
9
Cassette release button
0
Shaver head lock switch
q
Pop-out long hair trimmer
w
On/o
ff
switch
e
– setting button (sensitive)
r
+ setting button (intensive)
t
Reset button
z
Shaver display
u
Shaver-to-station contacts
i
Shaver power socket
o
Travel case
p
Special cord set
Before shaving
Prior to
fi
rst use you must connect the shaver to
an electrical outlet using the special cord set
p
or alternatively proceed as below.
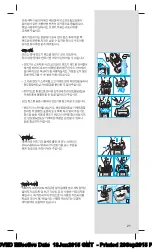
Installing the Clean&Renew station
• Using the special cord set
p
, connect the
station power socket
6
to an electrical outlet.
• Press the lift button
2
to open the housing.
• Hold the cleaning cartridge
7
down on a
fl
at,
stable surface (e.g. table).
• Carefully remove the lid from the cartridge.
• Slide the cartridge into the base of the station
as far as it will go.
• Slowly close the housing by pushing it down
until it locks.
The cleaning
fl
uid display
1
will show how much
fl
uid is in the cartridge:
up to 30 cleaning cycles available
up to 7 cleaning cycles remaining
new cartridge required
fast clean
fast clean
fast clean
2
1
97355214_799cc-7_CN-KR_S4-38.indd 27
97355214_799cc-7_CN-KR_S4-38.indd 27
03.06.15 09:27
03.06.15 09:27
CSS APPROVED Effective Date 18Jun2015 GMT - Printed 29Sep2015 Page 27 of 38


