background image


Contenuto 

1.


Attenzione .......................................................................................................... 3


2.


Istruzioni ............................................................................................................ 4


2.1


Interfaccia del corpo della telecamera ........................................................... 4


2.2


Componenti e funzioni della telecamera ....................................................... 5


2.3


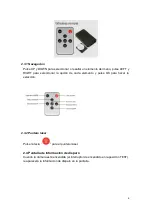
Telecomando ................................................................................................ 5


2.3.1


Navigazione ........................................................................................... 6


2.3.2


Puntatore laser ....................................................................................... 6


2.4


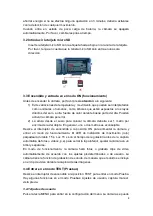
Informazioni di ripresa ................................................................................... 6


2.5


Formati supportati ......................................................................................... 7


3.


Funzionamento di base ..................................................................................... 7


3.1


Alimentazione ............................................................................................... 7


3.2


Inserire la scheda micro SD .......................................................................... 8


3.3


Accensione e attivazione .............................................................................. 8


3.4


Entrare in modalità TEST .............................................................................. 8


3.4.1


Impostazioni personalizzate ................................................................... 8


3.4.2


Cattura manuale .................................................................................... 9


3.4.3


Vedi immagini o video ............................................................................ 9


3.5


Spegnimento ................................................................................................. 9


4.


Funzionamento avanzato .................................................................................. 9


4.1


Menu impostazioni ........................................................................................ 9


4.1.1


Impostazioni foto .................................................................................. 10


4.1.2


Impostazioni video ................................................................................ 11


4.1.3


Impostazioni di sistema ......................................................................... 11


4.1.4


Predefinite ............................................................................................ 12


4.1.5


Impostazioni generali ........................................................................... 12


4.1.6


Imposta modalità telecamera ............................................................... 12


4.1.7


Formattazione di una scheda micro SD ................................................ 12


4.1.8


Impostazione delle dimensioni delle foto .............................................. 13


4.1.9


Impostazione della dimensione dei video ............................................. 13


4.1.10


Impostazione di data e ora ................................................................... 13


4.1.11


Impostazione Multi ............................................................................... 14


4.1.12


Imposta

zione dell’ISO

 .......................................................................... 14


4.1.13


Impostazione della lunghezza dei video ............................................... 14


4.1.14


Impostazione dell’audio per i filmati

 ...................................................... 14


4.1.15


Impostazione ritardo ............................................................................. 15


4.1.16


Impostazione timer ............................................................................... 15


4.1.17


Inserimento di una password ............................................................... 15


4.2


Riproduzione ............................................................................................... 16


4.2.1


Visualizzazione di foto o video ............................................................. 16


4.2.2


Cancellazione di foto e video ............................................................... 16


4.3


Puntatore laser ........................................................................................... 16


4.4


Numerazione dei file ................................................................................... 17


Содержание 57660

Страница 1: ...1 Scouting Kamera BLACK300 Bedienungsanleitung BRAUN PHOTO TECHNIK GmbH Merkurstrasse 8 72184 Eutingen www braun phototechnik de ...

Страница 2: ...g für Fortgeschrittene 9 4 1 Einstellungsmenü 9 4 1 1 Fotoeinstellungen 10 4 1 2 Videoeinstellungen 10 4 1 3 Systemeinstellungen 11 4 1 4 Standardeinstellungen 12 4 1 5 Allgemeine Einstellungen 12 4 1 6 Kameramodus einstellen 12 4 1 7 micro SD Karte formatieren 12 4 1 8 Bildgröße einstellen 13 4 1 9 Videogröße einstellen 13 4 1 10 Datum und Uhrzeit einstellen 13 4 1 11 Serienbilder einstellen 14 4...

Страница 3: ...efindet die micro SD Karte nicht einsetzen oder entfernen 8 Es ist empfehlenswert vor dem ersten Gebrauch die micro SD Card durch die Kamera zu formatieren 9 Die Kamera schaltet in USB Modus wenn sie mit einem USB Port eines Computer verbunden wird In diesem Fall funktioniert die micro SD Karte als Wechseldatenträger 10 Achten Sie bei einer Firmware Aktualisierung darauf dass die Batterie über ein...

Страница 4: ...r den Kauf der BRAUN Scouting Kamera BLACK300 Diese Kamera ist eine automatische Überwachungskamera Sie wird durch Bewegungen von Menschen oder Tieren in einem bestimmten zu überwachenden Bereich ROI über einen hochempfindlichen passiven Infrarot Bewegungssensor PIR ausgelöst und nimmt dann automatisch qualitativ hochwertige Bilder bis zu 12 MP oder zeichnet 1080p HD Videoclips WVGA oder QVGA auf ...

Страница 5: ...d Videos herunterzuladen 4 PIR Passiver Infrarot Sensor 5 LED Infrarotblitz 6 Objektiv 7 2 Zoll 5 cm Farb LCD 8 Mikrofon 9 Verriegelung 10 Ein Ausschalter EIN TEST AUS 11 Batteriefach 2 3 Fernbedienung Die Fernbedienung dient als Eingabegerät für die Kamera und sie wird hauptsächlich für Benutzereinstellungen und zur Eingabe des Passworts verwendet Es handelt sich um eine drahtlose Infrarot Fernbe...

Страница 6: ...tion für jeden Menüpunkt aus und bestätigen Sie die Auswahl mit OK 2 3 2 Laserzeiger Schalten Sie den Laserzeiger mit der Taste ein 2 4 Anzeige der Aufnahmeinformationen Wenn die Kamera eingeschaltet wurde der Ein Ausschalter wurde auf die Stellung TEST geschoben werden die Aufnahmeinformationen auf dem Monitor angezeigt ...

Страница 7: ...ch der Ein Ausschalter in der Stellung OFF rechts befindet bevor Sie die Batteriebox herausziehen Legen Sie vollständig aufgeladenen Batterien in die Batteriebox ein und achten auf die richtige Polarität wie in der Batteriebox dargestellt Schieben Sie die Batteriebox wieder in die Kamera Folgende 1 5 V Batterien können verwendet werden 1 Hochleistungs Alkalibatterien empfohlen 2 Wiederaufladbare A...

Страница 8: ...ntagehöhe der Kamera sollte 1 Meter über dem Objekt befinden Eine Montagehöhe von 1 bis 2 Metern ist ratsam Schieben Sie den Ein Ausschalter der Kamera in die Stellung ON um die Kamera einzuschalten und um den Live Modus aufzurufen Die Bewegungsanzeige LED rot blinkt für ca 15 Sek Die 15 Sek sind eine Wartezeit vor dem automatischen Aufnehmen von Bildern oder Videos Schließen Sie alle Abdeckungen ...

Страница 9: ...e Stellung OFF um die Kamera auszuschalten Bedenken Sie jedoch dass auch die ausgeschaltete Kamera einen geringen Verbrauch im μA Bereich hat 4 Bedienung für Fortgeschrittene Aus dem vorherigem Kapitel der grundlegenden Bedienung der Kamera wissen wir dass die Kamera drei grundlegende Betriebsmodi Ein Ausschalter besitzt 1 Ausgeschaltet Der Ein Ausschalter befindet sich in der Stellung OFF rechts ...

Страница 10: ...10 4 1 1 Fotoeinstellungen 4 1 2 Videoeinstellungen ...

Страница 11: ...11 4 1 3 Systemeinstellungen ...

Страница 12: ...m Formatieren der SD Card werden alle Bilder oder Videos auf der micro SD Karte gelöscht Vergessen Sie nicht vorher einen Backup der wichtigsten Daten zu erstellen a Zeigen Sie mit MENU das Einstellungsmenü an b Wählen Sie mit RIGHT die Option System setting Einstellung Standardein stellungen Punkte Modus Kamera Kamera Video Kamera und Video Zeitraffer Auflösung Kamera 12 M 12 M 8 M 5 M Verzögerun...

Страница 13: ...urück 4 1 9 Videogröße einstellen Dieser Parameter besitzt auch vier Werte 1080P 720P WVGA und VGA Die Werkeinstellung ist 1080P Im Folgenden wird gezeigt wie die Videogröße auf WVGA eingestellt wird a Zeigen Sie mit MENU das Einstellungsmenü an b Wählen Sie mit DOWN die Option Resolution c Wählen Sie mit RIGHT die Option WVGA d Speichern Sie mit OK die aktuelle Einstellung Kehren Sie anschließend...

Страница 14: ...U ab und kehren Sie zur Infoanzeige zurück 4 1 12 ISO einstellen Mit diesem Menü können Sie bei Dunkelheit bessere Bilder machen Es besitzt 3 Werte 100 200 400 a Zeigen Sie mit MENU das Einstellungsmenü an b Wählen Sie mit DOWN die Option ISO400 c Speichern Sie mit OK die aktuelle Einstellung Kehren Sie anschließend mit MENU zur zu Infoanzeige zurück d Brechen Sie das Einstellungsmenü mit MENU ab ...

Страница 15: ...ab und kehren Sie zur Infoanzeige zurück 4 1 16 Timer einstellen Mit diesem Parameter definieren Sie eine Tageszeit in der die Kamera scharf geschaltet ist Für den restlichen Tag ist die Kamera ausgeschaltet Der Timer kann für die Stunde von 0 23 und die Minute von 0 59 eingestellt werden Wenn die Kamera von acht Uhr früh bis fünf Uhr nachmittags scharf geschaltet sein soll dann sind folgende Schr...

Страница 16: ...zeigten Bildes angezeigt 4 2 2 Bilder oder Videos löschen Folgende Optionen stehen zur Verfügung a Zeigen Sie mit OK die Option Photos und Videos an b Wählen Sie mit MENU die Option Delete c Wählen Sie mit RIGHT die Option delete current oder delete all d Drücken Sie OK Es werden CANCEL und OK angezeigt e Löschen Sie mit OK das Bild oder das Video f Brechen Sie mit CANCEL ab Drücken Sie dann MENU ...

Страница 17: ...h wenn eine verbesserte Firmware zur Verfügung steht Folgende Optionen stehen zur Verfügung 1 Packen Sie die Aktualisierungsdatei aus 2 Kopieren Sie die Datei FWF900 bin auf die micro SD Karte 3 Setzen Sie die micro SD Karte in die Kamera ein 4 Schalten Sie die Kamera ein TEST Modus 5 Die Kamera liest die Datei und aktualisiert sich automatisch Beim Aktualisieren der Kamera bleibt der Bildschirm s...

Страница 18: ... 10 30 sec min Voreinstellung 1 Sek Auswählbare Bildauflösung 12 MP 8 MP 5 MP Serienbilderstellung 1 3 6 9 Bilder Videoauflösung 1080P 720P WVGA QVGA Dateisystem JPG AVI Zeit und Datum Angabe Ja Aufnahme Automatisch Kennwordschutz 4 Nummern Periodische Aufnahmen 1 Sek bis 24 Std Standby Stromverbrauch 0 2 mA Standby Zeit 6 Monate Anschlüsse micro USB micro SD Kartenhalter 9 V DC extern Befestigung...

Страница 19: ...1 Scouting Cam BLACK300 Instruction Manual BRAUN PHOTO TECHNIK GmbH Merkurstrasse 8 72184 Eutingen www braun phototechnik de ...

Страница 20: ...g 8 3 4 3 View Images or Videos 8 3 5 Power Off 8 4 Advanced Operations 8 4 1 Settings Menu 8 4 1 1 Photo Setting 9 4 1 2 Video Setting 9 4 1 3 System Setting 10 4 1 4 Default 11 4 1 5 General Settings 11 4 1 6 Set Camera Mode 11 4 1 7 Format micro SD Card 11 4 1 8 Set Photo Size 12 4 1 9 Set Video Size 12 4 1 10 Set Date and Time 12 4 1 11 Set Multi 13 4 1 12 Set ISO 13 4 1 13 Set Video Length 13...

Страница 21: ...ent power when having firmware upgrade otherwise the upgrade process could be interrupted incorrectly If any fault occurs after improper upgrading process the camera may stop function properly 11 Damage to the electronics housing and display caused by external influences such as heavy jerks electric shocks having fallen or others aren t covered by the warranty 12 Don t dismantle or repair the came...

Страница 22: ...os and video until there is insufficient light dusk when it begins to take infrared monochrome photos and video It is easy to use there is a 2 0 inch colorful LCD display on camera It is resistant against water and snow for outside uses 2 1 Camera Body Interface The camera has the following I O interfaces micro USB connector micro SD card slot External DC power connector 2 2 Camera components and ...

Страница 23: ...he camera and is primarily used for customer settings and password input This is an infrared type wireless remote control The maximum remote distance is 9 meters 2 3 1 Navigating Press UP or DOWN to select or highlight the menu item while press LEFT or RIGHT to select the option of each item and press OK to make selection 2 3 2 Laser Pointer Press for laser pointer ...

Страница 24: ...peration 3 1 Power Supply To supply power for the camera eight AA size batteries are needed Open the bottom cover Confirm that the power switch is at the OFF Right position pull out the battery depot Load the fully charged batteries into the depot according the polarities sign shown below Push back the battery compartment to the battery chamber The following batteries with 1 5V output can be used ...

Страница 25: ...an object one to two meters height are preferred Slide the power switch to the ON position to power on the camera and enter into the ON mode The motion indication LED red will blink for about 15s The 15s is a buffering time before automatic capturing photos or videos e g for closing and locking the bottom cover fixing the camera on a tree and walk away In ON mode the camera will take pictures or v...

Страница 26: ... camera Please note that even in the OFF mode the camera still consumes certain power at µA level 4 Advanced Operations From the basic operations of the camera in previous chapter we know that the camera has three basic operation modes Power switch 1 OFF mode Power switch is at OFF position Right 2 ON mode Power switch is at ON position Left 3 TEST mode Power switch is at TEST position Middle In t...

Страница 27: ...9 4 1 1 Photo Setting 4 1 2 Video Setting ...

Страница 28: ...10 4 1 3 System Setting ...

Страница 29: ...ay 4 1 7 Format micro SD Card The system will delete all images or videos stored in the mico SD card after formatting make sure that you have made a backup of important data a Press MENU to display the setting menu b Press RIGHT to select System setting Setting Default Items Mode Camera Camera Video Camera Video Timelapse Interval Resolution Camera 12M 12M 8M 5M Delay 1 Seconds 1 30 Seconds 1 30 M...

Страница 30: ...efault value is 1080P the following shows how to set it to be WVGA video size a Press MENU to display the setting menu b Press DOWN to select Resolution c Press RIGHT to select WVGA d Press OK to save the current setting then press menu to return to info display e Press MENU to cancel setting and return to info display 4 1 10 Set Date and Time You can change the date and time of the device by sett...

Страница 31: ...he following shows how to set video length to 30 Seconds provided that the previous value is 10 Seconds a Press MENU to display the setting menu b Press DOWN to select Video Length c Press OK to save the current setting then press MENU to return to info display d Press MENU to cancel setting and exit 4 1 14 Set Video Sound The following shows how to turn off the sound of the video a Press MENU to ...

Страница 32: ...til the start time changes to 8 and the stop time changes to 17 d Press OK to save the current setting then press MENU to return to info display e Press MENU to return to previous menu 4 1 17 Enter Password If the password setting is selected as On after switching on the camera the LCD screen on camera will prompt to enter password The default password is off It can be changed where the steps are ...

Страница 33: ... format the micro SD card 4 3 Laser Pointer The laser pointer can be turned on and is especially useful when it is somewhat dark as an additional function for pointing to an object or a certain region of interested ROI Press to turn on the laser light in TEST mode and use the tilt adjuster on the back of camera to adjust the angle of capturing direction WARNING Please note that the laser could be ...

Страница 34: ...ilter TFT Display 2 0 Color TFT LCD PIR sensor Triggering sensitivity High Normal Low PIR sensor angle of detection 60 IR LEDs Black 40 LEDs Max Night Vision Lighting Distance 65ft 20 meters Trigger Time 1 0 seconds Triggering Interval 1 5 10 30 sec min 1 sec default Selectable Image Resolution 12MP 8MP 5MP Multiple Photo 1 3 6 9 pictures Video Resolution 1080P 720P WVGA QVGA File Format JPG AVI D...

Страница 35: ...1 Scouting Cam BLACK300 Gebruiksaanwijzing BRAUN PHOTO TECHNIK GmbH Merkurstrasse 8 72184 Eutingen www braun phototechnik de ...

Страница 36: ...kelen 8 4 Geavanceerde opties 8 4 1 Settings Menu 8 4 1 1 Foto instellingen 9 4 1 2 Video instellingen 10 4 1 3 Systeem instellingen 10 4 1 4 Default 11 4 1 5 Algemene Instellingen 11 4 1 6 Set Camera Mode 11 4 1 7 micro SD Card formatteren 11 4 1 8 Foto formaat instellen 12 4 1 9 Video formaat instellen 12 4 1 10 Datum en tijd instellen 12 4 1 11 Multi functie 13 4 1 12 ISO instellen 13 4 1 13 Vi...

Страница 37: ... wordt in dat geval door u computer gezien als een externe verwijderbare schijf 10 Zorg ervoor dat er voldoende power is wanneer u een firmware update uitvoert zodat er geen problemen kunnen ontstaan bij het correct werken van het toestel 11 Beschadigingen veroorzaakt door hevige schokken vallen of verkeerdelijk gebruik vallen niet onder Garantie 12 Ontmantel of herstel nooit zelf de camera Indien...

Страница 38: ...deo WVGA or QVGA Bij daglicht zullen de opnames in kleur zijn bij weinig licht of nacht zullen de opnames Zwart wit zijn Imet zijn 2 0 kleuren display is het toestel eenvoudig in gebruik De camera is bestand tegen regen en sneeuw en kan dus zonder probleem buitenshuis gebruikt worden 2 1 Camera Body Interface De camera heeft de volgende SD kaart slot I O aansluitingen micro USB connector micro DC ...

Страница 39: ...ing Deze afstandsbediening wordt hoofdzakelijk gebruikt voor het maken van instellingen Maximum gebruiksafstand ligt op 9 meter 2 3 1 Navigating Press UP or DOWN to select or highlight the menu item while press LEFT or RIGHT to select the option of each item and press OK to make selection 2 3 2 Laser Pointer Druk op het voor de laser pointer functie ...

Страница 40: ...t haalt Gebruik enkel volle batterijen en plaats deze zoals aangegeven correct in de lade Plaats de batterijlade weer in het voorziene batterijcompartiment onderstaande 1 5V output batterijen kunnen gebruikt worden 1 Hoge performance alkaline batterijen Aanbevolen 2 Oplaadbare alkaline batterijen 3 Oplaadbare NiMH batterijren Het risiko op explosie bestaat wanneer u de verkeerde batterijen zou geb...

Страница 41: ...et intern geheugen en alle voorgeprogrammeerde instellingen Deze tijd kan ook gebruikt worden om het deksel onderaan te sluiten en de camera op zijn plaats te bevesigen In de ON modus zal de camera automatisch Foto s en of video s maken volgens de parameters die ingesteld werden in het toestel Indien de microfoon geactiveerd werd zal deze tijdens een videoopname ook het geluid opnemen 3 4 Aanzette...

Страница 42: ...a een licht verbruik heeft op µA niveau 4 Geavanceerde instellingen Uit de vorige hoofdstukken weten we dat de camera drie basis functies heeft die geselecteerd kunnen worden met de schakelaar 1 2 3 OFF mode Schakelaar staat in de OFF positie Rechts ON mode Schakelaar staat in de ON positie Links TEST mode Scakelaar staat in de TEST positie Midden Het is aanbevolen dat de camera in de OFF modus st...

Страница 43: ...9 4 1 1 Foto instellingen 4 1 2 Video instellingen ...

Страница 44: ...10 4 1 3 Systeem instellingen ...

Страница 45: ... naar info display 4 1 7 Formattern van de micro SD kaart OPGELET de camera verwijdert automatisch alle bestanden wanneer u de micro SD kaart formateert Vergewis u ervan dat u een backup van alle bestanden gemaakt heeft alvorens de kaart te formatteren a Druk MENU om de setting menu te openen b Druk RIGHT om System setting te selecteren Setting Default Items Mode Camera Camera Video Camera Video T...

Страница 46: ...naar info display 4 1 9 Video formaat instellen Hier kan u kiezen uit vier formaten 1080P 720P WVGA and QVGA Standaard staat deze op 1080P hieronder ziet u welke stappen u moet ondernemen om WVGA video te selecteren a Druk MENU om de setting menu te selecteren b Druk DOWN om Resolution te selecteren c druk RIGHT om WVGA te selecteren d Druk OK om u selectie op te slaan druk daarna op menu om terug...

Страница 47: ...n Deze waarde kan u helpen om tijdens de nacht betere foto s te maken er zijn drie waarden 100 200 400 a Druk MENU om de setting menu te selecteren b Druk DOWN om ISO400 te selecteren c Druk OK om u selectie op te slaan druk daarna op menu om terug te keren naar het info display d Druk MENU om een keuze ongedaan te maken en terug te keren naar info display 4 1 13 Video lengte instellen Volg onders...

Страница 48: ...erken Buiten deze tijdzone zal de camera gewoon op uit staan Je can de uren instellen met een waarde van 0 tot 23 en de minuten van 0 tot 59 Om de Timer in te stellen dient u onderstaande stappen te volgen a Druk MENU om de setting menu te selecteren b Druk DOWN om de Timer functie te selecteren c Druk RIGHT om de instelling te selecteren druk UP of DOWN om de waarde te veranderen van de start tij...

Страница 49: ...cteer Delete c Druk right om delete current ofdelete all te selecteren d Druk OK Cancel en OK zullen nu zichtbaar zijn e Druk OK om het bestand te wissen of Cancel om het beeld toch te bewaren Hou er rekening mee dat verwijderde beelden en of video s niet meer terug gehaald kunnen worden Het is aan te raden om de kaart te formatteren indien u deze volledig leeg wenst te maken 4 3 Laser Pointer De ...

Страница 50: ...dat de camera telkenmale opnieuw in de upgrade modus gaat wanneer u de camera inschakelt Plaats de micro SD kaart opnieuw in de camera 6 7 8 Appendix Technical Specifications Beeld sensor 5 Mega Pixel Color CMOS 12 MP interpolated Geheugen Micro SD Card up to 32GB Lens F 3 1 FOV 60 Size 145mm x 80mm x 55 mm IR Filter Vol automatische IR Filter TFT Display scherm 2 0 Color TFT LCD PIR sensor Trigge...

Страница 51: ...icro SD kaart houder 9V DC External Bevestigings methode Riem statief werkingstemperatuur 30 70 C Power Supply 8 AA batteries Water proof IP65 Security authentication FCC CE RoHS Inbegrepen Digitale Camera Afstandsbediening USB kabel CD handleiding ...

Страница 52: ...1 Scouting Cam BLACK300 Manual de instrucciones BRAUN PHOTO TECHNIK GmbH Merkurstrasse 8 72184 Eutingen www braun phototechnik de ...

Страница 53: ...r la cámara 9 4 Opciones avanzadas 9 4 1 Menú de ajustes 9 4 1 1 Ajustes Foto 10 4 1 2 Ajustes de Vídeo 11 4 1 3 Configuración del sistema 11 4 1 4 Ajuste 12 4 1 5 Configuración general 12 4 1 6 Establecer el Modo Cámara 12 4 1 7 Formatear la tarjera SD 12 4 1 8 Establecer el tamaño de la foto 13 4 1 9 Establecer el tamaño del vídeo 13 4 1 10 Ajustar la fecha y la hora 13 4 1 11 Establecer Multi 1...

Страница 54: ...interruptor en la posición ON cámara encendida 8 Es recomendable realizar el formateo de la tarjeta micro SD con la misma cámara cuando la use por primera vez 9 La cámara entrará en modo USB cuando la conecte a un puerto USB de un PC En este caso la tarjeta micro SD funciona como una unidad de disco extraíble 10 Por favor asegúrese de tener suficiente energía durante la actualización del Firmware ...

Страница 55: ...strucciones Le agradecemos la compra de la Cámara de exploración BLACK300 de BRAUN Esta es una cámara de vigilancia que funciona automáticamente Puede ser activada inmediatamente por cualquier movimiento de personas o animales en una cierta Región de Interés ROI siglas en inglés monitorizada por un sensor de movimiento Infrarrojo Pasivo PIR y entonces hará fotos de alta calidad hasta 12 MP o graba...

Страница 56: ...Infrarrojo Pasivo 6 Flash LED Infrarrojo 7 Objetivo 8 Pantalla LCD a color de 2 pulgadas 9 Grabadora de sonidos 10 Bloqueo 11 Interruptor de encendido ON TEST OFF Compartimiento de las pilas 2 3 Mando a distancia El mando a distancia es un dispositivo de entrada de la cámara y se usa principalmente para los ajustes de usuario e introducción de contraseña Es un mando a distancia inalámbrico por inf...

Страница 57: ...ra seleccionar la opción de cada elemento y pulse OK para hacer la selección 2 3 2 Puntero láser Pulse la tecla para el puntero láser 2 4 Pantalla de Información de disparo Cuando la cámara esté encendida el interruptor de encendido en la posición TEST le aparecerá la información de disparo en la pantalla ...

Страница 58: ...uptor de encendido está en la posición OFF a la derecha y saque el compartimiento de las pilas Coloque las pilas completamente cargadas en el compartimiento con las polaridades indicadas a continuación Presione el compartimiento de las pilas de vuelta a su alojamiento en la cámara Puede usar las siguientes pilas de 1 5 V 1 Pilas alcalinas de alta densidad y alto rendimiento recomendadas 2 Pilas al...

Страница 59: ... para colocar la cámara debería ser 1 metro por encima de la del objeto En general uno o dos metros es aconsejable Deslice el interruptor de encendido a la posición ON para alimentar la cámara y entrar en modo de funcionamiento El LED de indicación de movimiento rojo parpadeará durante 15 s Los 15 s son el tiempo de regulación antes de la captura automática de fotos o vídeos p ej para cerrar la ta...

Страница 60: ...ptor de encendido a la posición OFF para apagar la cámara Por favor tenga en cuenta que incluso estando apagada la cámara continua consumiendo energía a nivel de µA 4 Opciones avanzadas De la explicación de las operaciones básicas de la cámara en los capítulos previos sabemos que la cámara tienes tres modos de funcionamiento básicos interruptor de encendido 1 2 3 Apagada OFF Interruptor de encendi...

Страница 61: ...10 4 1 1 Ajustes Foto 4 1 2 Ajustes de Vídeo ...

Страница 62: ...11 4 1 3 Configuración del sistema ...

Страница 63: ...ra anular el ajuste y regresar a la pantalla de información 4 1 7 Formatear la tarjera micro SD El sistema eliminará todas las imágenes y vídeos guardados en la tarjeta micro SD después de formatearla asegúrese de que ha hecho una copia de seguridad de los datos importantes Predeterminado Ajuste Elementos Modo Cámara Cámara Vídeo Cámara y Vídeo Timelapse Resolución Cámara 12 M 12 M 8 M 5 M Retardo...

Страница 64: ...l vídeo Este parámetro también tiene cuatro valores 1080P 720P WVGA and QVGA El valor predeterminado es 1080P y a continuación se muestra cómo establecer un tamaño de vídeo WVGA a Pulse MENU para ver el menú de configuración b Pulse DOWN para seleccionar Resolution c Pulse RIGHT para seleccionar WVGA d Pulse OK para guardar el ajuste actual luego pulse MENU para regresar a la pantalla de informaci...

Страница 65: ...a guardar el ajuste actual luego pulse MENU para regresar a la pantalla de información d Pulse MENU para cancelar el ajuste y salir 4 1 13 Establecer la Duración del vídeo A continuación se muestra como establecer una duración de vídeo de 30 segundos suponiendo que el anterior opción es 10 segundos a Pulse MENU para ver el menú de configuración b Pulse DOWN para seleccionar Video Length c Pulse OK...

Страница 66: ... Suponiendo que la cámara debe trabajar desde las ocho a m a cinco p m los pasos son los siguientes a Pulse MENU para ver el menú de configuración b Pulse DOWN para seleccionar Timer c Pulse RIGHT para seleccionar el elemento use UP o DOWN para cambiar el valor hasta que la hora de inicio cambie a 8 y la hora final a 17 d Pulse OK para guardar el ajuste actual luego pulse MENU para regresar a la p...

Страница 67: ... seleccionar Delete c Pulse RIGHT para seleccionar delete current o delete all d Pulse OK CANCEL y quedará resaltado OK e Pulse OK para eliminar la foto o el vídeo f Pulse CANCEL para anular y luego pulse MENU y pulse OK para regresar a la pantalla de información Por favor tenga en cuenta que después de eliminar un archivo de imagen o de vídeo los archivos eliminados no se podrán recuperar Además ...

Страница 68: ... actualización cuando tenga disponible una mejora de Firmware Las operaciones a realizar son las siguientes 1 2 3 4 5 Descomprima el archivo de actualización Copie el archivo FWF900 bin en la tarjeta micro SD Introduzca la tarjeta micro SD en la cámara Encienda la cámara Modo Prueba La cámara leerá la tarjeta y se actualizará automáticamente Durante la actualización de la cámara la pantalla está a...

Страница 69: ...dos Intervalo de activación 1 5 10 30 sec min predeterminado 1 seg Resolución de imagen seleccionable 12 MP 8 MP 5 MP Fotos múltiples 1 3 6 9 fotos Resolución de vídeo 1080P 720P WVGA QVGA Formato de archivo JPG AVI Impresión de fecha y hora Si Exposición Auto Seguridad con contraseña 4 números Disparo periódico 1 seg 24 h Corriente en inactividad 0 2 mA Tiempo en inactividad 6 meses Interfaz de c...

Страница 70: ...1 Scouting Cam BLACK300 Manuale di istruzioni BRAUN PHOTO TECHNIK GmbH Merkurstrasse 8 72184 Eutingen www braun phototechnik de ...

Страница 71: ...mpostazioni foto 10 4 1 2 Impostazioni video 11 4 1 3 Impostazioni di sistema 11 4 1 4 Predefinite 12 4 1 5 Impostazioni generali 12 4 1 6 Imposta modalità telecamera 12 4 1 7 Formattazione di una scheda micro SD 12 4 1 8 Impostazione delle dimensioni delle foto 13 4 1 9 Impostazione della dimensione dei video 13 4 1 10 Impostazione di data e ora 13 4 1 11 Impostazione Multi 14 4 1 12 Impostazione...

Страница 72: ...do l interruttore di alimentazione è su ON 8 Vi raccomandiamo di formattare la scheda micro SD dalla videocamera quando la utilizzate la prima volta 9 La videocamera entrerà in modalità USB una volta connessa alla porta USB di un computer In questo caso la scheda micro SD funziona come disco rimovibile 10 Assicuratevi che ci sia abbastanza carica quando effettuate l aggiornamento del firmware altr...

Страница 73: ...struzioni Grazie per aver acquistato la telecamera BRAUN Scouting Cam BLACK300 Questa è una telecamera per la videosorveglianza automatica Può attivarsi in presenza di movimenti di persone o di animali in una determinata zona d interesse ROI monitorata da un sensore di movimento passivo a infrarossi PIR ad alta sensibilità e catturare automaticamente immagini di alta qualità fino a 12 MP o registr...

Страница 74: ...ore passivo a infrarossi 6 Flash LED a infrarossi 7 Obiettivo 8 Display LCD a colori da 2 pollici 9 Registratore di suoni 10 Chiusura 11 Interruttore di alimentazione ON TEST OFF Portabatterie 2 3 Telecomando Il telecomando serve a controllare la telecamera e viene utilizzato principalmente per le impostazioni personalizzate e per l inserimento di password Il telecomando di questo dispositivo è wi...

Страница 75: ...r selezionare l opzione relativa a ogni voce e premete OK per scegliere 2 3 2 Puntatore laser Premete il simbolo per attivare il puntatore laser 2 4 Informazioni di ripresa Quando la telecamera viene accesa interruttore di alimentazione sulla posizione TEST le informazioni di ripresa compariranno sul monitor ...

Страница 76: ...a ed estraete il portabatterie Inserite delle batterie completamente cariche nel portabatterie rispettando le polarità indicate Rimettete il portabatterie nel vano batterie Potete utilizzare le seguenti batterie da 1 5 V 1 Batterie alcaline ad alta densità e ad alte prestazioni raccomandate 2 Batterie alcaline ricaricabile 3 Batterie NiMH ricaricabili Rischio di esplosione in caso di sostituzione ...

Страница 77: ...mera e entrate in modalità ON Il LED della rilevazione del movimento rosso lampeggerà per circa 15 s I 15 s prima che la telecamera inizi a scattare foto o riprendere video automaticamente possono essere utilizzati per chiudere il coperchio inferiore o per fissare la tele camera a un albero e allontanarsi In modalità ON la telecamera scatterà foto o riprenderà video automaticamente in base alle im...

Страница 78: ...lità OFF la telecamera consuma un po di corrente nell ordine dei µA 4 Funzionamento avanzato Dal capitolo precedente sul funzionamento di base della telecamera abbiamo appreso che la telecamera ha tre modalità di funzionamento di base interruttore di alimentazione 1 Modalità OFF l interruttore di alimentazione è sulla posizione OFF destra 2 Modalità ON l interruttore di alimentazione è sulla posiz...

Страница 79: ...10 4 1 1 Impostazioni foto 4 1 2 Impostazioni video ...

Страница 80: ...11 4 1 3 Impostazioni di sistema ...

Страница 81: ...e corrente e Premete MENU per annullare le impostazioni e tornate alla visualizzazione delle informazioni 4 1 7 Formattazione di una scheda micro SD Con la formattazione il sistema cancellerà tutte le immagini e i video registrati sulla scheda micro SD Assicuratevi di avere effettuato una copia di backup dei dati Impostazione Predefinite Opzioni Modalità Telecamera Telecamera Video Telecamera e Vi...

Страница 82: ...alla visualizzazione delle informazioni e Premete MENU per annullare le impostazioni e tornate alla visualizzazione delle informazioni 4 1 9 Impostazione della dimensione dei video Anche questo parametro ha four valori 1080P 720P WVGA and QVGA Il valore predefinito è 1080P Di seguito viene mostrato come impostare la dimensione dei video su WVGA a Premete MENU per visualizzare il menu delle imposta...

Страница 83: ...formazioni e Premete MENU per annullare l impostazione e tornare alla visualizzazione delle informazioni 4 1 12 Impostazione dell ISO Questo menu può aiutarvi a migliorare la qualità delle foto notturne e ha 3 valori possibili 100 200 400 a Premete MENU per visualizzare il menu delle impostazioni b Premete DOWN per selezionare ISO400 c Premete OK per salvare l impostazione corrente poi premete MEN...

Страница 84: ...azioni e tornate alla visualizzazione delle informazioni 4 1 16 Impostazione timer Questo parametro imposta un lasso di tempo preciso nella giornata durante il quale viene attivata la telecamera Durante il resto del tempo il dispositivo resta spento L ora può essere impostata su un valore compreso fra 0 e 23 mentre i minuti su un valore compreso fra 0 e 59 Presupponendo di voler attivare la teleca...

Страница 85: ... OK sull interruttore per tornare alla visualizzazione delle informazioni Quando visualizzate le immagini verranno mostrati l indice e il numero totale delle immagini presenti sulla scheda micro SD e 4 2 2 Cancellazione di foto e video La procedura è la seguente a Premete OK per visualizzare foto e video b Premete Menu per selezionare Delete c Premete right per selezionare delete current o delete ...

Страница 86: ...to del firmware Questa telecamera è equipaggiata con una funzione di aggiornamento automatico del firmware L aggiornamento è necessario solo quando è disponibile un firmware migliore La procedura è la seguente 1 2 3 4 5 Decomprimete il file con l aggiornamento Copiate il file FWF900 bin sulla scheda micro SD Inserite la scheda micro SD nella telecamera Accendete la telecamera Modalità test La tele...

Страница 87: ...ntervallo di attivazione 1 5 10 30 sec min predefinito 1 sec Risoluzione delle immagini impostabile 12 MP 8 MP 5 MP Multiscatto 1 3 6 9 foto Risoluzione video 1080P 720P WVGA QVGA Formato file JPG AVI Sovraimpressione di data e ora Sì Esposizione Automatica Password di sicurezza A 4 cifre Scatto periodico 1 s 24 h Corrente necessaria in standby 0 2 mA Tempo di standby 6 mesi Interfaccia micro USB ...

Страница 88: ...1 Scouting Cam BLACK300 Manuel d instruction BRAUN PHOTO TECHNIK GmbH Merkurstrasse 8 72184 Eutingen www braun phototechnik de ...

Страница 89: ...es réglages 9 4 1 1 Réglage photo 10 4 1 2 Réglage vidéo 11 4 1 3 Réglage de l appareil 11 4 1 4 Réglages par défaut 12 4 1 5 Réglages généraux 12 4 1 6 Définir le mode de la caméra 12 4 1 7 Formater une carte mémoire micro SD 12 4 1 8 Définir la résolution des photos 13 4 1 9 Définir la résolution des séquences vidéo 13 4 1 10 Régler la date et l heure 13 4 1 11 Définir le mode rafale multi 14 4 ...

Страница 90: ...SD quand la caméra est allumée 8 Il est recommandé de formater la carte micro SD avec la caméra à la première utilisation 9 La caméra passera en mode USB lors de sa connexion au port USB de votre ordinateur Dans ce mode la carte micro SD fonctionnera comme un disque amovible 10 Veillez à ce que la caméra soit pleinement alimentée lors de la mise à niveau du micrologiciel firmware de cette façon la...

Страница 91: ...CK300 Cette caméra est une caméra de surveillance qui fonctionne de manière autonome et automatique Elle peut se déclencher à la suite d un mouvement de personne ou d animaux dans une certaine région d intérêt RDI surveillée par un détecteur de mouvement infrarouge passif IPR à haute sensibilité et permet de prendre automatiquement des photos de haute qualité jusqu à 12 mégapixels ou d enregistrer...

Страница 92: ...élécharger les photos et vidéos 4 5 IPR Détecteur infrarouge passif 6 Indicateur du mode infrarouge 7 Objectif 8 5 cm 2 pouces couleur Afficheur LCD 9 Microphone 10 Verrou 11 Interrupteur d alimentation ON TEST OFF Compartiment des piles 2 3 Télécommande La télécommande permet principalement d effectuer des réglages personnels et de saisir le mot de passe Il s agit d une télécommande sans fil de t...

Страница 93: ...IGHT pour sélectionner l option de chaque élément et appuyez sur OK pour valider la sélection 2 3 2 Pointeur laser Appuyez sur étoile pour activer le pointeur laser 2 4 Description de l afficheur Quand la caméra est mise en marche interrupteur d alimentation sur la position TEST des informations de prise de vue sont affichées ...

Страница 94: ...e type AA Retirez le capot inférieur Vérifiez que l interrupteur d alimentation est sur la position OFF à droite retirez le compartiment des piles Mettez en place les piles entièrement chargées dans le compartiment en respectant la polarité indiquée Réinsérez le compartiment des piles dans son logement Les piles de 1 5 V suivantes sont recommandées 1 Piles alcalines de hautes performances et de ha...

Страница 95: ... la majeure partie du jour au soleil ou tout autre source de chaleur Des déclenchements intempestifs de la caméra sont possibles 2 Placez la caméra à au moins 1 mètre du sol et de tout objet une hauteur d un à deux mètres est préférable Placez l interrupteur d alimentation de la caméra sur la position ON pour accéder au mode ON L indicateur lumineux de mouvement rouge clignotera pendant 15 seconde...

Страница 96: ...suppression d images ou de vidéos seront décrites dans le chapitre Opérations avancées 3 5 Mise hors tension Placez l interrupteur d alimentation sur la position OFF pour éteindre la caméra Il est à signaler que même en mode OFF la caméra continue de consommer de très faible quantité d énergie quelques µA 4 Fonctions avancées Grâce au chapitre précédent sur le fonctionnement de base nous savons qu...

Страница 97: ...10 4 1 1 Réglage photo 4 1 2 Réglage vidéo ...

Страница 98: ...11 4 1 3 Réglage de l appareil ...

Страница 99: ...pour annuler le réglage et revenir à l affichage des informations 4 1 7 Formater une carte mémoire micro SD Le formatage effacera toutes les images et les séquences vidéo enregistrées sur la carte mémoire micro SD veuillez effectuer une sauvegarde des informations Menu Réglages par défaut Options Mode Caméra Caméra Vidéo Caméra et Vidéo Timelapse Résolution Caméra 12 mégapixels 12 8 5 mégapixels D...

Страница 100: ...evenir à l affichage des informations e Appuyez sur MENU pour annuler le réglage et revenir à l affichage des informations 4 1 9 Définir la résolution des séquences vidéo Quatre valeurs sont possibles 1080P 720P WVGA QVGA La valeur par défaut est 1080P Les opérations ci dessous vous indiquent de quelle manière définir la résolution des séquences vidéo sur WVGA a Appuyez sur MENU pour afficher le m...

Страница 101: ...ler le réglage et revenir à l affichage des informations 4 1 12 Définir la sensibilité ISO Ce réglage vous permet d obtenir de meilleures photos de nuit Trois valeurs sont possibles 100 200 400 a Appuyez sur MENU pour afficher le menu des réglages b Appuyez sur DOWN pour sélectionner ISO400 c Appuyez sur OK pour mémoriser le réglage actuel puis appuyez sur MENU pour revenir à l affichage des infor...

Страница 102: ... 4 1 16 Régler le programmateur Ce réglage permet de définir un intervalle de temps pendant lequel la caméra peut se déclencher Le reste du temps la caméra sera inactive Les heures s étendent de 0 à 23 alors que les minutes de 0 à 59 Si vous prévoyez d utiliser la caméra de huit heures du matin à cinq heures de l après midi les opérations a effectué sont les suivantes a Appuyez sur MENU pour affic...

Страница 103: ...ours de la visualisation des images le nombre total des images sur la carte mémoire micro SD et la position de l image affichée sont indiqués respectivement 4 2 2 Supprimer une photo ou une séquence vidéo Les opérations à effectuer sont les suivantes a b c Appuyez sur OK pour afficher Photos and Video Appuyez sur MENU pour sélectionner Delete Appuyez sur RIGHT pour choisir d effacer l élément actu...

Страница 104: ...est dotée d une fonction de mise à niveau automatique La mise à niveau n est nécessaire que lorsqu un micrologiciel amélioré est disponible Les opérations à effectuer sont les suivantes 1 2 3 4 5 Décompressez le fichier de mise à niveau Copiez le fichier FWF900 bin sur une carte mémoire micro SD Insérez la carte mémoire micro SD dans le lecteur de la caméra Mettez sous tension la caméra Mode TEST ...

Страница 105: ...econde Intervalle de déclenchement 1 5 10 30 sec min par défaut 1 seconde Résolution d image réglable 12 8 5 mégapixels Nombre de photos en rafale 1 3 6 9 images Résolution vidéo 1080P 720P WVGA QVGA Format de fichier JPG AVI Incrustation de l heure et de la date Oui Exposition Automatique Protection par mot de passe 4 chiffres Programmation de la prise d image de 1 seconde à 24 heures Courant au ...

Отзывы: