background image


14 

3/ USING YOUR APPLIANCE 


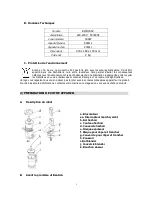
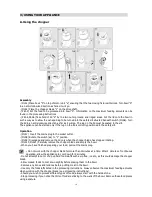
A. Using the chopper 
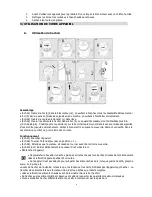


Assembly 

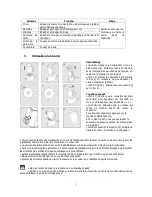
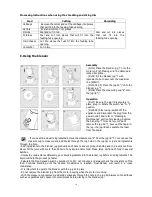
- (PicA1) Place bowl “b” on top of motor unit “a”, ensuring that the two closing fixtures interlock. Turn bowl “b” 
in an anti-clock-wise direction as far as it will go.   
- (PicA2) Place the chopper blade “c” on the drive shaft.     
- (PicA3) Put the food to be processed into bowl “b”. Information on the maximum feeding amounts can be 
found in the processing instructions. 
- (PicA4,A5,A6) Take hold of lid “d” by the two outer grooved and ridged areas. Put the lid onto the bowl in 
such a way as to allow the L-shaped lug to be turned into the safety slit situated beneath switch (PicA6). Turn 
the lid in an anti-clockwise direction as far as it will go. The lug on the lid must be seated in the slit.     
The appliance can be started only if the lug on the lid is correctly positioned in the safety slit. 
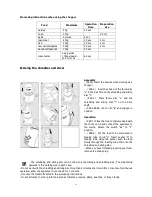
 
Operation 

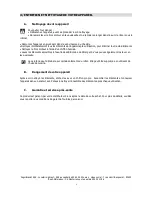
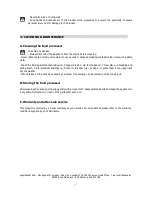
- (PicA7 ) Insert the mains plug in the socket outlet.     
- (PicA8) Rotate the switch (aa) to “1” position.     
- (PicA9) Disengage and remove the lid only when the chopper blade has stopped rotating.     
- (PicA10,PicA11) Carefully remove the chopper blade and empty the bowl.     
- When you have finished preparing your food, pull out the mains plug. 


Do not work with the chopper blade for more than 2minutes at a time. After 2 minutes of continuous 

operation, allow the appliance to cool down for 5 minutes. 

- Do not attempt to cut or chop up hard food-stuffs such as coffee, ice etc., as this could damage the chopper 
blade. 
- Allow cooked foods to cool down slightly before placing them in the bowl. 
- Remove any bones and tendons before putting meat in the bowl. 
- Use only the foodstuffs listed in the processing instructions. Always observe the maximum feeding amounts 
when working with the chopper blade (see processing instructions). 
- Should you wish to process different types of foods, always start with the hardest one. 
- Stop processing if you notice that bits of food are sticking to the walls of the bowl. Remove these food pieces 
using a spatula. 

Содержание ROB-304V

Страница 1: ...1 FR MANUEL D INSTRUCTION EN INSTRUCTION MANUAL Mini Robot Mini Food Processor ROB 304V ...

Страница 2: ...re nouveau mini robot BRANDT Bien entendu dans un souci permanent de satisfaire le mieux possible vos exigences vis à vis de nos produits notre service consommateurs est à votre disposition et à votre écoute pour répondre à toutes vos questions ou suggestions Et connectez vous aussi sur notre site www brandt com où vous trouverez tous nos produits ainsi que des informations utiles et complémentair...

Страница 3: ...cription de votre robot 5 B Avant la première utilisation 5 3 UTILISATION DE VOTRE APPAREIL 6 A Utilisation du hachoir 6 B Utilisation du disque pour râper et trancher 7 C Utilisation du blender 8 4 ENTRETIEN ET NETTOYAGE DE VOTRE APPAREIL 9 A Nettoyage de votre appareil 9 B Rangement de votre appareil 9 C Garantie et service après vente 9 ENGLISH INSTRUCTION MANUAL 10 ...

Страница 4: ...z ou électriques ou fours Éloigner l appareil de l eau ou de tout autre liquide afin d éviter tout risque de décharge électrique Ne pas brancher l appareil ci ce dernier se trouve sur une surface humide Déposer l appareil sur une surface sèche lisse et stable Lors de l utilisation Ne pas toucher l appareil avec les mains ou les pieds mouillés ou humides Ne jamais laisser l appareil sans surveillan...

Страница 5: ...ne devez pas le jeter avec les ordures ménagères apparaît sur le produit Pour de plus amples informations contactez votre mairie ou le magasin où vous avez acheté ce produit 2 PREPARATION DE VOTRE APPAREIL A Description du robot a Bloc moteur aa Interrupteur marche arrêt b Bol hachoir c Couteau hachoir d Couvercle hachoir e Disque expulseur f Disque pour râper et trancher g Couvercle pour râper et...

Страница 6: ...le cas contraire le robot ne pourra être mis en route Fonctionnement Sch A7 Branchez l appareil Sch A8 Tourner l interrupteur aa en position 1 Sch A9 Attendez que le couteau ait cessé de tourner avant de retirer le couvercle Sch A10 A11 Retirez délicatement le couteau D et videz le bol Débranchez l appareil Ne jamais faire travailler le hachoir plus de 2 minutes chaque fois Après 2 minutes de fonc...

Страница 7: ... et positionnez le disque à râper et trancher f sur le disque expulseur Sch B3 B4 B5 Positionnez le couvercle g et faites le tourner dans le sens contraire des aiguilles d une montre jusqu à enclenchement Fonctionnement Sch B7 Déposez un récipient sous la bouche de sortie des aliments et tourner l interrupteur aa en position 1 Sch B8 Insérez les aliments lentement dans la cheminée du couvercle g P...

Страница 8: ...ait cessé de tourner avant de retirer le couvercle Pour éteindre l appareil appuyez sur la touche et débranchez le Pour vider le bol vous pouvez laisser le couvercle en place et versez le contenu dans un récipient Nettoyez aussitôt le blender tel qu indiqué dans la section Entretien et nettoyage Vous pouvez ajouter des ingrédients en cours de fonctionnement Retirer le bouchon doseur k ajouter les ...

Страница 9: ...us pouvez également les laver en lave vaisselle La carotène peut déteindre sur certains éléments du robot Elle peut être supprimée en utilisant de l huile de cuisine B Rangement de votre appareil Après avoir nettoyé les éléments séchez les avec un chiffon propre Assembler les éléments et conserver l appareil dans un endroit sec Pensez à nettoyer l ensemble des éléments après chaque utilisation C G...

Страница 10: ...in an ongoing effort to satisfy your demands with regard to our products as best as possible our after sales service department is at your disposal and ready to listen in order to respond to all of your questions and suggestions You can also log on to our web site at www brandt com where you will find all our products as well as additional useful information BRANDT As part of our commitment to con...

Страница 11: ...ARING YOUR APPLIANCE 13 A Description of your food processor 13 B Before using your food processor 13 3 USING YOUR APPLIANCE 14 A Using the chopper 14 B Using the shredder slicer 15 C Using the blender 16 4 CLEANING AND MAINTENANCE 17 A Cleaning the food processor 17 B Storing the food processor 17 B Warranty and after sale service 17 ...

Страница 12: ...ely before changing the cutting tools disassembling or cleaning 8 The appliance is not intended for use by young children or infirm persons without supervision 9 Avoid contact with the blades and knives while the appliance is in operation 10 Never place your hand in way of the chopper blade or the shredding and slicing disc Keep long hair neckwear or other items of clothing away from the appliance...

Страница 13: ... not to dispose of it with household waste For further information contact your local authority or the shop where you bought the product 2 PREPARING YOUR APPLIANCE A Description of your appliance a Motor unit aa On Off Switch b Chopper Bowl c Chopper blade d Lid for chopper e Ejector disc f Shredding and slicing disc g Lid for shredder and slicer h Pusher i Blender jug j Jug lid k Measuring cup B ...

Страница 14: ... socket outlet PicA8 Rotate the switch aa to 1 position PicA9 Disengage and remove the lid only when the chopper blade has stopped rotating PicA10 PicA11 Carefully remove the chopper blade and empty the bowl When you have finished preparing your food pull out the mains plug Do not work with the chopper blade for more than 2minutes at a time After 2 minutes of continuous operation allow the applian...

Страница 15: ...tion PicB7 Place the food container underneath the chute on lid and connect the appliance to the mains Rotate the switch aa to 1 position PicB8 Put the food to be processed in feeding tube on lid g Insert pusher h in feeding tube Using the pusher push the food slowly through the feeding tube and onto the shredding and slicing disc When you have finished preparing your food remove the mains plug Th...

Страница 16: ...the blending i from motor unit Don t remove the jug lid j pour out the liquid in the jug the jug lid can separate the foam from the liquid If you need to add extra ingredients remove the measure cup k from the jug lid i Your can use the measure cup to measure and add liquids through the top hole on the jug lid or just add ingredients through the hole Add ingredients to the blender jug gradually ea...

Страница 17: ...f Lid for shredder and slicer g Pusher h Blender jug i by hand or place them in the upper rack of your washer Discoloration on the housing caused by carotene for example can be removed using cooking oil B Storing the food processor After cleaning the various parts wipe gently with a clean cloth Reassemble all parts and keep the appliance in a dry place Remember to clean all the parts after each us...

Отзывы: