background image

User Manual 


31 


[

HR

] (Human Readable) 

Select ON or OFF (HR Font Size = 7 pt.). 


[

WIDTH

] (Barcode Width) 

Select 2 dots or 3 dots. 

4.


Press [

ENTER

].             When you print the label, the line(s) designated as barcode will 

print as such (if HR has been selected, the text will be centered below). 

Multi-Zone Labels 

The multi-zone label feature works with numerous label media, for instance, a 

Lab Vial Side and Top


cartridge such as 

X-98-499

. Once you install the appropriate cartridge, the printer will recognize it 

and allow you to create and format multi-zone labels. 

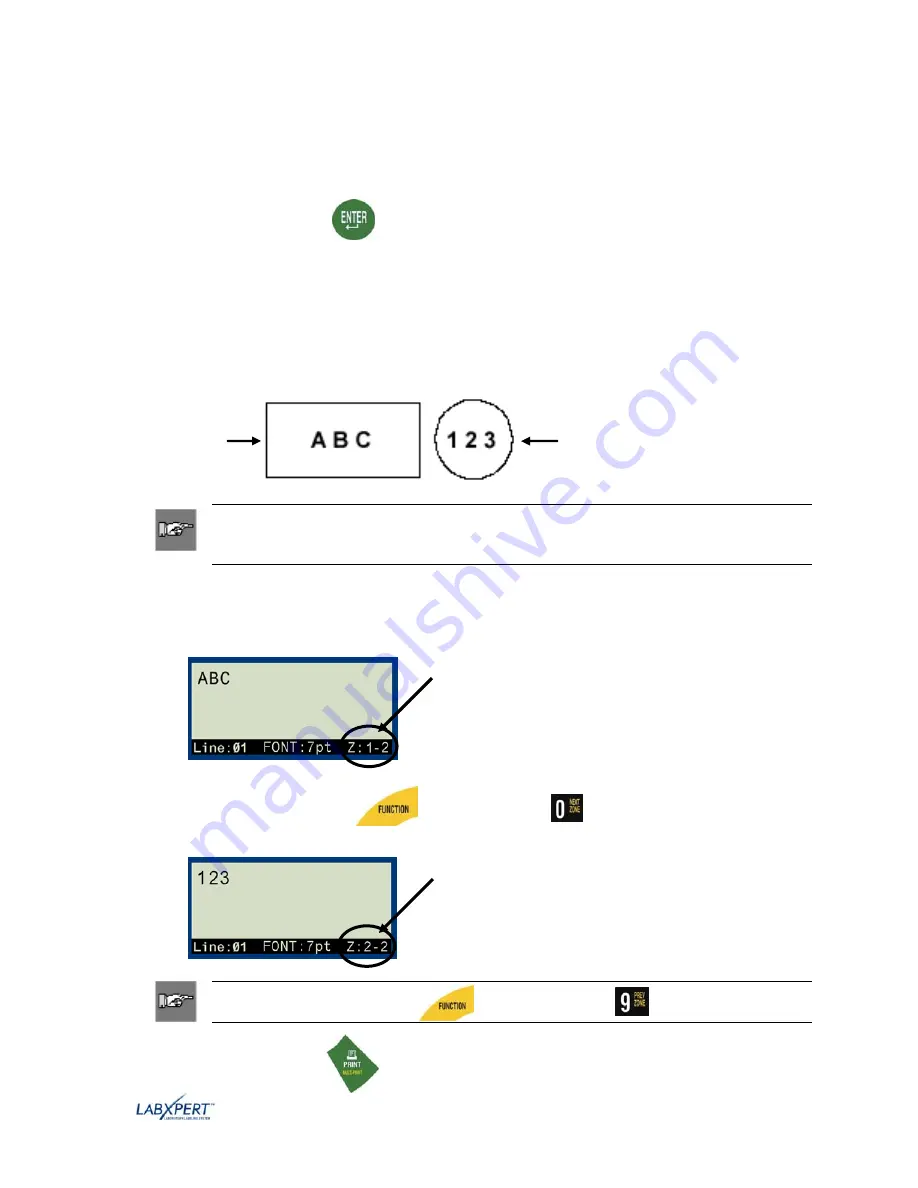
Multi-Zone Label Example 

Zone 1 

    Zone 2 


Note: Continuous and Vial


modes are disabled when die-cut label media is installed.  

If you have continuous label media installed, the printer will not recognize entry of  
multi-zone commands. See Glossary of Terms on page 45 for complete definitions. 

To create a multi-zone label: 

1.


Install a multi-zone (die-cut label) cartridge. 

2.


Enter characters for 

Zone 1


3.   Press [

FUNCTION

]                 + [

NEXT ZONE

]. 


  4.  Enter characters for  

Zone 2


5.   Press [

PRINT

]. 


Note: Pressing 

[

FUNCTION


[

PREV ZONE

]

             toggles back to  

Zone 1

The display will  
show that you are 
in 

Zone 1 of 2

.

The display will  
show that you are  
in 

Zone 2 of 2

Содержание LABXPERT

Страница 1: ...User Manual www bradyid com labxpert...

Страница 2: ...system described herein nor any liability for incidental or consequential damages arising from the use of this document Brady disclaims all warranties of merchantability of fitness for a particular p...

Страница 3: ...modifications not expressly approved by Brady Corporation could void the user s authority to use the equipment Canada This Class B digital apparatus complies with Canadian ICES 003 Cet appareil num r...

Страница 4: ...205 Fax 44 1295 27 17 55 E Mail tsuk bradycorp com Sweden Norway Finland Phone 46 85 90 057 33 Fax 46 85 90 818 68 E Mail tssweden bradycorp com Mexico Phone 01 800 112 7239 Fax 52 55 5527 55 86 E Ma...

Страница 5: ...THE DISPLAY SCREEN MENU AND KEYPAD 9 THE DISPLAY SCREEN 9 MENU BASICS 9 PERIPHERAL MODE CONNECTING TO AND PRINTING FROM A PC 10 MENU SELECTIONS 12 GUIDE TO KEYS 13 CHAPTER 5 CREATING AND PRINTING LABE...

Страница 6: ...ING A LABEL FROM MEMORY 34 DELETING A LABEL FROM MEMORY 35 CHAPTER 10 MAINTENANCE 36 CLEANING 36 ACCESSORY PARTS LIST 37 CHAPTER 11 TROUBLESHOOTING 38 TROUBLESHOOTING GUIDE 38 ERROR MESSAGES 39 APPEND...

Страница 7: ...tration Warranty Save Your Packaging The packaging surrounding your LABXPERTTM printer should be saved in the event of any future shipments of the printer and accessories Product Registration Register...

Страница 8: ...ions Metric U S Dimensions 190 5 x 241 3 x 88 9 mm 7 5 x 9 5 x 3 5 Weight Printer only 77 kg 1 70 lbs Weight Printer and Cartridge 98 kg 2 15 lbs Weight Printer and Batteries 91 kg 2 lbs Weight Printe...

Страница 9: ...00 3 2 2000 EN61000 3 3 1998 A1 and A2 WEEE RoHS CE CISPR A CE CISPR B Australia AS NZS 3548 1995 A1 and A2 Mexico NOM 019 SCFI 1998 Safety Information WARNING Please heed the following precautions be...

Страница 10: ...components that make up the LABXPERTTM printer Keypad Layout The LABXPERTTM Laboratory Labeling System is available in standard QWERTY keyboard layout style Battery Compartment 1 Material Cartridge 2...

Страница 11: ...ur LABXPERTTM Laboratory Labeling System These accessories may be ordered from your Brady distributor Note See also the Accessory Parts List on page 37 Hard Side Carrying Case PC Communication Cable A...

Страница 12: ...eral purpose laboratory ID for smooth flat surfaces Withstands exposure to numerous solvents B 461 Self laminating Polyester Extremely low profile material for self laminating vial tube and slide ID W...

Страница 13: ...cover located on the backside of the printer 2 Install the batteries as shown See inside the battery compartment for the battery positioning grid 3 Close the battery compartment Note You can print up...

Страница 14: ...idge release button on the backside of the printer and push firmly to eject cartridge 3 Remove the existing cartridge 4 Install the new cartridge as shown 5 Turn the locking lever up to lock both the...

Страница 15: ...screen Status Bar The status bar located on the bottom of the display indicates the current text line font size and label zone Contrast In order to change the contrast on the display press MENU and t...

Страница 16: ...vious menu level or exit menu mode and return to the display screen Peripheral Mode Connecting to and Printing from a PC You may use your PC to create and print labels with your LABXPERTTM printer Fir...

Страница 17: ...ep 1 On your LABXPERTTM printer press POWER Step 2 Press MENU Step 3 Press the NEXT softkey three 3 times until you advance to the PC option The display screen shows the following Step 4 Press the sof...

Страница 18: ...and vertical justification of legend JUST Rotate Set rotation of legend to 0 90 180 or 270 degrees ROT Mirror Reverse label content renders it readable for instance as a clear label on the bottom of a...

Страница 19: ...including font size When in MENU mode the Clear Esc function backs out of the menu This works the same whether or not you use it in conjunction with the Function key PRINT prints one copy of the legen...

Страница 20: ...t labels in pre defined zones When using a zone that is not pre defined this only functions for viewing or editing previously entered text FUNCTION then entering the character enables formatting of th...

Страница 21: ...g chapters of this manual Step 1 Press POWER Step 2 Press FONT SIZE Step 3 Use the up down arrow softkeys or the arrows on your keypad to select a font size Note See the Font Size Chart on page 41 Ste...

Страница 22: ...veral factors including label size number of characters of text entered on the label line number of lines of text entered on the label and the font sizes chosen for the label lines The printer allows...

Страница 23: ...y beneath AUTO 3 Press ENTER Press the AUTO softkey to toggle auto sizing on and off Note When AUTO is toggled to ON the auto size feature stays on until OFF is selected however you can still manually...

Страница 24: ...the display screen 4 Press ENTER to select the desired symbol category The symbols appear one at a time for the category selected 5 Press the up down arrow softkeys or the arrows on your keypad to scr...

Страница 25: ...the softkey or keypad arrows to navigate the character menu 3 When the desired character is reached press ENTER The selected international character is inserted in the cursor position Printing Labels...

Страница 26: ...he LABXPERTTM Laboratory Labeling System allows printing of vial labels including multiple put up vial vial top labels see Chapter 8 Advanced Features for multi zone label details Vial labels can be c...

Страница 27: ...3 123 Left Center Right Top Center Bottom To justify your legend 1 Press MENU 2 Press the JUST softkey The following menu options appear For horizontal justification press HORIZ then LEFT CENT or RIGH...

Страница 28: ...he Menu selections to reverse text on a label renders it readable for instance as a clear label on the bottom of a Petri dish Valid options are ON or OFF on whole label or zone by zone To mirror your...

Страница 29: ...me and date on the printer To set the time 1 Press MENU 2 Press the NEXT softkey two 2 times 3 Press the TIME softkey The following menu options appear with the display screen showing the current time...

Страница 30: ...the display screen showing the current date setting 4 Press the following softkeys to cycle to the correct month day or year DAY cycles to the correct day MON cycles to the correct month YEAR cycles t...

Страница 31: ...l receive this error message Cannot Fit The date prints on your label in dd MON yy format For example 15 MAR 07 Note The time and date stamp reflects real time Therefore the time and date printed on a...

Страница 32: ...he display screen shows the current language setting Pressing NEXT cycles through the set of eleven language options 4 Select your default language To select this language Press English ENG French FRE...

Страница 33: ...e following menu options appear Choose AUTO to have the specified font size and characters determine label length automatically up to a maximum of 75 characters or 19 in 482mm whichever is reached fir...

Страница 34: ...alized on the desired legend line 2 Use the arrows on your keypad right left to position the cursor under the character in the legend to be serialized 3 Press SERIAL The screen prompts you to enter th...

Страница 35: ...maximum value 9 z or Z the character immediately to the left is incremented and the right most character cycles back to its minimum value 0 a or A Once a serialized character has reached its maximum v...

Страница 36: ...while in barcode mode If you try to enter this type of information while in barcode mode you will receive this error message Invalid Character To change barcode symbology height human readable and wi...

Страница 37: ...it and allow you to create and format multi zone labels Multi Zone Label Example Zone 1 Zone 2 Note Continuous and Vial modes are disabled when die cut label media is installed If you have continuous...

Страница 38: ...Zone 1 Zone 2 Note Pressing FUNCTION and FUNCTION toggles between zones Note Go to Setting Legend Justification on page 21 for further information To set rotation of a legend within a multi zone label...

Страница 39: ...tion process press FUNCTION CLEAR ESC to return to the zone you were last in To create multi zone labels containing serialized data 1 Enter text into all zones on the label 2 Go to the zone you wish t...

Страница 40: ...he grid 3 Press SAVE If you try to save the legend to an occupied space you will get the option to overwrite it Recalling a Label from Memory To recall a label from memory 1 Press MEMORY 2 The grid ap...

Страница 41: ...number indicates a storage location is occupied 2 Use the arrows on your keypad to navigate to the desired storage location on the grid The first line of label text shows in the display to help you id...

Страница 42: ...ith black handle provided in your cleaning kit See the Accessory Parts List on page 37 WARNING Make sure to wait five minutes after cleaning so the printer is dry before installing a cartridge a Print...

Страница 43: ...sory Parts List Description Catalog No Hard side Carrying Case LABXPERT HC KEY AC Adapter North America XPERT AC AC Adapter Europe XPERT ACEUR AC Adapter UK XPERT ACUK PC Communication Cable PCCABLE 1...

Страница 44: ...ll is uneven or torn not a straight edge Use a pair of scissors to cut a straight leading edge on the marker roll WARNING When cutting die cut labels make sure to cut in between labels For continuous...

Страница 45: ...legend retrieval Install a cartridge containing larger labels See Replace material cartridge on page 7 Invalid Label The printer cartridge is not valid Install a new label cartridge See Replace materi...

Страница 46: ...40 User Manual Appendix A Menu Tree...

Страница 47: ...4 BRADY 12345 7 06 1 5 BRADY 12345 9 09 2 3 BRADY 12345 10 10 2 5 BRADY 12345 13 13 3 3 BRADY 12345 16 16 4 1 BRADY 12345 20 20 5 1 BRADY 12345 26 25 6 4 BRADY 12345 32 31 7 9 BRADY 12345 38 38 9 6 BR...

Страница 48: ...Inch mm PRINT SAMPLE 60 59 15 0 BRADY 123 65 64 16 3 BRADY 12 70 69 17 5 BRADY 12 76 75 19 0 BRADY 1 102 1 00 25 0 BRADY 126 1 25 33 0 Note The 102 pt and 126 pt font sizes print in uppercase only fo...

Страница 49: ...er Manual 43 Appendix C Symbol Library See the Symbols section on page 17 for instructions on selecting and printing the symbols shown below Greek Symbols Laboratory Symbols PPE Mandatory Hazard Warni...

Страница 50: ...44 User Manual Prohibition First Aid Fire Haz Mat ls WHIMIS Haz Mat ls HSID European Arrows Misc...

Страница 51: ...kers by spaces and notches Label Once a marker contains printed text it is referred to as a label Legend The actual text to be printed on a marker The legend appears on the LCD screen and can be store...

Отзывы: