background image

LabelMark Overview 

• 

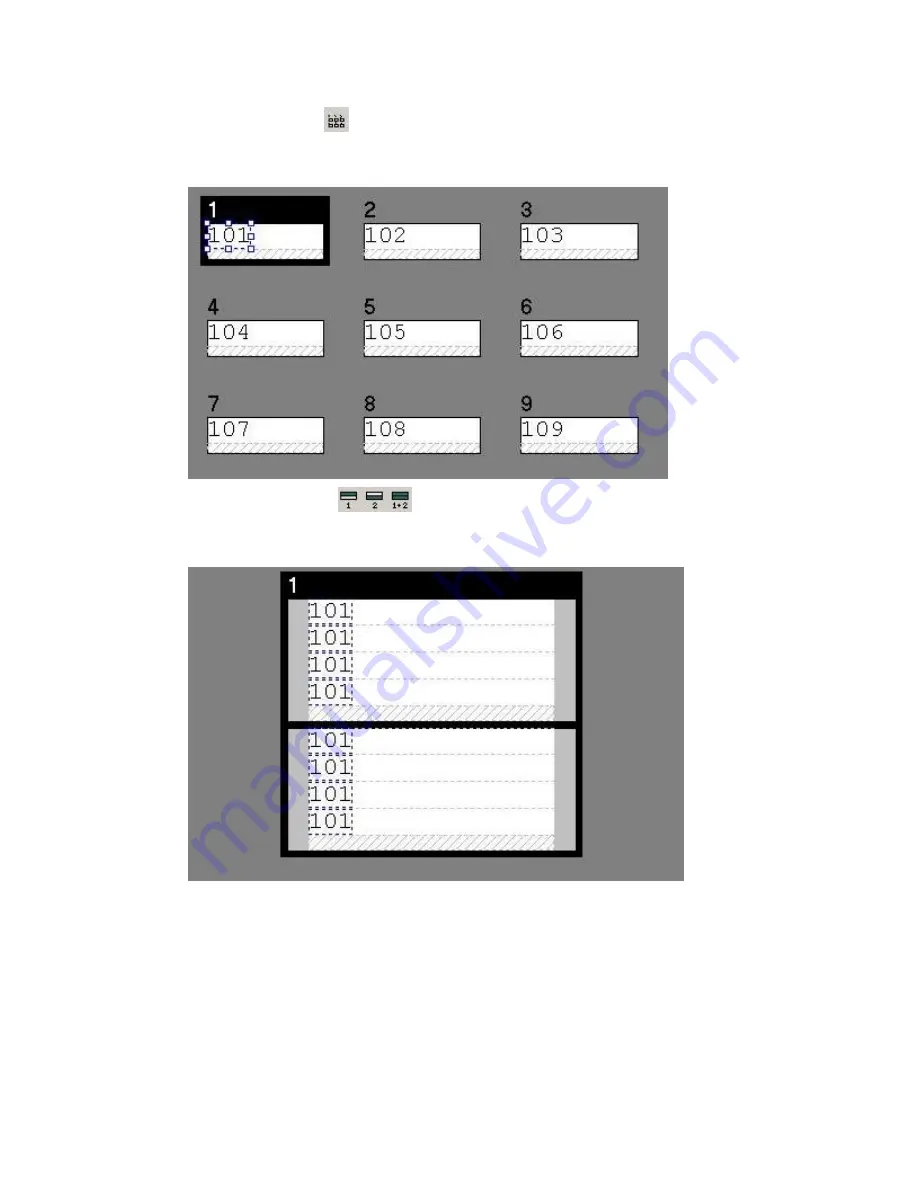
Multiple Label View


You will see as many labels in the file that will fit on your screen. Select the last label in the file 
and press 

Tab

 to create a new label. 


• 

Two-Sided SleeveView


When working with a two-sided printable sleeve, you can display either side or both sides.  
The 

Two-Sided Sleeve

 toolbar is disabled for other label parts. 


LabelMark Overview 


15 

Содержание LabelMark 3.2

Страница 1: ...LabelMark 3 2 User Guide...

Страница 2: ......

Страница 3: ...abel Navigation Toolbar 17 Two Sided Sleeve Toolbar 17 Changing User Defaults 18 Basic LabelMark Techniques 21 Creating a New Label File 21 Creating a New Label Using the DataComm Wizard 21 DataComm W...

Страница 4: ...el File 61 Selecting Print Ranges 62 Setting Two Sided Sleeve Print Options 64 Selecting a Printer 64 Troubleshooting Printer and Part Problems 65 Creating and Using Templates 67 Creating a Template 6...

Страница 5: ...and Lines 89 Importing Data into LabelMark Plus Simple 90 Importing Data into LabelMark Plus Advanced 90 Selecting Objects in LabelMark Plus 92 Object Toolbar 93 Moving an Object 93 Resizing an Object...

Страница 6: ......

Страница 7: ...scribed herein nor any liability for incidental or consequential damages arising from the use of this document Brady disclaims all warranties of merchantability of fitness for a particular purpose Bra...

Страница 8: ...Scandinavia 46 85 90 057 33 tscandinavia bradycorp com Spain 33 437 245 234 tsspain bradycorp com United Kingdom 44 1295 228 231 tsuk bradycorp com Other Countries 32 52 45 73 97 tsbelgium bradycorp c...

Страница 9: ...elect Start Run type D setup exe and click OK replace D with your CD drive 2 Click Install LabelMark Note Installation occurs in a new directory C Program Files Brady LabelMark 3 so earlier versions o...

Страница 10: ...g on your needs Note The TLS2200 Portable Printer does not require a driver Note To install the Brady TLS PC Link driver do not follow the procedure below Rather insert the LabelMark CD and click Prin...

Страница 11: ...ng the refresh options within the User Defaults Note This function can still be performed manually from the Tools menu or the Action toolbar Rotation View By a click of the Rotation View button you ca...

Страница 12: ...LabelMark User Guide Online User s Guide Overview Select Help User s Guide to display the LabelMark electronic reference system 6 Getting Started...

Страница 13: ...File When you start LabelMark the Welcome screen appears Select Create new file and click OK If LabelMark is already running click File New The New file screen appears Select the Printer to use from t...

Страница 14: ...defaults to Master all Brady stock parts If you select Favorite you will only see Printer types Part families and Parts in your favorite list see Creating a Favorite Label Parts List o If you created...

Страница 15: ...Getting Started 4 Print Labels Click File Print or click the Print icon on the toolbar The Print dialog box appears Set the print options if necessary and click Print Getting Started 9...

Страница 16: ...click the Save icon on the toolbar The Save As dialog box appears Type the file name and click Save LabelMark displays the default file location You may change to a different folder or change the defa...

Страница 17: ...etc Note The editor described above is for the LabelMark application which allows you to create text only labels The LabelMark Plus application also included on the LabelMark CD allows you to incorpo...

Страница 18: ...l and paste it in a new location menu equivalents Edit Cut Copy or Paste Undo Reverses an action Redo Performs an action again Label Part Setup Allows you to switch to a different part after you have...

Страница 19: ...ion Aligns text to the left center or right of the label menu equivalent Format Horizontal Justification Note LabelMark Plus justifies within the selected text block rather than the label Vertical Jus...

Страница 20: ...uivalent Edit Command Multiplier Copy Line or Copy Object copies the selected item into the next label menu equivalent Edit Copy Line or Copy Object Copy Label copies the active label and inserts a du...

Страница 21: ...ll fit on your screen Select the last label in the file and press Tab to create a new label Two Sided SleeveView When working with a two sided printable sleeve you can display either side or both side...

Страница 22: ...ew by 90 degree increments In LabelMark go to Format Rotate and select the desired rotation view The label will subsequently display the corresponding orientation Note You must be in Single Label View...

Страница 23: ...l is active Next creates a new label Go to Label jumps to a specific label number that you enter You can also press F7 or select Edit Go To Label to access the go to function Two Sided Sleeve Toolbar...

Страница 24: ...ch time you start LabelMark Select the 6 9 Underline box if you want all 6 and 9 characters underlined Un select the appropriate Use wizard for option if you would prefer to enter information on your...

Страница 25: ...rk Plus select the Auto match text size option also found in the Format drop down menu if desired Text size and condensing values remain the same for any text added within a print zone keeping formatt...

Страница 26: ......

Страница 27: ...the output type you are directed to the available label part categories and corresponding parts see DataComm Wizard Parts Sub Categories listed by name and dimension and displayed in preview mode To o...

Страница 28: ...part is highlighted in the grid the Preview area shows a preview of the blank label if the label is a continuous part the Length field becomes available so you can specify the label length The Standar...

Страница 29: ...ng on The Subcategory field shows the subcategories from the Workstation Labels output group Once you identify the workstation label part and click Next the Cable Label Part page will prompt you to id...

Страница 30: ...main editor window Note You can copy and paste linked objects between the two separate files All Output Selecting All Brady Labels allows you to see the entire list of Brady parts and filter them acc...

Страница 31: ...ocks Continuous Tapes for Patch Panels Lucent PatchMax Patch Panels 4 Port Patch Panels 6 Port Patch Panels Individual Port General ID Continuous Tapes All Horizontal Link Output Desi Strip Inserts Ou...

Страница 32: ...on wiremarking for all labels When Wiremark is selected here you can turn off this option for an individual label by using the Format Menu or the Wiremark button on the Action Toolbar Note When using...

Страница 33: ...els by utilizing any of the following options Click the line of text to select it or use Ctrl click to select multiple lines and go to the Format Menu Select the line of text and use the Format Toolba...

Страница 34: ...allowed to place anything in this area and it will not print You can modify a WireMarked label by changing its text Users commonly bottom align WireMarked labels WireMarking creates a text block in L...

Страница 35: ...d number of labels to create based on Start End and Step For example a Start of 1 End of 3 Step of 1 and Number of labels of 3 would result in 1 2 3 If you change the Number of labels to 6 the system...

Страница 36: ...click Time to add time elements o Click Space to insert a space o Click Add to insert the character in the text box you may change the character at any time Remove Last deletes the date time element...

Страница 37: ...next to a date time object Modifying Date and Time Information To change format or delete an existing date time field see Working with Linked Objects To manually or automatically refresh the date and...

Страница 38: ...fields To delete a linked object s If you select a linked object and press Delete the system asks if you want to delete all items linked to those in the current selection If you select No the system...

Страница 39: ...lick to select multiple lines of text Text is white on a black background when selected No To copy formatting in LabelMark refer to Repeating Common Commands A single label click on the label header t...

Страница 40: ...t Toolbar Reduce the font size Condense the text Use Automatic Text Formatting set in the User Defaults o Auto fit text lines also found in the Format drop down menu When the end of a line is reached...

Страница 41: ...ect s to the Start at label location the number of times specified in the Copies field You may have to move or delete objects that interfere with the placement of the items being pasted in LabelMark P...

Страница 42: ...nt to search for in the Find what box Type the text you want to replace it with in the Replace with box Check Match case if you want to find the exact text including upper and lowercase characters Sel...

Страница 43: ...New Part tab 3 Click Apply to File to preview the new part Click Restore to change back to the Original part Note If the new part is smaller than the original your data may no longer fit see Making Da...

Страница 44: ...el file 1 From the Welcome screen select Open saved file and click OK If you are already in the application select File Open 2 Select the file you want to open and click Open Note LabelMark displays t...

Страница 45: ...iginal settings and refresh the label file if you applied the changes to the file Labels per page the number of labels on the page for a sheet or roll of labels Across The number of labels across a sh...

Страница 46: ...ermashieldTM Part Layout A Top margin B Left margin C Horizontal gap D Vertical gap E Label width F Label height G Printable width H Printable height I X Offset J Y Offset Note A clear overlaminate ex...

Страница 47: ...he Create New Part tab LabelMark displays the settings for the active part irrelevant settings for the displayed part are disabled 3 Select the desired Printer type and Part family if necessary 4 Modi...

Страница 48: ...te Note X and Y Offset are zero for this example 6 Click Save Part to Database to create a new custom label part that you can use in other label files LabelMark prompts for a part name and ensures tha...

Страница 49: ...also set shape and positioning parameters for the separate zones similar to Creating a Custom Label Part The shapes include Rectangle Square Circle Oval and Rounded Rectangle and can be positioned us...

Страница 50: ...By selecting this option you will be able to enter the desired rectangle parameters in the fields shown in the screen below 1 Once you have entered all dimensions click Save Part to Database 2 Name t...

Страница 51: ...able to create a shape for an individual label zone other than a basic rectangle 1 Click Add Edit Label Zones The screen will display as follows allowing you to select one of four shapes and define t...

Страница 52: ...to determine Corner Roundness To define this use fractional increments that are fifty percent or less of the total maximum zone dimension For instance for a zone with a 0 8 width and 0 335 height the...

Страница 53: ...ate between the zones to modify them using this drop down menu 3 In the Shape drop down menu select Rectangle Square Circle Oval or Rounded Rectangle see Corner Roundness note in Single label zone oth...

Страница 54: ...lti Zone Label A Top margin B Left margin C Horizontal gap D Vertical gap E Label height F Printable height G Label width H Printable width Zone 1 I Non printable width Zone 2 J Printable width Zone 3...

Страница 55: ...s and their parameters 8 Click Save Part to Database Name the part in the Label part field and click OK Note This will create a new custom label part that you can use in other label files it appears i...

Страница 56: ...e Master parts list grid or scroll to the part by typing the part name in the Label part box use Ctrl click or Shift click to select more than one part 4 Click Copy to add the part to your list of fav...

Страница 57: ...and printer types only the parts in the selected Part family and Printer type will be shown 2 Select the part as you normally would Serializing Labels Advanced The Advanced Serialization function allo...

Страница 58: ...ending value before a lower priority string starts to increment e g a string of Priority 2 will not increment until a string of Priority 1 has reached its end value Click Clear All Values at any time...

Страница 59: ...omponent string click Add Component Change the Type Priority Start End or Step by clicking it in the grid and selecting or typing the revised value Check the Preview to see what the first serializatio...

Страница 60: ...5 Set final options as needed Refer to Serializing Labels Simple for details 6 Click Finished to serialize the labels See Working with Linked Objects to edit the serialization if necessary 54 Advanced...

Страница 61: ...14 15 16 17 18 19 1A 1B 1C 1D 1E 1F etc Octal Octal Base 8 0 7 numeric serialization 0 1 2 3 4 5 6 7 10 11 12 13 14 15 16 17 etc Custom User enters a custom serialization sequence The sequence define...

Страница 62: ...LAT 178 4 Pair BIX Block LAT 178 5 Pair BIX Block LAT 178 Blank BIX Block Patch Panel Laser Dot Matrix LAT 43 4 Port Patch Panel LAT 43 Blank Patch Panel LAT 44 6 Port Patch Panel LAT 44 Blank Patch...

Страница 63: ...label strip o Click OK See Working with Linked Objects to edit the serialization if necessary Following is an example of a 4 pair 110 block horizontal serialization and lines as it would print out on...

Страница 64: ...eate your file see Quick Start Guide Creating a Basic Text Label Using the Flip Flop Feature The flip flop feature allows you to transpose text around a flip point For example 123 456 would flip flop...

Страница 65: ...flip character from the selected label s after you have performed your left to right flip flop Top to Bottom Transposes text above the centerline to below the centerline and vice versa Note You do not...

Страница 66: ...LabelMark User Guide Top to Bottom Insert All Inserts a flipped version next to the original This option doubles the number of labels Before After 60 Advanced LabelMark Techniques...

Страница 67: ...l o Click Print to continue 2 From the Print dialog click Print Calibration Test to confirm that the printer is properly calibrated LabelMark prints three concentric rectangles centered on the label a...

Страница 68: ...Range Copies For example if you set Range Copies to 2 for the range of labels 1 through 3 the label sequence will print as follows 1 2 3 1 2 3 To change the number of times a label will print before p...

Страница 69: ...up to 10 ranges to a file Note Ranges print in the order they were added To delete a range Click the range you want to delete in the Range Selection table in the Print dialog box Click Delete Range T...

Страница 70: ...1 prints only the first side of the labels Side 2 prints only the second side of the labels Both prints the first and second side of the labels Note LabelMark prompts you to reverse the part to print...

Страница 71: ...ngs on your printer may not be set correctly Refer to the user s guide for your printer The label part used to design the LabelMark file does not match the labels loaded in the printer Change to the p...

Страница 72: ......

Страница 73: ...it will be replaced by your data when you create a file based on the template Note Date time serialization and data import are unavailable during the template creation and editing process The function...

Страница 74: ...y Lock Prevents users from editing the item Lock items that are static or unchanging from label to label An unlocked item is a placeholder that designates a field for variable data entry when you use...

Страница 75: ...elect the File radio button o Select the Use template check box 2 Click the Browse button select the desired template file and click Open 3 Click OK to create your new file 4 Enter data in the unlocke...

Страница 76: ...template Data only imports into unlocked text or barcode fields In LabelMark imported data fills unlocked text fields in labels from top to bottom In LabelMark Plus the Use existing objects option al...

Страница 77: ...er Default settings ODBC import is still available but there is now a method to import Excel and Lotus 1 2 3 spreadsheets and Access data that is easier to use see Importing Data into Label Files Simp...

Страница 78: ...ort Click Restore All Fields to restore all deleted fields o Click OK when finished Excel or Lotus 123 spreadsheet file or Access database file o Select Excel spreadsheet Lotus spreadsheet or Access d...

Страница 79: ...Importing Files Other data source o If you are importing from a database other than Access enter the necessary Other data source information see Importing Data From a Database Importing Files 73...

Страница 80: ...lly have data refresh either each time you open a file each time you print a file or both Go to Tools User Defaults Refresh Imported Data Refresh Options and define your settings Note You can set a de...

Страница 81: ...lay the import data wizard by clicking the Import Data Simple icon then clicking Advanced Import or by selecting Tools Import Data Advanced Note If you choose not to use the wizard by deactivating it...

Страница 82: ...are importing from a database other than Access enter the necessary Other data source information see Importing Data From a Database Note You can set a default data source under the Data Import tab in...

Страница 83: ...rt data o Change the import order by selecting a field and clicking or o Select a field and click Delete Field to exclude it from the import o Click Restore All Fields to restore all deleted fields 7...

Страница 84: ...fields you want to sort by and the direction for each sort 9 Manually edit the SQL statement if desired and click Next Warning Refrain from editing the query string unless you are skilled with SQL You...

Страница 85: ...as needed and click Finish See Serializing Labels Simple for descriptions of the options To manually refresh data Go to Tools Refresh Imported Data To automatically have the data refresh either each t...

Страница 86: ...two sided sleeves option if desired Select the fields to include in the import o Fields are column headings in the import data o Change the import order by selecting a field and clicking or o Select...

Страница 87: ...ing Data From a Database To import database data as opposed to ASCII text or spreadsheet data and other than Microsoft Access data into your label file you will have to perform a few additional steps...

Страница 88: ...ly import the data as is without using advanced features see Importing Data into Label Files Simple Filtering Import Data The filter feature allows you to add conditions to import fields Data must mee...

Страница 89: ...in past versions For example Value _ East would return A East B East C East etc For more than one condition use the AND OR radio buttons AND requires both conditions to be met OR requires one of the...

Страница 90: ...el A West OR The IN operator offers a concise way to handle a long list of values Field Operator Value AND OR Panel IN A East A West AND The list is enclosed in parentheses and each member of the list...

Страница 91: ...w toolbar allows you to create and select text barcode image rectangle and line objects in LabelMark Plus Icon Description Select Selects object for moving or sizing Text Creates text objects Barcode...

Страница 92: ...iple lines within a text block Inserting Barcodes To add a barcode to a label in LabelMark Plus 1 Select the Barcode icon on the Draw toolbar 2 Click on the desired location for the barcode s top left...

Страница 93: ...e following table describes the fields Property Field Description Data The information you want to present Symbology The barcode symbology used to represent the data Ratio Adjusts the ratio of wide to...

Страница 94: ...Border Width Provides a border on the left and bottom of the symbol for better ease of scanning ID Barcode Shape Options for a DataMatrix barcode are Square or Rectangle 3 Click OK when you are finis...

Страница 95: ...or line into a LabelMark Plus label 1 Select the Rectangle or Line icon on the Draw toolbar 2 Click on the desired starting location and drag the mouse with the left mouse button pressed to draw the...

Страница 96: ...If you choose not to use the wizard by deactivating it in the User Defaults see Data Import Overview the same options described below are still available but you can select each option individually us...

Страница 97: ...el If you select Use existing objects as the Sort order for importing data LabelMark Plus adds an Object column to the Included list If you selected the Use existing objects import option map each dat...

Страница 98: ...elect an object Use the Select tool to click the object you wish to edit To select more than one object hold down the Ctrl key and click on the objects you wish to edit To select all objects on the ac...

Страница 99: ...r Horizontally Moves the selected object s to the middle side to side of the label menu equivalent Object Align Note This is a one time action If you resize add text etc you will have to re center the...

Страница 100: ...r desired Width and Height and click OK With the Select tool grab one of the solid blue sizing handles and drag it to re size Deleting an Object To delete an object s in LabelMark Plus 1 Select the ob...

Страница 101: ...different labels 2 Cut or copy the object s Click the Cut icon on the toolbar removes the original object or objects Click the Copy icon on the toolbar leaves the original object s as is 3 Click the l...

Страница 102: ......

Страница 103: ...led to the C Program Files Brady LabelMark 3 Images folder for use with LabelMark Plus These images were provided solely for your convenience and you are responsible for their use If you plan to use a...

Страница 104: ...LabelMark User Guide 98 Symbols Guide...

Страница 105: ...Symbols Guide Symbols Guide 99...

Страница 106: ......

Страница 107: ...isting 83 select 87 symbology icon 88 toolbar icon 81 BIX block part numbers 52 serialization 52 C center horizontal 88 vertical 88 change part for existing file 36 printer for existing file 36 close...

Страница 108: ...import 77 datacomm labels 21 datamatrix 82 83 date time delete 30 icon 14 insert 29 modify existing 30 delete custom part 42 labels with command multiplier 34 object 89 documentation how to use online...

Страница 109: ...ialization 110 BIX block 52 I image file location 18 guide 5 insert 81 83 modify existing 84 select 87 import data filter 78 format 80 from database 77 into file based on template 66 into label file 7...

Страница 110: ...tall 3 open label file 37 upgrade from previous version 3 LabelMark Plus close 37 comparison with LabelMark 81 file extensions 36 install 3 open label file 37 language change LabelMark default 18 last...

Страница 111: ...ier 34 cut 90 delete 89 move 88 paste 90 resize 89 select all objects 87 select object 87 ODBC data source import data from 77 OLE DB provider import data from 77 open existing label file 37 existing...

Страница 112: ...1 red text and numbers barcode 82 import data does not fit 66 make data fit on label 33 repeat value limits continuous label options 54 setting 7 18 terminal block options 54 replace text 35 requireme...

Страница 113: ...import overview 67 ASCII text import procedure 71 copy text with command multiplier 34 find and replace 35 format 13 25 insert in LabelMark 25 insert in LabelMark Plus 81 make data fit on label 33 mo...

Страница 114: ...hange 18 user guide 5 V views multiple label view icon 12 single label toolbar 17 single label view icon 12 two sided sleeve toolbar 17 use views 14 zoom icon 12 W WebHelp how to use online user s gui...

Отзывы: