background image

19

IN THE FIELD TECHNIQUES

(motion modes only)

6

Use 

ALKALINE

batteries only.

To install the

batteries:

1

Remove the
battery cover by
disengaging the
clip at the back.

2

Align the polarity
of the batteries
correctly, with
the positive "+"
toward the coil
plug connection,
as indicated by
the  +  and  –
indicators on the
housing.

3

Insert (2) 9-Volt 

ALKALINE

batteries, with the contacts pointed inward,

and press down on the back of the batteries to snap them into place.

Some brands of batteries will require moderate force to clear the
retaining tabs.

If the batteries fit loosely, and you
want to guarantee a very secure
electrical contact, insert a piece of
paper or thin cardboard between the
back of the battery and the
supporting post. 

You may also

CAREFULLY pry back the four
contacts with a flat-head
screwdriver.

4

Replace the battery door.

Most metal detector problems are due to improperly installed batteries,
or the use of non-alkaline or discharged batteries.  

If the detector does

not turn on, please check the batteries.

If the detector does not turn on,

check to see that the batteries fit tightly.

If the batteries are loose, press them forward while pressing the POWER
touch pad.  To tighten up a loose battery, wedge a piece of paper or thin

BATTERIES

IN CASE OF LOOSE BATTERIES

angles, you may have
encountered multiple objects.
If you are new to the hobby,
you may want to dig all targets
at first.  With practice in the
field, you will learn to better
discern the nature of buried
objects by the nature of the
detector’s response.

You may encounter some false
signals as you proceed.  False
signals occur when the detector
beeps, but no metal target is
present.  False signals can be
induced by electromagnetic
interference, oxidation, or
highly mineralized ground
soils. If the detector beeps
once, but does not repeat the
signal with several additional
sweeps over the same spot,
there is probably no target
present.

When searching very trashing
ground, it is best to scan small
areas with slow, short sweeps.
You will be surprised just how
much trash metal and foil you
will find in some areas.  The

trashiest areas have been
frequented by the most people,
and frequently hold the most
promise for finding the most
lost valuables.  To make
searching easier in very trashy
areas, consider purchasing a 4-
inch Search Coil.  The 4-inch
coil’s narrower detection field
can better distinguish between
two objects in close proximity.

Also maintain the search coil
positioned just above the
surface of the ground, without
making contact with the
ground. Making contact with
the ground can cause false
signals.

False High Tones:

If detector emits false high
tones in DISCRIMINATION
mode, rotate the GROUND
BALANCE knob slightly
counter clock wise.

Содержание LEGACY 3300

Страница 1: ...amiliar with the detector 2 Do not use indoors This detector is for outdoor use only Many household appliances emit electromagnetic energy which can interfere with the detector If conducting an indoor demonstration turn the sensitivity down and keep the search coil away from appliances such as computers televisions and microwave ovens If your detector beeps erratically turn off appliances and ligh...

Страница 2: ... Discrimination 10 Notch 11 Zap 11 12 Pinpoint 12 Audio Target Identification 13 Target and Depth Display 14 15 Sensitivity Adjustment 16 In The Field Techniques 17 22 Ground Balancing 20 Trouble Shooting 23 Treasure Hunter s Code of Ethics Back Cover Warranty Back Cover S D o C o t L o o m N s D c P c f D t c F T ...

Страница 3: ...in certain metal detecting applications Examples of undesirable iron objects are old cans pipes bolts and nails Sometimes the desired target is made of iron Property markers for instance contain iron Valuable relics can also be composed of iron cannon balls old armaments and parts of old structures and vehicles can also be composed of iron FERROUS Metals which are made of or contain iron PINPOINTI...

Страница 4: ...ngth that lets you maintain a comfortable upright posture with your arm relaxed at your side and the search coil parallel to the ground in front of you 4 Wind the cable securely around the stem 5 Insert the plug into the matching connector on the right underside of the detector body Be sure that the key way and pins line up correctly 5 Twist locking collar to tighten connection between poles Cauti...

Страница 5: ... arm rest to one of the alternate positions If you cannot fully depress the button with your finger use a narrow object such as the blunt end of a ballpoint pen The arm rest must be twisted with moderate force to move it to an alternate position this adjustment is usually made infrequently If desired for added stability re install the screw The screw is not re installed in the furthest forward pos...

Страница 6: ...lectrical contact insert a piece of paper or thin cardboard between the back of the battery and the supporting post You may also CAREFULLY pry back the four contacts with a flat head screwdriver 4 Replace the battery door Most metal detector problems are due to improperly installed batteries or the use of non alkaline or discharged batteries If the detector does not turn on please check the batter...

Страница 7: ...nces or lights that cause electromagnetic interference e Pivot the search coil back toward the detector body III Power Up Turn Ground Balance knob to pre set position Press the POWER touch pad IV Wave each Object over the Search Coil a Notice a different tone for each object Bass Tone Nail Low Tone Pull Tab Medium Tone Zinc Penny High Tone Quarter b Motion is required Objects must be in motion ove...

Страница 8: ...N touch pad three times The flashing R will move to the 5 segment XI Press the NOTCH touch pad again The R will disappear under 5 XII Wave the nickel over the search coil The nickel is detected XIII Wave the penny over the coil XIV Press the ZAP touch pad An R will appear XV Wave the penny over the search coil again The penny the most recently detected item is eliminated from detection XVI Press t...

Страница 9: ...il to be in motion to detect a target When in the DISCRIMINATION ALL METAL or NOTCH modes the coil must be in continuous motion It is often useful to search for targets in a motion mode and when identified pinpoint their location with the PINPOINT control SENSITIVITY At its default sensitivity setting the detector will detect a coin sized object such as a quarter buried approximately seven inches ...

Страница 10: ...ult mode pressing the touch pad will change the detector into DISCRIMINATION mode If the detector is in the DISCRIMINATION mode pressing the touch pad will change the detector into ALL METAL mode DISCRIMINATION MODE Discrimination is used to eliminate unwanted objects from detection To enter this mode from ALL METAL mode press the DISC A M touch pad After pressing DISC A M the detector will Beep t...

Страница 11: ... the R moves upon each press of the DISCRIMINATION touch pad 6 Press NOTCH again The flashing R will become permanently illuminated If an object has been notched out you can return it to detection status To un notch a category 1 Press NOTCH 2 Move the flashing R over the permanently illuminated R using the DISCRIMINATION or touch pads 3 Press NOTCH again After NOTCHING OUT a category the detector ...

Страница 12: ...lems is the no motion PINPOINT mode At any time during operation press the PINPOINT touch pad and the detector enters the no motion mode In the PINPOINT mode any object in the coil s detection field will induce a monotone hum Pass the coil slowly over and around the target zone The target is where the sound is loudest See In the field techniques for more information on pinpointing techniques Be su...

Страница 13: ...ifferent tones depending on the object detected BASS TONE Ferrous objects such as iron and steel will induce a bass tone The smallest gold objects can also induce a bass tone Most Steel bottle caps LOW TONE Pull Tabs nickels smaller gold MEDIUM TONE Newer pennies post 1982 larger gold objects zinc small brass objects and most bottle screw caps will induce medium tones Many recent vintage foreign c...

Страница 14: ...r instance will usually illuminate the Iron 1 arrow whereas large structural ferrous objects will usually illuminate the Iron 3 arrow Objects in this category could be worthless scrap or a more valuable iron relic 5c PT Nickels and most newer pull tabs those that stay attached to the can will register here PT pull tabs Pull tabs from older beverage cans will register here Few newer pull tabs will ...

Страница 15: ... object and the distance from the coil As a starting point refer to the table below TARGET Readout The table below list some common approximate target value equivalents With experience in the filed you will recognize many types of metals by their numeric value VALUE RANGE POSSIBLE OBJECTS 0 9 Iron 10 39 Foil Nickel Typically 33 Pull Tab new type 40 49 Pull Tab old type 50 61 Screw Cap 62 76 Zinc P...

Страница 16: ...least 20 feet apart If the detector beeps erratically REDUCE THE SENSITIVITY by pressing the Sensitivity Pad on the left of the control panel SEVERE GROUND CONDITIONS A secondary use for the Sensitivity Control is to reduce false detection signals caused by severe ground conditions While your Legacy 3300 contains circuitry to eliminate the signals caused by most naturally occurring ground minerals...

Страница 17: ...ide pattern 2 Take visual note of the place on the ground where the beep sounds 3 Stop the coil directly over this spot on the ground 4 Now move the coil straight forward and straight back towards you a couple of times 5 Again make visual note of the spot on the ground at which the beep sounds 6 If needed X the target at different angles to zero in on the exact spot on the ground at which the beep...

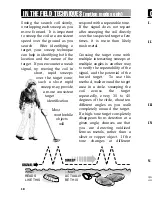
Страница 18: ...sweeping the coil directly over the suspected target a few times it is more than likely trash metal Crossing the target zone with multiple intersecting sweeps at multiple angles is another way to verify the repeatability of the signal and the potential of the buried target To use this method walk around the target area in a circle sweeping the coil across the target repeatedly every 30 to 40 degre...

Страница 19: ... same spot there is probably no target present When searching very trashing ground it is best to scan small areas with slow short sweeps You will be surprised just how much trash metal and foil you will find in some areas The trashiest areas have been frequented by the most people and frequently hold the most promise for finding the most lost valuables To make searching easier in very trashy areas...

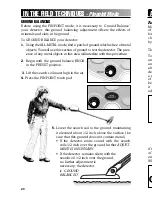
Страница 20: ... of ground to test the detector The pres ence of any metal objects in this area will interfere with this procedure 2 Begin with the ground balance KNOB in the PRESET position 3 Lift the search coil waist high in the air 4 Press the PINPOINT touch pad 5 Lower the search soil to the ground maintaining it elevated about 1 2 inch above the surface be sure that this ground does not contain metal If the...

Страница 21: ...lso cause the detector to sound off when the coil is lifted away from the ground As your search takes you to different areas verify the ground balance set ting periodically using the above procedure Within a geographical area ground conditions can change Varying elevation proximity to water and concentration of rock sand or clay can all affect ground condition and sometimes require recalibrating w...

Страница 22: ...nds of the sweep the target is located in the middle of that zone where the sound is loudest If the sound is loud over a wide area the buried object is large Use Pinpoint to trace an outline of such large objects Narrow It Down To further narrow the field of detection position the searchcoil near the center of the response pattern but not at the exact center and press PINPOINT again Now you will o...

Страница 23: ...ove coil slowly on to one target ID present at different angles or detector emits Highly oxidized multiple tones target Sensitivity set Reduce sensitivity too high No power no Dead batteries Replace batteries sounds Poor battery Push batteries in contact tighter Insert paper spacers see page 6 Pry back battery clips Cord not connected securely Check connections Detector sounds Ground Balance Move ...

Страница 24: ...discretion of the manufacturer Proof of Purchase is required to make a claim under this warranty Liability under this Warranty is limited to replacing or repairing at our option the metal detector returned shipping cost prepaid to First Texas Products Shipping cost to First Texas Products is the responsibility of the consumer NOTE TO FOREIGN COUNTRY CUSTOMERS This warranty may vary in other countr...

Отзывы: