background image

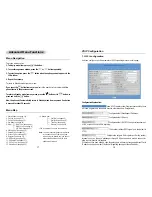
Configuration Explanation:

Configure PPPoE:

Apply

Current phone IP, subnet mask, mac address and current phone IP;

Select acquisition way of IP for WAN; This is single

option; Configure static IP parameter for WAN

Configure static IP address;

Configure subnet mask;

Configure IP address of the phone;

Configure "DNS domain" suffix;

if user input "domain" and it can't be resolved then the phone will add and resolve the
"domain" after user has input;

Main DNS server IP address;

The second DNS server IP address;

Service name, if PPPoE ISP has no special requirement

for this name, generally is the default;

PPPoE account;

PPPoE password;

Configure the parameter and then click "

" to go into effect;

Editing the Phonebook Entries:

1. Press the

button.

2. Press the

button to access

.

3. Press the

or

button until the phone number you want to edit displays.

4. If necessary, press the

button to clear the digit(s) then enter the desired number.

5. Press the

button to save the number.

MENU

C/R

This feature lets you add a special service number such as special network service
number. You can recall the number easily, then attach the phone number you want to call
by entering the phone number manually or accessing Phonebook.

The

he phone number.

You can store up to 3 Call by Call numbers.

Storing Call by Call Numbers:

Dialing Call by Call Number:
When you dial phone number manually:

special Call by Call number will be dialed, followed by t

1. Press the

button.

4. Enter the desired number (up to 10 digits), then press the

button.

2. Press the

or

button to choose

, then press the

button.

3. Press the

or

button to choose the desired memory cell.

1. Press the

button in Standby mode to recall the call by call numbers.

Result:

The currently stored call by call numbers are displayed.

Call by Call

Phonebook (Continue)

MENU

19

36

Содержание BOSST62

Страница 1: ...USER SMANUAL BOSST62 VoIP DECT PHONE ...

Страница 2: ...l not be disposed of with the usual household waste or in a fire 11 If you are sure you will not be going to use the handset over a month please take out the batteries from the battery compartment 12 Use only 13 Keep the phone out of the reach of children 14 Use the phone only in the described manner 15 Stop using the phone if it becomes damaged 16 The phone is designed to work with in a temperatu...

Страница 3: ...New call indicator DHCP server on LAN DHCP Client with 2 servers IP DNS relay on LAN Auto configuration on LAN for IP and DHCP server Call routing table for Phone Book Multi phone No for same phone Public No and Private No for phone HOTLINE Service Pick up phone dial immediately Black list for reject authenticated call Empty calling No reject service Limit dialing out No list No Disturb Caller ID ...

Страница 4: ...sing Handset Caller ID Type Intercom Between Handsets Call Transfer Between Handsets Part Two VoIP Phone Installation Make Phone Calls Configuration with WEB User Verification Configuration Menu Current State Network Configuration Wide Area Network WAN Local Area Network LAN 17 17 18 19 21 21 22 22 23 23 24 25 25 26 27 On this page user can save and configure telephone book 2 Phone book configurat...

Страница 5: ...strator level admin and the ordinary level guest are all weak account and weak password the username and password will be easily to be guessed on public network so the user had better modify the administrator and ordinary user Enter with manager level when making modification create a administrator account and a browse account you d better not set the name as admin administrator guest etc set pass...

Страница 6: ...ernet cable Ethernet connections IP indicator Indicate VoIP call In Use indicator Indicate the phone in use Before Using DCIN Configure upload or download system upgrade document or system layout file name It should be noted that system file take dlf as suffix configuration files take cfg as suffix Select server type On this page user can directly select the configuration files on the hard disk of...

Страница 7: ...of FTP server password Handset Earpiece LCD window Microphone Location and Function of Controls continued Rear View Scrolls through menu options Also adjusts volume In Standby mode scrolls through the phonebook entries Allows you to access menu options Also used to return to Standby mode from any menu When navigating menu options confirms the menu or the option selected Activates intercom communic...

Страница 8: ... and the phone will restart automatically Signal strength icon Line icon Key lock icon New call icon Mute icon Battery status icon This icon is always displayed when your phone is on and shows the current signal strength More bars indicate more signal strength This icon indicates that the line is engaged This icon indicates the keys are locked This icon indicates that there is a new call To view t...

Страница 9: ...lement configuration of using multi accounts concurrently For example now user has a H323 account and two SIP accounts then under the default condition user can only make calls by the default protocol Configure the number IP table to select the call protocol then user don t need to select default protocol before making calls every time The configuration process will not be repeated now I will main...

Страница 10: ...suffix this is optional configuration item it is the additive dial out number behind the number when no configuration has been made shown as no suffix Configure the replacing length replace the number that user input according to this length this is optional configuration item Of which the alias can be divided into four types it should be combined with replacing length to make the setup Add xxx ad...

Страница 11: ... at the lower part of the page of which It is to add outgoing call number there are two kinds of outgoing call number setup One is exactitude matching after this configuration has been done when the number is matching after this configuration has been done when the number is Using Headset optional The headset jack is located in the middle right side of the handset and is standard plug Simply plug ...

Страница 12: ...the gateway will not consider the user has handdown Configure lifeline prefix you must dial it before your desired phone number 48 Part One Cordless Phone Your new VoIP Vo ce over Internet Protocol phone can be used as a ordinary DECT Digital Enhanced Cordless Telecommunication phone It is designed with advanced features Similarly to GSM this technology allows you to get the benefits of the digita...

Страница 13: ...ne systems your phone can be set to either pulse dialing same as rotary or tone dialing DTMF 1 Press the button 2 Press the or button to choose then press the button 3 Enter the PIN then press the button 4 Press the button to choose then press the button 5 Press the or button to choose or 6 Press the button to save the selection Result The LCD window prompts you to enter the PIN The PIN is preset ...

Страница 14: ...lled automatically as soon as off hook and user can s dial any other number 1 Pick up the handset and press the button 2 Dial a telephone number 3 When the receiver answers speak 4 To end the call either press the button or Result You hear a dial tone You can store up to 10 telephone numbers in memory for automatic dialing For details see page 18 To make a call to the last number you dialed use th...

Страница 15: ...ng a Call When a call is received the phone rings and the icon on the display blinks If the caller can be identified the caller s phone number is displayed If the caller cannot be identified only the icon blinks 1 To answer the call press any button Or If the handset is on the base just simply lift it up You do not need to press any button 2 You can speak To end the call either press the button or...

Страница 16: ...ister and use two different kinds of services concurrently 2 SIP advanced configuration Configure explanation of private server To show the phone whether has been registered on public server or private server Configure IP address of SIP STUN server Adjusting Voice Volume volume 3 1 Press the button 3 Press the or button to choose then press the button 2 Press the or button to choose then press the...

Страница 17: ...he button in Standby mode 3 Press the button to dial the number Result The LCD window displays the last number you dialed When no numbers are found is displayed 2 If you want to scroll through the memory press the or button until you find out the number you want to call 1 Press the button 2 Scroll to the number you want to delete by using the or button 3 When the number appears on the display pres...

Страница 18: ...l the caller s phone number is shown on the screen if the caller s information is transmitted from the network on which the call was made The last 10 received calls are stored in the Caller ID memory and you can use the list to make a call to any of the numbers The Call ID icon appears when there are new calls in the memory Once you view all the new calls using the Call Log menu the icon will disa...

Страница 19: ...ISCO5300 and so on then it should be configured into RFC2543 to communicate normally the default is to enable RFC3261 Configure proxy server IP address usually SIP will provide user with service of proxy server and register server which have the same configuration so the configuration of proxy server is usually the same with that of register server but if the configurations of them are different s...

Страница 20: ...ll the telephone line might be disconnected and the handset returns to Standby mode Check if there is noise or static If so move the handset closer to the base station Out of Range Indication With the Smart Dial feature your phone displays the full phone number when you enter the first digit s of the number provided that the number is currently stored in your phone s memory for example stored in t...

Страница 21: ...ers response the phone will automatically swap to the default GK Configure GK backup server IP Configure server port for GK backup Configure ID for GK backup To access certain services such as voice mail or interactive telephone system it is necessary to use tone dialing When your phone is set to the pulse mode DTMF dialing is available temporarily Press the button while the phone is in the pulse ...

Страница 22: ...ssary 2 To scan through menu options press the or button repeatedly If you press the button from any menu the phone returns to the previous screen To return to Standby mode from any menu press the button or the button or press and hold the button Also the phone will automatically return to Standby mode from any menu if no button is pressed for about 30 seconds To return to Standby mode from any me...

Страница 23: ...one number to register with the telephone company s system and complete the call A pause provides a delay of 3 seconds 1 Press the button 2 Press the button to access 4 Enter the desired number up to 24 digits then press the button 5 Repeat if necessary Using a Pause 3 Press the or button to find the entry you want If you want to insert a dialing pause between numbers when you store a number in me...

Страница 24: ... phone number you want to edit displays 4 If necessary press the button to clear the digit s then enter the desired number 5 Press the button to save the number MENU C R This feature lets you add a special service number such as special network service number You can recall the number easily then attach the phone number you want to call by entering the phone number manually or accessing Phonebook ...

Страница 25: ...the address field now 1 Wide Area Network WAN Call By Call Continue 2 Press the or button to choose the desired Call by Call number then press the button 3 Enter the phone number you want to call 4 Press the button to dial the number 1 Press the button in Standby mode to recall the call by call numbers 2 Press the or button to choose the desired number then press the button 3 Press the or button t...

Страница 26: ...rresponding phone number of each protocol The version number and date of issue have been shown at the end of the page Every time you press a key your handset acknowledges it with a key tone You can set your handset with a key tone or to diable the key tone for a silent use 1 Press the button 2 Press the or button to choose then press the button 3 Press the or button to scroll through the key tone ...

Страница 27: ...fy 2 callers and select a VIP ring tone for each caller among 6 different tones 1 Press the button then press the button 2 Press the or button to choose 3 Press the or button to choose then press the button 4 Press the or button to choose the ring address you want then prese the button 5 Enter the phone number you want to designate then press the button 6 Press the or button to scan through the ri...

Страница 28: ...n 3 Enter the one digit access code using the number keypad 4 Press the button to save the selection Note When you dial a phone number in the Call Log list the number will be dialed following the access code and a preset pause time Setting Access Code MENU The handset which comes with the base unit was already registered as handset 1 Each additional handset you purchase must be registered to the b...

Страница 29: ...e the speed of getting through the line 5 Press and hold the button on the base for more than 5 seconds then the IN USE indicator starts to blinks Then release the button 6 Press the button 7 Enter your phone s AC Authentication Code and press the button The AC is 0000 Result Result The LCD window prompts you to enter AC When the registration is properly completed the LCD window displays the hands...

Страница 30: ...unit See page 23 1 Press the button 2 Press the or button to choose then press the button 3 Press the or button to scroll through the available bases 4 Press the button to save the selection Result If you select the handset will automatically find the first available base unit when you lose contact while moving around Selecting Base MENU Call Barring It is possible to set the phone to restrict num...

Страница 31: ... INT To deactivate a call barring number 1 Press the button 2 Press the or button to choose then press the button 3 Enter the PIN then press the button 4 Press the button to access 5 Press the or button to choose the cell number you want to deactivate and clear the number 6 Press the button to save the selection Call Baring Continue MENU You can remove the registered handset from the base if neces...

Страница 32: ... during an intercom conversation you will hear beeps When you hear the low beeps finish the intercom call by pressing the button Then the external line rings Press the button to answer the call Notes 4 To answer the call from you the paged handset s user should press any button 5 To end the call press either the button or the button INT INT INT There are two different Caller ID types which are DTM...

Отзывы: