background image

Before You Start

Read and understand all instructions before you use your product. If you do not follow the instructions 

in this manual, we are not responsible for injury or damage resulting from improper handling. This will 

also void the warranty.

Important Safety Precautions

•  Be sure to observe the following guidelines:

 - Do not increase speaker volume so high that you cannot hear what is around you.
 - Use caution or temporarily discontinue use in potentially hazardous situations.

•  Do not make any adjustment on the product when driving or in other situations where distractions can be 

hazardous. Responsible and safe driving is your primary responsibility when operating a vehicle.

•  Start volume at a low setting then gradually increase the volume until you can hear it comfortably, without 

sound distortion and ear discomfort.

•  In the event of smoke, strange noise or odor emitted from the product or any other abnormal operational 

signs appearing on the product, disconnect the product from the power supply. Discontinue use and contact 

your dealer or our technical support. Using the product in this condition may result in permanent damage to 

the system.

•  Servicing must only be carried out by a technician. Contact our technical support for any service question.

Installation Precautions

•  WARNING: Always consult a professional installer.

•  Installation must be performed by a professional. Contact our technical support for any installation questions.
•  Observe the safety and operating instructions of the devices which are connected to the product.
• 

Only use attachments/accessories specified by the manufacturer for installation.

•  Do not modify this product, as this affects the safety of the product. Risk of injury or damage to the product.
•  Before installation, disconnect the negative terminal of the vehicle battery to prevent damage to the product, 

fire, and/or possible injury.

Care for Your Product

•  DO NOT

 clean the product in hot weather (e.g. hot sunlight).

•  DO NOT

 use abrasive or highly alkaline cleaner on the product.

•  DO NOT

 use gasoline, acetone, carbon tetrachloride or other aggressive chemical solutions on the product.

•  DO NOT 

scrape the product with razor blade or other sharp instrument.

•  DO NOT 

use a pressure washer or pressurized water.

•  This product is water resistant. However, never submerge the product in water.

2

Содержание SB18BRGB

Страница 1: ...SB18BRGB ...

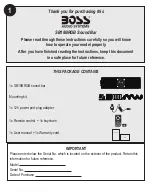
Страница 2: ...nstructions keep this document in a safe place for future reference IMPORTANT Please enter below the Serial No which is located on the exterior of the product Retain this information for future reference Model Serial No Date of Purchase 1 THIS PACKAGE CONTAINS 1x SB18BRGB sound bar Mounting kit 1x 12V power port plug adapter 1x Remote control 1x keychain 1x User manual 1x Warranty card ...

Страница 3: ...chnical support Using the product in this condition may result in permanent damage to the system Servicing must only be carried out by a technician Contact our technical support for any service question Installation Precautions WARNING Always consult a professional installer Installation must be performed by a professional Contact our technical support for any installation questions Observe the sa...

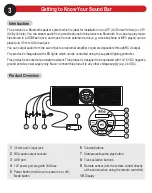
Страница 4: ...RCA output The product is integrated with LED lights which can be controlled using the supplied lighting controller This product is shockproof and water resistant This product is designed to be operated with 10 16 VDC negative ground vehicle power supply only Never connect this product to any other voltage supply e g 24 VDC Product Overview 1 2 3 4 9 10 8 7 6 5 1 3 5mm audio input jack 2 RCA audio...

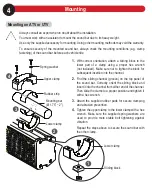
Страница 5: ... orientation attach a sliding block to the lower part of a clamp using a proper hex wrench not included Make sure not to tighten the block for subsequent insertion into the channel 2 Find the sliding channel groove on the top panel of the sound bar Correctly orient the sliding block and insert it into the channel from either end of the channel Then slide the clamp to a proper position and tighten ...

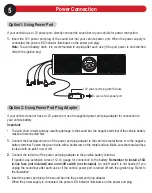
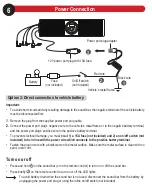
Страница 6: ...age to the sound bar the negative terminal of the vehicle battery must be disconnected first 1 Connect the black ground wire of the power port plug adapter to the vehicle s metal frame or to the negative battery terminal Fasten the ground wire with a bolt screw on the metal surface Make sure the metal surface is clean with no paint rust or dirt 2 Connect the red wire of the power port plug adapter...

Страница 7: ...nd the power port plug s positive wire to the positive battery terminal To prevent electrical damage you must install 1 a 15A fuse not included and 2 an on off switch not included to be in line with the power wire which connects to the positive battery terminal Fasten the ground wire with a bolt screw on the metal surface Make sure the metal surface is clean with no paint rust or dirt 11Turn on or...

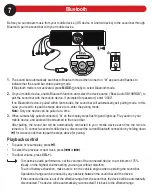
Страница 8: ...he display stops flashing and lights up Play audio on your mobile device and audio will be streamed to the sound bar After pairing the sound bar will be automatically connected to your mobile device each time the two are turned on To connect a second mobile device disconnect the current Bluetooth connection by holding down for two seconds then repeat the steps above for pairing 12Playback control ...

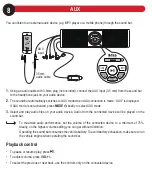
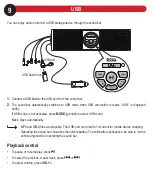
Страница 9: ...DE briefly to select AUX mode 3 Select and play audio files on your audio device Audio from the connected device will be played on the sound bar To maximize audio performance set the volume of the connected device to a minimum of 75 Ideally on the highest volume setting you can get without distortion Operating the sound bar consumes the vehicle battery To avoid battery exhaustion make sure to run ...

Страница 10: ...efly If USB mode is not activated press MODE briefly to select USB mode Music plays automatically MP3 and WMA files are playable The USB port can provide 1A current for mobile device charging Operating the sound bar consumes the vehicle battery To avoid battery exhaustion be sure to run the vehicle engine when operating the sound bar 14Playback control To pause or resume play press To select the p...

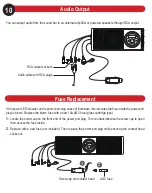
Страница 11: ... not illuminate this indicates the fuse inside the power port plug is blown Replace the blown fuse with a new 10AAGC fuse glass cartridge type 1 Locate the screw cap on the front end of the power port plug Turn counterclockwise the screw cap to open then access the fuse inside 2 Replace with a new fuse not included Then replace the power port plug while ensuring the contact head sticks out Screw c...

Страница 12: ...ination change the illumination intensity 7 SYN Enable or disable lights flashing to music When enabled SPEED buttons are invalid Playback control buttons A For Bluetooth and USB select the previous or next track B VOL Increase or decrease volume C EQ Select a preset sound mode D Start pause or resume music play E MODE Select a mode Bluetooth AUX and USB 11 1Important notes on battery Observe corr...

Страница 13: ...Bluetooth on the device is disabled Refer to the device s user manual on how to enable Bluetooth Make sure the device is within range The sound bar is already connected with another Bluetooth device Disconnect the current Bluetooth connection Bluetooth has been disconnected for more than seven minutes manually reconnect Bluetooth through your mobile device Audio quality from Bluetooth connection i...

Страница 14: ... x 1 25 mm soft dome Amplifier Amplifier class Class A B full range Input impedance 10 kΩ Frequency response 45 Hz 22 kHz Connectivity USB USB A MP3 WMA playable USB charging 1A AUX 3 5 mm jack for audio input RCA RCA sockets for audio output General Input voltage 12 VDC allowable 10 16 VDC Current draw 6A MAX Fuse 10A AGC type Clamp size range O D 1 75 2 Weight 8 2 lbs 3 7 kg Dimension drawing 18...

Страница 15: ...0522 ...
Отзывы: