background image

37

      309416

                                                                                                                                                01/31/2012

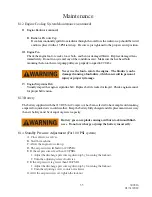
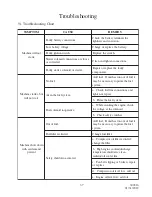
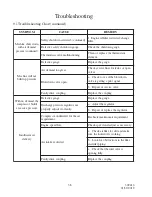
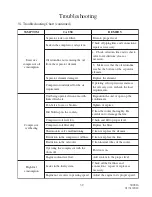
Troubleshooting

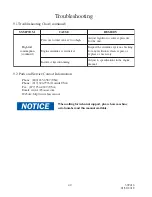
9.1 Troubleshooting Chart

M

O

T

P

M

Y

S

E

S

U

A

C

Y

D

E

M

E

R

t

o

n

l

l

i

w

e

n

i

h

c

a

M

k

n

a

r

c

.

s

n

o

i

t

c

e

n

n

o

c

y

r

e

t

t

a

b

y

t

l

u

a

F

r

o

f

s

l

a

n

i

m

r

e

t

y

r

e

t

t

a

b

e

h

t

k

c

e

h

C

.

n

o

i

s

o

r

r

o

c

d

n

a

s

s

e

n

t

h

g

i

t

.

e

g

a

t

l

o

v

y

r

e

t

t

a

b

w

o

L

.

y

r

e

t

t

a

b

e

h

t

e

c

a

l

p

e

r

r

o

e

g

r

a

h

C

.

h

c

t

i

w

s

n

o

i

t

i

n

g

i

y

t

l

u

a

F

.

h

c

t

i

w

s

e

h

t

e

c

a

l

p

e

R

e

s

o

o

l

e

r

a

s

n

o

i

t

c

e

n

n

o

c

d

i

o

n

e

l

o

s

r

e

t

r

a

t

S

.

d

e

d

o

r

r

o

c

r

o

.

s

n

o

i

t

c

e

n

n

o

c

n

e

t

h

g

i

t

d

n

a

n

a

e

l

C

.

r

e

t

r

a

t

s

r

o

d

i

o

n

e

l

o

s

r

e

t

r

a

t

s

y

t

l

u

a

F

y

t

l

u

a

f

e

h

t

e

c

a

l

p

e

r

r

o

r

i

a

p

e

R

.

s

t

n

e

n

o

p

m

o

c

t

u

b

,

s

k

n

a

r

c

e

n

i

h

c

a

M

t

r

a

t

s

t

o

n

l

l

i

w

.l

e

u

f

o

N

t

i

l

e

u

f

f

o

t

u

o

n

u

r

s

a

h

t

i

n

u

f

I

.l

e

u

f

d

d

A

l

e

u

f

e

h

t

e

m

i

r

p

o

t

y

r

a

s

s

e

c

e

n

e

b

y

a

m

.

m

e

t

s

y

s

.

m

e

t

s

y

s

l

e

u

f

e

h

t

n

i

r

i

A

d

n

a

s

n

o

i

t

c

e

n

n

o

c

e

n

i

l

l

e

u

f

k

c

e

h

C

.

a

.

r

i

a

p

e

r

r

o

n

e

t

h

g

i

t

.

m

e

t

s

y

s

l

e

u

f

e

h

t

e

m

i

r

P

.

b

.

e

v

i

t

a

r

e

p

o

n

i

d

i

o

n

e

l

o

s

l

e

u

F

k

c

e

h

c

;

e

n

i

g

n

e

e

h

t

g

n

i

k

n

a

r

c

e

l

i

h

W

.

a

.

d

i

o

n

e

l

o

s

e

h

t

t

a

e

g

a

t

l

o

v

r

o

f

.

s

e

h

c

t

i

w

s

y

t

e

f

a

s

k

c

e

h

C

.

b

n

w

o

d

s

t

u

h

s

e

n

i

h

c

a

M

d

n

a

m

e

d

r

i

a

h

t

i

w

t

n

e

s

e

r

p

.l

e

u

f

f

o

t

u

O

t

i

l

e

u

f

f

o

t

u

o

n

u

r

s

a

h

t

i

n

u

f

I

.l

e

u

f

d

d

A

l

e

u

f

e

h

t

e

m

i

r

p

o

t

y

r

a

s

s

e

c

e

n

e

b

y

a

m

.

m

e

t

s

y

s

.

d

e

t

c

i

r

t

s

e

r

r

e

t

l

i

f

l

e

u

F

.

r

e

t

l

i

f

l

e

u

f

e

g

n

a

h

C

.

d

e

t

a

v

i

t

c

a

n

w

o

d

t

u

h

s

y

t

e

f

a

S

;

d

e

t

c

i

r

t

s

e

r

r

e

t

l

i

f

l

i

o

r

o

s

s

e

r

p

m

o

C

.

a

.

r

e

t

l

i

f

e

h

t

e

g

n

a

h

c

e

g

r

a

h

c

s

i

d

/

t

n

a

l

o

o

c

e

n

i

g

n

e

h

g

i

H

.

b

n

a

e

l

c

;

n

w

o

d

t

u

h

s

e

r

u

t

a

r

e

p

m

e

t

.

s

n

i

f

r

e

l

o

o

c

l

i

o

/

r

o

t

a

i

d

a

r

r

i

a

p

e

r

;

n

e

k

o

r

b

r

o

g

n

i

p

p

i

l

s

t

l

e

b

n

a

F

.

c

.

e

c

a

l

p

e

r

r

o

.l

i

o

d

d

a

;

w

o

l

l

e

v

e

l

l

i

o

r

o

s

s

e

r

p

m

o

C

.

d

.l

i

o

d

d

a

;

w

o

l

l

e

v

e

l

l

i

o

e

n

i

g

n

E

.

e

Содержание 210 DUS JD4045

Страница 1: ...in a safe and convenient location for future reference For technical support Phone 800 635 6587 USA Phone 219 324 7776 Outside USA Fax 877 254 4249 USA Email service bossair com Website http www bossair com Service and Maintenance Manual 210 DUS JD4045 IT4 74HP Air Compressor 309416 05 03 2013ARB ...

Страница 2: ...2 309416 01 31 2012 ...

Страница 3: ...eparator Tank 15 Separator Element 15 5 5 Pressure Relief Valve 16 5 6 Engine Air Filter 16 5 7 Compressor Air Filter 16 5 8 Cooling Systems 16 Engine Radiator 16 Compressor Oil Cooler 16 5 9 Compressor Oil Filter 16 5 10 Compressor Oil Thermal Valve 16 5 11 Compressor Inlet Valve 17 5 12 Minimum PressureValve 17 5 13 Blowdown Valve 17 5 14 Blowdown Switch 17 5 15 Discharge Pressure Regulator Valv...

Страница 4: ...and Low Temperature Fuel 20 Cold Weather Fuel 20 6 5 Connecting the Air Discharge Lines 20 6 6 Pre Startup Inspection 20 6 7 Machine Documentation 21 6 8 Check Fluid Levels 21 6 9 Initial Startup Preparation 21 6 10 Initial Startup 22 Operation 23 24 7 1 Routine Operating Procedures 23 Routine Startup Preparation 23 Routine Startup Procedure 23 Routine Shutdown Procedure 23 7 2 Emergency Shutdown ...

Страница 5: ...sureAdjustment For 100 PSI System 35 8 15 Idle SpeedAdjustment 36 8 16 Rated SpeedAdjustment 36 Troubleshooting 37 40 9 1 Troubleshooting Chart 37 9 2 Parts and Service Contact Information 40 Warranty 41 45 10 1 Warranty Policy 41 10 2 Summary of MainWarranty Provisions 42 10 3 Warranty Return Goods Instructions 43 10 4 Warranty Claims Preparation of Part Return 43 10 5 Return orWarranty Claims Fi...

Страница 6: ... 01 31 2012 Parts and Illustration Section continued 46 63 11 5 Cooling System 54 11 6 Electrical System 56 11 7 Canopy System 58 11 8 Decal System 60 11 9 Hose System 62 11 10 SystemWiring Diagram 63 Contents ...

Страница 7: ...7 309416 01 31 2012 Manual Change History E T A D N O I T A C O L E G N A H C F O N O I T P I R C S E D S L A I T I N I 1 1 Revision List ...

Страница 8: ...own highdischargepressure shutdown automaticblowdowndevice pressure reliefvalve highenginecoolanttemperature low engineoilpressure andclearlydisplayedwarning informationdecals 2 1 General Information Thank you for choosing the 210 DUSAir Compressor Before operating this system read over this manual and become well acquainted with your newmachine Doingthiswillincreaseyoursafetyandmaximizethelife of...

Страница 9: ...ioninefficiency andworstofall LossofLife Watch for safety hazards and correct them promptly Understanding the proper operation of this equipment is critical to its safe operation The owner lessor and or operator of this equipment is hereby notified and forewarned that any failure to observe the safetyandoperatingguidelinesmayresultininjuryand ordamage BossIndustries Inc expressly disclaimsresponsi...

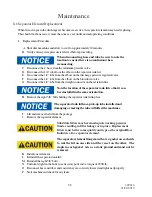
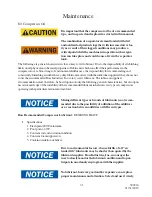
Страница 10: ...temcom ponents as this can cause the unit to ignite or explode during operation Keep combustibles out of and away fromsysteminletsandanyassociatedenclosures Never disable override or remove safeties either tempo rarilyorpermanently Thefollowingsafetyprecautionsareageneralguidetosafeoperationoftheequipment Systemcontainshotoil Thesystemmustbeshutoffprior to servicing Then permit system to cool down...

Страница 11: ...pproved replacement parts Check engine s operator manual for required service andmaintenanceintervals Never place machine on a grade more than 15 degrees Keep doors closed on the machine during operation Thismachineisequippedwithsafetyunloading system to prevent damage to the compressor drive coupling Should an attempt be made to start this systemimproperly themachinewillrununloadedfor 60 seconds ...

Страница 12: ...ectrical Shock Hot Pressurized Oil Close Doors OilLevel Thismachineissuppliedwithafullcomplementofsafetyandidentificationdecals Thesedecalsare affixedtotheunitduringfinalassembly Thesedecalsmustbeclearlyvisibleandundamaged Should anyofthesedecalsbecomeillegibleordamaged immediatelyreplacethedecal ...

Страница 13: ...13 309416 01 31 2012 Safety 3 3 Safety and Information Decals continued Overfill Negative Ground System Serial Tag Compressor Oil Hot Coolant BreathingAir ...

Страница 14: ... 0 0 2 5 2 1 2 5 2 3 2 0 0 4 2 d n e r i A r o s s e r p m o C o i t a R r a e G 5 0 3 h t i w G 0 1 A C S e n i g n E 4 7 P H D J 5 4 0 4 M I R T N I R E I T 4 E A S W B E V I R D X U A m e t s y S l a c i r t c e l E e n i g n E C D V 2 1 s n o i s n e m i D e s a B 2 1 0 7 X 0 3 X 8 5 4 8 k n a T l e u F l e s e i D l a n o i t p O P A C L 0 4 1 L A G 7 3 M I D 5 6 X 0 3 X 8 7 e l g n A g n i t...

Страница 15: ...wo helical grooved rotors mesh to compress air Inlet air is trapped as the male lobes roll down the female grooves pushing trapped air along compressing it until it reaches the discharge port at the end of the stator which deliverssmooth flowing pulse freeair Beinganoilfloodedsystem theoilservesthreepurposes lubricates the rotating parts and bearings serves as a cooling agent for the compressed ai...

Страница 16: ... is a two stage dry type intake filter with a gravity evacuator and replaceable internalelement Ontheoutletofthecompressorairfilterisanairfilterrestrictionindicator This indicator serves as a maintenance tool 5 8 Cooling Systems I EngineRadiator The radiator is designed to dissipate the heat load of the engine and is mounted in front of the specially selected engine fan Hot engine coolant is passe...

Страница 17: ...stamped with an I and a P The I side is connected to dry air from the separator tank and the P side is the pilot signal coming from the compressor inlet valve 5 15 Discharge Pressure Regulator Valve This valve located downstream of the separator element is used to set the desired discharge pressure Thisvalvewillsendapneumaticsignaltotheinletvalvetostartclosingwhenthepressureexceedsthe setpoint Thi...

Страница 18: ...ressor discharge temperature When the temperature reaches 245 F thesystemwillshutdown Duringoperation thedischargetemperatureshouldbeapproximately 170 F to 190 F V Hourmeter The hourmeter records the total number of operating hours It serves as a guide in following the recommendedmaintenanceschedule Thehourmeterwillonlyrunwhentheengineisoperating VI Voltmeter Thisfeaturedisplaysthevoltageofthebatt...

Страница 19: ...al State and Local codes or requirements in addition to Boss Industries Inc and any company s regulations Donotmodifythissystemexceptwithwrittenfactoryapproval 6 2 Placing The Machine Thefirststepininstallingthe210DUSAirCompressorisplacingthesystemonasolid levelsurface This machine is designed to run at up to a 15 grade maximum The machine must be supplied ample ambientair asthesystemwilloverheati...

Страница 20: ...point is the temperature at which wax crystals begin to form in dieselfuel The viscosity of the fuel must be kept above 1 3 centistoke to provide adequate fuel system lubrica tion UseASTM No 2D fuel with a minimum cetane number of 40 No 2 diesel fuel gives the best economy and performance under most operating conditions See engine manufactures operators instruction manual for the proper engine fue...

Страница 21: ...rmaincomponentsinthesystem I MachineSerialNumber __________________________________________ II CompressorAirend Serial Number __________________________________________ III EngineSerialNumber __________________________________________ IV Separator Tank Serial Number __________________________________________ Themachineisfactoryfilledpriortoshipment Theproperfluidlevelsarealsolistedinthemaintenance...

Страница 22: ...lanttemperaturereaches190 F VI Check for leaks again VII Verify the engine speed is 1800 RPM VIII Open an air service valve and verify the speed increases to 2400 RPM IX Close the service valve X Rotate the unloader valve to UNLOAD XI Allow engine to idle until the air pressure has dropped below 50 PSI XII Turntheignitionswitchtothe OFF position XIII Initialstartuptestingiscomplete Installation Th...

Страница 23: ...ctions for corrosion F Checktheconditionoftheenginefanbelt G Check for fuel oil and or coolant leaks II Routine Startup Procedure A Verify the unloader valve is in the UNLOAD position and all service valves are closed B Hold down the bypass switch and turn the ignition switch to START C Whenenginestarts releasetheignitionswitchandcontinueholdingbypassswitchuntiltheoil pressure has exceeded 30PSI D...

Страница 24: ...lem has been properly resolved I EmergencyShutdownProcedure A Flip up the red emergency stop switch cover on the instrument panel B Flipthetoggleswitchuptoimmediatelyshutdownthemachine C Once the machine has stopped flip the shutdown switch and cover back down D Fixtheproblemthatrequiredtheemergencyshutdown E Remove the side panel and replace the 20 amp fuse on the rear of the instrument panel Shu...

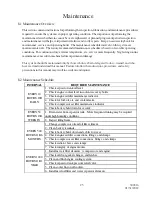
Страница 25: ...injuries 8 1 Maintenance Overview 8 2 Maintenance Schedule INTERVAL REQUIRED MAINTENANCE 1 Check separator tank oil level 2 Check engine coolant levelin coolant recovery bottle 3 Check engine air filter maintenance indicator 4 Check for fuel oil air and coolant leaks 5 Check compressor air filter maintenance indicator 6 Check battery hold down for security 1 Drain water from separator tank More fr...

Страница 26: ... r i A r o s s e r p m o C 5 9 0 7 0 3 t i K r i a p e R l a e S t f a h S G 0 1 A C S Phone 800 635 6587 USA Phone 219 324 7776 Outside USA Fax 877 254 4249 USA Email service bossair com Website http www bossair com 8 3 Recommended Spare Parts List 8 4 Parts and Service Contact Information Check engine s operator manual forrequired service and maintenance intervals Compressor oil and oil filter i...

Страница 27: ...27 309416 01 31 2012 8 5 Maintenance Log Maintenance Accum Hours Date Service Performed Parts Replaced Service Work By ...

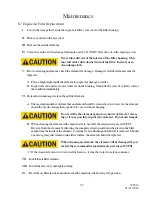
Страница 28: ...move the separator element K Installanewelement L Reinstalltheseparatortanklid M Reinstalltheeight5 8 bolts N Uniformly tighten the bolts in a crisscross pattern to a torque of 220ft lb O Reconnect hose and tubes and ensure they are correctly located and tightened properly P Start machine and check for any leaks Substitute filters may have inadequate working pressure limits resulting in filter lea...

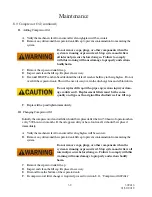
Страница 29: ...the element with compressed air never let the air pressure exceed 30 PSI Reverse flush the element by directing the compressed air up and down the pleats in the filter mediafromtheinsideoftheelement Continuereverseflushinguntilalldustisremoved Should any oil or greasy dirt remain on the filter surface the element should be replaced Do not strike the element against any hard surfaces for clean ing ...

Страница 30: ...ndicatorandthemachinewillbereadyforoperation B When cleaning the element with compressed air never let the air pressure exceed 30 PSI Reverse flush the element by directing the compressed air up and down the pleats in the filter mediafromtheinsideoftheelement Continuereverseflushinguntilalldustisremoved Should any oil or greasy dirt remain on the filter surface the element should be replaced Do no...

Страница 31: ...ust and corrosion inhibitors 4 Contains foam suppressors 5 Containsoxidationstabilizer It is important that the compressor oil be of a recommended type and inspected and replaced as started in this manual The combination of a separator element loaded with dirt and oxidized oil products together with increased air veloc ity as a result of this clogged conditions may produce a critical point while t...

Страница 32: ... before doing so Failure to comply with this warning will cause damage to property and serious bodily harm 8 9 Compressor Oil continued C Remove the separator tank fill cap D Inspect and clean the fill cap Replace if necessary E Dexron IIIATF can then be added until the oil level reaches halfway in the sightglass Do not over fill the separator tank This will cause oil carryover in the discharge li...

Страница 33: ...ay distort the threads or damage the filter element seal H Replacefillcapandtightenimmediately I Run system briefly to see if more oil needs to be added and to ensure there are no leaks Do not replace fill cap with a pipe cap serious injury or dam age could result Replacement filters must be the same quality and type as the original Boss Industries Inc fill cap 8 10 Compressor Oil Cooler Any sign ...

Страница 34: ...centration level should not exceed recommended levels To do so can cause coolingsystemfailure 1 Amixture of 50 antifreeze and 50 water is required for temperatures above 34 F 2 Amixture of 60 antifreeze and 40 water is required for temperatures below 34 F This provides protection to 65 F 3 Never exceed a 60 overall antifreeze mix C CoolantLevel Before each start up when radiator is cold the coolan...

Страница 35: ...rflow the radiator cap should be tested and or replaced with a 13 PSI rated cap Be sure cap is tightened to the proper secure position III EngineFan Check the engine fan for cracks loose bolts and bent or damaged blades Replace damaged fans immediately Do not run system if any of the conditions exist Make sure the hex head bolts mounting the fan to the water pump pulley are properly torqued to 29 ...

Страница 36: ...ischarge pressure gauge reads the desired working pressure Verify that air is not bleeding out of the bottom of the discharge pressure regulator If air is bleed ing out the standby pressure is set too high Follow the steps in section 8 14 for reducing the standby pressure VI Loosen the adjustment locknut on the adjustment screw towards the front of the engine VII Turn the adjustment screw clockwis...

Страница 37: ...s m e t s y s l e u f e h t n i r i A d n a s n o i t c e n n o c e n i l l e u f k c e h C a r i a p e r r o n e t h g i t m e t s y s l e u f e h t e m i r P b e v i t a r e p o n i d i o n e l o s l e u F k c e h c e n i g n e e h t g n i k n a r c e l i h W a d i o n e l o s e h t t a e g a t l o v r o f s e h c t i w s y t e f a s k c e h C b n w o d s t u h s e n i h c a M d n a m e d r i a ...

Страница 38: ...a v e v l a v e c i v r e s r o r i a p e R b g n i l p u o c e v i r d y t l u a F g n i l p u o c e h t e c a l p e R e h t d n a m e d o n h t i W s d l i u b r o s s e r p m o c e r u s s e r p e v i s s e c x e e g u a g e v i t c e f e D e g u a g e h t e c a l p e R t o n r o t a l u g e r e r u s s e r p e g r a h c s i D y t l u a f r o d e t s u j d a y l r e p o r p r o t a l u g e r e ...

Страница 39: ...p o g n i e b t i n U r i a h s e r f d e t i m i l e h t p u n e p o r o t i n u e h t n o i t i s o p e R t n e m e n i f n o c n e k o r b r o e s o o l s i t l e b n a F e c a l p e r r o n e t h g i T s r e l o o c e h t n o p u d l i u b t r i D e B y l h g u o r o h t r e l o o c e h t n a e l C s n i f e h t e g a m a d o t t o n l u f e r a c w o l l e v e l l i o r o s s e r p m o C l e ...

Страница 40: ...U A C Y D E M E R l e u f h g i H n o i t p m u s n o c d e u n i t n o c h g i h o o t t e s e v l a v t e l n i o t e r u s s e r P e r u s s e r p t c e r r o c o t r o t a l u g e r t s u j d A t i n u e h t r o f d e t c i r t s e r s i e k a t n i r i a e n i g n E g n i k c e h c m e t s y s e k a t n i r i a e h t t c e p s n I r o r i a p e r n a e l c n o i t c i r t s e r y n a r o f y ...

Страница 41: ...ne 1 year This warranty does not cover damage caused by accident misuse or negligence If the compressor unit is disassembled the warranty is void BOSS s sole responsibility and Buyer sexclusiveremedyhereunderislimitedtosuchrepair replacement orrepaymentofthepurchase price Parts not of BOSS manufacture are warranted only to the extent that they are warranted by the originalmanufacture BOSSshallhave...

Страница 42: ...ervice report for each occurrence of material defect of defectiveworkmanshipwillcausewarrantyclaimtoberejected Defectivematerialmustbereturnedwithin30daysofreceiptofshippinginstructions Failuretodoso withinspecifiedtimewillresultinforfeitureofclaim Thedistributorisresponsiblefortheinitialinvestigationandwriteupofthewarrantyclaim Distributor shall be allowed no more than 30 days from date of repair...

Страница 43: ...package 1 ReturnGoodsAuthorization 2 Distributor or end users return address 3 Correct factory address 4 Number of packages pertaining to each claim NOTE Our warranty requires that all defective parts be returned to BOSS INDUSTRIES freight prepaid Items sent without RGAnumber will not be accepted Unauthorized Returns Will Immediately Be Refused At Dock 10 5 Return or Warranty Claims Filing Procedu...

Страница 44: ...w hoursofoperation Responsibilityforthesafedeliveryofthekitorfactoryinstalledunitwasassumed bythecarrieratthetimeofshipment Therefore claimsforlossordamagetothecontentsofthekitor factoryinstalledunitshouldbemadeuponthecarrier 2 Concealed loss or damage Concealed loss or damage means loss or damage which does not become apparent until the kit is unpackedorthefactory installedunitisrunbytheend user ...

Страница 45: ...le from the factory For current prices and availability contact BOSS INDUSTRIES Inc oranauthorizedBOSSINDUSTRIESdistributor PricesareF O B shippingpoint Pricesdonotincludelaborforremovalorinstallation Warranty 10 8 Screw Compressor Airend Exchange Program ...

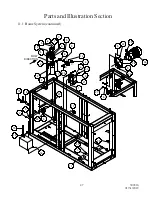
Страница 46: ...T 8 1 901515 030 ELBOW 9 1 960412 075 NIPPLE 10 1 922112 020 NIPPLE 11 1 309279 FRAME 12 1 306042 BRACKET 13 1 301662 VALVE 14 1 120 14966 BRACKET 15 2 120 26804 BOLT 16 1 123 66019 BATTERY 17 1 960216 100 ELBOW 18 1 922216 040 NIPPLE 19 1 125 18146 VALVE 20 2 929104 075 BOLT 21 1 150 90199 TANK 22 4 924304 145 NUT 23 2 301755 012 RELAY 24 1 961812 075 TEE 25 6 991200 031 INSERT 26 1 309408 ASSY 2...

Страница 47: ...16 01 31 2012 11 1 Frame System continued Parts and Illustration Section 11 16 4 24 25 25 1 5 4 12 8 13 6 20 5 21 1 9 6 5 7 22 23 5 19 18 17 2 3 10 7 6 5 14 15 5 7 5 27 5 22 26 5 22 28 29 A B C FLOW DIRECTION ...

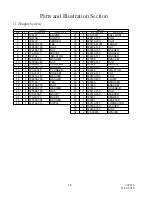
Страница 48: ... 198 NUT 23 1 150 90665 MOUNT 24 1 150 90729 MOUNT 25 8 937806 094 WASHER 26 1 922102 015 NIPPLE Parts List ITEM QTY PART NUMBER DESCRIPTION 27 1 120 19071 BALL JOINT 28 4 929216 350 BOLT 29 8 929212 300 BOLT 30 1 980704 012M ELBOW 31 1 924604 164 NUT 32 2 937808 125 WASHER 33 4 938816 350 WASHER 34 6 938604 071 WASHER 35 1 307055 BRACKET 36 8 929806 075 BOLT 37 1 301834 SWITCH 38 4 929806 125 BOL...

Страница 49: ...ystem continued Parts and Illustration Section 17 28 24 39 20 21 9 23 13 3 15 29 12 10 37 31 11 51 27 6 42 41 50 26 41 9 7 8 4 30 19 14 35 34 40 32 5 49 38 33 9 32 5 47 15 46 10 12 45 34 19 45 8 15 29 9 40 34 44 7 43 2 25 36 52 54 53 16 ...

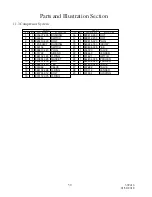
Страница 50: ...NG 9 1 970804 025 GASKET 10 4 929212 800 BOLT 11 8 938812 250 TEE 12 1 300036 VALVE 13 1 926102 238 O RING 14 1 980704 012 BOLT 15 1 973112 075 O RING Parts List ITEM QTY PART NUMBER DESCRIPTION 16 4 929212 350 BOLT 17 4 938912 200 BOLT 18 1 902915 020 PLUG 19 1 960224 150 ELBOW 20 1 980804 025 TEE 21 1 304720 VALVE 22 1 308463 SENDER 23 1 301421 SWITCH 24 1 964804 025 WASHER 25 1 960404 025 WASHE...

Страница 51: ...51 309416 01 31 2012 11 3 Compressor System continued Parts and Illustration Section 5 15 9 3 6 2 28 6 3 19 4 10 11 18 7 22 8 1 21 29 13 23 12 24 20 25 26 16 11 17 14 27 AIR FLOW ...

Страница 52: ...2915 005 PLUG 17 3 938208 112 WASHER 18 1 977604 025 ELBOW 19 1 303192 TANK 20 1 902915 010 PLUG 21 1 960320 150 ELBOW 22 1 960212 100 ELBOW 23 3 964804 025 TEE 24 1 902915 060 PLUG 25 1 988204 025 CONNECTOR 26 3 929808 125 BOLT 27 3 937808 125 WASHER 28 1 987204 025 CONNECTOR 29 1 922224 000 NIPPLE 30 1 300107 SIGHTGLASS 31 1 960124 150 CONNECTOR 32 1 301466 150 CAP 33 1 960624 150 TEE 34 1 30421...

Страница 53: ... 31 2012 11 4 Discharge System continued Parts and Illustration Section 26 24 35 6 45 41 20 28 42 8 13 23 32 30 31 34 25 43 15 9 10 12 11 23 23 4 5 1 16 12 3 19 2 40 7 14 18 41 33 29 21 27 17 44 22 38 39 37 36 P I ...

Страница 54: ...1 1 309283 COOLER ASSY 2 1 309303 SHROUD 3 10 938004 062 WASHER 4 14 938604 071 WASHER 5 1 902915 010 PLUG 6 6 929105 100 BOLT 7 6 938205 071 WASHER 8 6 938005 078 WASHER 9 10 929104 075 BOLT 10 1 960212 100 ELBOW 11 2 309307 GUARD 12 2 924304 145 NUT 13 2 929104 100 BOLT 14 1 907604 030 BUSHING 15 1 960012 075 ELBOW ...

Страница 55: ...55 309416 01 31 2012 11 5 Cooling System continued Parts and Illustration Section 9 3 4 11 11 13 4 4 12 9 3 4 10 2 6 8 7 5 1 14 15 ...

Страница 56: ... and Illustration Section Parts List ITEM QTY PART NUMBER DESCRIPTION 1 3 924304 145 NUT 2 5 943103 025 RIVET 3 1 120 16580 SPRING 4 4 938604 071 WASHER 5 1 109 90240 DOOR 6 1 120 65681 EYEBOLT 7 2 983904 075 BOLT 8 1 40032 ASSY 9 1 977004 062 WASHER ...

Страница 57: ...57 309416 01 31 2012 11 6 Electrical System continued Parts and Illustration Section 2 9 4 1 4 1 4 3 6 5 7 8 ...

Страница 58: ...INSERT 10 1 307255 PANEL 11 1 307260 PANEL 12 3 307256 PANEL 13 2 307257 COVER 14 2 980100 300 CLAMP 15 1 307708 MUFFLER 16 2 304071 BAND 17 1 150 90915 CAP 18 4 304716 MOUNT 19 8 938205 071 WASHER 20 4 925505 273 NUT 21 4 938005 078 WASHER 22 4 925205 273 NUT 23 6 in 972303 010 PIPE 24 1 304038 MOD FOAM 25 3 304038 FOAM 26 2 962112 075 UNION 27 2 977515 075 CAP 28 1 309408 ASSY 29 2 929104 125 BO...

Страница 59: ...012 DETAIL A DETAIL B A B 17 23 14 15 14 18 16 19 21 22 5 6 8 9 4 7 5 6 4 30 29 28 30 31 19 20 11 13 2 25 12 3 4 6 5 3 25 12 13 12 27 27 26 10 4 6 5 25 1 33 32 11 7 Canopy System continued Parts and Illustration Section ...

Страница 60: ... 104 90029 2 4A DECAL HOT COOLANT 104 90040 1 4B DECAL HOT EXHAUST 104 90027 1 4C DECAL HUMAN AIR 104 90025 1 4D DECAL 12 VOLT 104 90032 1 4E DECAL ELECT SHOCK 104 90031 1 4F DECAL OIL RESERVOIR 104 90115 1 4G DECAL DO NOT OVERFILL 104 90120 1 4H DECAL HOT OIL 104 90112 1 4I DECAL COMPRESSOR OIL DRAIN BGB 305254 1 5 DECAL ENGINE OIL DRAIN BGB 305255 1 6 DECAL OPERATION DUS SAFETY 307688 1 7 DECAL ...

Страница 61: ...61 309416 01 31 2012 11 8 Decal System continued Parts and Illustration Section DETAIL A A 9 4B 4A 2 5 8 7 4C 9 4A 1 4E 4F 6 4D 4G 4I 3 4H ...

Страница 62: ...ER TO TEE ON THERMAL VALVE I 3 4 AIR HOSE BOTTOM OF SEPARATOR TANK TO REMOTE DRAIN J 3 4 AIR HOSE ENGINE OIL PAN TO REMOTE DRAIN K 1 4 TUBE INLET VALVE TO P PORT ON BLOWDOWN VALVE L 1 4 TUBE ELBOW ON SEPARATOR TANK TO SOLENOID ON INLET VALVE M 1 4 TUBE TEE ON REGULATOR TO ELBOW ON TURN VALVE N 1 4 TUBE TEE ON INLET VALVE TO SPEED CONTROL CYLINDER O 1 4 TUBE TEE ON REGULATOR TO TEE ON INLET VALVE P...

Страница 63: ...63 309416 01 31 2012 11 10 SystemWiring Diagram Parts and Illustration Section ...

Отзывы: