04
15
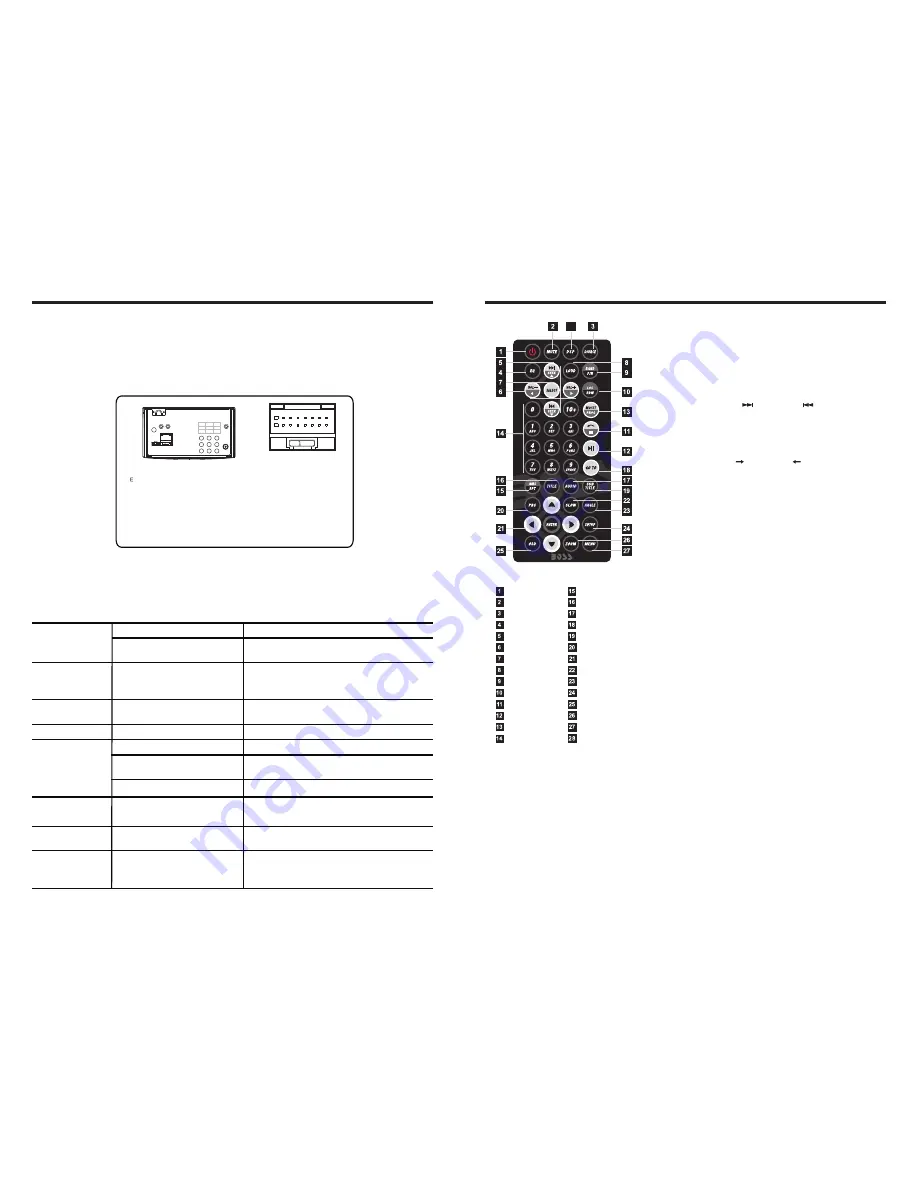
1. POWER
Press once to switch on, press again to
switch off.
2. MUTE Button
Press once to turn off audio output,
press again to resume volume level.
3. SOURCE Button
Press this button to change mode.
4. EQ Button
Press this button to choose POP
、
ROCK
、
CLASSIC
、
EQ off.
5. SEEK+ ( ) / SEEK-( ) Button
In normal playback MP3
、
USB
、
SD songs,
Press this button to previous song or next
song.
6. VOL+ ( ) / VOL- ( )
Press this button to increase or decrease
volume level.
7. SEL Button
Press this button to choose sound feature.
8. LOUD Button
Press this button to startup LOUD function.
9. BAND-P/N Button
In radio mode, press this button to choose
band.
In VCD
、
DVD mode, press this button to
choose
、
or NTSC system.
10. LOC / RDM Button
In radio mode, press this button to switch
between local and direction.
In VCD
、
CD mode, press this key to
randomly play.
11. STOP Button
Press this button to stop playing.
12. PLAY / PAUSE Button
Press this button to switch between play
and pause.
In stop mode, press this button to play.
13. ST / PROG Button
In radio mode, press this button to choose
stereo or mono station.
In audio mode, it can help STOP button to
programmed play.
PAL
AUTO
POWER ON/OFF
MUTE
SOURCE
EQ
SEEK+ / SEEK-
VOL+ / VOL-
SEL
LOUD
BAND / P / N
LOC / RDM
STOP
PLAY / PAUSE
ST / PROG
0-10+
DSP
AMS / RPT
TITLE
AUDIO
GO TO
SUBTITLE
PBC
UP / DOWN / L / R ENTER
SLOW
ANGLE
SETUP
OSD
ZOOM
MENU
28
WIRING DIAGRAM
TROUBLE SHOOTING
PROBLEM
CAUSE
SOLUTION
After ignition switch
off, setting
information all lose
Reset information and save
Change battery or fuse
Cannot power on
Change fuse same as the old one
Some factors cause MPU
wrong operation
Press RES button on the panel by penpoint,
then, power on
Poor performance
of radio station
Cannot load disk
There is a disk inside
Remove disc before inserting another one
Weak signal
Move the car to another place, then research
Cannot play disc
Disc is scratched
Change new disc
Put wrong side of disc into
the unit
Insert in the disk with sign side up
Clean lens by lens clean disc
Lens is dirty
Cannot switch
language/subtitle
There is only one language/
subtitle in disc
If disc is not with multi-language/subtitle, it
cannot switch language/subtitle
No image
Other factors cause MPU
wrong operation
Press [RES] button on the panel by penpoint,
then, power on
Cannot watch
image during
driving
It’s not allowed to watch image
during driving
Park the car in a safe place, put the car stall
in “ P ” postion, pull up the hand brake,
parking brake wire must be grounded
Check fuse
This player is equipped with ISO standard connector, please follow below instruction:
●
Yellow – 12 V Constant
●
Black – Ground wire
●
Blue - Power Antenna / Remote Amp Turn On
●
Orange – Back-Up Camera Trigger (+)
●
Red - ACC ON (+12V)
●
Parking Brake (-)
●
White/White black - Left front speaker (+/-)
●
Purple/Purple black - Right rear speaker (+/-)
●
Green/Green black - Left rear speaker (+/-)
●
Grey/Grey black - Right front speaker (+/-)
F
2
1 3
15
16
6
4
5 7 9 1113
8 10
14
12
5
1.Black GND battery -
2.Yellow BATT b
3.Red ACC switch control
4.Braking Wire
5.NC
6.CCD control
7.Blue ANT Radio automatic antenna
8.NC
9.Purple RR+ rear right s
10.Purple/black RR- rear right speaker –
11.Grey FR+ front right s
12. Grey/black FR- front right speaker –
13.White FL+ front left s
14.White/black FL- front left speaker –
15.Green RL+ rear left s
16. Green/black RL- rear left speaker –
ANT
-
FM/AM antenna
G1 - Red Rear RCA R output
G2 - White Rear RCA L output
G3 - Yellow VIDEO–OUT1
G4 - Brown Subwoofer output
G5 - Yellow Rear view input
G6 - Yellow VIDEO –OUT2
G7 - Red AUX R Audio input
G8 - White AUX L Audio input
G9 - Yellow Video input
E3
-
White Learning SWC
E1
-
Black Learning SWC GND
E2
-
Brown Learning SWC
E4
-
Dark grey with Red /White tip
Front RCA output (Right Red
Left White)
E5
-
Rear USB Plug
D
-
Media
G1
G2
G3
G4
G5
G6
G7
G8
G9
RR
R L
V
-
OUT1
V
-
OUT2
AUX-R
AUX-L
V-IN
C A M
SW
D
ANT
E
F
5
Remote
Control
Operation
Содержание BV9356I
Страница 1: ......


