background image

15

The unit is allowed to connect with external Audio / 
Video  system  such  like  Digital  Camera  or  Game 
Console. You can connect the external A/V system 
thru the A/V in jack on front panel. After connect with 
external A/V system, pressing mode to “A/V In  2” to 
enjoy this external A/V system on this unit.

7) FRONT PANEL A/V IN JACK

To Reset the DVD Setting

After releasing the front panel, use a pencil or any non-metalic object to press & hold the reset 
button for five seconds to reset the main unit  and the unit will return to the factory default settings.

ET

RE

S

RESET 

To Reset the Main Unit System

Press SET UP button on remote control or long press AS/PS button to bring 
up the SET UP Menu, select RATING then select DEFAULT, the DVD Setting 
will resume to factory default value .

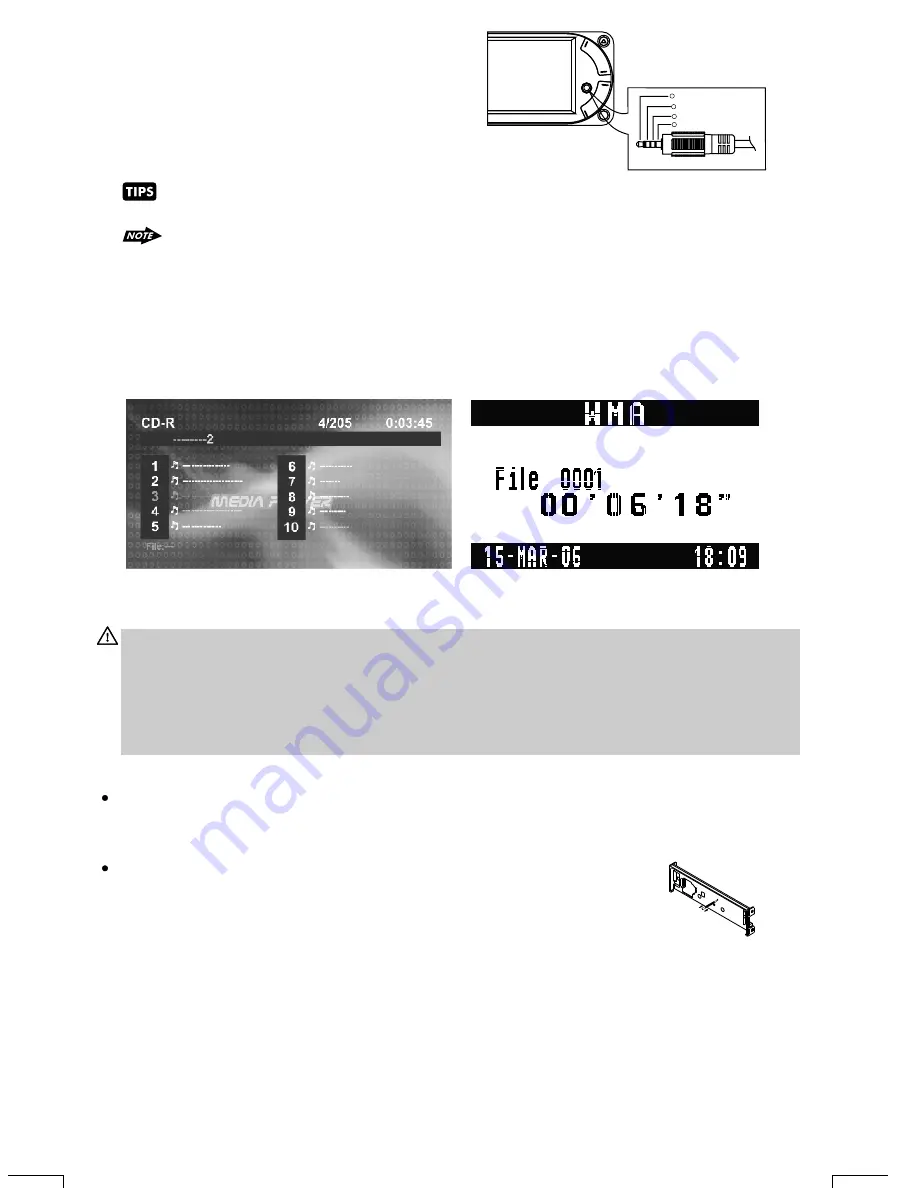
The unit is only support the 3.5mm A/V Jack Pin Assignment shown as the diagram.. 

The unit is support A/V out thru the A/V Jack on front  panel. For more details operation, 
please refer to “Menu operation-AV Jack

18) Display / Menu Button(DISP/MENU)

This DISPLAY inter-change button can be used to interchange between the 2 type of DISPLAY 
INTERFACE,  the  'Image  Display  Interface”  &  'Big  Font  Display  interface'.  This  is  useful  when 
playing a CD or MP3 or WMA or other music disc and if user prefer to see the CD Track no / MP3 File 
number and elapse time with bigger numerical fonts, the Big Font Display offer a better read out for 
the  numerical  display.  User  can  press  the  DISP  button  to  inter-change  from  Image  Display 
Interface to Big Font Display Interface. 

Image Display Interface

Big Font Display Interface

Caution:
In some countries, it's unlawful to operate a vehicle while video is displayed in the driver's viewing 
area. 

 always switch the unit's display to "Big Font Type Display" mode by pressing the 

DISP/MENU button while driving.

For safety reason, the driver should only enjoy / watch the video while the car is in parking mode.

Please

3.5mm A/V Cable ( not included )

Video

Right Audio

Left Audio

Ground

1

2

3

4

Содержание BV7970

Страница 1: ......

Страница 2: ... DIAGRAM POWER SPEAKERS 10 PANEL OPEN CLOSE OPERATION 11 CONTROL PANEL FUNCTION 12 REMOTE FUNCTION 14 BASIC OPERATIONS 18 DUAL ZONE OPERATION 19 AUDIO OPERATION 21 TUNER OPERATION 22 RDS OPERATION 23 iPod OPERATION 24 CD OPERATION 27 MP3 WMA OPERATION 30 JPEG CD OPERATION 31 DVD OPERATION 38 MEMORY CARD OPERATION 39 DivX OPERATION 41 SYSTEM SET UP MENU 47 SPECIFICATION 48 TROUBLE SHOOTING ...

Страница 3: ...TRIC SHOCK AND ANNOYING INTERFERENCE USE ONLY THE RECOMMENDED ACCESSORIES THIS DEVICE IS INTENDED FOR CONTINUOUS OPERATION This product incorporates copyright protection technology that is protected by method claims of certain U S Patents and other intellectual property rights owned by Macrovision Corporation and other rights owners Use of this copyright protection technology must be authorized by...

Страница 4: ...ED D NOTE ON REGION CODE E DISC MAINTENANCE B FORMAT CAN PLAY WITH THIS UNIT Wipe the disc surface from the center to the edge Never touch the under side of a disc Digital Versatile Discs DVDs Video CDs VCDs HDCD Digital Versatile Discs Recordable DVD R Digital Versatile Discs Rewritable DVD RW Compact Discs CDs CD Recordable CD R CD Rewritable CD RW AUDIO FORMAT Playback CD DA and MP3 or WMA digi...

Страница 5: ...items below If something is missing contact the store where you purchased the player Remote control Lithium Battery 3V 2 20 R 5 C Audio Video cable Half Sheeve Insert Key 1 Dashboard 2 Nut 5mm 3 Spring washer 4 Screw 4X12mm 5 Screw 6 Support Strap 7 Plain washer 1 7 4 2 3 5 6 Owner s anual m Owner s Manual a ra W r nty a C rd Warranty Card ...

Страница 6: ...ot air from heater or where it would be subject to dust dirt or excessive vibration Be sure to remove the front panel before installing the unit DIN FRONT REAR MOUNT This unit can be property installed either from Front conventional DIN Front mount or Rear DIN Rear mount installation utilizing threaded screw holes at the sides of the unit chassis For details refer to the following illustrated inst...

Страница 7: ...g and half sleeve are not used for method B installation a Frame b Insert fingers into the groove in the front of frame and pull out to remove the frame When re attaching the frame point the side with a groove down wards and attach it c Insert the levers supplied with the unit into the grooves at both sides of the unit as shown in figure until they click Pulling the levers makes it possible to rem...

Страница 8: ... it The rear connector that connects the main unit and the D C P is an extremely important part Be careful not to damage it by pressing on it with fingernails pens screwdrivers etc Note If the D C P is dirty wipe off the dirt with soft dry cloth only And use a cotton swab soaked in isopropyl alcohol to clean the socket on the back of the D C P 1 Turn the Power off 2 Press the Panel Release Button ...

Страница 9: ... W OUT SUB WOOFER OUTPUT 2nd AUDIO OUTPUT BLUE 2nd AUDIO OUT ORANGE VIDEO IN YELLOW AUDIO IN R AUDIO INPUT RIGHT AUDIO IN L AUDIO INPUT LEFT VIDEO OUT 1 VIDEO 1 OUTPUT VIDEO OUT 2 VIDEO 2 OUTPUT RED WHITE YELLOW YELLOW VCR or DVD or GAME CONSOLE FUSE CAMERA VIDEO INPUT ...

Страница 10: ...OLTS RIGHT FRONT PRE AMPLIFIER LINE OUT FRONT PRE AMPLIFIER LINE OUT COMMON RIGHT FRONT SPEAKER RIGHT REAR SPEAKER RIGHT REAR SPEAKER LEFT REAR SPEAKER IGNITION ACC REAR PRE AMPLIFIER LINE OUT COMMON RIGHT REAR PRE AMPLIFIER LINE OUT ISO CONNECTOR WIRING CHART PIN WIRE COLOR FUNCTION LABEL A4 A5 A7 A8 B1 B2 B3 B4 B5 B6 B7 YELLOW BLUE RED BLACK VIOLET VIOLET BLACK GREY GREY BLACK WHITE WHITE BLACK ...

Страница 11: ...n the panel if a CD is loaded it will be ejected automatically No further key press is needed If the ejected CD is not being removed after 10 seconds it will be reloaded automatically And the panel will automatically slide up after disc has been reloaded Warning If the ejected disc remains in the slot the Open button will not function so closing the panel by using Open button is prevented unless t...

Страница 12: ...Down Tune Down File Track Down Mute Audio Menu OSD Band Set up Set up Ok Repeat Track Repeat Disc Repeat Off Repeat Chapter Repeat Title Repeat Off Stop Stop DVD Audio Panel Release button Memor y 2 Memor y 3 Memor y 4 Memor y 5 Memor y 6 Fast Forward Fast Backward Fast Backward Panel Release button Short Press Long Press Short Press Long Press Short Press Long Press 2 Zon e Sub W Ix bass Parking ...

Страница 13: ...de Volume Up Fast Forward Tune Up Tune Down Left Right Up Down Seek Up Seek Down Track Up Track Down File Up File Down Next Back Ok Ok Ok Track NO Access Track NO Access Track NO Access Track NO Access File NO Access Numeric 1 File NO Access File NO Access File NO Access Numeric 2 Numeric 3 Numeric 4 Left Right Up Down Left Right Up Down Stop Stop Stop Volume Down Fast Forward Fast Forward Fast Ba...

Страница 14: ...ess File NO Access Numeric 9 Numeric 0 iX Bass Band M6 Track NO Access Track NO Access 24 25 26 Track NO Access File NO Access File NO Access File NO Access Numeric 6 Numeric 7 Numeric 8 Sub W M5 23 Track NO Access File NO Access Numeric 5 Memory 5 Short Press Long Press Short Press Long Press Short Press Long Press Short Press Long Press Memory 6 Numeric 10 Track NO Access File NO Access 1 9 10 5...

Страница 15: ...evel and Low Pass Filter control will only appear in the Audio Menu only if the Subwoofer function is currently activated On 10 iX BASS BUTTON iX BASS Long Press the iX Bass button to turn on the IX Bass function and iX Bass will appear in the LCD display for 3 seconds Press the iX Bass button again to turn off the IX Bass function Please refer to the related description in Audio Operation of iX B...

Страница 16: ...ru the A V Jack on front panel For more details operation please refer to Menu operation AV Jack 18 Display Menu Button DISP MENU This DISPLAY inter change button can be used to interchange between the 2 type of DISPLAY INTERFACE the Image Display Interface Big Font Display interface This is useful when playing a CD or MP3 or WMA or other music disc and if user prefer to see the CD Track no MP3 Fi...

Страница 17: ... the vehicle is in Reverse Gear Backup mode the front in dash TFT display will automatically switch to Back Up Camera Video signal regardless whatever mode is currently displayed on the front in dash TFT If connected to a back up camera system but this option is selected to OFF mode User still can press the mode button to switch AV In 1 to display the Back Up Camera Video on the front in dash TFT ...

Страница 18: ...rear speaker s audio output will be TURNED OFF This function is useful while listening with the HEADPHONE and user doesn t need Rear Speakers sounds output through rear speakers Select ON to reactivate the rear speakers sound output Inter Amplifier On Off Inter Amp This is a option selection for user to turn the unit s built in Amplifier system on or off OFF is the default setting This option is u...

Страница 19: ...etween the F Zone Front and the R Zone Rear sources If Front Zone F Zone is selected user have 10 seconds to use the Volume UP DOWN button to navigate through different modes Tuner DVD AV 1 AV 2 are available for selection for Front AV Output If Rear Zone R Zone is selected user have 10 seconds to use the Volume UP DOWN button to navigate through different modes Tuner DVD AV 1 AV 2 are available f...

Страница 20: ...w Pass Filter LPF User has 5 seconds to use the encoder volume knob to select the 4 different Low Pass filter Flat 80Hz 120Hz or 160Hz The Sub woofer LPF control is only applicable if the unit is equipped with the optional sub woofer line out and only if the unit is connected to an optional sub woofer speaker The Sub woofer LPF option will only appear in the Audio Menu if the Sub woofer function i...

Страница 21: ...djust the desired Treble level range from 6 to 6 encoder Treble CFQ Freq User has 5 seconds to use the encoder volume knob to adjust the desired Treble center frequency to 10KHz 12 5KHz 15KHz or 17 5KHz BALANCE User has 5 seconds to use the encoder volume knob to adjust the Balance between the right and left speakers from R12 full right to L12 full left C00 represents an equal balance between the ...

Страница 22: ...ing button for less than 3 seconds to move to next station automatically 20 21 TUNING UP DOWN BUTTON 12 17 PRESET STATIONS BUTTONS Six numbered preset buttons store and recall stations for each band 11 AUTOMATICALLY STORE PRESET SCAN AS PS Automatically select 6 strong stations and store them in the current band Select a band If needed Press AS PS button for more than three seconds The new station...

Страница 23: ...w Lost TP TA TA seek will automatic activate and searches to another TA station 3 PTY Function Pressing PTY TA button more than 3 seconds to go into PTY select mode The user now has 5 seconds to select the desired PTY item by using encoder vloume knob Once selected the PTY item user have 5 seconds to press AUDIO CENTER or TUNE UP or TUNE DOWN buttons 3 seconds to seek for the selected PTY item The...

Страница 24: ...UT setting please refer to Menu operation AV Jack Noted of iPod Video Playback on this unit Before starting the iPod Video Playback on this unit please make sure to have the iPod Video setting as follow 1 Go to the Videos Menu of the iPod Video 2 Go to the Video Settings 3 Go to the TV OUT set it to ON 4 Then select on the iPod Video the Video file you would like to play press Play Please always f...

Страница 25: ... 1 1 VCD 2 0 and audio CD 3 Pressing STOP twice is resume playback from the beginning of the disc 18 STOP To operates CD function through the following keys on the remote control Audio CD Operation TFT Monitor 1 Press PAUSE to pause playback still mode The sound from the disc is muted during still mode 2 Press PLAY to resume normal playback 17 PAUSE PLAY BUTTON 9 29 32 18 14 17 16 13 8 15 19 10 7 ...

Страница 26: ... number direct access and use when function need numeric Selection or Input like in the Goto function etc 2 Use when playback DVD which need numeric Selection or Input like in the Goto function etc 32 REPEAT 10 13 UP DOWN LEFT RIGHT BUTTON Use to move cursor up down left right 16 OK BUTTON Use this button to confirm the selection 25 The fast forward backward speed may differ depending upon the dis...

Страница 27: ...TOP to stop playback and show the logo screen The player memorizes the location where playback is stopped 2 Press PLAY to resume playback from the location where playback is stopped DVD VCD 1 1 VCD 2 0 and audio CD 3 Pressing STOP twice is resume playback from the beginning of the disc 26 When the last track playback completed the unit will automatically enter into STOP mode User can press play bu...

Страница 28: ...Track to Play 1 Use the UP DOWN LEFT RIGHT direction buttons to move to different file numbers 2 Press the RIGHT direction button when the highlighted file is in the column on the far right and up to five more file in the current directory will be displayed 3 Press the LEFT direction button when the highlighted file is in the column to the far left and the previous five file will be displayed 4 Pr...

Страница 29: ...ess than 3 seconds to repeat play the current file And keep on repeat Playing the current file until the repeat play is disabled To disable current file repeat play press REPEAT button less than 3 seconds 10 13 UP DOWN LEFT RIGHT BUTTON Use to move cursor up down left right 16 OK BUTTON Use this button to confirm the selection 28 The fast forward backward speed may differ depending upon the disc 1...

Страница 30: ...he DISC playback again when in the STOP mode 15 14 12 13 21 20 16 17 DVD MENU DVD AUDIO Press REPEAT button less than 3 seconds to repeat play the current song And keep on repeat Playing the current song until the repeat play is disabled To disable current song repeat play press REPEAT button less than 3 seconds Press RANDOM button less than 3 seconds is random play all songs on the disc To disabl...

Страница 31: ... pictures is five seconds PAUSE NEXT BACK and NUMERIC selection and navigation keys work the same as in other operations 30 1 Press the TITLE key to get a thumbnail view Nine pictures 3x3 will be displayed on the screen beginning with the last viewed picture on the upper left part of the screen The first thumbnail image will be highlighted with a blue border 2 Use the direction keys LEFT RIGHT UP ...

Страница 32: ...ack 2 Press PAUSE to single step forward to the next picture in the video DVD and VCD only 3 Press PLAY to resume normal playback 18 STOP 1 Press STOP to stop playback and show the logo screen The player memorizes the location where playback is stopped 2 Press PLAY to resume playback from the location where playback is stopped DVD VCD 1 1 VCD 2 0 and audio CD 3 Pressing STOP twice is resume playba...

Страница 33: ...s DVD MENU for the main menu 34 OSD BUTTON 1 Press OSD button once to display the amount of time played and time remaining to be played on the disc For example the OSD may display 32 2 Press OSD button a second time to additionally display the disc type current chapter DVD or track VCD audio CD and total number of chapters or tracks Also displayed for DVD only is the current title total number of ...

Страница 34: ...ific chapter within a specified title DVD only and enter the title and chapter numbers with the number pad and LEFT RIGHT direction buttons as follows Select Track to jump to the beginning of a specific track within a non DVD disc and enter the track number with the number pad as follows 1 Press ZOOM during normal slow or still playback 33 ZOOM BUTTON 2 Pressing the ZOOM button repeatedly increase...

Страница 35: ...etup Menu 1 The first press will show the current subtitle setting selected subsequent presses toggle to the next subtitle setting 2 Some DVDs display subtitles automatically and cannot be turned Off even if the subtitle function is set to Off 3 During some scenes the subtitles may not appear immediately 4 Some DVDs allow subtitle selections and turn subtitles on or off only via the disc menu 5 Wh...

Страница 36: ...total available angles to select for example 39 ANGLE 1 The first press will show the current angle selected Subsequent presses toggle to the next angle 2 The TFT monitor will light its angle icon when angle changes are available 3 Some DVDs allow angle changes only via the disc menu 4 When a disc is replaced the Set Up returns to the default angle ...

Страница 37: ...to fast forward through the disc Each time the button is pressed a new speed 2X 4X 8X or 20X is selected 2 Press PLAY to resume normal playback 3 Long press FAST BACKWARD to fast reverse through the disc Each time the button is pressed a new speed 2X 4X 8X or 20X is selected 4 Press PLAY to resume normal playback 14 REPEAT 3 RPT 15 DVD MENU 4 RDM Under the DVD MENU or ROOT or TILTLE is display on ...

Страница 38: ...tton the LCD will display Set Up and keep on blinking User can use the following buttons to adjust the Set Up items shown on the TFT monitor as follow Encoder Volume Knob as Cursor to navigate thru the Set Up Items shown on the TFT Monitor Track Up Down 20 21 buttons as Cursor Left Right to navigate thru the Set Up items shown on the TFT Monitor AUDIO button as ENTER to confirm the selected item s...

Страница 39: ...de button to select card mode The unit will starts playing the files contained on the Memory Card Once the unit read the Memory Card successfully the first file on the Memory Card will automatically start playback Press Mode button repeatedly is allowing changing to other modes or swich back to card mode If no any Memory Card is inserted into the main unit card slot Press mode button will Automati...

Страница 40: ...talian Norwegian Portuguese Spanish and Swedish Central European Include Albanian Croat Czech Dutch English German Hungarian Irish Polish Romanian Slovak Slovene and Sorbian Slavoic Cyrillic Include Bulgarian Belorussian English Macedonian Moldavian Russian Serbian and Ukrainian The Subtiltle selection is appear in the SET UP menu language subtitle DivX DivX External Subtitle The XXXXXXXX is a ran...

Страница 41: ...ent limits the number of times a user can view the rented movie An expired error is displayed when this limit is reached and the movie will not play again Choose Yes if you wish to use a rental view or No to abort During the playback you can press stop and resume the playback from the last position with the Play button without using a new rental view A purchased or rented movie will play only on t...

Страница 42: ...ll be displayed When the category changes are set press UP repeatedly to return to the text buttons Selecting the appropriate button and pressing OK can change settings in a different category 1 Use the UP DOWN direction buttons to select the setting to be changed 2 Press OK to cycle through each possible option or display a list of the options When a list of options appears press the UP DOWN dire...

Страница 43: ...e following options are available On Enable display of OSD status messages Off Disable display of OSD status messages Western European Include Albanian Breton Catalan Danish Dutch English Faroese Finnish French Gaelic German Icelandic Irish Italian Norwegian Portuguese Spanish and Swedish Central European Include Albanian Croat Czech Dutch English German Hungarian Irish Polish Romanian Slovak Slov...

Страница 44: ...Aspect setting allows the user to select the aspect ratio of the TV DVD and VCD only The following options are available 4 3 Aspect ratio of TV is 4 3 16 9 Aspect ratio of TV is 16 9 Both widescreen and 4 3 contents will fill the entire screen Selecting the Video setting allows the user to select the TV output DVD and VCD only The following options are available NTSC TV is NTSC PAL content is play...

Страница 45: ... define if the priority is to play the Audio content or the Video The following options are available Picture CD View There are two options are available in Picture CD View Original Used to switch the picture size to the current display resolution Directly Fit to screen Like letter box Take the minimum value of horizontally fit scale ratio and vertically fit scale ratio Audio Settings 1 Using the ...

Страница 46: ...ns explain how to change each of the player s Rating settings Password Selection to Lock and Unlock the Parental Control Rating Selecting the Password Setting Allows the user to enter a password to lock and unlock the parental control rating setting into the player The following options are available Unlocked The parental control is unlocked and may be changed in the Rating selection factory defau...

Страница 47: ... a parental control setting of 2 or less are allowed to play PG Only titles with a parental control setting of 3 or less are allowed to play PG 13 Only titles with a parental control setting of 4 or less are allowed to Play PG R Only titles with a parental control setting of 5 or less are allowed to play R Only titles with a parental control setting of 6 or less are allowed to play NC 17 Only titl...

Страница 48: ...KHz 3dB 1200 mV 4 7k ohm Radio Section FM Frequency Range Usable Sensitivity Stereo Separation S N Ratio AM or MW Frequency Range Usable Sensitivity S N Ratio 522 1620 Khz 9 kHz Space 530 1720 10 kHz Space 40dB at S N 20dB 40 dB See Disc Note for more details description 0 dB 20Hz to 20Khz 3dB 2 Channel Stereo 60dB 1khz 90 dB 9 87 5 108 0 MHz 50 kHz Space 87 5 107 9 MHz 200 kHz Space 15dB at S N 3...

Страница 49: ... level Wiring is not properly connected Check wiring connection The operation keys do not work No sound The built in microcomputer is not operating properly due to noise Press the RESET button Front panel is not properly fixed into its place Sound skips The installation angle is more than 30 degrees Adjust the installation angle to less than 30 degrees The disc is extremely dirt or defective disc ...

Страница 50: ...4 10 R 02 0809 ...

Отзывы: