background image

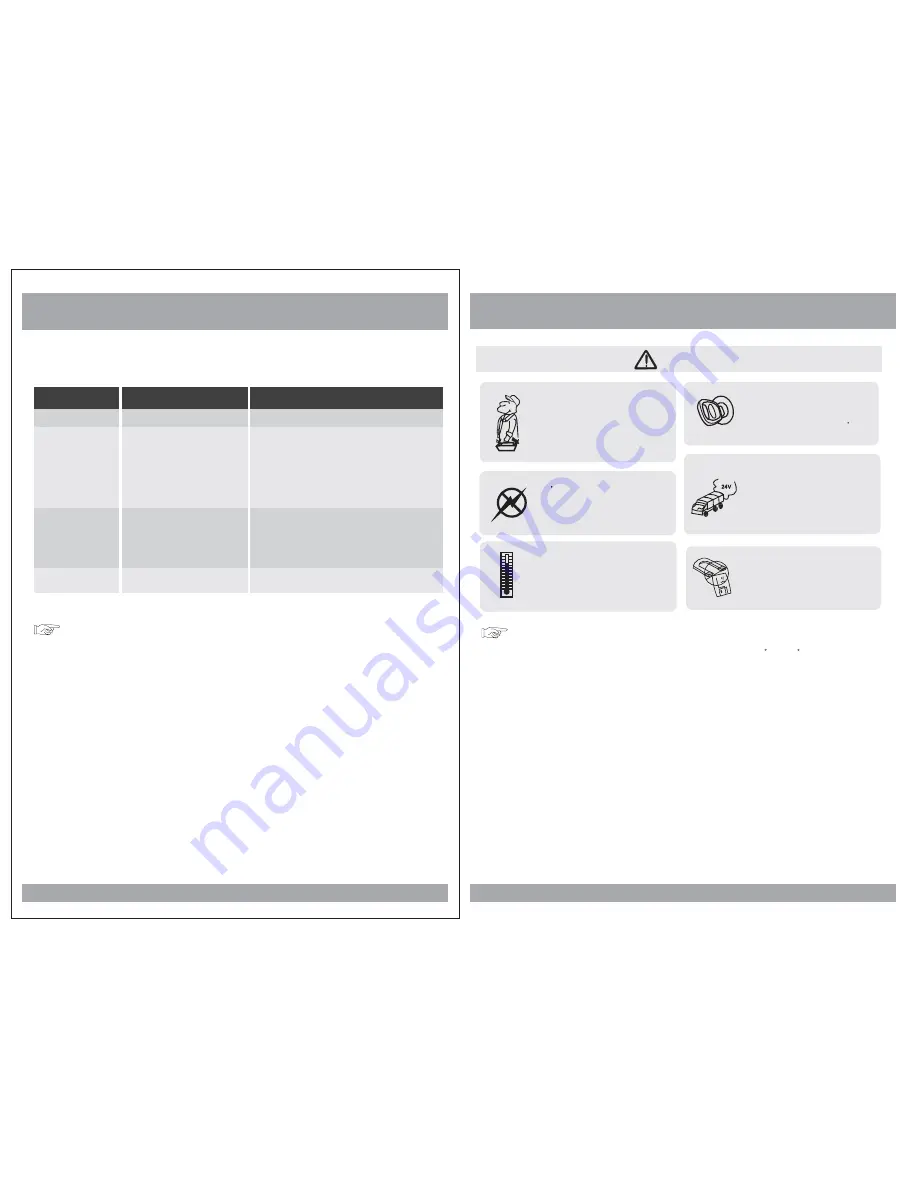
Quality installations are best

performed by qualified and

certified installers.

Don t touch the unit if there is
a flash of lightning. You may
receive an electric shock.

Do not cover or stop up heater
ducts or vents. It may cause a
fire or receive an electric shock.

Watching the monitor for an
extended period of time
without the engine running
may deplete the vehicle s
battery charge.

This product is designed for
operation with a 12 Volt DC,
negative ground vehicle. It
is not suitable for operation
under other conditions or
voltages.

CAUTION

Operating Notes

Do not bring magnetic devices
such as credit card or magnetic
card near the magnets.

5

Caution

Troubleshooting

Symptom

Items to Check

Actions to be Taken

Remote control does
not work properly.

Is the power turned on?

Is the audio which is connected with
the audio cable set to receive
the DVD signal output?

Is audio cable connected securely?

Is the monitor which is connected
with the audio cable turned on?

Is the audio output set in the correct
position?

Is the remote control facing
the remote sensor?

Is the distance too far?

Is there any obstacle in the middle?

Is the battery weak?

Check the car battery capacity.

Select the correct input mode for the audio receiver.

Connect the audio cable into the jacks securely.

Turn on the monitor connected with the audio cable.

Set the Audio Output to the correct position,
and then turn on the DVD player again by pressing
the POWER button.

Point the remote control toward the remote sensor of
the product.

Use the remote control within 15 feet.

Remove the obstacle.

Replace with new battery.

Buttons do not work.

No sound

When a disc is brought from a cold environment to a warm one, there may be moisture
on the the disc, or condensation on the pickup lens. It will affect disc playback.

1. Remove the disc from the DVD player.
2. Turn on the power and leave it on for an hour to vaporize the condensation.

32

Moisture or condensation on lens

1. The operating temperature of this product is limited to 14 ~+140 F.

2. If your vehicle is extremely hot or cold you must allow time for your air

conditioner or heater to cool or heat the vehicle until operating temperatures
have returned to normal operating ranges.

3. Optimal picture quality is achieved when viewed from directly front of the

monitor (+/-30degrees).

4. Do not open the housing and

yourself. Refer

servicing to qualified personnel.

5. DVD Players use an invisible laser beam which can cause hazardous radiation

exposure. Be sure to operate the unit correctly as instructed.

6. Do not cut the car power supply off while a disc is playing. It can cause

damage to the DVD Player.

attempt to make any repairs

Содержание BV12.1BGT

Страница 1: ......

Страница 2: ......

Страница 3: ...ssword Change 4 6 8 10 12 13 14 15 16 17 19 6 12 17 17 17 18 18 19 19 DVD Functions Eject Vol Vol Mute Play or Pause Audio Stop Arrows Setup Menu Display Number Buttons Subtitle Title Slow Fast Reverse Searching Fast Forward Searching Previous Next Repeat A B Repeat NTSC PAL Angle PBC Zoom GO To Connection Diagram Installation Disc Information Troubleshooting Specifications 20 20 20 20 21 22 23 23...

Страница 4: ...accident Use extra caution with any liquids in your car If you or your child spills any liquid on these products pull your vehicle to the roadside and turn the key off to disconnect or wipe the products with a towel Do not operate the equipment until all liquids have either evaporated or you have had the monitor inspected at a service center by a qualified technician Severe harm or danger can resu...

Страница 5: ...ceiver Connect the audio cable into the jacks securely Turn on the monitor connected with the audio cable Set the Audio Output to the correct position and then turn on the DVD player again by pressing the POWER button Point the remote control toward the remote sensor of the product Use the remote control within 15 feet Remove the obstacle Replace with new battery Buttons do not work No sound When ...

Страница 6: ...3 Korea and Southeast Asia 4 Australia Mid South America 5 Russia 6 China How to handle the disc Don t touch the shiny side of the disc the side with the embedded information Don t stick a label or a glue based note on either side of the disc Don t use discs that have glue or a damaged label with exposed adhesive residue It might result in damage to your DVD player Don t put discs in the sunshine ...

Страница 7: ...NPUTS Dome Light Button POWER Button AV Select Button MENU Button Buttons PLAY PAUSE Button 1 Open the package and check that these items are presents INSTALLATION PLATE UNIT SCREW A SCREW B 2 Connect the external compoments to the RCA cable or AV output Refer to the connection diagram on page 33 3 Match the position of installation bracket and installation plate with screw A 4 Tighten the unit wi...

Страница 8: ...creen MODE RETURN not function in this unit DVD SD USB POWER 1 2 MUTE Press this button to switch off the audio during playback Press again to restore the audio 3 UP DOWN RIGHT LEFT ARROWS MENU OSD on monitor Press this button to open the on screen menu system to setup and control various parameters of the monitor and DVD player UP DOWN MENU DVD menu This button permits you to view the menu on the...

Страница 9: ...Use to incease or decrease volume level Use this button to select one of the audio soundtracks programmed on a DVD disc It is alse used to select the audio output mode for the DVD playback Press this button to confirm the item you have found and highlighted using the arrow buttons Usually this is done to confirm a selection or item to be played on the DVD If your DVD disc supports zooming in to se...

Страница 10: ...e CH Time Chapter time Repeat Sets the repeat play Time Display Watch play time 27 OSD 2 X 3 X 4 X 1 2 1 3 1 4 ZOOM X 2 CONDITION ZOOM X 3 ZOOM X 4 ZOOM X 1 2 ZOOM X 1 3 ZOOM X 1 4 Off Menu Title Chapter Audio Subtitle 01 02 01 02 06 61 06 61 5 1CH Chinese 5 1CH Chinese OFF Bitrate 31 Bitrate 31 Title Elapsed 0 20 02 Title Elapsed 0 20 02 This button does not function in PBC mode This button does ...

Страница 11: ...play Shuffle Random Single Repeat folder one time Single play NTSC PAL This button is used to select the video standard for the DVD mode between NTSC and PAL formats Angle Some DVD s are recorded with additional footage which allows you to view a scene from a different camera angle If the ANGLE feature is enabled in the Setup Menu see page 14 and the disc has this option an angle mark will be disp...

Страница 12: ...omatically until canceled DVD VCD AUDIO 25 OSD CONDITION A A B Start point of repeat Ending point repeat function To adjust CONTRAST BRIGHTNESS COLOR or FM press the MENU button until you arrive at the screen for that item Use the arrow buttons to adjust the value Press the MENU button to make another adjustment or leave the MENU system Contrast Brightness Color FM CONTRAST BRIGHTNESS COLOR 42 55 ...

Страница 13: ... rewind search FR 16X FR 32X PLAY 8X rewind search 16X rewind search 32X rewind search Play OSD CONDITION FR 2X FR 4X FR 8X 2X rewind search 4X rewind search FR 16X FR 32X PLAY 8X rewind search 16X rewind search 32X rewind search Play Fast Forward Searching Pressing FF button changes the play mode as follow repeatedly DVD OSD CONDITION FF 2X FF 4X FF 8X 2X forward search 4X search forward Pressing...

Страница 14: ... the on screen display language 14 Set TV Display Mode Set TV Display Mode General Setup Page General Setup Page Normal LB Wides TV Display OSD Lang TV Display OSD Lang PS Normal PS Set OSD Language Set OSD Language General Setup Page General Setup Page TV Display TV Display PS OSD Lang OSD Lang ENG English DVD Functions Subtitle SUB T This button is used to select the language for the on screen d...

Страница 15: ...disc Number Buttons The 0 through 9 number buttons are used to enter the number of the track the number of the DVD chapter the time the date etc 22 OSD CONDITION Single Elapsed Single Remain Display time Left display time No sign Chapter Remain Display Off Display the Chapter Remaining No sign Display Off Total Elapsed Total Remain Display the total remaining DVD Select a track by pressing the cor...

Страница 16: ...ous menus you can use the arrow buttons to define the area of the screen you want to enlarge in ZOOM mode DVD After pressing STOP button select the desired folder and set the condition by pressing ENTER button Disc Stop 2 Time Setup Pressing the SETUP button opens the Setup Menu where you can make and adjust DVD settings to suit your equipment and preferences MP3 Set Downmix Mode Set Downmix Mode ...

Страница 17: ...dio Use the audio language menu to select the subtitle language that you prefer If the disc you are playing has that language available it will display subtitles in that language 1 Press the SETUP button during stop mode 2 Press the buttons to move to Preference 3 Press the buttons to move to Audio 4 Press the ENTER button 5 Press the buttons to select desired audio language 17 Subtitle Preferred ...

Страница 18: ...hen in the DEFAULT settings mode all the settings of the Setup Menu will be returned to the factory defaut settings except for Parental Level Region and Password values 1 Press the SETUP button when stop mode 2 Press the buttons to move to Preference 3 Press the buttons to move to Default 4 Press the ENTER button to select Reset 5 Default 18 Audio Subtitle On ENG Load Factory Setting Load Factory ...

Отзывы: