background image

Settings for Each Track

17

O

ver

vie
w

Basic O

per
ation

Sa

ving

Phr

ase M

emor

y

Rh

ythm

LOOP FX

Sy

st

em S

ettings

USB

MIDI

A

ppendix

Track

Settings for Each Track

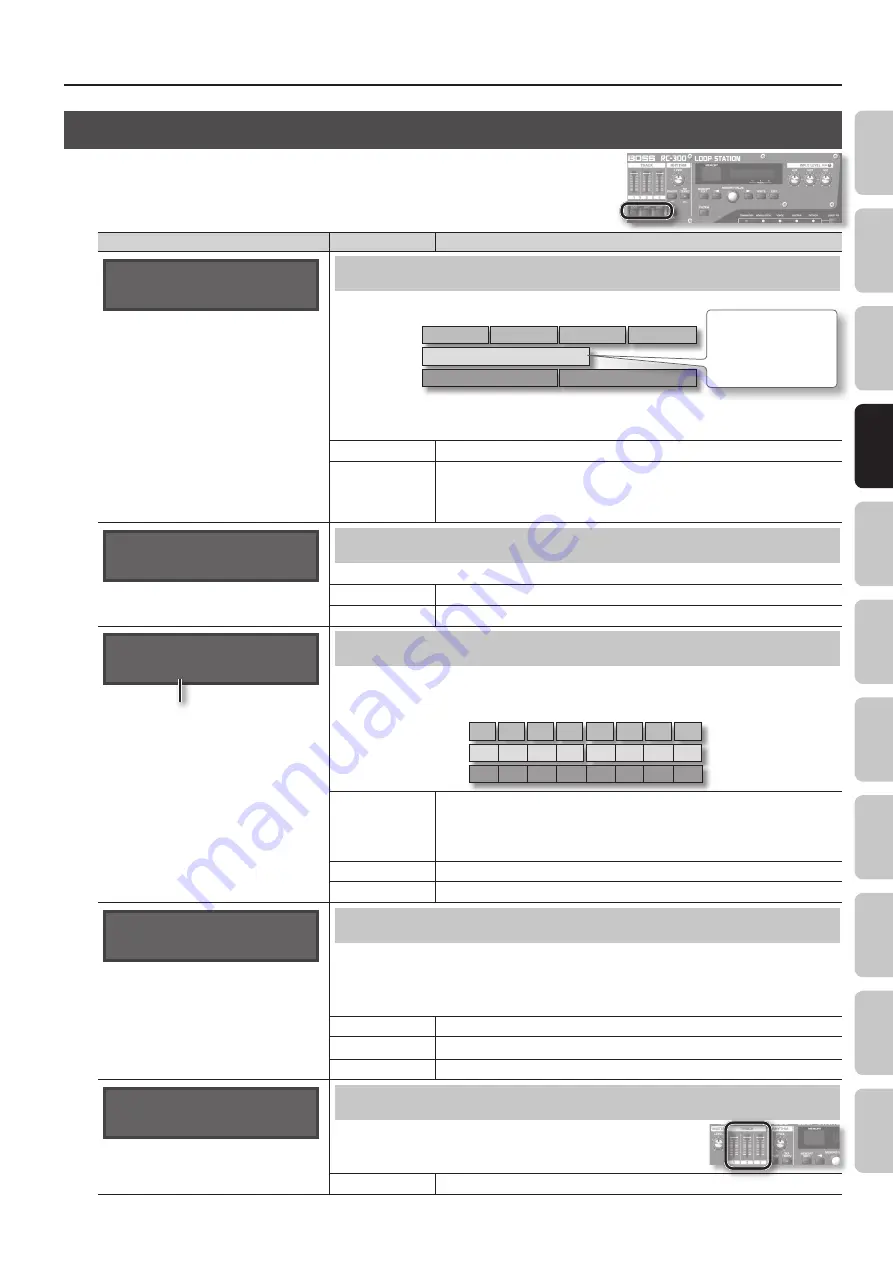
Here you can specify the playback method and other settings individually for each track.

First press the [EDIT] button of the track that you want to edit. 
For details, refer to “Basic Editing Procedure” (p. 9).

Parameter

Value

Explanation

Track1:Play Mode

LOOP

Specifying How the Track Will Play (Play Mode)

This specifies whether the track playback will be looped or one-shot (i.e., not looped).

Loop

One Shot

Loop

Track 1

Track 2

Track 3

If one-shot playback is 

selected, playback will 

stop when it reaches the 

end of the phrase (it will 

not loop).

*  Recording/overdubbing cannot be carried out with respect to tracks that are set to “ONE SHOT.” To create a track 

intended for one-shot playback, you first need to carry out recording/overdubbing while it is set to “LOOP” and save 

it. Then, you should change its setting to “ONE SHOT.”

LOOP

Conventional loop playback.

ONE SHOT

The phrase will play only once from the beginning to the end of the track, and then stop 

automatically.
If you press the [REC/DUB/PLAY] pedal during playback, playback will begin again from the 

beginning of the track (Retrigger Playback).

Track1:Reverse

OFF

Playing a Track Backward (Reverse)

This specifies whether the track will play forward in the conventional manner, or play backward in time (reverse playback).

OFF

Playback is normal.

ON

Playback is reversed.

Track1:Measure

(BPM120.0)  AUTO

Original Tempo (p . 19)

Specifying the Number of Measures in a Track (Measure)

You can specify the number of measures for each track. When recording rhythm sounds or when recording along 

with other tracks, it’s convenient to specify the number of measures before you record, so that looping will occur at 

the specified measure length, even if you don’t operate the pedal when you’ve finished recording.

One measure

Four measures

Eight measures

Track 1

Track 2

Track 3

AUTO

Tracks that are set to AUTO will have the same number of measures. The number of 

measures is determined by the first-recorded track of the tracks that are set to AUTO. For 

example, if all tracks are set to AUTO, the value set as the number of measures for the 

second and subsequent tracks will be identical to the number of measures in the first track 

that was recorded.

FREE

The number of measures will be set automatically, corresponding to the length of the recording.

1, 2, 3...

The number of measures will be set manually.

Track1:Stop Mode

IMMEDIATE

Specifying How the Track Will Stop (Stop Mode)

This specifies how the track will stop when you press the [STOP] pedal.

•  The PLAY indicator will blink until playback stops.
•  If you press the [STOP] pedal once again before playback stops, playback will stop immediately.
*  You can’t overdub during the time until playback stops.

IMMEDIATE

Playback will stop immediately.

FADE OUT

Playback will fade out and then stop.

LOOP END

Playback will continue to the end of the loop, and then stop.

Track1:PlayLevel

100

Adjusting the playback level of the Tracks (Play Level)

You can adjust the playback level of the tracks. You can also change this value 

with the TRACK [1]–[3] sliders.

0–200

Playback level of the track.

Содержание Boss Loop Station RC-300

Страница 1: ...create a wide variety of performances by layering sound while you record and carry out play back in real time You can save a maximum of approximately 3 hours of stereo sound total for all phrase memo...

Страница 2: ...0 Units MIDI Sync 21 Setting the Overdubbing Method Overdubbing Mode 21 Switching Between Stereo and Mono Recording Mode 21 Specifying a Phrase Memory s Tempo 21 Adjusting the Time Used to Fade Out Fa...

Страница 3: ...nnel 34 Synchronizing the Tempo of Two RC 300 Units MIDI Sync 34 MIDI Program Change Out 34 USB Related Settings 35 Adjusting the USB Audio Input Volume USB In Level 35 Adjusting the USB Audio Output...

Страница 4: ...TATUS indicators Lights when there is data in a track p 10 TRACK EDIT buttons Used to make settings for each track p 17 3 RHYTHM p 25 RHYTHM LEVEL knob This adjusts the volume level of the rhythm soun...

Страница 5: ...r two seconds or longer you will then be able to use the TRACK 1 pedal to select a phrase memory and use the TRACK 3 pedal to select the LOOP FX type For details refer to Using the pedals to select ph...

Страница 6: ...ty of parameters p 24 MIDI connectors For connecting MIDIdevice p 38 You can also connect an additional RC 300 unit for synchronized playback POWER switch This turns the power on off p 7 INPUT INST ja...

Страница 7: ...nd turn off the power on all devices before making any connections Before connecting or disconnecting any connection cables be sure all the volume controls in your system are set to minimum When conne...

Страница 8: ...istening to a rhythm at the tempo you specify What is the LOOP FX p 28 You can apply an effect to the sound of each track This effect is called a LOOP FX What are system settings p 32 Settings that ap...

Страница 9: ...er to the pages listed below Item Page Settings for each track p 16 Phrase memory settings p 20 Rhythm settings p 25 LOOP FX settings p 28 System settings p 32 1 Press the button for the type of item...

Страница 10: ...OOP FX NOTE The minimum recording time for a track is approximately 1 5 seconds If you press the pedal within approximately 1 5 seconds after you start recording recording will continue until the trac...

Страница 11: ...erformed on only one track at a time For example if all tracks in the phrase memory are empty and you re recording track 1 pressing the track 2 REC DUB PLAY pedal will switch track 1 to playback and r...

Страница 12: ...able for overdubbing Track clear Holding down the STOP pedal for two seconds or longer will clear the track This Clear operation is temporary the track saved in the phrase memory will not be erased If...

Страница 13: ...loop playback Press the track 1 REC DUB PLAY pedal to start recording Record your vocal into the microphone Dun Dun Dun Record your vocal into the microphone Dun Dun Dun 1 1 2 2 3 5 4 4 6 5 6 Overdub...

Страница 14: ...to use when you need a pattern with the same backing as it allows you to prepare tracks simply and easily without having to start recording from scratch again 1 To prevent loss of the content of the...

Страница 15: ...y 5 Press the WRITE button the phrase memories will be exchanged If you decide to cancel the operation press the EXIT button Deleting a Phrase Memory Initialize This operation erases a phrase memory a...

Страница 16: ...rhythm even if the timing at which recording ended was not quite accurate Recorded phrase Start Stop Even if the timing is slightly inaccurate the phrase length will automatically be adjusted to the...

Страница 17: ...al Tempo p 19 Specifying the Number of Measures in aTrack Measure You can specify the number of measures for each track When recording rhythm sounds or when recording along with other tracks it s conv...

Страница 18: ...ks are already playing back the playback start location of the other tracks will become the current location of the phrase being played The following illustration is an example of how playback will oc...

Страница 19: ...e phrase memory tempo p 21 Other tracks have phrases with the following settings Play Mode at LOOP Loop Sync ON Play Mode at LOOP Tempo Sync ON Cases other than the above The original tempo is automat...

Страница 20: ...t the cursor position DEL RHYTHM TAP TEMPO Deletes the character at the cursor position and shifts all characters after it to the left Memory Level 100 Adjusting the Phrase MemoryVolume Memory Level Y...

Страница 21: ...chieve a kind of delay effect similar to that obtained from an effects processor Memory Rec Mode STEREO Switching Between Stereo and Mono Recording Mode Before you record you must specify whether you...

Страница 22: ...ly one track will play Track 1 Track 2 Track 3 If Single Track Play is on the track that s currently playing will stop when you start playback of another track If Track Change p 22 is set to LOOP END...

Страница 23: ...PE INC Switches the LOOP FX type FX TYPE DEC UNDO REDO Allows you to undo redo the last recording or overdubbing of a track p 12 TR1 3 UNDO REDO Allows you to undo redo a specific track p 12 TR1 3 PLA...

Страница 24: ...hrase memory Assign3 ON CTL1 PEDAL MEMORY INC The pedals will switch phrase memories Assign4 ON CTL2 PEDAL MEMORY DEC Assign5 ON CTL3 PEDAL FX TYPE INC The pedals will switch the LOOP FX type Assign6...

Страница 25: ...sound at the phrase memory tempo 1 Press the TAP TEMPO button The phrase memory tempo is displayed Memory Tempo 120 0 Set the tempo as described in Specifying a Phrase Memory s Tempo p 21 You can also...

Страница 26: ...o begin looping i e when the RC 300 switches to overdubbing or playback OFF The rhythm will not stop when the first pass of recording ends REC END The rhythm will stop when the first pass of recording...

Страница 27: ...as 6 8 Simple Beat 1 10 Swing 1 2 Bossa Feel Samba Feel 1 2 909 Beat 909 Clap Hi Hat 1 2 Kick Hi Hat Conga Maracas Simple Beat 1 9 Bossa Feel Samba Feel 1 2 909 Beat 909 Clap Hi Hat 1 2 Kick Hi Hat 1...

Страница 28: ...st press the LOOP FX button For details refer to Basic Editing Procedure p 9 The LOOP FX parameters will differ depending on the LOOP FX that is selected Parameter Value Explanation FX Target MAIN OUT...

Страница 29: ...on MODULATION FLANGER Produces a metallic resonance reminiscent of a jet airplane taking off and landing PHASER Gives the sound a swishing quality by adding a phase shifted sound PAN Moves the stereo...

Страница 30: ...for changes in the volume level A higher value makes the change more abrupt FX Rate 85 0 100 1 MEAS Adjusts the speed of the effect FX Depth 50 0 100 Adjusts the intensity of the effect SLICER settin...

Страница 31: ...back 20 0 100 Adjusts the number of repetitions for the delay FX E Level 50 0 120 Adjusts the volume level of the delay LO FI setting Parameter Value Explanation FX Level 50 0 100 Adjusts the volume l...

Страница 32: ...imiting the Phrase MemoriesThat can be Switched Phrase Memory Extent By setting the upper and lower limits for the phrase memories the RC 300 can switch to you ll more easily be able to select the phr...

Страница 33: ...use the same output at all times MEMORY The output destination specified by the phrase memory will be used MAIN Regardless of the setting of the phrase memory the sound will be output from the MAIN OU...

Страница 34: ...ys MIDI Sync MEMORY Synchronizing theTempo ofTwo RC 300 Units MIDI Sync Two RC 300 units can be synchronized after connecting them together using a MIDI cable For details refer to ConnectingTwo RC 300...

Страница 35: ...B Setting the Output Jacks for the USB Audio USB Output Select You can select the output jacks to which the USB audio is output MAIN The sound is output from the MAIN OUTPUT and PHONES jacks SUB The s...

Страница 36: ...work correctly for some types of computers Refer to the Roland website for details on the operating systems that are supported Use a USB cable and a USB connector on your computer that supports USB 2...

Страница 37: ...mal status Never turn off the power while the RHYTHM ON OFF button is blinking NOTE Never use your computer to format the BOSS_RC 300 drive Doing so will cause the RC 300 to stop operating correctly I...

Страница 38: ...messages are output from the RC 300 at all times Set the external MIDI device beforehand so it is ready to receive MIDI Clock and MIDI Start and Stop messages For details refer to the owner s manual t...

Страница 39: ...et Assign Target p 23 to specify the parameter that will be controlled ConnectingTwo RC 300 Units Two RC 300 units can be synchronized after connecting them together using a MIDI cable Use a commercia...

Страница 40: ...SYSTEM The system settings will be returned to their factory set state MEMORY All phrase memories will be erased initialized If you execute SYSTEM MEMORY or MEMORY all of the RC 300 s phrase memories...

Страница 41: ...the end of the longest track is reached the RC 300 automatically switches to overdubbing Aligning the Beginning of Loop Playback Loop Sync p 18 Recording starts immediately when Auto Recording is set...

Страница 42: ...er or size of MIDI messages transmitted to the RC 300 MIDI Off Line There is a problem with the MIDI cable connection Check to make sure the cable has not been disconnected and that there is no short...

Страница 43: ...dal Sliders TRACK 1 3 sliders Knobs MASTER LEVEL knob RHYTHM LEVEL knob AUX knob INST knob MIC knob Displays 7 segments 2 characters LED 16 characters 2 lines backlit LCD Connectors INPUT MIC jack XLR...

Страница 44: ...ting watts amperes for the extension cord Excessive loads can cause the insulation on the cord to heat up and eventually melt through Before using the unit in a foreign country consult with your retai...

Страница 45: ...been lost Roland Corporation assumes no liability concerning such loss of data Copyright Recording duplication distribution sale lease performance or broadcast of copyrighted material musical works vi...

Страница 46: ...29 N Name 20 Not Empty 42 O Original Tempo 19 37 OTHER 29 Output 19 26 Output Select 19 Overdubbing 11 Overdubbing Mode 21 Overdub Mode 21 P PAN 18 29 30 Parameter 9 Pattern 25 PEAK indicator 6 Pedal...

Страница 47: ...tions However there is no guarantee that interference will not occur in a particular installation If this equipment does cause harmful interference to radio or television reception which can be determ...

Страница 48: ...Musicales J E Olear y ESQ Manduvira Asuncion PARAGUAY TEL 595 21 492147 PERU Audionet Distribuciones Musicales SAC Juan Fanning 530 Miraflores Lima PERU TEL 511 4461388 TRINIDAD AMR Ltd Ground Floor...

Отзывы: