background image

3. INSTALLATION

30°

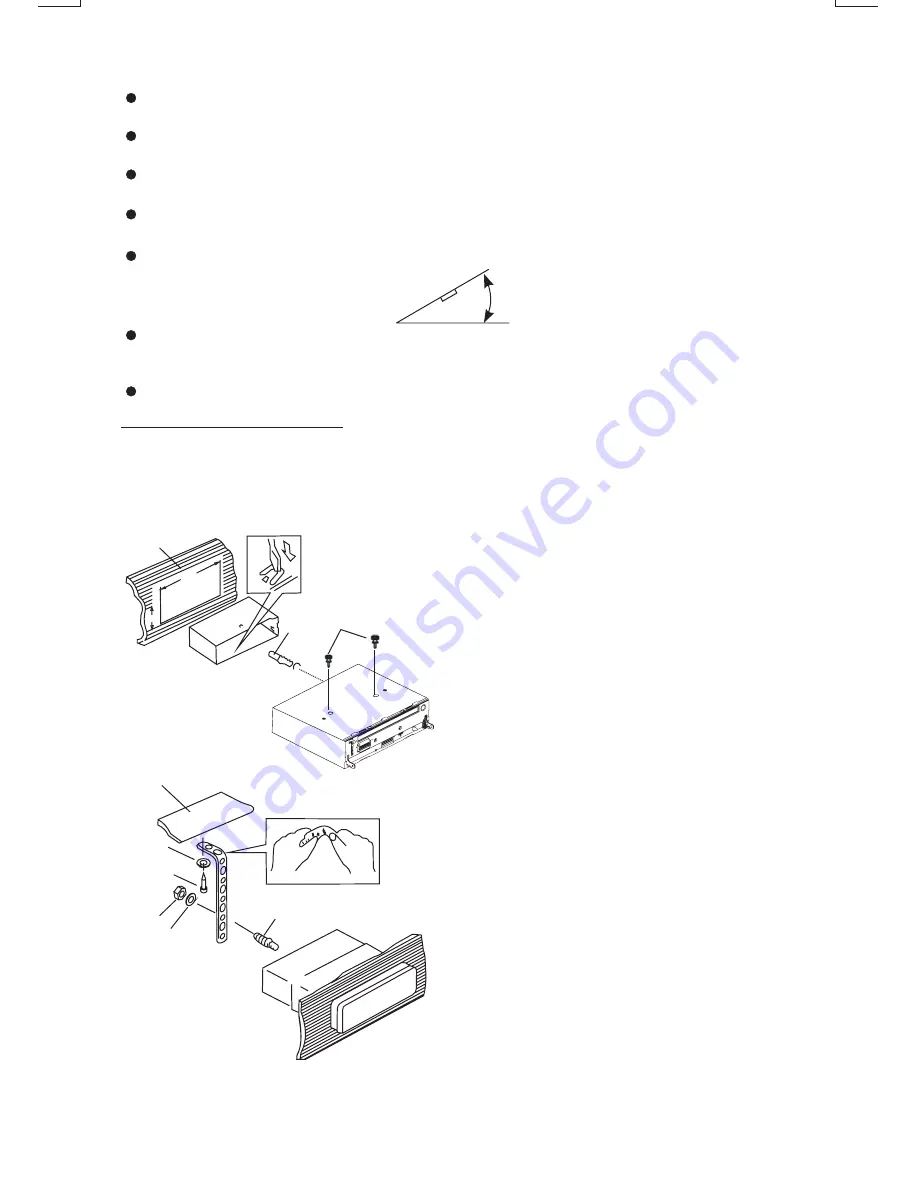
DIN FRONT/REAR-MOUNT

-  DIN FRONT-MOUNT (Method A)

Installation the unit

1.  Dashboard
2.  Half Sleeve

3.  Screw

1

7

4

2

3

5

6

1.  Dashboard
2.  Nut (5mm)
3.  Spring washer
4.  Screw (4x12mm)
5.  Screw
6.  Support Strap

7.  Plain washer

182

53

1

2

E - 2

Before finally installing the unit, connect the wiring temporarily and make sure it is all
connected up properly and the unit and system work properly.
Use only the parts included with the unit to ensure proper installation. The use of
unauthorized parts can cause malfunctions. 
Consult with your nearest dealer if installation requires the drilling of holes or other
modifications of the vehicle. 

Install the unit where it does not get in the driver's way and cannot injure the passenger if
there is a sudden stop, like an emergency stop.

If installation angle exceeds 30° from horizontal, the unit might not give its optimum
performance.

Avoid installing the unit where it would be subject to high temperature, such as from direct
sunlight, or from hot air, from heater, or where it would be subject to dust dirt or excessive
vibration.

Be sure to remove the front panel before installing the unit.

This unit can be property installed either from “Front” (conventional DIN Front-mount) or
“Rear”(DIN Rear-mount installation, utilizing threaded screw holes at the sides of the unit
chassis). For details, refer to the following illustrated installation methods A and B.

3

4

4.  Remove the two screws that fix the CD 

deck mechanism player before
mounting the unit.

After inserting the half sleeve into the
dashboard, select the appropriate tab
according to the thickness of the
dashboard material and bend them
inwards to secure the holder in place.

Be sure to use the support strap to
secure the back of the unit in place. The
strap can be bent by hand to the desired
angle.

Содержание 820UA

Страница 1: ...24 10 R 03 0500...

Страница 2: ...e 15 Source 16 Front Audio Anschluss 17 Taste USB 1 Teclapararemoveropainelfrontal 2 TeclaMute 3 Teclaparaejetarodisco 4 TeclaLigar desligar 5 TeclaDisplay informa oMP3 iD3 6 TeclaLocal Distante 7 Tec...

Страница 3: ...g from under the stickers Do not stick paper or tape on the disc P 2 Before playing clean the discs with an optional cleaning cloth Wipe each disc from the centre out P 4 Do not use solvents such as b...

Страница 4: ...ngle exceeds 30 from horizontal the unit might not give its optimum performance Avoid installing the unit where it would be subject to high temperature such as from direct sunlight or from hot air fro...

Страница 5: ...o remove the frame When re attaching the frame point the side with a groove down wards and attach it c Insert the levers supplied with the unit into the grooves at both sides of the unit as shown in f...

Страница 6: ...case and be careful not to drop it or subject it to strong shocks When the release button is pressed and the D C P is unlocked the car s vibrations may cause it to fall To prevent damage to the D C P...

Страница 7: ...NEGRO BLANCO NEGRO VERDE GRIS BLANCO ROJO AMARILLO NEGRO VIOLETA AZUL ALTAVOZ TRASERO DERECHO ALTAVOZ TRASERO IZQUIERDO ALTAVOZ FRONTAL DERECHO ALTAVOZ FRONTAL IZQUIERDO ALTAVOZ FRONTAL DERECHO SALID...

Страница 8: ...rently in what mode When in USB or SD mode if the USB or SD is being removed unit will automatically switch to radio mode Connect the external signal to AUX in jack located at the front of the panel t...

Страница 9: ...R FAD While the selected function is displayed turn Volume Knob to adjust the level within 5 seconds otherwise the unit will return to volume adjustment mode E 7 6 MUTE BUTTON MUTE 8 BAND LOUDNESS BUT...

Страница 10: ...utton briefly to enter Preset Scan mode it will scan all the preset stations in the memories you can hear that it will stay on each station for about 5 seconds 2 AUTO MEMORY STORE Press AS PS button f...

Страница 11: ...to skip to previous skip Press and hold Track Up Down Button to fast forward or fast reverse CD player starts when you release the button E 9 9 CD OPERATIONS 16 CD SLOT Insert the disc into CD slot Th...

Страница 12: ...rive device available with all the future technology especially those USB drive device which require to install a driver Always choose a compatible USB drive device which is compatible with this unit...

Страница 13: ...ck Please refer to section CD operations MP3 operations 1 Please make sure to insert the SD card in the correct direction orientation as indicated in picture P 7 Wrong insert will cause permanent seri...

Страница 14: ...ne Up Down Buttons Both operations will be described But Encoder Volume Knob is available on some models only Please skip this description if your model is not equipped with this feature THERE ARE FOU...

Страница 15: ...CTORY BY USING ENCODER VOLUME KNOB Under MP3 play mode press MP3 MENU BUTTON three times Then the first Directory name is shown Rotate ENCODER VOLUME KNOB ROTATE ANTI CLOCKWISE First to navigate throu...

Страница 16: ...Preset Scan Band Loudness Mute FM Mono Stereo Change to CD Mode Preset EQ Display Clock CD Player Mode Power On Off Pause CD Scan Repeat Shuffle Select Vol Bas Tre Fad Bal Adjust Vol Bas Tre Fad Bal T...

Страница 17: ...preavviso 87 5 107 9MHz 87 5 108MHz 10 7 Mhz migliore di 15dB a S N 30 dB 25dB a 1KHz 50dB Raggio di Frequenza Frequenza intermedia Sensibilit Separazione Stereo Rapporto S N SEZIONE RADIO FM Aliment...

Страница 18: ...connection The operation keys do not work No sound The built in microcomputer is not operating properly due to noise Press the RESET button Front panel is not properly fixed into its place Sound skips...

Отзывы: