background image

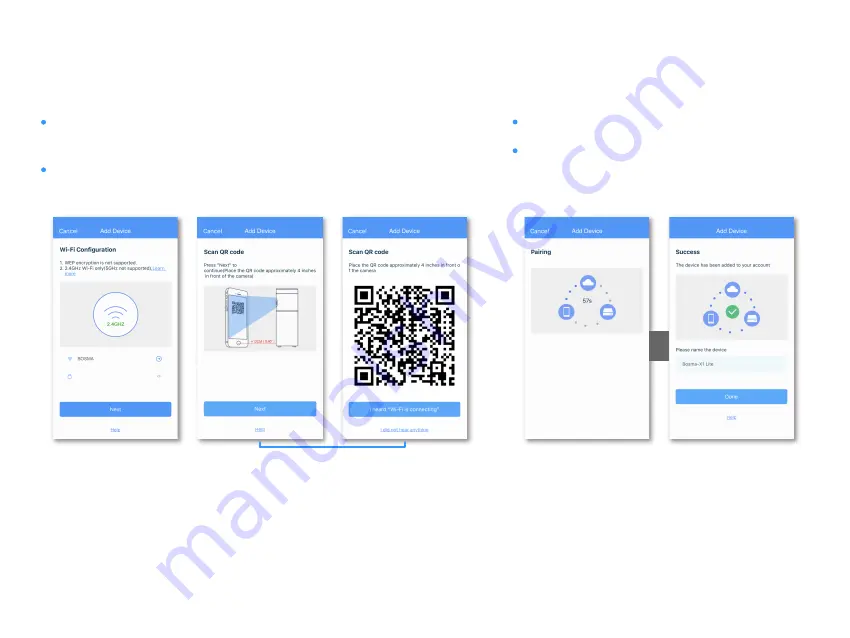
Step 6: A QR code will be generated. Place the QR code rougly 3-4 inches in front of 

the camera till you hear "Wi-Fi is connecting". Then tap "I heard'Wi-Fi is connecting'" 

to continue.

Step 5: Select the WiFi you want the X1 Lite to connect to and enter its password. Note 

that only 2.4Ghz WiFi is supported.

Step 5

Step 6

Step 7: Wait for the X1 Lite camera to connect.

Step 8: Once the device has been added successfully, 

you can edit the device name.

Step 7

Step 8

Содержание X1 Lite

Страница 1: ...User Manual BOSMA X1 Lite Security Camera ...

Страница 2: ...t Vision High quality night vision allows you to see everything clearly even at zero lighting condition Two way Audio Communication Communicate with your loved ones at home anytime anywhere Built in Smart Hub available on X1 Lite Connect Work with other BOSMA peripheral devices such as the door sensor motion sensor night light etc Motion Sound Detections Keen motion and sound detections in any env...

Страница 3: ...PRODUCT DESCRIPTION Light sensor Camera Indicator light Mic Speaker Power Pairing button Infrared LEDs Micro SD card slot Reset button Pairing button ...

Страница 4: ...p the button at the top right corner Step 3 Tap X1 Lite Series in the list Step 4 Connect the X1 Lite to power and wait for it to power up After you hear system startup and waiting for connection tap Next If you did not hear either message long press the reset button until you hear system reset to reset the camera Step 1 Step 3 Step 4 Step 2 ...

Страница 5: ...ng Then tap I heard Wi Fi is connecting to continue Step 5 Select the WiFi you want the X1 Lite to connect to and enter its password Note that only 2 4Ghz WiFi is supported Step 5 Step 6 Step 7 Wait for the X1 Lite camera to connect Step 8 Once the device has been added successfully you can edit the device name Step 7 Step 8 ...

Страница 6: ... devices 7 Adjust speaker volume 8 SD card settings 9 Manage Wi Fi network of the device 10 Check firmware update and turn on off auto update 11 Home page display switch 12 Remove device 13 Motion Sound detection and notification settings 2 Camera on off switch 4 Manage recording schedule 3 Device settings 2 Date and time display 3 Change video quality 4 Full screen switch 5 Change timeline date 6 Liv...

Страница 7: ... Long press the pairing button of the accessory device for about 3 seconds Step 4 After the accessory device is found rename the device if needed and tap Add to proceed Step 5 Tap Done after the accessory device is successfully added Step 6 Set a Preset Camera Position for this accessory device The X1 Lite will rotate to this position when an event is triggered by this accessory device Step 1 Step...

Страница 8: ... for this device 5 Home page display switch 6 Remove device 1 DOOR WINDOW SENSOR 1 Rename the device 2 Current status display 4 Paired gateway device information 3 Battery level 5 Notifications settings 6 Manage the Preset Camera Position for this device 7 Home page display switch 8 Remove device 1 2 3 5 6 7 8 4 2 3 4 5 6 ...

Страница 9: ...use chemicals or detergents to clean the device always turn off the device before cleaning SAFETY INSTRUCTIONS SPECIFICATIONS Resolution Field of View 1920 1080 138 Diagonal Night Vision Siren Power Hub Infrared Night Vision w 4 IR LEDs 110 dB alarm siren Audio 2 way audio communication DC 5V 2A 10W 915MHz up to 650ft range Storage Wireless Local micro SD up to 128GB micro SD card sold separately 8...

Отзывы: