background image


en

3

Contents

enInstruction Manual and Installation Instructions

8

Intended use. . . . . . . . . . . . . . . . .4

(

Safety instructions  . . . . . . . . . . .5

Electrical safety. . . . . . . . . . . . . . . . . . 5

Risk of injury . . . . . . . . . . . . . . . . . . . . 5

Safety for children. . . . . . . . . . . . . . . . 5

7

Environmental protection . . . . . .7

Packaging/used appliance . . . . . . . . . 7

Tips on economical use . . . . . . . . . . . 7

Y

Main points in brief . . . . . . . . . . .8

*

Getting to know the appliance .  9

Washing machine . . . . . . . . . . . . . . . . 9

Control panel  . . . . . . . . . . . . . . . . . . 10

Z

Laundry. . . . . . . . . . . . . . . . . . . .11

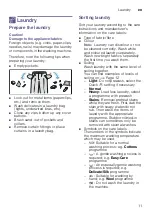
Prepare the laundry  . . . . . . . . . . . . . 11

Sorting laundry . . . . . . . . . . . . . . . . . 11

C

Detergent  . . . . . . . . . . . . . . . . . .12

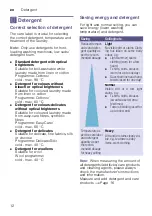
Correct selection of detergent  . . . . . 12

Saving energy and detergent . . . . . . 12

/

Overview of programmes . . . . .13

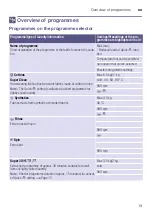
Programmes on the programme 

selector. . . . . . . . . . . . . . . . . . . . . . . 13

Starching  . . . . . . . . . . . . . . . . . . . . . 15

Dyeing/bleaching . . . . . . . . . . . . . . . 15

Soaking  . . . . . . . . . . . . . . . . . . . . . . 15

\

Additional programme 
settings . . . . . . . . . . . . . . . . . . . .15

Extra Rinse

 à

  . . . . . . . . . . . . . . . . . 15

Quick 

e

  . . . . . . . . . . . . . . . . . . . . . 15

1

Operating the appliance . . . . . .15

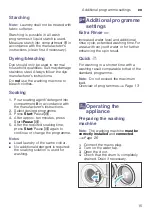
Preparing the washing machine . . . . 15

Select programme/switch on the 

appliance . . . . . . . . . . . . . . . . . . . . . 16

Select additional programme 

settings . . . . . . . . . . . . . . . . . . . . . . . 16

Placing laundry into the drum . . . . . .16

Measure and add detergent and care 

products  . . . . . . . . . . . . . . . . . . . . . .16

Start the programme . . . . . . . . . . . . .17

Changing the programme . . . . . . . . .17

Cancel the programme . . . . . . . . . . .18

Programme end  . . . . . . . . . . . . . . . .18

Removing laundry/switching off the 

appliance. . . . . . . . . . . . . . . . . . . . . .18

H

Sensors  . . . . . . . . . . . . . . . . . . . 18

Automatic load sensing. . . . . . . . . . .18

Unbalanced load detection system . .18

2

Cleaning and maintenance. . . . 19

Machine housing/control panel . . . . .19

Drum . . . . . . . . . . . . . . . . . . . . . . . . .19

Descaling  . . . . . . . . . . . . . . . . . . . . .19

Detergent drawer and housing . . . . .19

Detergent solution pump blocked . . .19

The drain hose at the siphon 

is blocked . . . . . . . . . . . . . . . . . . . . .20

Filter in the water supply blocked . . .20

3

 Faults and what to do 

about them.  . . . . . . . . . . . . . . . . 21

Emergency release . . . . . . . . . . . . . .21

Information on the display panel . . . .22

Faults and what to do about them. . .22

4

After-sales service  . . . . . . . . . . 24

[

Consumption rates . . . . . . . . . . 25

Consumption values table . . . . . . . . .25

J

Technical data . . . . . . . . . . . . . . 26

5

Positioning and connecting . . . 26

Included with the appliance. . . . . . . .26

Safety instructions . . . . . . . . . . . . . . .27

Installation surface. . . . . . . . . . . . . . .27

Installation on a base 

or a wooden joist floor. . . . . . . . . . . .27

Содержание WAK18065SG

Страница 1: ...en Instruction Manual and Installation Instructions Washing machine WAK18065SG ...

Страница 2: ...perating and installation instructions describe different models any differences will be pointed out at the relevant points in the text Read these operating and installation instructions before switching on the washing machine Display rules Warning This combination of symbol and signal word indicates a possibly dangerous situation Not heeding the warning can cause death or injuries Caution This si...

Страница 3: ...lect additional programme settings 16 Placing laundry into the drum 16 Measure and add detergent and care products 16 Start the programme 17 Changing the programme 17 Cancel the programme 18 Programme end 18 Removing laundry switching off the appliance 18 H Sensors 18 Automatic load sensing 18 Unbalanced load detection system 18 2 Cleaning and maintenance 19 Machine housing control panel 19 Drum 1...

Страница 4: ...ts for hand wash When measuring the amount of all detergents additives care products and cleaning agents always check the manufacturer s instructions The washing machine may be used by children over the age of 8 years old and by persons with reduced physical sensory or mental capacity or by persons with a lack of experience or knowledge if they are supervised or have been instructed by a responsib...

Страница 5: ...se injuries Do not climb onto the washing machine If you lean on the washing machine door when it is open the washing machine may tip over and cause injuries Do not lean on the washing machine door when it is open Reaching into the drum when it is turning can cause injuries to hands Do not reach into the drum when it is turning Wait until the drum has stopped turning Warning Risk of scalding When ...

Страница 6: ...th them or they may pull them over their heads and suffocate Keep packaging film and packaging parts out of the reach of children Warning Risk of poisoning Detergents and care products may be poisonous if consumed Keep detergents and care products out of the reach of children Warning Eye skin irritation Detergents and care products may cause irritation if they come into contact with the eyes or sk...

Страница 7: ...dealers Don t keep any replaced spare part s from the product in an exposed area Tips on economical use Always fill the appliance with the maximum amount of laundry for the relevant programme Overview of programmes Page 13 Wash normally soiled laundry without a prewash Save energy and detergent when washing lightly and normally soiled laundry Saving energy and detergent Page 12 Energy saving mode ...

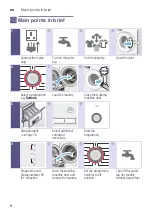
Страница 8: ...t a programme e g Cottons Load the laundry Close the washing machine door 3 Add detergent Page 16 Select additional settings if necessary Start the programme 4 Programme end Status indicator 0 for f flashes Open the washing machine door and remove the laundry Set the programme selector to off position Turn off the water tap for models without Aqua Stop ...

Страница 9: ... Getting to know the appliance Gettingtoknowtheappliance Washing machine 6 7 Detergent drawer Page 16 0 Controls display elements 8 Washing machine door with window handle 9S Open the washing machine door 9T Close the door Service flap ...

Страница 10: ...a programme 0 Extra Rinse Quick e for choosing the additional programme settings Overview of all programme settings Page 15 8 Status indicators for the programme progress programme sequence 6 End 0 Spin Rinse N Wash Ready Programme selector for selecting a programme and for switching the machine on and off ...

Страница 11: ...undry separately Wash new bright fabrics separately the first time you wash them Soiling Wash laundry with the same level of soiling together You can find examples of levels of soiling on Page 12 Light Do not prewash select the Quick e setting if necessary Normal Heavy Load less laundry select a programme with prewash Stains Remove pretreat stains while they are fresh First dab the stain with soap...

Страница 12: ...nt for woollens Suitable for wool Wool programme cold max 40 C Saving energy and detergent For light and normal soiling you can save energy lower washing temperature and detergent Note When measuring the amount of all detergents additives care products and cleaning agents please always check the manufacturer s instructions and information Measure and add detergent and care products Page 16 Saving ...

Страница 13: ...ble programme settings i Cottons Super Clean Hard wearing fabrics heat resistant fabrics made of cotton or linen Note The Quick e setting is suitable as a short programme for lightly soiled laundry Max 6 5 kg 4 kg cold 40 60 90 C 900 rpm O e f Synthetics Fabrics made from synthetic or blended fabrics Max 3 5 kg 30 C 900 rpm O e O Rinse Extra rinse with spin 900 rpm O 0 Spin Extra spin 900 rpm Supe...

Страница 14: ... wash programme to prevent shrinkage of laundry with longer programme breaks fabrics rest in the detergent solu tion Notes Wool is of animal origin e g Angora alpaca llama sheep Use a detergent which is suitable for machine washing wool Max 2 kg cold 800 rpm Drum Clean l Programme for cleaning and caring for the drum and the outer tub e g before the 1st wash cycle if an odour has formed after a pr...

Страница 15: ...ause A 5 After the required soaking time press Start Pause A again to continue or change the programme Notes Load laundry of the same colour No additional detergent is required the soaking solution is used for washing Additional programme settings Additionalprogrammesettings Extra Rinse à Increased water level and additional rinse cycle extended washing time For areas with very soft water or for f...

Страница 16: ...better during the spin cycle Individual items of laundry may lead to imbalances Observe the specified maximum load Overfilling has a negative impact on the washing result and promotes creasing 1 Place presorted items of laundry unfolded in the washing drum 2 Make sure that no items of laundry are trapped between the washing machine door and the rubber seal and close the door The Start Pause A butt...

Страница 17: ...t and fully remove the drawer 2 Slide the measuring aid forwards fold it down and click it into place 3 Reinsert the drawer Note Do not use the measuring aid for gel detergents and washing powder or for programmes with prewash or when Ready in time is selected For models without a measuring aid pour the liquid detergent into the appropriate dispenser and place it in the drum Start the programme Se...

Страница 18: ...washing machine door and detergent drawer open so that any residual water can dry away Always wait for the end of the programme otherwise the appliance may still be locked Then switch on the appliance and wait for it to unlock If the display panel goes off at the end of a programme energy saving mode is active To activate the panel press any button H Sensors SensorsAutomatic load sensing The autom...

Страница 19: ...aling Descaling should not be necessary if the detergent is measured out correctly However if it is required follow the manufacturer s instructions for the descaling agent Suitable descalers can be obtained via our website or from our after sales service Page 24 Detergent drawer and housing If the washing machine contains detergent or fabric softener residues 1 Pull out the detergent drawer Press ...

Страница 20: ... must be able to rotate Refit the pump cover and screw it on tightly The handle must be in a vertical position 6 Place the service flap back on lock it into place and close it Note To prevent unused detergent from flowing straight into the drain during the next wash Pour 1 litre of water into compartment II and start the Drain programme The drain hose at the siphon is blocked 1 Switch off the appl...

Страница 21: ...l continue running when the power supply has been restored However if the laundry has to be removed the washing machine door can be opened as follows Warning Risk of scalding When you are washing at high temperatures there is a risk of scalding if you come into contact with detergent solution and laundry If possible leave it to cool down Warning Risk of injury You may injure your hands if you reac...

Страница 22: ...l the after sales service Page 24 Faults Cause remedial action Water is leaking out Attach replace the drainage hose correctly Tighten the screw connection of the supply hose No water supply Detergent not dispensed Start Pause A not pressed Tap not turned on Filter blocked Clean the filter Page 20 Note If an additional water filter has been installed depending on model Page 20 check for contaminan...

Страница 23: ...laundry Use standard detergent Foam escapes from the detergent drawer Too much detergent used Mix one tablespoon of fabric softener with 1 2 litre water and pour into compartment II not for outdoor fabrics sportswear fabrics or those made with down Reduce the detergent dosage for the next wash cycle Improper detergent use Only use detergent suitable for front loading washing machines Intense noise...

Страница 24: ... by engineers Please give the after sales service the product number E no and the production number FD of the appliance You can find this information depending on the model On the inside of the washing machine door in the opened service flap and on the rear of the appliance Trust the expertise of the manufacturer Contact us for assistance By doing so you will ensure that the repairs are carried ou...

Страница 25: ... Delicate Silk 30 C 2 kg 0 17 kWh 48 l 3 4 h p W Wool cold 2 kg 0 03 kWh 42 l 3 4 h Programme Load Energy consumption Water Programme duration Super Clean 60 C 6 5 kg 1 01 kWh 47 l 3 1 4 h Values determined according to IEC 60456 Observed values may deviate from the indicated values due to influence of water pressure hardness and inlet temperature ambient temperature type amount and soiling of lau...

Страница 26: ...luded with the appliance Note Check the machine for transport damage Never use a damaged machine If you have a complaint please contact the retailer from whom you purchased the appliance or our after sales service Mains cable 0 Bag Installation and operating instructions After sales service location directory Warranty Cover caps for openings left after removing the transport locks Wrench 8 Water d...

Страница 27: ...ion points for the water supply hose and water drain hose are under high water pressure To prevent leaks and water damage you must follow the instructions in this section Notes In addition to the safety information listed here the local water and electricity supplier may have special requirements If in doubt have the appliance connected by a specialist Installation surface Note The washing machine...

Страница 28: ...pliance for the first time make sure that you completely remove all four transport locks Keep the locks in a safe place To prevent transport damage from occurring if the appliance is moved at a later date you must refit the transport locks before transporting the appliance Note Keep the screws and sleeves in a safe place 1 Take the hoses out of the holders 2 Unscrew and remove all four transport b...

Страница 29: ...y hose supplied or one that was purchased from an authorised specialist retailer Do not bend squash modify or cut through the water supply hose otherwise its strength is no longer guaranteed Only tighten the screw connections by hand If the screw connections are tightened too much with a tool pliers the thread may be damaged Optimum water pressure in the supply network At least 100 kPa 1 bar Maxim...

Страница 30: ... end of the drain hose is immersed in the drained water water may be sucked back into the appliance and may damage the appliance fabrics Make sure that The plug does not block drainage from the sink The end of the drain hose is not immersed in the drained water The water drains away quickly enough Drainage into a siphon The connection point must be secured using a hose clamp with a diameter of 24 ...

Страница 31: ...rently applicable regulations The mains plug can be accessed at all times The mains cable is not bent squashed modified cut through or in contact with heat sources Grounding Instructions Warning Danger of death Improper connection of the ground may result in electric shock Have the appliance checked by a qualified technician or licensed electrician if you are in doubt as to whether the washing mac...

Страница 32: ...approx 1 litre of water into compartment II 9 Pour standard detergent into compartment II Note To prevent foaming only use half of the amount of detergent recommended by the detergent manufacturer Do not use detergent for wool or delicates 10 Close the detergent drawer 11 Press Start Pause A 12 Switch off the appliance at the end of the programme Your washing machine is now ready to use Transporta...

Страница 33: ...ting en 33 Installing the transport locks 1 Remove the covers and keep them in a safe place Use a screwdriver if necessary 2 Insert all four sleeves Clip the mains cable securely in the holders Insert and tighten the screws ...

Страница 34: ...6 ...

Страница 35: ...6 ...

Страница 36: ...001050219 9411 You can find the contact information for all countries in the attached after sales service directory 7 Advice and repair order in the event of faults GB 0344 892 8979 Calls charged at local or mobile rate IE 01450 2655 0 03 per minute at peak Off peak 0 0088 per minute ...

Отзывы: