background image

IP Camera 200 Series

Installation | en

19

Bosch Security Systems

Installation and Operation Manual

AR18-10-B012 | v1.54 | 2011.08

3.2

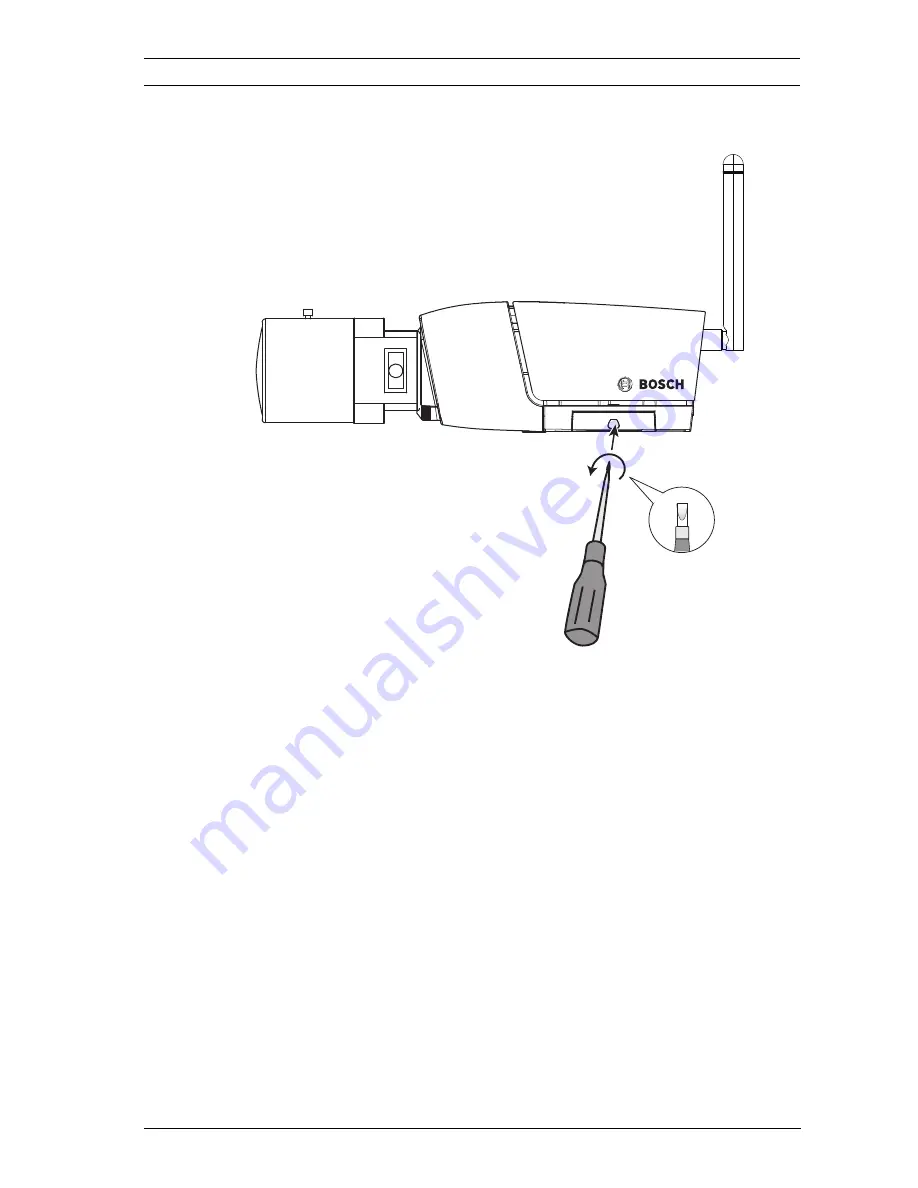
SD card

Figure 3.2

SD card

1.

Unscrew the cover on the right side of the camera. 

2.

Slide the SD card into the slot. 

3.

Close and secure the cover. 

The camera supports most SD/SDHC cards.

Note:

Use high speed SD cards, class 4 or above (the higher read/

write speed the better).

Содержание NBC-255-W

Страница 1: ...HD 720p IP Wireless Camera NBC 265 W en Installation and Operation Manual ...

Страница 2: ......

Страница 3: ...ts 13 2 Introduction 14 2 1 Features 14 2 2 Unpacking 16 3 Installation 18 3 1 Wireless antenna 18 3 2 SD card 19 3 3 Mounting the camera 22 3 5 Network connector 26 3 6 Power connection 27 3 6 1 DC power connection 27 3 7 I O connector 29 3 8 Audio connectors 31 3 9 Resetting the camera 32 4 Browser connection 59 4 1 System requirements 59 4 2 Establishing the connection 60 4 2 1 Password protect...

Страница 4: ...8 5 8 System Overview 68 6 Advanced Mode 69 6 1 Advanced Mode menu tree 69 6 2 General 70 6 2 1 Identification 70 6 2 2 Password 70 6 2 3 Date Time 72 6 2 4 Display Stamping 73 6 3 Web Interface 75 6 3 1 Appearance 75 6 3 2 LIVEPAGE Functions 76 6 3 3 Logging 77 6 4 Camera 78 6 4 1 Installer Menu 78 6 4 2 Picture Settings 79 6 4 5 Encoder Streams 89 6 4 6 Audio 90 6 5 Recording 91 6 5 1 Storage Ma...

Страница 5: ... 2 Relay 118 6 8 Network 120 6 8 1 Network Access 120 6 8 2 Advanced 124 6 8 3 WLAN 125 6 8 4 Multicast 126 6 8 5 FTP Posting 127 6 9 Service 129 6 9 1 Maintenance 129 6 9 2 System Overview 131 7 Operation via the browser 132 7 1 Livepage 132 7 1 1 Processor load 133 7 1 2 Image selection 134 7 1 3 Digital I O 135 7 1 4 System Log Event Log 136 7 1 5 Saving snapshots 136 7 1 6 Recording video sequ...

Страница 6: ...12 v1 54 2011 08 Installation and Operation Manual Bosch Security Systems 8 3 Customer service 141 9 Maintenance 142 9 1 Repairs 142 9 1 1 Transfer and disposal 142 10 Technical Data 143 10 1 Specifications 143 10 1 1 Dimensions 157 10 1 2 Accessories 160 ...

Страница 7: ...tuation such as Dangerous Voltage inside the product If not avoided this will result in an electrical shock serious bodily injury or death WARNING Medium risk Indicates a potentially hazardous situation If not avoided this could result in minor or moderate bodily injury CAUTION Low risk Indicates a potentially hazardous situation If not avoided this could result in property damage or risk of damag...

Страница 8: ...Take precautions to protect the unit from power and lightning surges 5 Controls adjustment Adjust only those controls specified in the operating instructions Improper adjustment of other controls may cause damage to the unit 6 Power sources Operate the unit only from the type of power source indicated on the label 7 Servicing Unless qualified do not attempt to service this unit yourself Refer all ...

Страница 9: ...ined by turning the equipment off and on the user is encouraged to try to correct the interference by one or more of the following measures reorient or relocate the receiving antenna increase the separation between the equipment and receiver connect the equipment into an outlet on a circuit different from that to which the receiver is connected consult the dealer or an experienced radio TV technic...

Страница 10: ...ntenna s used for this transmitter must not be co located or operating in conjunction with any other antenna or transmitter 1 4 UL certification Disclaimer Underwriter Laboratories Inc UL has not tested the performance or reliability of the security or signaling aspects of this product UL has only tested fire shock and or casualty hazards as outlined in UL s Standard s for Safety for Closed Circui...

Страница 11: ...erated with a minimum distance of 20 centimeters between the radiator and your body 1 6 Bosch notices More information For more information please contact the nearest Bosch Security Systems location or visit www boschsecurity com Disposal Your Bosch product was developed and manufactured with high quality material and components that can be recycled and reused This symbol means that electronic and...

Страница 12: ...gital Equipment Corporation Permission to use copy modify distribute and sell this software and its documentation for any purpose and without fee is hereby granted provided that the above copyright notices appear in all copies and that both those copyright notices and this permission notice appear in supporting documentation and that the names of Adobe Systems and Digital Equipment Corporation not...

Страница 13: ... compression technology to give clear images reducing bandwidth and storage The camera can be used as a stand alone video surveillance system with no additional equipment or it can easily integrate with the Bosch DVR 700 Series recorders Features include SD SDHC card slot supports edge recording up to 32 GB Tri streaming Two H 264 streams and one M JPEG stream HD 720p Progressive scan for sharp im...

Страница 14: ...and UK plug Camera mount kit Quick installation guide CD ROM Bosch Video Client Documentation Tools Wireless antenna If equipment has been damaged during shipment repack it in the original packaging and notify the shipping agent or supplier WARNING Installation should only be performed by qualified service personnel in accordance with the National Electrical Code or applicable local codes CAUTION ...

Страница 15: ...R18 10 B012 v1 54 2011 08 Installation and Operation Manual Bosch Security Systems 3 Installation 3 1 Wireless antenna Figure 3 1 Wireless antenna 1 Screw the antenna onto the screw connector on the rear of the camera 2 Straighten the antenna ...

Страница 16: ... AR18 10 B012 v1 54 2011 08 3 2 SD card Figure 3 2 SD card 1 Unscrew the cover on the right side of the camera 2 Slide the SD card into the slot 3 Close and secure the cover The camera supports most SD SDHC cards Note Use high speed SD cards class 4 or above the higher read write speed the better ...

Страница 17: ...ead The mounting socket is isolated from ground to prevent ground loops Figure 3 3 Mounting a camera 1 Use three screws to secure the base of the mounting unit to a wood Ø3 8 mm 26 mm deep or concrete Ø6 mm 26 mm deep surface 2 On the mounting unit loosen the ball socket adjustment ring 2 CAUTION Do not point the camera lens into direct sunlight as this may damage the sensors 3x Ø3 8 mm D 26 mm 3x...

Страница 18: ...n and Operation Manual AR18 10 B012 v1 54 2011 08 3 Adjust the ball socket so that camera mount is correcrly aligned for the required angle 4 Screw camera onto mount and when in position tighten the locking ring 1 securely 5 Tighten the ball socket adjustment ring 2 securely ...

Страница 19: ...08 Installation and Operation Manual Bosch Security Systems 3 4 Network connector Figure 3 4 Network connection Connect the camera to a 10 100 Base T network Use a shielded UTP Category 5e cable with RJ45 connectors 1 2 3 4 DC12V Ethernet Line out Reset Line in I O ...

Страница 20: ...ack from the power supply into the DC12V socket of the camera 3 Connect the power supply to either a 230 VAC or a 120 VAC power supply outlet When power is supplied to the camera the LED on the bottom front of the camera lights This LED can be disabled in the Installer menu Note The date time must be synchronized each time after power on It is important to ensure that the date time is correct for ...

Страница 21: ...in of insulation Relay output switching capability Max voltage 24 VAC or 24 VDC Max 1 A continuous 12 VA Trigger in 9 VDC minimum 30 VDC maximum Reverse polarity connection will be inactive Alarm input configurable as active low or active high Function Pin I O socket Relay 1 Relay out contact 1 2 Relay out contact 2 Alarm input 3 Relay in Positive 4 Relay in Negative 1 2 3 4 DC12V Ethernet Line ou...

Страница 22: ... Operation Manual AR18 10 B012 v1 54 2011 08 3 7 Audio connectors Figure 3 7 Audio connectors Connect audio devices to the Line In and Line Out connectors 1 2 3 4 DC12V Ethernet Line out Reset Line in I O Line R GND Line L Line in 9 kOhm typ 200 mVrms Line out 16 Ohm min 200 mVrms ...

Страница 23: ... Resetting the camera If the camera cannot be connected because the IP address has changed press and hold the reset button 7 seconds approximately until the LED flashes red to recall the factory default values The factory default IP address is 192 168 0 1 Figure 3 8 Reset button 1 2 3 4 DC12V Ethernet Line out Reset Line in I O ...

Страница 24: ...epth Intranet or Internet network access The Web browser must be configured to enable Cookies to be set from the IP address of the unit In Windows Vista deactivate protected mode on the Security tab under Internet Options To play back live video images an appropriate ActiveX must be installed on the computer If necessary the required software and controls can be installed from the product disk pro...

Страница 25: ...0 Bosch VMS connections are supported 4 2 1 Password protection in camera A camera offers the option of limiting access across various authorization levels If the camera is password protected a message to enter the password appears 1 Enter the user name and the associated password in the appropriate fields 2 Click OK If the password is correct the desired page is displayed 4 3 Protected network If...

Страница 26: ...The RECORDINGS link is only visible if a storage medium is available Ensure that MPEG_ActiveX is installed Figure 4 1 Livepage 4 4 1 Livepage The LIVEPAGE is used to display and control the video stream Refer to Section 7 1 Livepage page 132 for more information 4 4 2 Recordings Click RECORDINGS in the application title bar to open the playback page Refer to Section 7 2 Recordings page page 138 fo...

Страница 27: ... fundamental functioning of the unit for example firmware updates can only be made using the configuration menu The configuration menu tree allows all parameters of the unit to be configured The configuration menu is divided into Basic Mode and Advanced Mode Refer to Section 5 Basic Mode page 64 for more information on basic settings refer to Section 6 Advanced Mode page 69 for more information on...

Страница 28: ...re changed by entering new values or by selecting a pre defined value in a list field Saving changes After making changes in a window click Set to send the new settings to the device and save them there Clicking Set saves only the settings in the current window Changes in any other windows are ignored Click SETTINGS in the applications title bar to close the window without saving the changes Note ...

Страница 29: ... camera and allows all configuration settings to be changed user is the middle authorization level This user can operate the device play back recordings and also control a camera but cannot change the configuration live is the lowest authorization level It can only be used to view the live video image and switch between the different live image displays Use the various authorization levels to limi...

Страница 30: ...ices operating in the system or network it is important to synchronize their internal clocks For example it is only possible to identify and correctly evaluate simultaneous recordings when all devices are operating on the same time As the device time is controlled by the internal clock it is not necessary to enter the day or date of the week These are set automatically The time zone in which the s...

Страница 31: ...ddress allocation set this parameter to On to activate the automatic acceptance of DHCP assigned IP addresses Note Certain applications for example Bosch Video Management System use the IP address for the unique assignment of the device If using these applications the DHCP server must support the fixed assignment between IP address and MAC address and must be appropriately set up so that once an I...

Страница 32: ...Outdoor for the operation environment 5 6 Audio Switch the camera microphone On or Off 5 7 Recording Record the images from the camera to a storage medium For long term authoritative images it is essential to use an NVR or an appropriately sized iSCSI system 5 7 1 Storage medium 1 Select the required storage medium from the list 2 Click Start to start recording or Stop to end recording 5 8 System ...

Страница 33: ... is opened The settings are changed by entering new values or by selecting a pre defined value in a list field Saving changes After making changes in a window click Set to send the new settings to the device and save them there Clicking Set saves only the settings in the current window Changes in any other windows are ignored Click SETTINGS in the applications title bar to close the window without...

Страница 34: ...at makes it as easy as possible to identify the location unambiguously Initiator extension Add text to an initiator name to make identification easier in large iSCSI systems This text is added to the initiator name separated from it by a full stop 6 2 2 Password A password prevents unauthorized access to the device The device recognizes three authorization levels service user and live service is t...

Страница 35: ...if a live password is assigned a service and a user password should also be set When assigning passwords always start from the highest authorization level service and use different passwords Password Define and change a separate password for each level while logged in as service or if the device is not protected by a password Enter the password 19 characters maximum for the selected level Confirm ...

Страница 36: ...to apply the system time from your computer to the device Note It is important to ensure that the date time is correct for recording An incorrect date time setting could prevent correct recording Device time zone Select the time zone in which the system is located Daylight saving time The internal clock can switch automatically between normal and daylight saving time DST The device already contain...

Страница 37: ...ra can receive the time signal from a time server using various time server protocols and then use it to set the internal clock The device polls the time signal automatically once every minute Enter the IP address of a time server Time server type Select the protocol that is supported by the selected time server It is recommended to select the SNTP server protocol This protocol provides high accur...

Страница 38: ...s information can be useful for recorded video images however it does increase the processor s computing time Select Off if displaying milliseconds is not needed Alarm mode stamping Select On for a text message to be overlaid in the event of an alarm It can be displayed at a position of choice using the Custom option or it can be set to Off for no overlay information If the Custom option is select...

Страница 39: ... via the Internet Intranet For access via the Internet Intranet there must be a connection in order to display the image The image files are not stored on the camera To restore the original graphics delete the entries in the Company logo and Device logo fields Website language Select the language for the user interface here Company logo Enter the path to a suitable image in this field The image ca...

Страница 40: ...ts are displayed next to the video image as icons along with their assigned names If an alarm is active the corresponding icon changes color Show relay outputs The relay output is shown next to the video image as an icon along with its assigned name If a relay is switched the icon changes color Show VCA metadata When video content analysis VCA is activated additional information is displayed in th...

Страница 41: ...e location of individual images and video sequences saved from the Livepage If necessary click Browse to find a suitable folder 6 3 3 Logging Save event log Select this option to save event messages in a text file on the local computer This file can be viewed edited and printed with any text editor or standard office software File for event log Enter the path for saving the event log here If neces...

Страница 42: ...a picture Main frequency and Operation environment Select 50 Hz or 60 Hz as the main frequency and Indoor or Outdoor for the operation environment Exposure frame rate Auto exposure frame rate the camera automatically sets the framerate The camera tries to maintain the selected default shutter speed as long as the light level of the scene permits Select a minimum frame rate from 4 to 30 fps Fixed e...

Страница 43: ...ite balance ATW Auto tracking white balance allows the camera to continually adjust for optimal color reproduction In Manual mode the Red Green and Blue gain can be manually set to a desired position Apply white balance Hold puts the ATW on hold and saves the color settings R gain The red gain adjustment offsets the factory white point alignment reducing red introduces more cyan G gain The green g...

Страница 44: ...80 en Advanced Mode IP Camera 200 Series AR18 10 B012 v1 54 2011 08 Installation and Operation Manual Bosch Security Systems Default Click Default to set all video values to their factory setting ...

Страница 45: ...he performance and quality of both live view and recording Preview Previews of streams 1 and 2 can be shown 1 Click Preview to display a preview of the video for streams 1 and 2 the current profile is shown above the preview 2 Click 1 1 Live View below a preview to open a viewing window for that stream Various additional items of information are shown across the top of the window 3 Click Preview t...

Страница 46: ...is QVGA the JPEG resolution will be VGA The M JPEG frame rate varies depending on system loading 6 4 4 Audio Select the microphone or line in connector as the Audio input or switch it off Adjust the Input volume with the slider Switch the Audio output On or Off Select G 711 or L16 as the audio Recording format The default value is G 711 Select L16 if you want better audio quality with higher sampl...

Страница 47: ...ation might be different because of different scenes or networking status for example For long term authoritative images use an appropriately sized iSCSI system A Video Recording Manager VRM can control all recording when accessing an iSCSI system The VRM is an external program for configuring recording tasks for video servers For Recording Storage Management Recording Profiles Retention Time Reco...

Страница 48: ...SCSI system is selected as the storage medium a connection to the desired iSCSI system is needed to set the configuration parameters The storage system selected must be available on the network and completely set up Amongst other things it must have an IP address and be divided into logical drives LUN 1 Enter the IP address of the required iSCSI destination in the iSCSI IP address field 2 If the i...

Страница 49: ...t individual media or iSCSI drives and transfer these to the Managed storage media list Activate the storage media in this list and configure them for storage Note Each storage medium can only be associated with one user If a storage medium is already being used by another user decouple the user and connect the drive to the camera Before decoupling make absolutely sure that the previous user no lo...

Страница 50: ...as been used the recording in question is stopped Specify limitations for overwriting old recordings by configuring the retention time Formatting Storage Media Delete all recordings on a storage medium at any time Check the recordings before deleting and back up important sequences on the computer s hard drive 1 Click a storage medium in the Managed storage media list to select it 2 Click Edit bel...

Страница 51: ... each data stream when recording This selection is independent of the selection for live data stream transmission The properties of the profiles are defined on the Encoder Profile page Recording includes Specify whether in addition to video data audio or metadata for example alarms or VCA data should also be recorded Including metadata could make subsequent searches of recordings easier but it req...

Страница 52: ...cording Check the with encoding interval from profile box and select a predefined profile to set a specific encoding interval for alarm recording Check the Export to FTP box to send standard H 264 files to the FTP server whose address is displayed Alarm triggers Select the alarm type Alarm input Motion Audio alarm Video loss alarm that is to trigger a recording Select the Virtual alarm sensors tha...

Страница 53: ...older recordings are only overwritten if the retention time entered here has expired Make sure that the retention time corresponds with the available memory capacity A rule of thumb for the memory requirement is as follows 1 GB per hour retention time with VGA for complete frame rate and high image quality Enter the required retention time in hours or days for each recording Recording 1 correspond...

Страница 54: ... button to deselect any of the intervals 4 Click Select All to select all of the intervals to be assigned to the selected profile 5 Click Clear All to deselect all of the intervals 6 When finished click Set to save the settings to the device Holidays Define holidays whose settings will override the settings for the normal weekly schedule 1 Click the Holidays tab Days that have already been defined...

Страница 55: ...fter completing configuration activate the recording schedule and start recording Modify the configuration at any time 1 Click Start to activate the recording schedule 2 Click Stop to deactivate the recording schedule Recordings that are currently running are interrupted Recording status The graphic indicates the recording activity An animated graphic is seen when recording is taking place 6 5 5 R...

Страница 56: ...he device maintains the connection for as long as an alarm exists Number of destination IP address Specify the numbers of the IP addresses to be contacted in the event of an alarm The device contacts the remote locations one after the other in the numbered sequence until a connection is made Destination IP address For each number enter the corresponding IP address for the desired remote station De...

Страница 57: ...dwidth must be available on the network for additional video images if Multicast operation is not possible To enable Multicast operation select the UDP option for the Video transmission parameter here and on the Network page Stream Select a stream to be transmitted Remote port Select a browser port depending on the network configuration The ports for HTTPS connections are only available if the On ...

Страница 58: ...image in a split screen SSL encryption SSL encryption protects data used for establishing a connection such as the password By selecting On only encrypted ports are available for the Remote port parameter SSL encryption must be activated and configured on both sides of a connection The appropriate certificates must also have been uploaded Auto connect Select On to automatically re established a co...

Страница 59: ...gorithms Such changes can be due to movements in the camera s field of view Select various VCA configurations and adapt these to your application as required The Silent MOTION configuration is active by default In this configuration metadata is created to facilitate searches of recordings however no alarm is triggered 1 Select a VCA configuration and make the required settings 2 If necessary click...

Страница 60: ... the file name and where to save it 4 Click Load to load a saved profile A new window opens in which to select the profile file and specify where to save the file To rename a profile 1 To rename the file click the icon to the right of the list field and enter the new profile name in the field Do not use any special characters for example 2 Click the icon again The new profile name is saved The cur...

Страница 61: ...alysis must be activated At least one sensor field must be activated The individual parameters must be configured to suit the operating environment and the desired responses The sensitivity must be set to a value greater than zero Note Reflections of light from glass surfaces etc lights switching on and off or changes in the light level caused by cloud movement on a sunny day can trigger unintende...

Страница 62: ...sor fields Activate or deactivate each of these fields individually To exclude particular regions of the camera s field of view from monitoring due to continuous movement by a tree in the wind for example the relevant fields can be deactivated 1 Click Select Area to configure the sensor fields A new window opens 2 If necessary click Clear All first to clear the current selection fields marked red ...

Страница 63: ...ered by short term changes for example cleaning activities in the direct field of vision of the camera Global change slider Set how large the global change in the video image must be for an alarm to be triggered This setting is independent of the sensor fields selected under Select Area Set a high value if fewer sensor fields need to change to trigger an alarm With a low value it is necessary for ...

Страница 64: ...rm is triggered This detects tampering that would otherwise not be detected for example if the camera is turned 1 Click Reference to save the currently visible video image as a reference 2 Click Select Area and select the areas in the reference image that are to be monitored 3 Check the box Reference check to activate the on going check The stored reference image is displayed in black and white be...

Страница 65: ...f these fields individually Select only those areas for reference monitoring in which no movement takes place and that are always evenly lit as false alarms could otherwise be triggered 1 Click Select Area to configure the sensor fields A new window opens 2 If necessary click Clear All first to clear the current selection fields marked yellow 3 Left click the fields to be activated Activated field...

Страница 66: ...selected profile 3 Use the right mouse button to deselect any of the intervals 4 Click Select All to link all time intervals to the selected profile 5 Click Clear All to deselect all of the intervals 6 When finished click Set to save the settings in the device Holidays Define holidays on which a profile should be active that are different to the standard weekly schedule 1 Click the Holidays tab An...

Страница 67: ...ced Mode en 103 Bosch Security Systems Installation and Operation Manual AR18 10 B012 v1 54 2011 08 3 Click OK The item is deleted from the table and the window closes 4 The process must be repeated for deleting additional days ...

Страница 68: ...e Select the VCA configuration here that is to be enabled via an active trigger A green check mark to the right of the list field indicates that the trigger is active Trigger inactive Select the VCA configuration here that is to be activated if the trigger is not active A green check mark to the right of the list field indicates that the trigger is inactive Delay s Select the delay period for the ...

Страница 69: ...grams You can also use the name in the Forensic Search program function as a filter option for quick search in recordings Enter a unique and clear name here Do not use any special characters for example Signal Ranges Exclude particular signal ranges in order to avoid false alarms For this reason the total signal is divided into 13 tonal ranges mel scale Check or uncheck the boxes below the graphic...

Страница 70: ...ransfer Protocol Outgoing e mails are sent to the mail server via the address entered Otherwise leave the box blank 0 0 0 0 SMTP user name Enter a registered user name for the chosen mail server SMTP password Enter the required password for the registered user name Format Select the data format of the alarm message Standard with JPEG e mail with JPEG image file attachment SMS e mail in SMS format ...

Страница 71: ... Enter the e mail address for alarm e mails here The maximum address length is 49 characters Sender name Enter a unique name for the e mail sender for example the location of the device This makes it easier to identify the origin of the e mail Test e mail Click Send Now to test the e mail function An alarm e mail is immediately created and sent ...

Страница 72: ...not use any special characters for example 6 7 2 Relay Configure the switching behavior of the relay output Select different events that automatically activate an output For example turn on a floodlight by triggering a motion alarm and then turn the light off again when the alarm has stopped Idle state Select Open for the relay to operate as an N O contact or select Closed if the relay is to opera...

Страница 73: ...gnal Motion alarm sTrigger by motion alarm as configured on the VCA page Local input sTrigger by the corresponding external alarm input Remote input s Trigger by remote station s corresponding switching contact only if a connection exists Relay name The relay can be assigned a name here The name is shown on the button next to Trigger relay The LIVEPAGE can also be configured to display the name ne...

Страница 74: ...resses after the reboot Automatic IP assignment If a DHCP server is employed in the network for the dynamic assignment of IP addresses activate acceptance of IP addresses automatically assigned to the device Certain applications Bosch Video Management System Archive Player Configuration Manager use the IP address for the unique assignment of the device If using these applications the DHCP server m...

Страница 75: ...st operation is only possible with the UDP protocol The TCP protocol does not support multicast connections The MTU value in UDP mode is 1514 bytes HTTP browser port Select a different HTTP browser port from the list if required The default HTTP port is 80 To limit connection to HTTPS deactivate the HTTP port To do this activate the Off option HTTPS browser port To limit browser access to encrypte...

Страница 76: ...a special operation type Network MSS Byte Set the maximum segment size for the IP packet s user data here This gives the option to adjust the size of the data packets to the network environment and to optimize data transmission Please comply with the MTU value of 1 514 bytes in UDP mode iSCSI MSS Byte Specify a higher MSS value for a connection to the iSCSI system than for the other data traffic v...

Страница 77: ...stered at DynDNS org here Force registration now Force the registration by transferring the IP address to the DynDNS server Entries that change frequently are not provided in the Domain Name System It is a good idea to force the registration when setting up the device for the first time Only use this function when necessary and no more than once a day to avoid the possibility of being blocked by t...

Страница 78: ...ot send the traps automatically and will only reply to SNMP requests If one or two SNMP host addresses are entered SNMP traps are sent automatically Select Off to deactivate the SNMP function 1 SNMP host address 2 SNMP host address To send SNMP traps automatically enter the IP addresses of one or two target devices here SNMP traps To choose which traps are sent 1 Click Select A dialog box appears ...

Страница 79: ...ion should not be used in large installations due to the large number of registration notifications TCP metadata input The device can receive data from an external TCP sender for example an ATM or POS device and store it as metadata Select the port for TCP communication Select Off to deactivate the function Enter a valid Sender IP address 6 8 3 WLAN To use a wireless LAN connection proceed as foll...

Страница 80: ...t multicast connections A special IP address class D address must be configured for multicast operation in a multicast enabled network The network must support group IP addresses and the Internet Group Management Protocol IGMP V2 The address range is from 225 0 0 0 to 239 255 255 255 The multicast address can be the same for multiple streams However it is then necessary to use a different port in ...

Страница 81: ... FTP server at specific intervals If required retrieve these images at a later date to reconstruct alarm events JPEG resolution corresponds to the highest setting from the two data streams File name Select how file names are created for the individual images that are transmitted Overwrite The same file name is always used and any existing file will be overwritten by the current file Increment A nu...

Страница 82: ... address Enter the IP address of the FTP server on which to save the JPEG images FTP server login Enter your login name for the FTP server FTP server password Enter the password that gives access to the FTP server Path on FTP server Enter an exact path to post the images on the FTP server Max bit rate Enter a limit for the bit rate in kbps ...

Страница 83: ... the firmware file in the field or click Browse to locate and select the file 3 Click Upload to begin transferring the file to the device The progress bar allows monitoring of the transfer The new firmware is unpacked and the Flash memory is reprogrammed The time remaining is shown by the message going to reset Reconnecting in seconds When the upload is completed successfully the device reboots au...

Страница 84: ...elect the desired file 2 Make certain that the file to be loaded comes from the same device type as the device to be reconfigured 3 Click Upload to begin transmission to the device The progress bar allows monitoring of the transfer Once the upload is complete the new configuration is activated The time remaining is shown by the message going to reset Reconnecting in seconds When the upload is comp...

Страница 85: ...upport purposes Click Download and select a storage location for the file Note Make sure that the HTTPS browser port is not set to Off and TLS 1 0 support is activated for your browser 6 9 2 System Overview This window is for information only and cannot be modified Keep this information at hand when seeking technical support Select the text on this page with a mouse and copy it so that it can be p...

Страница 86: ...n various text overlays may be visible on the live video image Other information may also be shown next to the live video image on the Livepage The display depends on the settings on the LIVEPAGE Functions page Figure 7 1 Livepage 7 1 1 Processor load When accessing the camera with a browser the processor load and network information is available in the upper right of the window next to the Bosch ...

Страница 87: ...rlays provide the following information Decoding error The frame might show artefacts due to decoding errors If subsequent frames reference this corrupted frame they might also show decoding errors as well but won t be marked with the decoding error icon Alarm flag set on media item Communication error Any kind of communication error is indicated by this icon Cause can be a connection failure to t...

Страница 88: ...ld contains information about the operating status of the camera and the connection These messages can be saved automatically in a file Events such as the triggering or end of alarms are shown in the Event Log field These messages can be saved automatically in a file To delete the entries from the fields click the icon in the top right hand corner of the relevant field Watermarking flag set on med...

Страница 89: ...torage location depends on the configuration of the camera 1 Click the recording icon to record video sequences Saving begins immediately The red dot on the icon indicates that a recording is in progress 2 Click the recording icon again to stop recording Play back saved video sequences using the Player from Bosch Security Systems 7 1 7 Running recording program The hard drive icon below the camera...

Страница 90: ...B012 v1 54 2011 08 Installation and Operation Manual Bosch Security Systems All connected users receive audio signals sent from the camera but only the user who first pressed the F12 key can send audio signals others must wait for the first user to release the key ...

Страница 91: ... 1 Select Recording 1 or 2 in the drop down menu The contents for 1 and 2 are identical only the quality and location may be different 2 Use the arrow buttons to browse the list 3 Click a track The playback for the selected sequence starts Export to FTP Click Export to FTP to send the current track to the FTP server If required change the times within the selected range 7 2 1 Controlling playback ...

Страница 92: ...ng functions Start Pause playback Jump to start of active sequence or to previous sequence Jump to start of the next video sequence in the list Slide control Continuously select playback speed by means of the speed regulator Bookmarks In addition set markers in the sequences so called bookmarks and jump directly to these These bookmarks are indicated as small yellow arrows above the time interval ...

Страница 93: ...ms The following table is intended to help identify the causes of malfunctions and correct them when possible 8 3 Customer service If a fault cannot be resolved please contact your supplier or system integrator or contact Bosch Security Systems Customer Service directly The Installer should write down all information regarding the unit so that it can be referenced for warranty or repair The Malfun...

Страница 94: ... and Operation Manual AR18 10 B012 v1 54 2011 08 version numbers of the firmware and other status information can be seen when the unit starts or by opening the Service menu Note down this information and the information found on the camera label before contacting customer service ...

Страница 95: ...us materials that must be disposed of according to law Defective or superfluous devices and parts should be disposed of professionally or taken to your local collection point for hazardous materials CAUTION Never open the casing of the camera The unit does not contain any user serviceable parts Ensure that all maintenance or repair work is performed only by qualified personnel electrical engineeri...

Страница 96: ... VGA CIF QVGA Video compression H 264 MP Main Profile H 264 BP Baseline Profile Plus M JPEG Max frame rate 30 fps M JPEG rate varies depending on system loading Lens type Varifocal 2 8 to 12mm manual iris F1 4 to 360 Lens mount CS mount Alarm Input 9 to 30 VDC Relay Out 24 VAC VDC 1 A Audio Input Built in microphone Line in jack connector Audio Output Line out jack connector Audio communication Tw...

Страница 97: ...ient ARP DNS DDNS NTP SNMP UPnP 802 1X iSCSI Ethernet 10 100 Base T auto sensing half full duplex RJ45 Wireless LAN IEEE 802 11b g Wireless security WPA PSK TKIP WPA2 PSK AES Dimensions with lens H x W x D 55 x 72 x 178 mm 2 17 x 2 83 x 7 00 in Weight with lens Approx 349 g 0 77 lb Mounting inch mounting socket on top and bottom Operating Temperature Camera 0 ºC to 45 ºC 32 ºF to 113 ºF Operating ...

Страница 98: ...nsions 10 1 2 Accessories LTC 9348 00 Series Indoor Dome housings for cameras lens to 216 mm 8 5 in ceiling mount tinted metal backbox Contact a Bosch representative in your area for the latest available accessories or visit our website at www boschsecurity com 72 2 83 55 2 18 mm in 178 7 00 115 6 4 55 49 5 1 94 47 2 1 86 1 4 20UNC 1 4 20UNC 5 4 0 21 60 7 2 40 ...

Страница 99: ...146 en Technical Data IP Camera 200 Series AR18 10 B012 v1 54 2011 08 Installation and Operation Manual Bosch Security Systems ...

Страница 100: ......

Страница 101: ...Bosch Security Systems www boschsecurity com Bosch Security Systems 2012 ...

Отзывы: