


English |
15
Bosch Power Tools
1 609 92A 41K | (28.9.17)
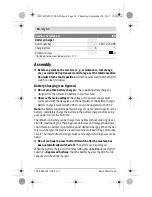
The charging procedure starts as soon as the main plug of the battery charger
is inserted into the socket and the cordless screwdriver is afterwards placed
on the battery charger
11
.
The battery charge-control indicator
5
indicates the charging progress. The
indicator lights up
green
during the charging process. When the battery
charge-control indicator
5
is no longer lit, the battery is fully charged.
During the charging procedure, the handle of the machine warms up. This is
normal.
Disconnect the battery charger from the mains supply when not using it for
longer periods.
The power tool cannot be used during the charge procedure; it is not defec-
tive when inoperative during the charging procedure.
Protect the battery charger against moisture!
Observe the notes for disposal.
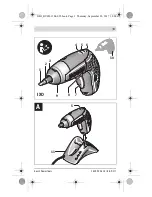
Changing the Tool (see figure B)
Do not use double-sided screwdriver bits that are longer than 25 mm.
Insert the screwdriver bit
1
directly into the tool holder
2
.
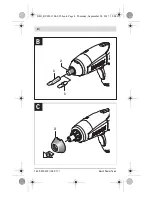
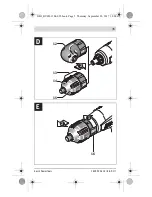
Torque Attachment/Angle Driver Head (see figures C – F)
The angle driver head
12
enables screwdriving at hard to reach locations.
With the torque presetting ring
14
on the torque attachment
13
, the request-
ed torque can be preset in 10 steps. With the correct setting, the tool bit is
stopped as soon as the screw is driven flush into the material or when the set
torque is reached.
Assembly (see figures C–D)
For assembly of the attachments, pull the rubber cap
3
off toward the front.
Afterwards the attachments can be mounted. The attachments can be
mounted offset by 45°.
Dismounting (see figures E–F)
To dismount the attachments, turn the release ring
16
in rotation direction
and pull the attachment off toward the front. Afterwards, mount the
rubber cap
3
again.
OBJ_BUCH-1384-005.book Page 15 Thursday, September 28, 2017 12:00 PM


