Cleaning aid
en
23
14.5 Discoloration of the burners
After long use, the brass burner parts become darker
due to natural oxidation. This discolouration does not
affect their usability.
14.6 Cleaning the pan support manually
WARNING ‒ Risk of burns!
The appliance becomes hot during operation.
▶
Allow the appliance to cool down before cleaning.
1.
Carefully remove the pan support.
2.
Soak the pan support in the sink.
3.
Clean the pan support using a scrubbing brush and
washing-up liquid.
4.
Rinse the pan support rinse with clean water.
5.
Dry the pan support with a kitchen towel.
14.7 Using cleaning gel for burnt-on dirt
For hard-to-remove, burnt-on dirt, you can order a
cleaning gel from our online shop, from your specialist
retailer or via our after-sales service.
1.
Follow the instructions on the cleaning product.
2.
Remove the pan supports and the burner parts.
3. ATTENTION!
On the burner parts, the controls and the aluminium
surfaces, the cleaning gel leads to damage.
▶
Only use the cleaning gel on the pan supports
and stainless steel surfaces.
Apply the cleaning gel to the burnt-on dirt.
4.
If necessary, let the dirt soak overnight.
14.8 Cleaning the stainless steel
surfaces
1.
Observe the information regarding the cleaning
agents.
2.
Clean using a sponge cloth and hot soapy water in
the direction of the finish.
3.
Dry with a soft cloth.
4.
Apply a thin layer of the stainless steel cleaning
product with a soft cloth.
Tip:
You can obtain stainless steel cleaning products
from after-sales service or the online shop.
14.9 Cleaning the burners
After long use, the brass burner parts become darker
due to natural oxidation. This discolouration does not
affect their usability.
WARNING ‒ Risk of burns!
The appliance becomes hot during operation.
▶
Allow the appliance to cool down before cleaning.
1.
Carefully remove the pan support.
2.
Carefully remove the burner parts.
3.
Clean the burner parts using a scrubbing brush and
washing-up liquid.
4.
Rinse the burner parts with clean water.
5.
Ensure that the burner parts are completely dry be-
fore fitting them; otherwise, there may be ignition
problems or problems during operation.
14.10 Cleaning the cooking zone switch
Clean the cooking zone switch after use if it is dirty or
stained.
Note:
¡
Read the information on unsuitable cleaning agents.
¡
Do not use a glass scraper.
¡
Do not use a glass ceramic cleaner.
¡
Do not remove the cooking zone switch.
1.
Clean the cooking zone switch using hot soapy wa-
ter and a soft cloth.
– Wring out the cloth well. The cloth must not be
too wet.
– Wash new sponge cloths thoroughly before use.
2.
Dry with a soft cloth.
15 Cleaning aid
The cleaning aid is a fast alternative for occasionally
cleaning the cooking compartment. The cleaning aid
evaporates soapy water and therefore softens dirt. This
means that dirt can be removed more easily.
15.1 Setting the cleaning aid
WARNING ‒ Risk of scalding!
If there is water in the cooking compartment when it is
hot, this may create hot steam.
▶
Never pour water into the cooking compartment
when the cooking compartment is hot.
Requirement:
The cooking compartment must be
cooled down completely.
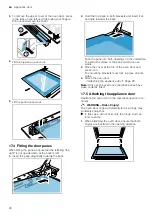
1.
Remove the accessories from the cooking compart-
ment.
2.
Add one drop of detergent to 0.4 l water and pour it
onto the centre of the cooking compartment floor.
Do not use distilled water.
3.
Use the function selector to set the
Bottom heat-
ing
type of heating.
4.
Use the temperature selector to set 80 °C.
5.
Press repeatedly until
is selected in the dis-
play.
6.
Use or to set the duration to four minutes.
a
After a few seconds, the appliance starts heating
and the duration counts down.
a
When the cooking time has counted down, a signal
sounds and the duration is at zero in the display.
7.
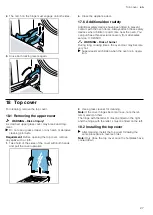
Switch off the appliance and leave it to cool for ap-
prox. 20 minutes.


