background image

en

    Getting to know your appliance

8

*

Getting to know your 

appliance

Getting 

to know y

our appli

ance

In this chapter, we will explain the displays and controls. 

You will also find out about the various functions of your 

appliance.

Note: 

Depending on the appliance model, individual 

details and colours may differ.

Control panel

In the control panel, you can use the various buttons, 

touch fields, touch-screen displays and the rotary 

selector to set the different appliance functions. The 

current settings are shown on the display.
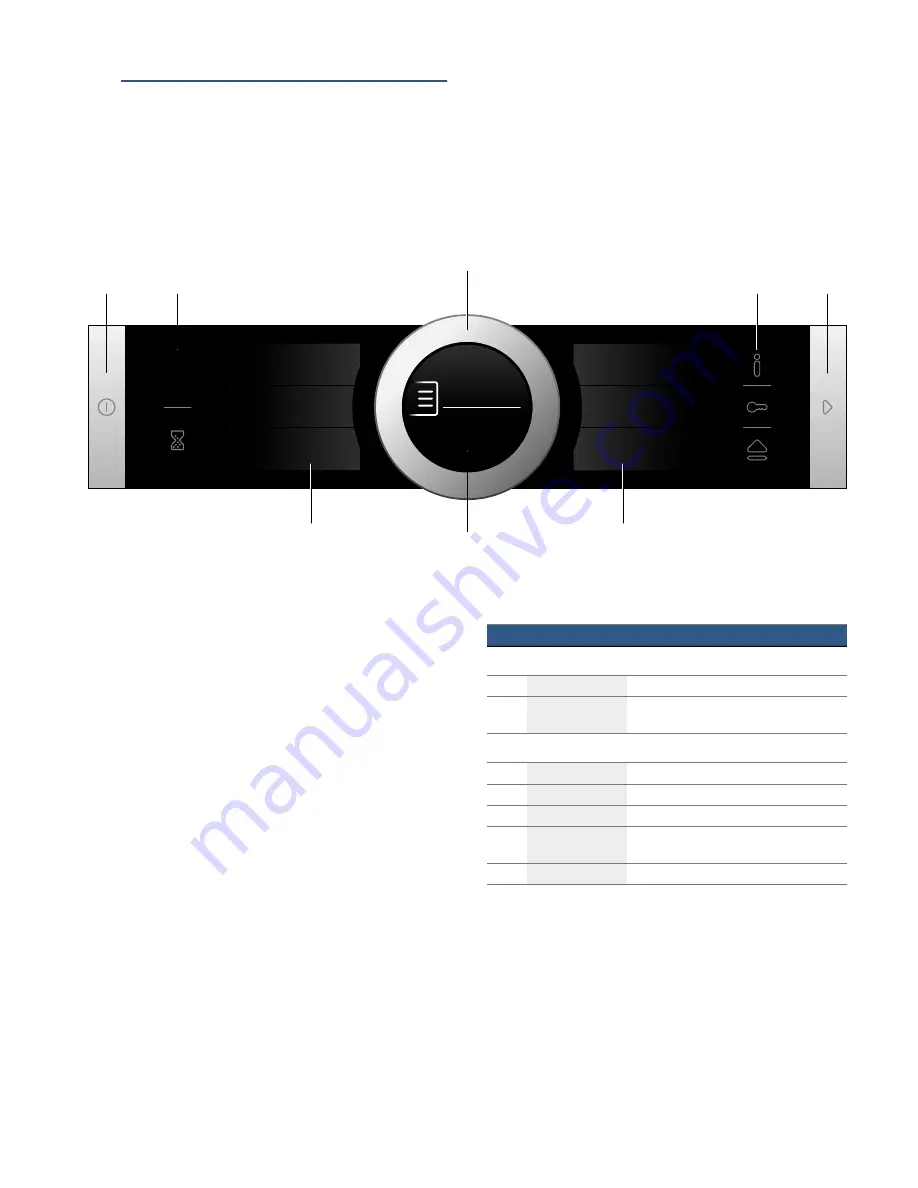
The overview shows the control panel when the 

appliance is switched on with the menu display.

Controls

The individual controls are adapted for the various 

functions of your appliance. You can set your appliance 

simply and directly.

Buttons and touch fields

Here you can find a short explanation of the various 

buttons and touch fields.

--------

Rotary selector

You can use the rotary selector to change the setting 

values shown on the display.
You can also use the rotary selector to scroll through 

the selection lists on the touch-screen displays.
In most selection lists, you have to turn the rotary 

selector in the opposite direction once you reach the 

beginning or the end of the list.

PV

ƒ&

+HL]DUW

2EHU8QWHUKLW]H

+HL]DUW

2EHU8QWHUKLW]H

+HL]DUW

2EHU8QWHUKLW]H

8POXIWJULOOHQ

*ULOOJUR‰H)OlFKH

2EHU_8QWHUKLW]H

(FR

6FKQHOOYRUKHL]HQ

DXV

(QGH

PHQX

RQ

RII

VWDUW

VWRS

$XVZDKO

+DXSWPHQ

+RPH&RQQHFW

$VVLVWDQW

&OHDQLQJ

7\SHVRIKHDWLQJ

$VVLVW

6WHDP

%DVLF

VHWWLQJV

#

+

+

(

Buttons


The buttons on the left- and right-hand side of the 

control panel have a pressure point. Press these 

buttons to activate them.

For appliances that do not have a stainless steel 

front, these two button touch fields do not have a 

pressure point.

0

Touch fields


There are sensors under the touch fields. Simply 

touch the respective symbol to select the function.

8

Rotary selector


The rotary selector is fitted so that you can turn it 

indefinitely to the left or right. Press it lightly and 

move it in the direction required using your finger.

@

Display


You can see the current adjustment values, 

options or notes in the display.

H

Touch-screen displays


You can see the current selection options in the 

touch-screen displays. You can select these here 

directly by touching the appropriate text field. The 

text fields change depending on the selection.

Symbol

Meaning

Buttons

ÿ

on/off

Switching the appliance on and off

l

Start/Stop

Starting, pausing or cancelling (hold down 

for approx. 3 secs) an operation

Touch fields
Menu

Menu

Opens the "Operating modes" menu

t

Timer

Selects the timer 

°

Information

Displays information

D

Childproof lock

Activating and deactivating (hold down for 

approx. 4 secs) the childproof lock

v

Open cover

Filling or emptying the water tank

Содержание HRG6769.6B

Страница 1: ... en Instruction manual Oven with steam jet function HRG6769 6B ...

Страница 2: ......

Страница 3: ...eheating 17 Dough proving setting 18 Filling the water tank 18 After every steam operation 19 O Time setting options 20 Setting the cooking time 20 Setting the end time 21 Setting the timer 22 Meat thermometer 22 Types of heating 22 Inserting the meat probe into the food 23 Setting the core temperature 23 Core temperatures of different foods 24 A Childproof lock 24 Activating and deactivating 24 Q...

Страница 4: ...ter unpacking it Do not connect the appliance if it has been damaged in transport Only a licensed professional may connect appliances without plugs Damage caused by incorrect connection is not covered under warranty This appliance is intended for domestic use only The appliance must only be used for the preparation of food and drink The appliance must be supervised during operation Only use this a...

Страница 5: ...ing compartment may create hot steam Never pour water into the hot cooking compartment Warning Risk of injury Scratched glass in the appliance door may develop into a crack Do not use a glass scraper sharp or abrasive cleaning aids or detergents Risk of injury The hinges on the appliance door move when opening and closing the door and you may be trapped Keep your hands away from the hinges Warning...

Страница 6: ...e of over 50 ºC has been set This will cause heat to accumulate The baking and roasting times will no longer be correct and the enamel will be damaged Aluminium foil Aluminium foil in the cooking compartment must not come into contact with the door glass This could cause permanent discolouration of the door glass Silicone pans Do not use any silicone pans or any mats covers or accessories that con...

Страница 7: ...ean the water tank with a soft cloth and standard washing up liquid 7Environmental protection Environmentalprotection Your new appliance is particularly energy efficient Here you can find tips on how to save even more energy when using the appliance and how to dispose of your appliance properly Saving energy Only preheat the appliance if this is specified in the recipe or in the tables in the oper...

Страница 8: ...HU 8QWHUKLW H 8POXIWJULOOHQ ULOO JUR H OlFKH 2EHU _ 8QWHUKLW H FR 6FKQHOOYRUKHL HQ DXV QGH PHQX RQ RII VWDUW VWRS XVZDKO DXSWPHQ RPH RQQHFW VVLVWDQW OHDQLQJ 7 SHV RI KHDWLQJ VVLVW 6WHDP DVLF VHWWLQJV Buttons The buttons on the left and right hand side of the control panel have a pressure point Press these buttons to activate them For appliances that do not have a stainless steel front these two bu...

Страница 9: ...s of these in the corresponding sections You can open the Operating modes menu by pressing the menu field Highlighted The highlighted value can be changed directly without first being selected After starting an operation either the temperature or the level is always highlighted At the same time the white line is the heating line and gradu ally turns red Enlarged Whilst you are changing the highlig...

Страница 10: ...le fish and larger pieces of meat The grill element and the fan switch on and off alternately The fan circulates the hot air around the food Grill large area Grill settings 1 low 2 medium 3 high For grilling flat items for grilling such as steaks and sausages for making toast and for cooking au gratin The whole area below the grill element becomes hot Grill small area Grill settings 1 low 2 medium...

Страница 11: ...tches off again For most operating modes the interior lighting switches on as soon as the operation is started When the operation has finished the lighting switches off Note You can set the interior lighting not to come on during the operation in the basic settings Basic settings on page 25 Cooling fan The cooling fan switches on and off as required The hot air escapes above the door Caution Do no...

Страница 12: ...ully pulled out This makes it easy to place the accessories in position To unlock push the pull out rails back into the cooking compartment with a certain amount of force Notes Make sure that you always insert the accessories into the cooking compartment the right way round Always insert accessories fully into the cooking compartment so that they do not touch the appliance door Locking function Th...

Страница 13: ... wire rack Baking tray Pyrolytic For tray bakes and small baked products Wire insert For meat poultry and fish For inserting into the universal pan to catch dripping fat and meat juices Profi pan For preparing large quantities Lid for the Profi pan The lid turns the Profi pan into a Profi roasting dish Pizza tray For pizzas and large round cakes Grill tray Pyrolytic Use for grilling in place of th...

Страница 14: ...ce Apply the following initial settings on the appliance Setting the language The language is the first setting displayed German is the preset language 1 Turn the rotary selector to set the required language 2 Touch the next text field to confirm The next setting appears Setting the clock The clock starts at 12 00 1 Touch the Clock text field 2 Set the clock using the rotary selector 3 Touch the n...

Страница 15: ...uld be displayed when the appliance is switched off in the basic settings Basic settings on page 25 Starting the operation You must press the l Start Stop button to start each operation After starting the appliance the time display is shown on the display along with the settings The display ring and the heating line also appear Pausing the operation You can also interrupt and then continue an oper...

Страница 16: ...om heating Intensive heat To achieve an even cooking result do not place your food or accessories into the cooking compartment until Rapid heating is complete Applying settings Ensure you have selected a suitable type of heating and set a temperature of at least 100 C Otherwise rapid heating cannot be activated 1 Set the type of heating and temperature 2 Touch the Rapid heating text field On is di...

Страница 17: ...ocus 4 Turn the rotary selector to set the steam level 5 Press the l Start Stop button to start The appliance begins to heat up Note If the water tank runs dry during an operation with steam assistance a message appears on the display prompting you to fill up the water tank The operation continues without adding steam Changing and cancelling To change the steam level touch the Steam level text fie...

Страница 18: ...with steam open the control panel and fill the water tank with water Make sure that you have set the water hardness range correctly Basic settings on page 25 Warning Risk of injury and risk of fire Only fill the water tank with water or with the descaling solution that is recommended by us Do not pour any flammable liquids e g alcoholic drinks into the water tank Due to hot surfaces vapours from f...

Страница 19: ...ing compartment To dry the cooking compartment you can either use the Drying operating mode or dry the cooking compartment by hand Notes Once the appliance has been switched off the v field remains lit for a little longer to remind you to empty the water tank Remove limescale marks with a cloth soaked in vinegar then wipe with clean water and dry with a soft cloth Emptying the water tank Caution D...

Страница 20: ...ish on the appliance This means that the cooking time is not unintentionally exceeded and you do not need to interrupt other work in order to end the operation Applying settings Depending on which direction you turn the rotary selector first the cooking time starts at a particular default value Left 10 minutes right 30 minutes The cooking time can be set in one minute increments up to one hour and...

Страница 21: ... is 45 minutes and the dish should be ready at 12 00 1 Set the operating mode and temperature or level 2 Set the cooking time 3 Before starting the operation touch the End text field The projected end time is highlighted white in the display 4 Set a later end time using the rotary selector 5 Press the l Start Stop button to start The time at which the appliance will start is shown in the display T...

Страница 22: ...ld The timer duration is displayed in white and in focus and can be changed by using the rotary selector If you want to cancel the timer reset the timer duration to zero Once the change has been applied the symbol is no longer lit up Meat thermometer Meatthermometer The meat thermometer makes accurate cooking possible It measures the temperature inside the food As soon as the set temperature is re...

Страница 23: ...ted white in the display 4 Turn the rotary selector to set the core temperature 5 Press the l Start Stop button to start The time on the display shows how long the operation has already been running The appliance begins to heat up Steaming 1 Touch the Menu field 2 Touch the Steaming text field 3 Touch the text field with the required type of heating The default cooking compartment temperature is h...

Страница 24: ...ures of different foods Do not use frozen food The figures in the table are given as a guide They depend on the quality and composition of the food You can find comprehensive information on the heating mode and temperature at the end of the instruction manual Tested for you in our cooking studio on page 41 AChildproof lock Childprooflock Your appliance is equipped with a childproof lock so that ch...

Страница 25: ...ppliance using the ÿ On Off button if you do not need to use it List of basic settings Depending on the features of your appliance not all basic settings are accessible Note Changes to the language button tone and display brightness settings take effect immediately All other changes take effect after the settings have been changed Power cut The changes you make to the settings are saved even after...

Страница 26: ...type of heating The appliance heats up with top bottom heating You can set a temperature between 85 C and 140 C The Types of heating operating mode must be selected The selection list for the types of heating appears on the touch screen displays 1 Touch the Sabbath mode text field The default temperature is highlighted white in the display 2 Set the required temperature using the rotary selector 3...

Страница 27: ...network automatically 3 Press the WPS button on the router Wait until Network connection successful is shown in the display 4 Touch Connect to the app The appliance is ready to connect to the app 5 Start the app on the mobile device and follow the instructions for automatic network registration The process for registering is completed once Successfully connected to the app is shown in the display ...

Страница 28: ...n itself 1 Touch the Menu field 2 Touch the Remote Start text field C appears in the display Remote start is automatically deactivated in the following situations The oven door is opened 15 minutes after remote start is activated The oven door is opened 15 minutes after the oven operation ends 24 hours after remote start is activated When you start the oven operation on the appliance remote start ...

Страница 29: ...e Connect to the app text field Remote control You can use the Home Connect app to easily access the functions of your oven Notes Operation on the appliance always has priority During this time it is not possible to operate the appliance using the Home Connect app The remote control is activated when the appliance is first delivered If the remote control has been deactivated only the oven s operat...

Страница 30: ... clean your appliance Suitable cleaning agents To ensure that the different surfaces are not damaged by using the wrong cleaning agent observe the information in the table Depending on the appliance model not all of the areas listed may be on in your appliance Caution Risk of surface damage Do not use Harsh or abrasive cleaning agents Cleaning agents with a high alcohol content Hard scouring pads ...

Страница 31: ...vinegar solution Clean with a dish cloth and then dry with a soft cloth Soften baked on food residues with a damp cloth and soapy water Use stainless steel wire wool or oven cleaner to remove stubborn dirt Leave the cooking compartment open to dry after cleaning Using the cleaning function gives the best results Cleaning function on page 32 Note Food residues can cause white deposits to form These...

Страница 32: ... cannot clean any of the wire racks when using the cleaning function The wire racks are not suitable for cleaning using the cleaning function this will discolour them Further accessories suitable for cleaning using the cleaning function are listed in the table for special accessories Accessories on page 12 Warning Risk of fire Loose food residues grease and meat juices may catch fire during the cl...

Страница 33: ...appliance must be descaled depends on the hardness of the water used When only five more steam assisted operations are possible or fewer the appliance reminds you to descale it with a message on the display The number of remaining operations is displayed after the appliance is switched on You can therefore prepare for the descaling in good time Start Caution Damage to the appliance Use only liquid...

Страница 34: ...good care and cleaning your appliance will retain its appearance and remain fully functional for a long time to come This will tell you how to remove the appliance door and clean it Removing and fitting the appliance door For cleaning purposes and to remove the door panels you can detach the appliance door The appliance door hinges each have a locking lever When the locking levers are closed figur...

Страница 35: ...slightly 2 Press on the right and left side of the cover figure 3 Remove the cover figure Close the appliance door carefully Note Clean the stainless steel inlay in the cover with stainless steel cleaner Clean the rest of the door cover with soapy water and a soft cloth 4 Open the appliance door again slightly Put the cover back in place and press on it until it clicks audibly into place figure 5 ...

Страница 36: ...at the arrow is in the top right of the panel and that it aligns with the arrow on the metal panel 1 Insert the intermediate panel at the bottom into the retainer and push it in firmly at the top figure 2 Push both retainers downwards figure 3 Insert the front panel at the bottom into the retainers figure 4 Close the front panel until both upper hooks are opposite the opening figure 5 Press the fr...

Страница 37: ... out of the support in the control panel The rotary selector has been accidentally disengaged The rotary selector can be removed Simply place the rotary selector back in its support in the control panel and push it in so that it engages and can be turned as usual The rotary selector can no longer be turned easily There is dirt under the rotary selector The rotary selector can be removed To disenga...

Страница 38: ...e appliance heats up until the set cooking time has elapsed Cooking compartment bulbs To light the interior of your cooking compartment your appliance has one or more long life LED bulbs However if ever an LED bulb or the bulb s glass cover is defective call the after sales service The lamp cover must not be removed The Fill water tank message appears even though the water tank is full The panel i...

Страница 39: ...size and type of cookware For an optimal cooking result use food that is in good condition and chilled meat only For frozen food use food straight out of the freezer only For some food a temperature heating mode and cooking time is suggested The temperature and the cooking time can be changed according to your requirements For other dishes you will be asked to enter the weight Always enter the tot...

Страница 40: ... accessories that contain silicone Otherwise the baking sensor will be damaged The baking sensor is active while Do not open door is shown on the display Do not open the appliance door otherwise the settings will be cancelled The appliance asks you whether you wish to continue cooking The appliance will continue to heat and you can adjust the suggested time You must monitor the process yourself Ap...

Страница 41: ...hes and the ideal settings for them We will show you which type of heating and temperature are best suited to your dish You will get information on suitable cooking accessories and the height at which they should be placed in the oven You will also get tips about cookware and preparation methods Note A lot of steam can build up in the cooking compartment when cooking food Your appliance is very en...

Страница 42: ... must be resistant to heat and steam for use in steam assisted baking Greaseproof paper Only use greaseproof paper that is suitable for the selected temperature Always cut greaseproof paper to size Recommended setting values The table lists the optimal heating type for various baked items The temperature and baking time depend on the amount and consistency of the dough mixture For this reason the ...

Страница 43: ...180 Soufflé 1 2L soufflé dish 2 160 170 35 45 Soufflé 1 2L soufflé dish 2 160 180 2 35 45 Soufflé individual moulds 2 170 190 65 75 Choux pastry baking tray 3 190 210 30 40 Choux pastry baking tray 3 200 220 1 25 35 Meat Pie rectangular pie tin 2 180 190 40 50 Meat Pie rectangular pie tin 2 170 180 2 40 50 Yorkshire pudding 12 cup tin 3 200 220 15 25 Jacket potatoes baking tray 3 150 170 75 90 Jac...

Страница 44: ...ck to one another during baking There should be a gap of approx 2 cm around each item This gives enough space for the baked items to expand well and brown on all sides The cake is too dry Set the temperature 10 C higher and shorten the baking time The cake is generally too light in col our If the shelf position and the cookware are correct then you should increase the temperature if necessary or e...

Страница 45: ...rly Place the cookware onto the wire rack The distance between the meat and the lid must be at least 3 cm The meat may rise Very hot steam may escape when opening the lid after cooking Lift the lid at the rear so that the hot steam can escape away from you If necessary braise the meat first by searing it Add water wine vinegar or a similar liquid to the braising liquid A covering at least 2 cm dee...

Страница 46: ...k 2 180 190 15 25 Rack of lamb each 700 g wire rack 2 200 20 170 180 1 25 30 Pork Roast joint wire rack 2 180 190 30 35 Roast joint 1 5 kg wire rack 2 120 3 30 190 200 30 160 170 1 80 100 Loin joint wire rack 2 180 190 35 35 Loin joint 1 kg wire rack 2 180 190 25 30 170 180 1 70 80 Belly wire rack 2 170 180 30 25 Gammon joint wire rack 2 160 170 30 30 Gammon joint 1 5 kg wire rack 2 170 180 2 100 ...

Страница 47: ...oking time in mins Preheat Without fat layer best and neck do not turn Skin side down Bone side down Turn after app 1 hour The cooking compartment becomes very dirty Prepare your food in an enclosed roasting dish with higher temperature or use the grill tray You will achieve the best roasting results if you use the grill tray The grill tray can be bought later as a special accessory The roast is t...

Страница 48: ...take the joint out of the cooking compartment more easily in the cookware and prepare the sauce in the cookware itself Only use cookware which is suitable for use in an oven Check whether the cookware fits in the cooking compartment Glass cookware is most suitable Place hot glass cookware onto a dry mat after cooking If the surface is damp or cold the glass may crack Add in a little liquid if the ...

Страница 49: ...o toast Temperature and cooking time depend on the quantity composition and temperature of the food Settings ranges are indicated for this reason Try using the lower values at first You can use a higher setting next time if necessary The setting values are based on the assumption that unstuffed chilled ready to roast poultry meat and fish are placed into a cold cooking compartment In the table you...

Страница 50: ...0 25 Poultry Chicken drumstick 150 g each wire rack 3 7 210 230 20 30 Chicken drumstick 150 g each wire rack 3 7 210 220 2 30 40 Chicken breast boned 150 g each wire rack 3 3 1st side 10 15 2nd side 10 15 Chicken breast boned 150 g each wire rack 3 7 200 210 2 20 30 Chicken whole wire rack 2 7 200 220 20 15 Chicken whole 1 5 kg wire rack 2 7 180 190 2 65 75 Chicken portion bone in 200 250 g each w...

Страница 51: ...rack Insert the wire rack with the open side facing the appliance door and the curved lip pointing downwards Always place ovenware tins and dishes on the wire rack Universal pan or baking tray Slide the universal pan or the baking tray in carefully as far as the limit stop with the bevelled edge facing the appliance door Greaseproof paper Only use greaseproof paper that is suitable for the selecte...

Страница 52: ...ls universal pan baking tray 3 1 190 210 30 40 Croquettes universal pan 3 200 220 25 35 Hash browns universal pan 3 200 220 25 35 Potatoe wedges universal pan 3 190 210 25 35 Baked goods frozen prebaked Rolls baguettes universal pan 3 180 200 10 15 Rolls baguettes universal pan 3 180 200 1 15 25 Fried food frozen Fish fingers universal pan 3 200 220 20 30 Chicken nuggets universal pan 3 190 210 20...

Страница 53: ...iversal pan or baking tray Slide the universal pan or the baking tray in carefully as far as the limit stop with the bevelled edge facing the appliance door Baking tins and cookware Dark coloured metal baking tins are most suitable These allow you to make energy savings of up to 35 per cent Cookware made from stainless steel or aluminium reflects heat like a mirror Non reflective cookware made fro...

Страница 54: ...e e g a glass porcelain serving dish Place the cookware into the cooking compartment to preheat it Always place the uncovered cookware onto the wire rack at level 2 You can find additional information in the tips on slow cooking attached to the settings table Quiche quiche tin dark coated 3 190 210 35 45 White Bread loaf tin 1x 900 g or 2x 450 g 2 190 200 40 50 Scones baking tray 3 190 210 15 20 J...

Страница 55: ...ed 2 8 10 90 150 210 Pork Pork tenderloin steak 5 6 cm thick 1 5 kg Cookware uncovered 2 8 10 80 210 240 Pork fillet whole Cookware uncovered 2 6 8 80 90 120 Pork medallions 4 cm thick Cookware uncovered 2 5 7 80 90 120 Beef Joint of beef rump 6 7 cm thick 1 5 kg Cookware uncovered 2 8 10 80 210 270 Beef tenderloin whole 1 kg Cookware uncovered 2 4 6 80 150 210 Sirloin 5 6 cm thick Cookware uncove...

Страница 56: ... a reference Type of heating used Drying Preserving You can preserve fruit and vegetables using your appliance Warning Risk of injury If the food is preserved incorrectly the preserving jars may burst Follow the instructions for preserving Jars Use only clean and undamaged preserving jars Only use heat resistant clean and undamaged rubber rings Check clips and clamps in advance For each preserving...

Страница 57: ...Before you switch off the appliance or change the cooking mode check whether the contents of the jars are bubbling as they should The bubbling process starts after approx 30 60 minutes Type of heating used 4D hot air Allowing the dough to prove at dough proving setting Yeast dough will prove considerably more quickly using the Dough proving heating type than at room temperature and does not dry ou...

Страница 58: ...frosted food to rest for another 10 to 30 minutes in the appliance whilst it is switched off so that the temperature balances out Type of heating used B Defrosting Dish Accessories cookware Shelf posi tion Type of heating Step Tempera ture in C Cooking time in mins Yeast dough sweet E g small baked items Bowl 2 T Dough fer mentation 35 40 30 45 Universal pan 2 T Final fermen tation 35 40 10 20 Ric...

Страница 59: ...in the table Remove unused accessories from the cooking compartment This will allow you to achieve ideal cooking results and save energy Type of heating used U Reheating Keeping warm You can keep cooked dishes warm using the Keeping warm heating type You can use the various moisture levels to prevent the cooked dishes from drying out Do not cover the food Do not keep cooked dishes warm for longer ...

Страница 60: ...note the information in the tables about preheating The setting values are valid without rapid heating up For baking use the lower of the indicated temperatures first Types of heating used 4D hot air Top bottom heating Intensive heat The levels of steam intensity are indicated as numbers in the table 1 Low 2 Medium 3 High Dish Accessory Shelf posi tion Type of heating Tempera ture in C Steam in te...

Страница 61: ...e caught and the cooking compartment stays cleaner Type of heating used Grill large area Dish Accessories Shelf posi tion Type of heating Grill setting Cooking time in mins Grilling Toasting bread Wire rack 5 3 4 6 Beefburger 12 pieces Wire rack 4 3 25 30 Do not preheat Turn after 2 3 of the total time ...

Страница 62: ...6 ...

Страница 63: ......

Страница 64: ...3PCFSU PTDI BVTHFSÉUF NC XXX CPTDI IPNF DPN BSM 8FSZ 4USB F ßODIFO 3 9001157433 9001157433 960425 ...

Отзывы: