background image

Page 3

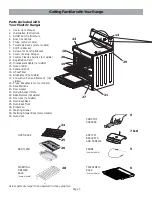
1. Use & Care Manual

2. Installation Instructions

3. AHAM Anti-Tip Brochure

4. Bosch Cookbook

5. Probe (some models)

6. Telescopic Racks (some models)

7. Anti-Tip Bracket

8. Screws for Anti-Tip Bracket

9. Ceran Cooktop Scraper

10. Cooktop Cleaning Solution (not visible)

11. Registration Card

12. Incandescent Lights (not visible)

13. Oven Control

14. Panel and Knob

15. mTwisT Dial

16. Broil Element (not visible)

17. Convection Fan and Element  (not

visible)

18. Probe Receptacle (some models)

19. Rack Positions

20. Door Gasket

21. Model & Serial # Plate

22. Bake Element (not visible)

23. Door Lock (not visible)

24. Oven Rack Back

25. Oven Rack Front

26. Broiler Pan

27. Warming Drawer

28. Warming Drawer Rack (some models)

29. Oven Vent

Getting Familiar with Your Range

OVEN RACK

TELESCOPIC

RACK

(some models)

PROBE

(some models)

WARMING

DRAWER

RACK

(some models)

BROIL PAN

Parts Included with

Your Electric Range:

COOKTOP

SCRAPER

Actual parts are larger than depicted in above graphics.

ANTI-TIP

BRACKETS

AND SCREWS

13

14

15

19

20

5

26

21

23

24

25

27

9

28

6

7 & 8

18

29

Содержание HES242U

Страница 1: ...odels HES242U HES245U HES246U HES247U HES252U HES255U HES256U PLEASE READ ENTIRE INSTRUCTIONS BEFORE PROCEEDING PLEASE READ ENTIRE INSTRUCTIONS BEFORE PROCEEDING PLEASE READ ENTIRE INSTRUCTIONS BEFORE PROCEEDING PLEASE READ ENTIRE INSTRUCTIONS BEFORE PROCEEDING PLEASE READ ENTIRE INSTRUCTIONS BEFORE PROCEEDING IMPORTANT Save these instructions INSTALLER Please leave these instructions with this un...

Страница 2: ...e a safe reliable appliance Read all instructions carefully before using this range These precautions will reduce the risk of burns electric shock fire and injury to persons Do not operate the oven or cooktop controls if the glass is broken Food splatter or cleaning solution may penetrate a broken control panel and create a risk of electric shock Contact a qualified technician immediately should y...

Страница 3: ...tures 9 Operating the mTwisT Cooktop 11 The Oven Oven cut here Features 12 Oven Modes Bake and Convection Bake 13 Oven Modes Broil and Convection Broil 14 Oven Modes Convection Roast 15 Oven Modes Dehydrate 16 Selecting the Mode 17 Using the Timer s 18 Using Timed Cook 19 Using the Probe some models 20 The Warming Drawer 21 Care and Cleaning Cooktop 23 Oven 25 Self Help Maintenance Etc Cookware Se...

Страница 4: ...ot use corrosive chemicals vapors or nonfood products in this appliance This type of range is specifically designed to heat or cook It is not designed for industrial or laboratory use The use of corrosive chemicals in heating or cleaning will damage the appliance In the event that personal clothing or hair catches fire DROP AND ROLL IMMEDIATELY to extinguish flames Do not allow children to use thi...

Страница 5: ...nge and even tip it over causing severe personal injury Have the installer show the location of the circuit breaker or fuse Mark it for easy reference WARMING DRAWER SAFETY To reduce the risk of fire electric shock or injury to persons Do not store flammable materials in the warming drawer Use care when opening the warming drawer Open door slightly and let hot air or steam escape before removing o...

Страница 6: ...n Fan and Element not visible 18 Probe Receptacle some models 19 Rack Positions 20 Door Gasket 21 Model Serial Plate 22 Bake Element not visible 23 Door Lock not visible 24 Oven Rack Back 25 Oven Rack Front 26 Broiler Pan 27 Warming Drawer 28 Warming Drawer Rack some models 29 Oven Vent GettingFamiliarwithYourRange OVEN RACK TELESCOPIC RACK some models PROBE some models WARMING DRAWER RACK some mo...

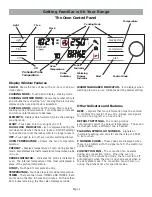
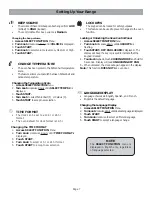
Страница 7: ...re are two timers TIMER 1 AND TIMER 2 Each counts down the time in hours and minutes With less than 60 minutes remaining the timer also displays seconds Other Indicators and Features BEEP Signals that more information must be entered or confirms the receipt of an entry A Beep also signals the end of a program or an oven error DEFAULT SETTINGS The cooking modes automatically select the default temp...

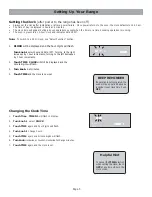
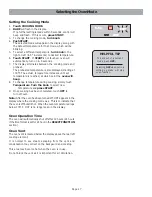
Страница 8: ...s 4 Touch TIME and the clock is now set Changing the Clock Time 1 Touch Time TIMER 1 will flash in display 2 Turn knob to select CLOCK 3 Touch TIME again and hour digits will flash 4 Turn knob to change hours 5 Touch TIME again and minute digits will flash 6 Turn knob clockwise or counter clockwise to change minutes 7 Touch TIME again and the clock is set Note To switch to a 24 hr clock see Select...

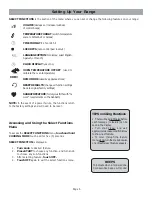
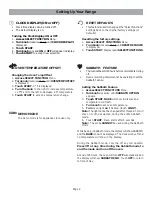
Страница 9: ...play to show next feature To move through the feature menu slowlyturntheknobclockwise oneclickaftereachfeatureappears TIPS on Using Functions BEEPS To indicate when a mode is done 3 consecutive beeps will sound VOLUME decrease or increase loudness of control beeps TEMPERATURE FORMAT switch temperature scale to Fahrenheit or Celsius TIME FORMAT 12 hr or 24 hr LOCK KEYS oven control pad lockout LANG...

Страница 10: ...owlyuntildesiredlanguageisdisplayed 3 Touch START 4 Turn knob clockwise to select a different language 5 Touch START to accept a language change Changing the beep volume 1 Access SELECT FUNCTION Menu 2 Turnknob clockwiseslowly until VOLUMEis displayed 3 Touch START 4 Turn knob to select volume level Low Medium or High 5 Touch START BEEP VOLUME Thevolumeofthecontrolbeepcanbechanged from LOW softest...

Страница 11: ... DisplayreadsSELECTFUNCTIONS SABBATH FEATURE Theovenwillbakefor48hoursbeforeautomaticallyturning off Oven or warming drawer cannot be operating to set the Sabbath Feature Setting the Sabbath Feature 1 Access SELECT FUNCTIONS Menu 2 Turn knob clockwise until SABBATH OPTION appears 3 Touch START BAKE will show in display and temperature will flash 4 Turn knob to set oven temperature 5 Turn oven ligh...

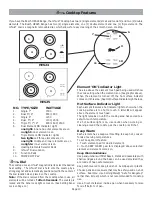
Страница 12: ...rable material resistant to impact but not unbreakable if a pan or other object is dropped on it Never cook food directly on the glass Avoid placing a wok support ring trivet or other metal stand on the glass surface Do not use the glass surface as a cutting board Do not slide cookware across the cooking surface it may scratch the glass Do not place wet pans on the glass surface Cooktop Features R...

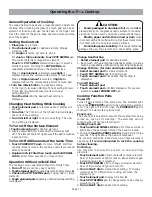
Страница 13: ...ight The area above the element touch pad being used will show the cook setting when the element is on See graphic above When the element is turned off the hot surface indicator comes on in this area See Hot Surface Indicator Light below Keep Warm Each element has a keep warm setting to keep hot cooked foods at serving temperatures To set Keep Warm feature 1 Touch element pad for desired element 2...

Страница 14: ...mTwisT Dial The cooktop can be operated without the mTwisT dial 1 Turn off Panel Lock see next column 2 Touch element pad for desired element Display shows 0 3 Choose the POT SIZING pad if using dual or triple element 4 Touch element pad repeatedly until desired heat settting is displayed Change Heat Setting 1 Select element pad for desired element 2 Each touch of the element pad changes setting C...

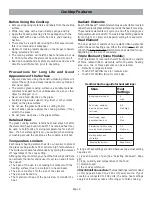
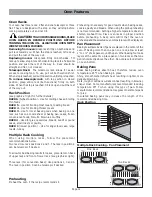
Страница 15: ... A beep will confirm that the oven is preheatedandtheselectedoventemperaturewillbedisplayed Pan Placement Baking results are better if pans are placed in the center of the oven If baking more than one pan on a rack allow at least 1 to 1 of air space around the pan When baking four cake layers at the same time place pans on two racks so that one pan is not directly above the other Do not place food...

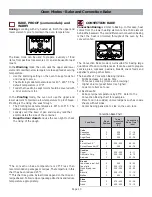
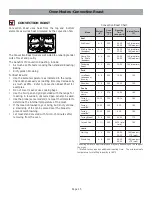
Страница 16: ...ncovered pans such as cookie sheets without sides Center baking pans side to side on the oven rack The Convection Bake mode is well suited for baking large quantities of food on multiple racks It can be used to prepare cookies pies cupcakes pastries breads snack foods and appetizers among other items Baking is cooking with dry heated air Both the upper and lower element cycle to maintain the oven ...

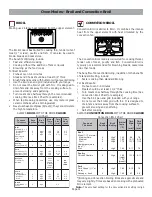
Страница 17: ...fats and oils away from the cooking surface to prevent smoking and spattering Salt after cooking ALWAYS BROIL WITH THE DOOR CLOSED ALWAYS CONVECTION BROIL WITH THE DOOR CLOSED Note The only heat setting for the Convection Broil setting is High Convection Broil Chart Broil Chart d n a d o o F s s e n k c i h T k c a R n o i t i s o P l i o r B g n i t t e S l a n r e t n I p m e T F e m i T 1 e d i...

Страница 18: ... v O p m e T F g n i t s a o R e m i T b l r e p n i m p m e T l a n r e t n I F f e e B t s a o R b i R 6 4 5 2 3 2 3 5 2 2 3 8 2 e r a r d e m 5 4 1 m u i d e m 0 6 1 t s a o R e y E b i R s s e l e n o b 6 4 5 2 3 2 3 4 2 2 3 7 2 e r a r d e m 5 4 1 m u i d e m 0 6 1 e y E p m u R n i o l r i S p i T s s e l e n o b 6 3 5 2 3 0 3 5 2 2 3 8 2 e r a r d e m 5 4 1 m u i d e m 0 6 1 n i o l r e d n...

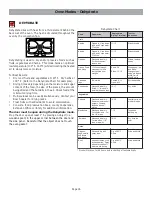
Страница 19: ...m o r f d e l e e p y l n i h t s e g n a r o 4 2 s l e e P 6 1 2 1 s e c i l S y r d l e e p e g n a r O e l t t i r b d n a s e c i l s e g n a r O d n a y r d e r a s n i k s s i t i u r f e l t t i r b t s i o m y l t h g i l s e l p p a e n i P s g n i r d e i r d l e w o T 3 1 9 d e n n a C 2 1 8 h s e r F e l b a i l p d n a t f o S s e i r r e b w a r t S y r d l e w o t d n a h s a W n i ...

Страница 20: ...ch Temperature Turn the knob to select new Temperature and press START 9 Once cooking has been completed touch OFF to turn off oven Oven Operation Time The oven will automatically shut off after 12 hours 24 hours if the time format is set for 24 hour in the SELECTFUNCTION section HELPFUL TIP Selecting OFF when not in a setting up mode will stop oven function To back out of a current mode push OFF ...

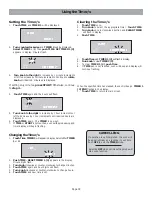
Страница 21: ... beep periodically as a reminder to set time Push OFF to exit the TIMER mode Selecting OFF when not in a setting mode will stop oven function CLEAR TIMER 1 CLEAR TIMER 1 CLEAR TIMER 1 CLEAR TIMER 1 CLEAR TIMER 1 0 00 0 00 0 00 0 00 0 00 CUT HERE TIMER 1 TIMER 1 TIMER 1 TIMER 1 TIMER 1 0 00 00 00 00 00 AM 5 Turn knob to the right to increase by 1 hour increments or left to decrease by 1 hour increm...

Страница 22: ...rogrammed cooking time the oven will automatically turn off Display will show TIME COOK END and the oven will beep Reminder beeps will sound for up to fifteen minutes until any pad is touched Note Remove food from oven immediately after cycle has finished to prevent overcooking Food left in the oven will continue to cook eveb after the cycle is complete To check the cooking time and stop time afte...

Страница 23: ...for the probe is 135 F to 200 F 57 C to 93 C Preheating the oven is not recommended when using the probe A hot oven will impair your ability to easily connect the probe to the receptacle and into the meat Oven temperature can be set for 100 F up to 450 F 38 C up to 232 C INSERTING THE PROBE Insert the probe tip into the food item For meats insert the probe tip into the thickest part and not touch ...

Страница 24: ...x5 H Utensil sizes 2 9 x 13 Pyrex 3 quart dishes side by side 2 9 1 2 x 15 Pyrex 4 quart dishes side by side 4 10 1 2 plates single or stacked 3 11 plates single or stacked Large 14 pizza in box Packaged Inside Drawer Reversible Rack some models Low Medium High WARMING DRAWER RACK some models 3 2 1 Contact your dealer to order a warming drawer rack The warming drawer has three settings Low Meduim ...

Страница 25: ...serving dish while preheating drawer Add cooked hot food in cooking utensil or to heat safe serving dishes Foodmaybekepthotinitscookingcontainerortransferred to a heat safe serving dish Aluminum foil may be used to cover food Setting the Temperature Set Temp with Oven Control Warming drawer settings are Low Medium and High The temperatures range from 132 149 F on Low 150 180 F on Medium 181 to 200...

Страница 26: ... marks that can occur on the counter level surface between uses Daily Cleaning Techniques 1 Clean the surface when it is completely cool with the Cooktop Cleaning Crème Exception Remove Dry Sugar Sugar Syrup Tomato Products and Milk immediately with the razor blade scraper See Care and Cleaning Chart next page 2 Wipe off spatters with a clean damp sponge or paper towel Rinse and dry Use white vine...

Страница 27: ...ld abrasive Bon Ami Soft Scrub without bleach with a dampened paper towel Rinse and reapply creme Failure to remove metal marks before the next heating makes removal very difficult The minerals in some water can be transferred onto the surface and cause stains Use undiluted white vinegar rinse and dry Recondition with Cooktop Cleaning Creme Remove boilovers and stains before using the cooktop agai...

Страница 28: ...nd clean frame areaoutside gasket DO hand clean door area outside gasket DO hand clean 1 1 2 from rack guides to front of oven cavity Bosch ovens feature a self cleaning function that eliminates the manual labor involved with cleaning your oven During self cleaning the oven uses a very high temperature to burn away food soil and grease It is common to see smoke and or an occasional flame up during...

Страница 29: ...Note In the Delayed Self Clean Mode the door latch is automatically activated when the display reads DELAYED CLEAN This ensures that the door cannot be opened while the oven interior is at high clean temp eratures The door lock symbol will appear in the display at this point When the lock symbol appears in the display gently pull on the door to confirm that it is locked close Care and Cleaning Ove...

Страница 30: ...ss cleaner Use Fantastik or Formula 409 to remove grease spatters and stubborn stains Painted Clean with hot sudsy water or apply Fantastik or Formula 409 to a clean sponge or paper towel and wipe clean Avoid using powdered cleansers steel wool pads and oven cleaners Porcelain Immediately wipe up acid spills like fruit juice milk and tomatoes with a dry towel Do not use a moistened sponge towel on...

Страница 31: ...ns may overhang the element area by 1 all around Tight Fitting Lids A lid shortens cooking time and water boils faster by holding the heat inside the pan Specialty pans such as griddles roasters pressure cookers woks water bath canners and pressure canners must have the same features as described above Use only a flat bottom wok Never place a support ring such as a wok ring or trivet on the cookin...

Страница 32: ...ely 3 Flip lever on hinge toward you see Figure A 4 Close the door to approximately halfway open 5 Holding the door firmly on both sides using both hands pull the door straight out of the hinge slots Hold firmly the door is heavy See Figure B 6 Place the door in a convenient and stable location for cleaning Removing the Door Make sure oven is cool and power to the oven has been turned off before r...

Страница 33: ...eating surface Base diameter of pan is too small for the size of the element Pan ingredients have boiled dry Material of pan is a poor heat conductor heat transfers too slowly This is normal with new cooktops and will disappear after several uses Check the power source to see if a fuse has blown or if the circuit breaker tripped Check power supply Cooktop panel is locked Touch and hold PANEL LOCK ...

Страница 34: ...nd wait 5 minutes Turn breaker back on The oven should reset itself and will be operable Check the circuit breaker or fuse box to your house Make sure there is proper electrical power to the oven Make sure the oven temperature has been selected Check oven calibration Adjust calibration if necessary see Oven Temperature Offset Refer to cooking charts for recommended rack position Always reduce reci...

Страница 35: ...nded with respect to such parts Other Conditions of the Limited Warranties The warranties provided in this Statement of Limited Warranty exclude defects or damage resulting from 1 use of the Range in other than its normal and customary manner commercial use of the Range shall not be deemed normal or customary 2 misuse abuse accidents or neglect 3 improper operation maintenance installation or unau...

Страница 36: ...t notice Some models are certified for use in Canada BSH is not responsible for products which are transported from the United States for use in Canada Check with your local Canadian distributor or dealer BSH Home Appliances Corporation 5551 McFadden Avenue Huntington Beach CA 92649 For the most up to date critical installation dimensions by fax use your fax handset and call 702 833 3600 Use code ...

Отзывы: