


Page 1
RANGE SAFETY
• Tie long hair so that it does not hang loose.
• The heating elements may be hot even though they are not
red in color. Interior surfaces of an oven become hot enough
to cause burns.
• Do not touch heating elements or interior surfaces of oven
during operation.
• During and after use, do not touch or let clothing or other
flammable materials contact the heating elements or the
interior surfaces of the oven until they have had sufficient
time to cool.
• The trim on the sides of the oven door may become hot
enough to cause burns.
• Use care when opening the door. Open the door slightly to
let hot air or steam escape before removing or replacing
food.
• Do not heat unopened food containers. Build-up of pressure
may cause the container to burst and cause injury.
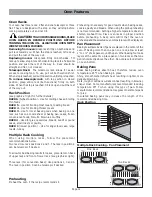
• Always place oven racks in desired location while oven is
cool. If a rack must be moved while oven is hot, do not let
potholder contact the hot heating elements.
• Use only dry potholders. Moist or damp potholders on hot
surfaces may result in burns from steam. Do not let potholder
touch hot heating elements. Do not use a towel or other
bulky cloth.
• Keep the oven free from grease build up.
• Do not place food directly on oven bottom.
• When using cooking or roasting bags in the oven, follow the
manufacturer’s directions.
• Do not use aluminum foil to line oven bottoms, except as
suggested in this manual. Improper installation of aluminum
foil many result in a risk of electric shock or fire.
• To avoid electric shock, do not operate the oven without the
light bulb cover in place.
APPLIANCE SAFETY
• This appliance must be properly installed and grounded by
a qualified technician. Connect only to properly grounded
outlet. Refer to Installation Instructions for details.
• This appliance should be serviced only by a qualified service
technician. Contact the nearest authorized service center
for examination, repair or adjustment.
• Do not repair or replace any part of the range unless
specifically recommended. Refer service to an authorized
servicer.
• Do not operate this appliance if it is not working properly
or if it has been damaged, until an authorized servicer has
examined it.
• Use this appliance only for its intended use as described in
this manual. If you have any questions, contact the
manufacturer.
• Do not cover or block any openings on this appliance.
• Do not use corrosive chemicals, vapors, or nonfood products
in this appliance. This type of range is specifically designed
to heat or cook. It is not designed for industrial or laboratory
use. The use of corrosive chemicals in heating or cleaning
will damage the appliance.
• In the event that personal clothing or hair catches fire,
DROP AND ROLL IMMEDIATELY to extinguish flames.
• Do not allow children to use this appliance unless closely
supervised by an adult. Children and pets should not be left
alone or unattended in the area where the appliance is in
use. They should never be allowed to sit or stand on any
part of the appliance.
Please read all instructions before using this appliance.
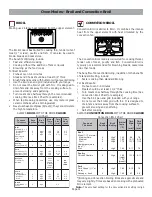
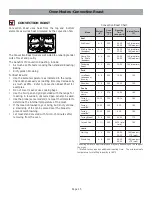
Important Safety Instructions
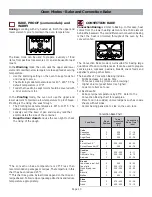
COOKTOP SAFETY
• Do not cook on a cooktop in which the glass top has broken.
If the cooktop glass should break, do not use it or attempt
to clean or fix it. Cleaning solutions and spillovers may
penetrate the broken cooktop and create a risk of electric
shock. Turn off electric circuit to the cooktop and call an
authorized service agency immediately.
• When using the cooktop, DO NOT TOUCH THE HOT
COOKING AREA OR THE IMMEDIATE SURROUNDING
AREA. Even though dark in color, these areas may be hot.
Areas adjacent to the elements may become hot enough to
cause burns. Never let clothing, potholders, or other
flammable materials come in contact with a cooking area
until it has cooled.
• Use high heat settings on the cooktop only when necessary. Use
low to medium settings to heat oil slowly.
• Never move a pan of hot oil, especially a deep fat fryer. Wait until
it is cool.
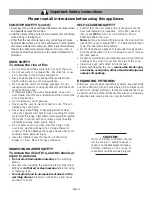
PERSONAL SAFETY
WARNING
To reduce the risk of injury to persons, in the event of a
grease fire, observe the following:
• Use an extinguisher ONLY IF:
• You know you have a Class ABC extinguisher, and you already
know how to operate it.
• The fire is small and contained in the area where it started.
• The fire department is being called.
• You can fight the fire with your back to an exit.
• In the event of a grease fire SMOTHER FLAMES with a close-
fitting lid, cookie sheet, or other metal tray, then turn off the
elements. BE CAREFUL TO PREVENT BURNS. If the flames do
not go out immediately, EVACUATE AND CALL THE FIRE
DEPARTMENT.
• Do not use water, including wet dishcloths or towels on grease
fires. A violent steam explosion may result.
• SMOTHER FLAMES from other types of food fires with baking
soda. NEVER use water on cooking fires.
• NEVER PICK UP A FLAMING PAN. You may be burned.
• ALWAYS have a working SMOKE DETECTOR near the kitchen.
• LEAVE THE HOOD VENTILATOR ON when flambéing food.