1 609 929 X30 | (22.3.11)
Bosch Power Tools
18
|
English
Operation
Actuation systems
The pneumatic tool can be operated with two different actuations sys-
tems:
–
Single actuation with safety run
With this actuation system, the discharge lock-off
2
must first be firmly
pressed against the workpiece. A fastener is not discharged until the
trigger
5
is pulled.
Afterwards, further discharging procedures can only be actuated,
when the trigger and the discharge lock-off have first been set back to
the starting position.
–
Contact actuation
With this actuation system, the trigger
5
must be pulled first. A fastener
is always discharged when the discharge lock-off
2
is firmly pressed
against the workpiece while the trigger is pressed.
This enables a higher working speed to be achieved.
The actuation system is set via the selector switch
6
.
Starting Operation
Disconnect the air supply before making any adjust-
ments, changing accessories, or placing the pneumatic
tool aside.
This safety measure prevents accidental start-
ing of the pneumatic tool.
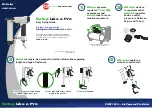
Working with Single Actuation (see figure C)
– Press selector switch
6
inward and at the same time pivot it to the bot-
tom position until it engages.
The actuation system “single actuation” is set.
– Firmly position the outlet
13
or the rubber workpiece protector
1
on
the workpiece until discharge lock-off
2
is pressed in completely.
– Afterwards, briefly press trigger
5
and release again.
A nail is discharged.
– Allow the pneumatic tool to bounce back from the workpiece.
– For another driving procedure, completely lift the pneumatic tool from
the workpiece and position it firmly at the next desired location.
Working with Contact Actuation (see figure D)
– Press selector switch
6
inward and at the same time pivot it to the up-
per position until it engages.
The actuation system “contact actuation” is
set.
– Press and hold the trigger
5
.
– Firmly position the outlet
13
or the rubber workpiece protector
1
on
the workpiece until discharge lock-off
2
is pressed in completely.
A nail is discharged.
– Allow the pneumatic tool to bounce back from the workpiece.
– For another driving procedure, completely lift the pneumatic tool from
the workpiece and position it firmly at the next desired location.
– Move the pneumatic tool uniformly over the workpiece by lifting it off
and applying it again.
Each time when applying the pneumatic tool while the discharge lock-
off is pressed in, a nail will be discharged.
– As soon as the desired amount of nails have been driven in, release trig-
ger
5
again.
Working Advice
Disconnect the air supply before making any adjust-
ments, changing accessories, or placing the pneumatic
tool aside.
This safety measure prevents accidental start-
ing of the pneumatic tool.
Check the proper function of the safety and actuation devices, and the
tight seating of all screws and nuts each time before using.
Disconnect a defective or not properly operating pneumatic tool immedi-
ately from of the air supply and contact an authorised service agent for
Bosch power tools.
Do not perform any incorrect manipulations on the pneumatic tool. Do not
disassemble or block any components of the pneumatic tool, such as the
discharge lock-off.
Do not carry out “emergency repairs” with unsuitable means. The pneu-
matic tool is to be maintained regularly and properly (see “Maintenance
and Cleaning”, page 19).
Avoid any weakening and damage whatsoever of the pneumatic tool, e.g.,
through:
– Imprinting or engraving,
– Retrofitting measures not approved by the manufacturer,
– Guiding along templates manufactured of hard material, e.g. steel,
– Dropping on or sliding over the floor,
– Using as a hammer,
– Applying any kind of force.
Make sure to check whatever is below or behind your workpiece. Do not
shoot nails into walls, ceilings or floors, when persons are behind them.
The nails can burst through the workpiece and injure someone.
Do not shoot a nail onto an already driven-in one. This could cause the nail
to deform, the nails could become jammed or the pneumatic tool could
move uncontrolled.
When the pneumatic tool is used under cold ambient conditions, the first
nails will be driven in slower than usual. Once the pneumatic tool has
warmed up during working, normal operating speed will be regained.
Avoid blank shots in order to reduce the wear of the impact striker.
For longer work breaks or after finishing work, disconnect the pneumatic
tool from the air supply and empty the magazine.
Emptying the Magazine (see figures E1
–
E2)
– With the nail pusher
18
pressed, pull the magazine slider
11
to the rear
until the last nail is free; then carefully guide the magazine slider toward
the front to the beginning of the magazine
10
.
Note:
Do not let the magazine slider snap back without guiding it. Other-
wise, the magazine slider could become damaged, and there is danger of
your fingers being caught or pinched.
– Turn the pneumatic tool so that the nails in the magazine slide back to
the magazine spring
17
.
– Push the magazine spring down and allow the nails to slide past the nail
pusher
18
out of the magazine
10
.
Adjusting the Depth Stop (see figure F)
The driving depth of the nails can be set with thumbwheel
12
.
– Empty the magazine
10
.
(See “Emptying the Magazine”, page 18)
–
Nails are driven in too deeply:
To reduce the driving depth, turn thumbwheel
12
in anticlockwise di-
rection
.
or
OBJ_BUCH-1302-001.book Page 18 Tuesday, March 22, 2011 11:17 AM