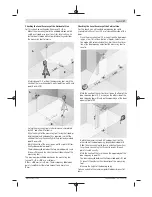
– Mount the measuring tool in the middle between walls A
and B on a tripod, or place it on a firm, level surface. Se-
lect horizontal mode with automatic levelling and allow
the measuring tool to level in.
2,5 m
5,0 m
5,0 m
5,
0 m
5,0 m
A
B
– At a distance of 2.5 m from the measuring tool, mark the
centre of the laser line on both walls (point
Ⅰ
on wall A and
point
Ⅱ
on wall B).
2,5 m
d
5,0 m
2,5 m
5,
0 m
A
B
– Set up the measuring tool at a 5 m distance and rotated
by 180° and allow it to level in.
– Align the height of the measuring tool (using the tripod or
by placing objects underneath as required) so that the
centre of the laser line exactly hits the previously marked
point
Ⅱ
on wall B.
– Mark the centre of the laser line on wall A as point
Ⅲ
(ver-
tically above or below point
Ⅰ
).
– The discrepancy
d
between the two marked points
Ⅰ
and
Ⅲ
on wall A reveals the actual horizontal deviation of the
measuring tool.
The maximum permitted deviation on the measuring dis-
tance of 2 ×
5
m =
10
m is as follows:
10
m × ±
0.3
mm/m = ±
3
mm. The discrepancy
d
between
points
Ⅰ
and
Ⅲ
must therefore amount to no more than
3
mm.
Checking the Level Accuracy of the Vertical Line
For this check, you will need a door opening (on solid
ground) which has at least 2.5 m of space either side of the
door.
– Place the measuring tool 2.5 m away from the door open-
ing on a firm, flat surface (not on a tripod). Select cross-
line mode with automatic levelling. Aim the vertical laser
line at the door opening and allow the measuring tool to
level in.
2,5 m
2,5 m
– Mark the centre of the vertical laser line on the floor of the
door opening (point
Ⅰ
), 5 m away on the other side of the
door opening (point
Ⅱ
) and on the upper edge of the door
opening (point
Ⅲ
).
2 m
d
– Rotate the measuring tool 180° and position it on the
other side of the door opening, directly behind point
Ⅱ
.
Allow the measuring tool to level in and align the vertical
laser line in such a way that its centre passes through
points
Ⅰ
and
Ⅱ
exactly.
– Mark the centre of the laser line on the upper edge of the
door opening as point
Ⅳ
.
– The discrepancy
d
between the two marked points
Ⅲ
and
Ⅳ
reveals the actual vertical deviation of the measuring
tool.
– Measure the height of the door opening.
You can calculate the maximum permitted deviation as fol-
lows:
English |
17
Bosch Power Tools
1 609 92A 4HM | (19.11.2018)
Checking the Level Accuracy of the Horizontal Line
For this check, you will need a free area of 5 ×
5
m.


