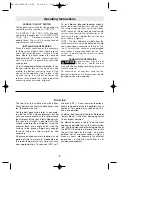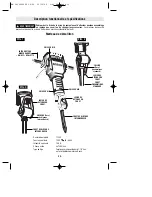
PADDLE "ON/OFF" SWITCH
The paddle switch enables the operator to
control the switch functions of "ON /OFF".
TO SWITCH THE TOOL "ON": Squeeze
and hold the paddle lever. TO SWITCH THE
TOOL "OFF ": Release pressure on the
paddle lever. The switch is spring loaded
and will return automatically.
INSTALLING ACCESSORIES
Clean the insert shank end of the accessory
to remove any debris, then lightly grease
with a light oil or lubricant. If work is to be
done where the accessories are changed
frequently and laid in dirt, sand or concrete
dust, it is best not to grease the shank after
wiping clean.
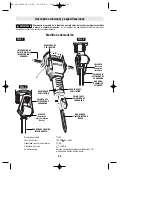
To lock
standard air steel in place
, lower
the tool retainer lever all the way down and
around the bottom and raise lever all the
way up to the opposite side. To lock, insert
air steel up to the striker and lower the
retainer lever around the shank below the
accessory collar as shown in figure 2.
To lock
Bosch internal locking steel
in
place, lower tool retainer until you can slide
the internal locking steel up to the striker.
NOTE: notch on internal locking steel should
always face toward the retainer lever. To
lock, raise the tool retainer lever all the way
up as shown in figure 3.
NOTE: The high efficiency available from the
rotary hammers can only be obtained if sharp
and undamaged accessories are used. The
"cost" to maintain sharp and undamaged
accessories is more than offset by the "time
saved" in operating the tool with sharp
accessories.
REMOVING ACCESSORIES
Accessories may be hot
after use. Avoid contact
with skin and use proper protective gloves or
cloth to remove.
To remove an accessory, reverse the
previous directions. All accessories should
be wiped clean after removing.
-7-
Operating Instructions
!
WARNING
The tool may be switched on with either
hand. Balance the tool with both hands and
rest the tool on the hip.
For the best penetration rates in concrete,
run the tool with a steady pressure, but do
not use excessive force as this will decrease
the efficiency of the tool. Start chipping with
the tool in a straight in position until the
surface to be broken is chipped. Draw the
hammer back at an angle of 60˚ with the
surface to be broken. Apply only enough
force to keep the tool weight on the
accessory
All grease packed hammers require a short
period of time to warm up. Depending on
the room temperature, this time may vary
from approximately 15 seconds (90˚F) to 2
minutes (32˚F). A new hammer requires a
break-in period before full performance is
realized. This period may require up to 5
hours of operation.
Avoid no load running of the tool. No load or
"empty blows" is the most damaging factor
to any impact hammer.
An electric hammer is likely to be the most
expensive portable tool at the construction
job. The long wear and efficient operation of
the BOSCH hammers will more than justify
the cost for tools of this type. As earlier
pointed out, sharp accessories as well as
clean air vents are necessary for efficient
operation. Establish and follow a set
maintenance program.
"TOOL TIPS"
BM 1619929522 12/02 12/10/02 3:43 PM Page 7


