Bosch BEA 750 Скачать руководство пользователя страница 4

1.  Recovery über USB

Das System der BEA 750 wird mit Hilfe eines Recovery-
USB-Sticks wiederhergestellt Dieser Recovery-USB-
Stick kann, mit einem handelsüblichen USB-Stick 
selbstständig erzeugt werden. 


i

Eine Recovery sollte durchgeführt werden, wenn im 
installierten System Fehler auftreten, die auf das 
System zurückzuführen sind.


i

Der nachfolgend beschriebene Ablauf erzeugt einen 
Recovery-USB-Stick für BEA 750 Ländervarianten mit 
offenem Windows Betriebssystem:


R

Deutschland


R

Frankreich


R

Finnland


i

Für Ländervarianten mit geschlossenem Betriebssys-
tem muss ein separater Recovery-USB-Stick erstellt 
werden. Weitere Informationen siehe 1 689 978 620. 

1.1 

Bootfähigen USB-stick erstellen


!

Es muss immer die aktuelle Version der Software 
BoschBEA750RecoveryMaker verwendet werden.


!

Während des Erstellungsprozesses werden alle 
bestehenden Daten auf dem USB-Stick gelöscht. 
Benötigte Daten müssen vorher gesichert werden.


i

Es wird ein USB-Stick mit mindestens 8 GB Spei-
cherkapazität benötigt.


i

Für die Erstellung des bootfähigen USB-Sticks sind 
Administratorrechte erforderlich.

1. 

Software BoschBEA750RecoveryMaker über  

http://cdn.esitronic.de/BEA/Service/BoschBEA750RecoveryMaker.zip 

herunterladen.

2. 

Zip-Archiv an einen gewünschten Ort mit genügend 
freier Speicherkapazität entpacken (z. B. Desktop 
oder Eigene Dokumente).


?

Es entsteht ein Ordner und eine ausführbare Datei:
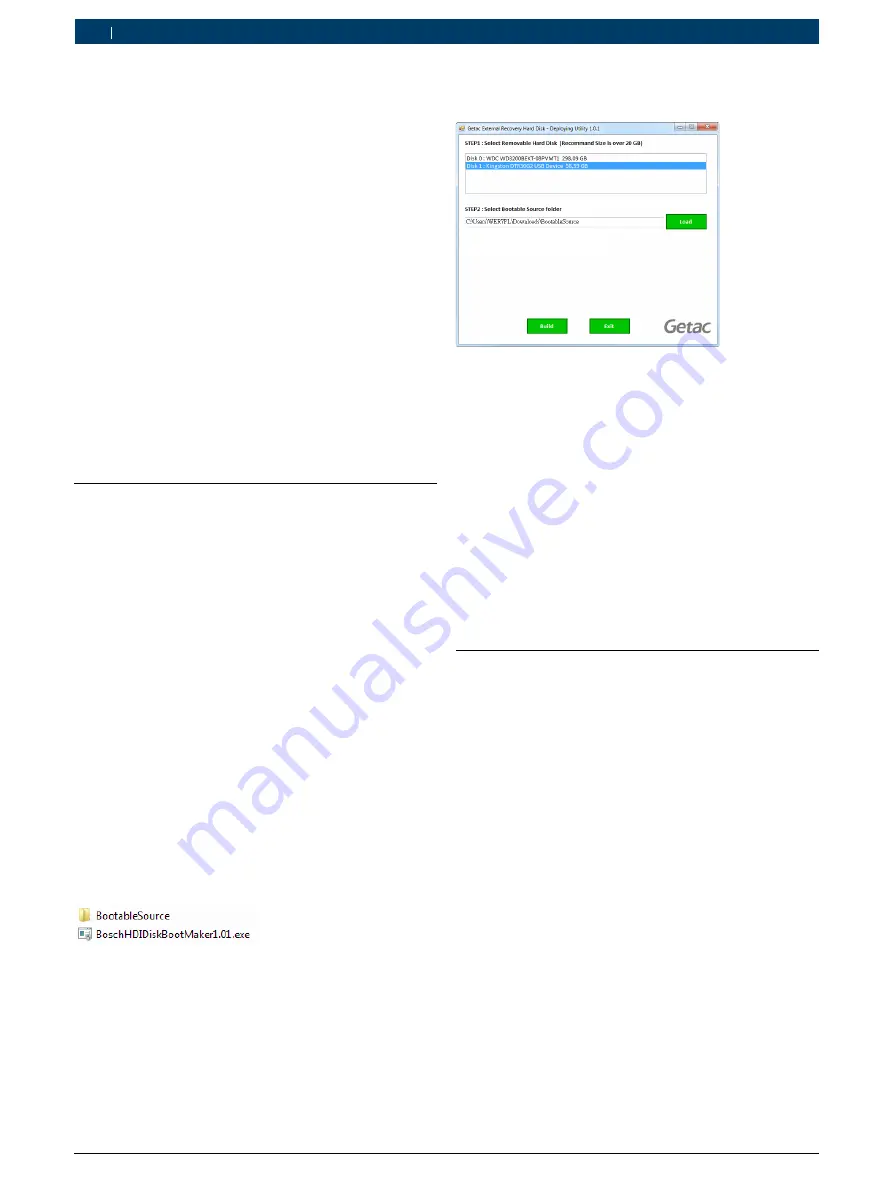
3. 

USB-Stick anschließen.

4. 

Software BoschHDIDiskBootMakerX.XX.exe mit 
einem Doppelklick ausführen.

5. 

Unter STEP1, den entsprechenden USB-Stick wählen.

6. 

Unter STEP2, den Pfad zum „Bootable Source“-Ord-
ner angeben. 


i

Solange sich die ausführbare Datei und der Bootable 
Source“-Ordner im gleichen Verzeichnis befinden über-
nimmt die Software automatisch den korrekten Pfad.

7. 

<

Build

> wählen.


?

Meldung „Deploying successfully“ erscheint.

8. 

<

Exit

> wählen.


"

USB-Stick ist nun in einen boothfähigen USB-Stick 
umgewandelt..


!

Der USB-Stick ist nun bootfähig, beinhaltet aber 
noch kein Image und damit keine Systemdaten. In 
diesem Zustand ist der USB-Stick noch nicht zur 
Installation geeignet.

1.2 

Aktuelles Windows-Image auf den 

USB-Stick spielen


i

Das Recovery-Image ist ca. 4 GB groß. Der Down-
load kann daher, je nach Internetverbindung, einige 
Zeit in Anspruch nehmen.

1. 

Aktuelles Windows-Image über nachfolgenden Link 
herunterladen. 

http://cdn.esitronic.de/BEA/750/Recovery/pr7bosch.wim

2. 

USB-Stick anschließen.

3. 

WIM-Datei


auf den USB-Stick, in den Ordner 

sources


kopieren.


"

Image ist auf dem USB-Stick und kann für die Installa-
tion verwendet werden.


i

Solange keine neue Version der Software BoschHDI-
DiskBootMaker verfügbar ist, kann ein neues Image 
durch Ersetzen der alten WIM-Datei auf den USB-
Stick gespielt werden.


!

Der USB-Stick kann mit diesem Image zur Recovery 
jeder Ländervariante verwendet werden. Der Reco-
very-Prozess stellt in diesem Fall nur das Betriebs-
system wiederher. Die gewünschte Ländervariante 
muss nachträglich installiert werden, siehe 1.4.

1 689 978 638

2019-04-08

Robert Bosch GmbH

4  |  1 687 370 330  |  Recovery über USB

de

Содержание BEA 750

Страница 1: ...750 Recovery USB Stick en Assembly instructions BEA 750 Recovery USB Stick fr Notice d assemblage BEA 750 Recovery USB Stick es Instrucciones de montaje BEA 750 Recovery USB Stick it Istruzioni per l assemblaggio BEA 750 Recovery USB Stick ...

Страница 2: ......

Страница 3: ...1 689 978 638 2019 04 08 Robert Bosch GmbH 1 687 370 330 3 de Deutsch 4 Englisch 6 Français 8 Español 10 Italiano 12 ...

Страница 4: ...chließen 4 Software BoschHDIDiskBootMakerX XX exe mit einem Doppelklick ausführen 5 Unter STEP1 den entsprechenden USB Stick wählen 6 Unter STEP2 den Pfad zum Bootable Source Ord ner angeben i i Solange sich die ausführbare Datei und der Bootable Source Ordner im gleichen Verzeichnis befinden über nimmt die Software automatisch den korrekten Pfad 7 Build wählen Meldung Deploying successfully ersch...

Страница 5: ...neu gestartet werden 8 Bildschirmanweisungen beachten und befolgen Betriebssystem wird wiederhergestellt 1 4 BEA 750 Ländervariante installieren 1 Wenn folgender Bildschirm erscheint Update USB Stick einstecken i i Ist z B bei OTP Kunden oder manchen Ländervari anten kein Update USB Stick verfügbar kann dieser separat bestellt werden In Ausnahmefällen stehen PKG Dateien als ZIP Archiv verpackt in ...

Страница 6: ...tware BoschHDIDiskBootMakerX XX exe with a double click 5 In STEP 1 select the appropriate USB stick 6 In STEP 2 specify the path to the Bootable Source folder i i If the executable file and the Bootable Source folder are in the same directory the software will automati cally select the correct path 7 Select Build The message Deploying successfully appears 8 Select Exit The USB stick is now conver...

Страница 7: ...the power key 8 Read and follow the on screen instructions The operating system is restored 1 4 Installing BEA 750 country variants 1 When the following display appears insert the up date USB stick i i If an update USB stick is not available e g in the case of OTP customers or many country variants it can be ordered separately In exceptional cases PKG files are available for download as a ZIP arch...

Страница 8: ...réalisant un double clic 5 Sélectionner la clé USB correspondante sous STEP1 6 Indiquer le chemin d accès vers le dossier Bootable Source sous STEP2 i i Tant que le fichier exécutable et le dossier Bootable Source se trouvent dans le même répertoire le logiciel reprend automatiquement le chemin d accès adéquat 7 Sélectionner Build Le message Deploying successfully apparaît 8 Sélectionner Exit La c...

Страница 9: ...he arrêt 8 Respecter et suivre les instructions figurant à l écran Le système d exploitation est restauré 1 4 Installer la variante nationale BEA 750 1 Lorsque l écran suivant apparaît insérer la clé USB de mise à niveau i i Si pour certains clients OTP ou dans le cas de plusieurs variantes nationales aucune clé USB de mise à niveau n est disponible elle peut être commandée séparément Dans des cas...

Страница 10: ... 4 Ejecutar el software BoschHDIDiskBootMakerX XX exe haciendo doble clic 5 Seleccionar la memoria USB correspondiente en STEP1 6 En STEP2 indicar la ruta de la carpeta Bootable Source i i Mientras el archivo ejecutable y la carpeta Bootable Source se encuentren en el mismo directorio el soft ware reconoce automáticamente la ruta correcta 7 Seleccionar Build Aparece el mensaje Deploying successful...

Страница 11: ...r en cuenta y seguir las instrucciones de la pantalla Se restablece el sistema operativo 1 4 Instalar la variante del país del pro ducto BEA 750 1 Si aparece la siguiente pantalla enchufar la memoria USB de actualización i i Si p ej para los clientes OTP o en algunas variantes de país no hay disponible ninguna memoria USB de actualización esta se puede pedir por separado En casos excepcionales hay...

Страница 12: ...endo doppio clic su di esso 5 Nello STEP1 selezionare la chiavetta USB corrisponden te 6 Nello STEP2 inserire il percorso per la cartella dell origine avviabile i i Finché il file eseguibile e la cartella dell origine avviabi le si trovano nella stessa directory il software assume automaticamente il percorso corretto 7 Selezionare Crea Viene visualizzato il messaggio Distribuzione ri uscita 8 Sele...

Страница 13: ...schermo Il sistema operativo viene ripristinato 1 4 Installare la variante nazionale BEA 750 1 Se viene visualizzata la seguente schermata inserire la chiavetta USB di aggiornamento i i Se ad esempio in caso di clienti OTP o di alcune varianti nazionali non si dispone della chiavetta USB di aggior namento è possibile ordinarla separatamente In casi eccezionali i file PKG compressi in un archivio Z...

Страница 14: ......

Страница 15: ......

Страница 16: ...Robert Bosch GmbH Diagnostics Franz Oechsle Straße 4 73207 Plochingen DEUTSCHLAND www bosch com bosch prueftechnik bosch com 1 689 978 638 2019 04 08 ...

Отзывы: