Bosch BEA 750 Скачать руководство пользователя страница 5

1.3 

Recovery durchführen


!

Alle Daten und Anwendungen auf der Festplatte 
werden während der Installation gelöscht!


!

Die Spannungsversorgung während der Installation 
darf nicht unterbrochen werden.


i

Für die Recovery ist eine USB-Tastatur notwendig.

1. 

BEA 750 über den Netzschalter an der Geräterück-
seite ausschalten.

2. 

USB-Stick an BEA 750 anschließen.

3. 

Tastatur an BEA 750 anschließen.

4. 

Netzschalter an der Geräterückseite einschalten und 
BEA 750 über die Ein-/Aus-Taste starten.

5. 

Wenn während des Systemstarts folgender Bild-
schirm erscheint, <

F11

> drücken, um den Bootmana-

ger zu öffnen.

6. 

Passwort "

ia4kd

" eingeben.

7. 

Im eingeblendeten Bildschirm den USB-Stick als 
Startgerät wählen.


i

Die Bezeichnung des USB-Sticks unterscheidet sich, 
je nach verwendetem Fabrikat, von der unten darge-
stellten Bezeichnung.


?

Nach einigen Sekunden startet die Software in ei-
ner Kommandozeile.


i

Erscheint in der Kommandozeile nur die Pfadangabe 
X:\WINDOWS\SYSTEM32\>_ muss das System über 
die Ein-/Aus-Taste neu gestartet werden.

8. 

Bildschirmanweisungen beachten und befolgen.


"

Betriebssystem wird wiederhergestellt.

1.4 

BEA 750 Ländervariante installieren

1. 

Wenn folgender Bildschirm erscheint, Update-USB-
Stick einstecken.


i

Ist z. B. bei OTP-Kunden oder manchen Ländervari-
anten kein Update-USB-Stick verfügbar, kann dieser 
separat bestellt werden. In Ausnahmefällen stehen 
PKG-Dateien als ZIP-Archiv verpackt in der Gesamt-
übersicht aller Software-Versionen in EDIS zum 
Downlaod bereit.

2. 

<

Weiter

> wählen.

3. 

Bildschirmanweisungen beachten und befolgen.


"

Ländervariante wird installiert.

1.5 

Betriebssystem-Einstellungen durch-

führen

1. 

BEA 750 einschalten.

2. 

"

Settings >>


Language

" wählen

3. 

In der Liste der angezeigten Sprachen die gewünsch-
te Sprache wählen und mit "

Next

" bestätigen.

4. 

"

Einstellungen >> Betriebssystem

" wählen.

5. 

Einstellungen für Datum, Uhrzeit, Drucker oder 
WLAN vornehmen.


"

BEA 750 startet neu.

1.6 

Gerätekonfiguration durchführen
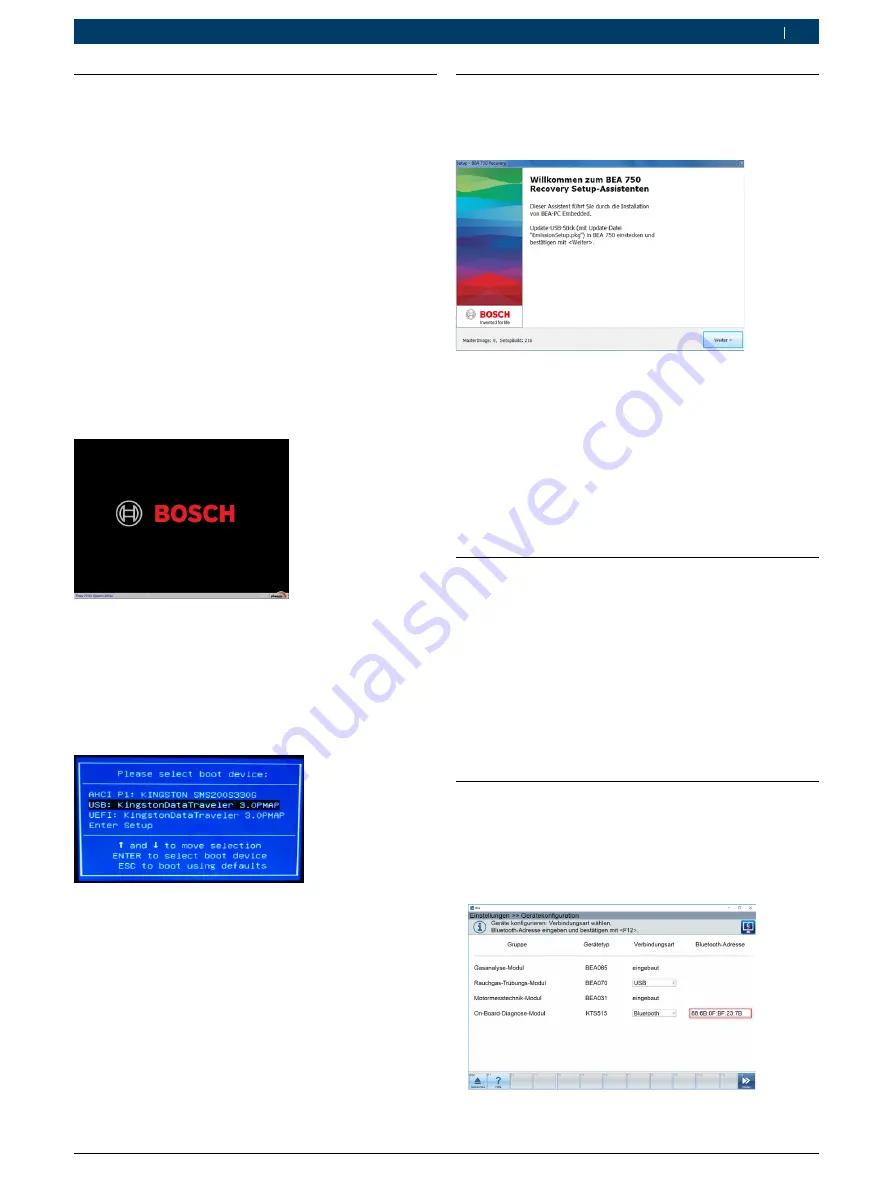
1. 

BEA 750 einschalten.

2. 

"

Einstellungen >> Gerätekonfiguration

" wählen.

3. 

Verbindungsart Bluetooth wählen.

4. 

Bluetooth-MAC-Adresse eingeben.

5. 

<

F12

> wählen.


"

Die Gerätekonfiguration ist abgeschlossen.

1 689 978 638

2019-04-08

Robert Bosch GmbH

Recovery über USB  |  1 687 370 330  |  5

de

Содержание BEA 750

Страница 1: ...750 Recovery USB Stick en Assembly instructions BEA 750 Recovery USB Stick fr Notice d assemblage BEA 750 Recovery USB Stick es Instrucciones de montaje BEA 750 Recovery USB Stick it Istruzioni per l assemblaggio BEA 750 Recovery USB Stick ...

Страница 2: ......

Страница 3: ...1 689 978 638 2019 04 08 Robert Bosch GmbH 1 687 370 330 3 de Deutsch 4 Englisch 6 Français 8 Español 10 Italiano 12 ...

Страница 4: ...chließen 4 Software BoschHDIDiskBootMakerX XX exe mit einem Doppelklick ausführen 5 Unter STEP1 den entsprechenden USB Stick wählen 6 Unter STEP2 den Pfad zum Bootable Source Ord ner angeben i i Solange sich die ausführbare Datei und der Bootable Source Ordner im gleichen Verzeichnis befinden über nimmt die Software automatisch den korrekten Pfad 7 Build wählen Meldung Deploying successfully ersch...

Страница 5: ...neu gestartet werden 8 Bildschirmanweisungen beachten und befolgen Betriebssystem wird wiederhergestellt 1 4 BEA 750 Ländervariante installieren 1 Wenn folgender Bildschirm erscheint Update USB Stick einstecken i i Ist z B bei OTP Kunden oder manchen Ländervari anten kein Update USB Stick verfügbar kann dieser separat bestellt werden In Ausnahmefällen stehen PKG Dateien als ZIP Archiv verpackt in ...

Страница 6: ...tware BoschHDIDiskBootMakerX XX exe with a double click 5 In STEP 1 select the appropriate USB stick 6 In STEP 2 specify the path to the Bootable Source folder i i If the executable file and the Bootable Source folder are in the same directory the software will automati cally select the correct path 7 Select Build The message Deploying successfully appears 8 Select Exit The USB stick is now conver...

Страница 7: ...the power key 8 Read and follow the on screen instructions The operating system is restored 1 4 Installing BEA 750 country variants 1 When the following display appears insert the up date USB stick i i If an update USB stick is not available e g in the case of OTP customers or many country variants it can be ordered separately In exceptional cases PKG files are available for download as a ZIP arch...

Страница 8: ...réalisant un double clic 5 Sélectionner la clé USB correspondante sous STEP1 6 Indiquer le chemin d accès vers le dossier Bootable Source sous STEP2 i i Tant que le fichier exécutable et le dossier Bootable Source se trouvent dans le même répertoire le logiciel reprend automatiquement le chemin d accès adéquat 7 Sélectionner Build Le message Deploying successfully apparaît 8 Sélectionner Exit La c...

Страница 9: ...he arrêt 8 Respecter et suivre les instructions figurant à l écran Le système d exploitation est restauré 1 4 Installer la variante nationale BEA 750 1 Lorsque l écran suivant apparaît insérer la clé USB de mise à niveau i i Si pour certains clients OTP ou dans le cas de plusieurs variantes nationales aucune clé USB de mise à niveau n est disponible elle peut être commandée séparément Dans des cas...

Страница 10: ... 4 Ejecutar el software BoschHDIDiskBootMakerX XX exe haciendo doble clic 5 Seleccionar la memoria USB correspondiente en STEP1 6 En STEP2 indicar la ruta de la carpeta Bootable Source i i Mientras el archivo ejecutable y la carpeta Bootable Source se encuentren en el mismo directorio el soft ware reconoce automáticamente la ruta correcta 7 Seleccionar Build Aparece el mensaje Deploying successful...

Страница 11: ...r en cuenta y seguir las instrucciones de la pantalla Se restablece el sistema operativo 1 4 Instalar la variante del país del pro ducto BEA 750 1 Si aparece la siguiente pantalla enchufar la memoria USB de actualización i i Si p ej para los clientes OTP o en algunas variantes de país no hay disponible ninguna memoria USB de actualización esta se puede pedir por separado En casos excepcionales hay...

Страница 12: ...endo doppio clic su di esso 5 Nello STEP1 selezionare la chiavetta USB corrisponden te 6 Nello STEP2 inserire il percorso per la cartella dell origine avviabile i i Finché il file eseguibile e la cartella dell origine avviabi le si trovano nella stessa directory il software assume automaticamente il percorso corretto 7 Selezionare Crea Viene visualizzato il messaggio Distribuzione ri uscita 8 Sele...

Страница 13: ...schermo Il sistema operativo viene ripristinato 1 4 Installare la variante nazionale BEA 750 1 Se viene visualizzata la seguente schermata inserire la chiavetta USB di aggiornamento i i Se ad esempio in caso di clienti OTP o di alcune varianti nazionali non si dispone della chiavetta USB di aggior namento è possibile ordinarla separatamente In casi eccezionali i file PKG compressi in un archivio Z...

Страница 14: ......

Страница 15: ......

Страница 16: ...Robert Bosch GmbH Diagnostics Franz Oechsle Straße 4 73207 Plochingen DEUTSCHLAND www bosch com bosch prueftechnik bosch com 1 689 978 638 2019 04 08 ...

Отзывы: