background image

23

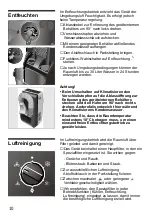
The air inside a room is circulated through a set of
purifying filters when the appliance is set to this
function.

The appliance comes with a main filter with a
double active purifying filter. This special filter is
for:

- Smells and smoke.
- Pollen, bacteria and dust.

Put the air expulsion duct in the same position as
for dehumidification.

Set purification speed setting:     maximum
or silent     .

When the appliance or the model is fitted with
optional filters, we recommend you leave the
optional filters in position regardless of the
desired function setting (cooling,
dehumidification, air purification). The appliance
purifies the air more efficiently in this way.

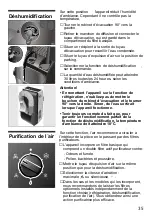
When set to     , the appliance removes humidity
from the atmosphere. It does not, however, control
the temperature.

Turn drainage stopcock 90 ° in an anti-clockwise
direction.

Remove stopcock plug and insert drainage pipe.
stored in the main filter compartment.

Place a bowl at the drainage pipe outlet to collect
the condensed water in.

Put the air extraction duct in storage position.

Set control knob to dehumidification position     .

The amount of water removed from the air can
reach as much as 30 liters/24 hours, depending
on atmospheric conditions.

Warning!

• Do not forget to put the plug back in place on

the drainage stopcock and to turn the
stopcock 90° in a clockwise direction before
setting the appliance to the temperature
control setting. The appliance will shed water
should you fail to do so. 

• Always remember that in order for the

dehumidification function to work properly,
ambient temperature must be at least 18°C.

Air purification

Dehumidification

Содержание B1 RKM 09000

Страница 1: ...ns for Use FR Mode d emploi NL Gebruiksaanwijzing IT Instruzioni sull uso ES Instrucciones de manejo PT Instruções de uso B1 RKM 09000 Internet http www bosch hausgeraete de Bosch Info Team DE Tel 01 80 5 30 40 50 0 13 DEM 0 24 Min DTAG ...

Страница 2: ...Robert Bosch Hausgeräte GmbH Carl Wery Str 34 D 81739 München Germany ...

Страница 3: ...ebeschreibung 5 Bedienfeld 6 Betriebsbedingungen Betriebsbedingungen 7 Transport des Gerätes 7 Inbetriebnahme Kühlen 8 Möglichkeiten der Warmluftabführung 9 Entfeuchten 10 Luftreinigung 10 Pflege und Wartung Reinigung 11 Vor der Inbetriebnahme zu Saisonbeginn 11 Garantiebedingungen 12 Überlegungen die Ihnen einen Anruf beim Kundendienst ersparen können 14 Technische Daten 15 ...

Страница 4: ...etzen Sie sich mit Ihrer Gemeinde oder Stadtverwaltung oder anderen zuständigen Stellen in Verbindung Vor der Inbetriebnahme Ihres Gerätes 4 Lesen Sie die Bedienungsanleitung aufmerksam durch bevor Sie das Gerät zum ersten Mal benutzen Die Anleitung enthält nicht nur wichtige Informationen für den Gebrauch sondern auch wichtige Hinweise für Ihre persönliche Sicherheit und die Instandhaltung des Ge...

Страница 5: ... Luftaustrittsdüse Befestigungsband mit Fenstersauger Abluftschlauch Lufteinlassöffnung Wasserablassschlauch Kabelfach Öffnung zum Ablassen des Kondenswassers Ablassöffnung und Ablasshebel zum Ablassen des Wassers im Entfeuchtungsbetrieb Befestigungshaken für den Abluftschlauch Typenschild ...

Страница 6: ...stellen des Luftstroms Thermostat Funktions Wahlschalter Gerät außer Betrieb Maximaler Kühlbetrieb Leiser Kühlbetrieb Entfeuchtungsbetrieb Signallampe Luftumwälzung leise zur Luftreinigung Luftumwälzung maximal zur Luftreinigung ...

Страница 7: ...es Kabel mit ähnlichen Eigenschaften auszutauschen Wenden Sie sich dazu an den Hersteller oder den Kundendienst oder anderes fachkundiges Personal Achtung Wird das Klimagerät aus und sofort wieder eingeschaltet so verzögert sich der Wiederanlauf des Kompressors um ca 3 Minuten Diese Zeit ist nötig um den korrekten Betrieb des Gerätes zu gewährleisten Transport des Gerätes Vor dem Transport ist das...

Страница 8: ...bluft über den Abluftschlauch nach außen abgeführt Bei extrem hohen Feuchtigkeitsbedingungen wird das Gerät das Kondenswasser im Innenbehälter sammeln Wenn ein bestimmter Pegel erreicht wird leuchtet die Signallampe auf womit darauf hingewiesen wird dass der Behälter entleert werden muss Schalten Sie das Gerät aus und warten Sie 10 Minuten damit der Wiederanschluss der Sicherheitssysteme ermöglich...

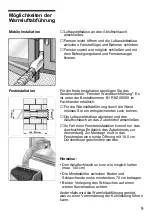
Страница 9: ...Warmluftabführung durch die Wand müssen Sie ein entsprechendes Loch bohren Die Luftaustrittsdüse abziehen und den Abluftschlauch an das Zubehörteil anschließen Im Fall einer Fensterinstallation kommt nur das durchsichtige Endstück des Zubehörsets zur Anwendung Zur Montage muß in das Fensterglas eine runde Öffnung mit 10 5 cm Durchmesser geschnitten werden Hinweise Den Abluftschlauch so kurz wie mö...

Страница 10: ...t jedoch keine Temperaturregelung Ablasshebel zur Entleerung des geräteinternen Behälters um 90 nach links drehen Verschlussstopfen abziehen und Wasserablassschlauch aufstecken Mit einem geeigneten Behälter abfließendes Kondenswasser auffangen Den Abluftschlauch in Parkstellung bringen Funktions Wahlschalter auf Entfeuchtung stellen Je nach Umgebungsbedingungen können der Raumluft bis zu 30 Liter ...

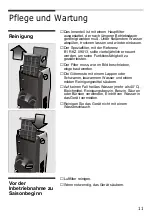
Страница 11: ...ljährlich erneuert werden um seine Funktionsfähigkeit zu gewährleisten Der Filter muss wie im Bild beschrieben eingebaut werden Die Gitterroste mit einem Lappen oder Schwamm lauwarmem Wasser und einem milden Reinigungsmittel säubern Auf keinen Fall heißes Wasser mehr als 40 C Bleichmittel Reinigungsbenzin Benzin Säuren oder Bürsten verwenden Eintritt von Wasser in das Gerät vermeiden Reinigen Sie ...

Страница 12: ...uf leicht zerbrechliche Teile wie z B Glas oder Kunststoff bzw Glühlampen Eine Garantiepflicht wird nicht ausgelöst durch geringfügige Abweichungen von der Soll Beschaffenheit die für Wert und Gebrauchstauglichkeit des Gerätes unerheblich sind oder durch Schäden aus chemischen und elektrochemischen Einwirkungen von Wasser sowie allgemein aus anomalen Umweltbedingungen oder sachfremden Betriebsbedi...

Страница 13: ...ner Ersatzlieferung behalten wir uns die Geltendmachung einer angemessenen Nutzungsanrechnung für die bisherige Nutzungszeit vor 5 Garantieleistungen bewirken weder eine Verlängerung der Garantiefrist noch setzen sie eine neue Garantiefrist in Lauf Die Garantiefrist für eingebaute Ersatzteile endet mit der Garantiefrist für das ganze Gerät 6 Weitergehende oder andere Ansprüche insbesondere solche ...

Страница 14: ...ignallampe nicht erlischt Kondenswassertank im Gerät entleeren Das Ablassen des Kondenswassers erfolgt über den Ablassschlauch der an der Geräteunterseite angeschlossen wird Beachten Sie dazu die Anweisungen im Kapitel Kühlen Überprüfen ob Ablasshebel zum Ablassen des Kondenswassers in der richtigen Position ist Überprüfen ob der Abluftschlauch ordnungsgemäß angeschlossen ist Überprüfen ob der Abl...

Страница 15: ...erprüfen ob Luftein und auslass frei sind Wenn Sie ein zyklisches Wassergurgeln hören so ist das auf den Betrieb der Wasserkreislaufpumpe zurückzuführen die die Leistung des Geräts verbessert Andere Maßnahmen oder Reparaturarbeiten müssen von einem fachkundigen Techniker durchgeführt werden Wenden Sie sich in diesem Fall bitte an Ihren Vertragshändler an unseren Kundendienst oder an eine der autor...

Страница 16: ...anel 19 Requirements for Use Requirements for use 20 Transportation requirements 20 Instructions for Use Temperature control 21 Ways of releasing air outdoors 22 Dehumidification 23 Air purification 23 Cleaning and Maintenance Cleaning 24 Prior to use at change of season 24 Technical Service Warranty 25 Things that can save you from making unnecessary phone calls 26 Technical Information 27 ...

Страница 17: ... which need to be disposed of in accordance with current regulations Do not dispose of your old appliance yourself Get in touch with your local council or other competent body for information about how best to dispose of it Before connecting your new appliance 17 Read the instructions book before using your appliance for the first time It contains important information not only concerning use but ...

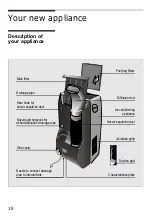
Страница 18: ...ppliance Purifying filters Diffusion duct Suction pad Hot air expulsion duct Air intake grille Drainage pipe Wire cavity Nozzle to connect drainage pipe to internal tank Nozzle and stopcock for dehumidification drainage pipe Rear hook for hot air expulsion duct Characteristics plate ...

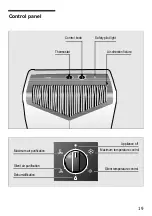
Страница 19: ... panel Air direction fixture Thermostat Control knob Appliance off Maximum temperature control Silent temperature control Dehumidification Safety pilot light Silent air purification Maximum air purification 19 ...

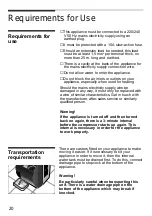
Страница 20: ...nly be replaced with a wire of similar characteristics Get in touch with the manufacturer after sales service or similarly qualified person Warning If the appliance is turned off and then turned back on again there is a 3 minute interval before the compressor starts up again This interval is necessary in order for the appliance to work properly Transportation requirements There are castors fitted ...

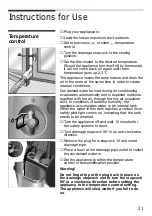
Страница 21: ...ct In conditions of extreme humidity the appliance accumulates water in an internal tank When the water in this tank reaches a certain level safety pilot light comes on indicating that the tank needs to be emptied Turn the appliance off and wait 10 minutes for the safety systems to reset Turn drainage stopcock 90 in an anti clockwise direction Remove the plug from stopcock 10 and insert drainage p...

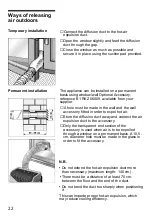
Страница 22: ...de in the wall and the wall accessory fitted in order to expel hot air Store the diffusion duct away and connect the air expulsion duct to the accessory Only the transparent end section of the accessory is used when air is to be expelled through a window on a permanent basis A 10 5 cm diameter hole must be made in the glass in order to fit the accessory N B Do not extend the hot air expulsion duct...

Страница 23: ...rom the atmosphere It does not however control the temperature Turn drainage stopcock 90 in an anti clockwise direction Remove stopcock plug and insert drainage pipe stored in the main filter compartment Place a bowl at the drainage pipe outlet to collect the condensed water in Put the air extraction duct in storage position Set control knob to dehumidification position The amount of water removed...

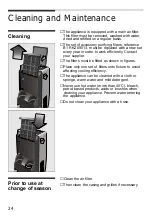
Страница 24: ...year in order to work efficiently Contact your supplier The filters must be fitted as shown in figures Place only one set of filters onto fixture to avoid affecting cooling efficiency The appliance can be cleaned with a cloth or sponge warm water and mild detergent Never use hot water more than 40 C bleach petrol based products acids or brushes when cleaning your appliance Prevent water entering t...

Страница 25: ...plate Technical Service Warranty Warranty The conditions of warranty depend on the relevant Supplier in a particular country Contact the establishment where you purchased your appliance for more information and quote the appliance model and factory number The receipt of purchase for the appliance must be produced prior to any work carried out under warranty The following procedures can help you so...

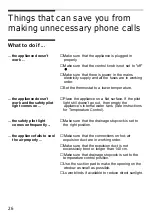
Страница 26: ... appliance on a flat surface If the pilot light still doesn t go out then empty the appliance s internal water tank See instructions for Temperature Control Make sure that the drainage stopcock is set to the right position Make sure that the connections on hot air expulsion duct are in working order Make sure that the expulsion duct is not excessively bent or longer than 140 cm Make sure that drai...

Страница 27: ...s properly fitted onto the appliance Make sure that the appliance s air inlets and outlets are free from obstruction If the noise sounds like water flowing then this is due to the pump which circulates water around the system so as to enhance the efficiency of the appliance Any other kind of fault or repair work must be dealt with by a specialised technician Contact your authorised supplier the af...

Страница 28: ... contrôle 31 Conditions d Utilisation Conditions d utilisation 32 Conditions de transport 32 Instructions d Usage Climatisation 33 Possibilités d évacuer l air à l extérieur 34 Déshumidification 35 Purification de l air 35 Nettoyage et Maintenance Nettoyage 36 Avant une utilisation en début de saison 36 Service Technique Garantie 37 Considérations qui vous éviteront d appeler le Service Technique ...

Страница 29: ... au rebut par d autres moyens Contactez votre Mairie ou un autre centre compétent pour la reprise de celui ci Avant de connecter votre appareil 29 Lisez le manuel d instructions avant de l utiliser pour la première fois Il contient des informations importantes non seulement pour l utilisation mais aussi pour votre sécurité et la maintenance de l appareil Conservez ce manuel d instructions Il pourr...

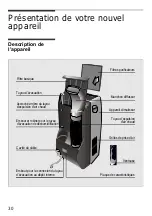
Страница 30: ...rs Manchon diffuseur Ventouse Tuyau d expulsion d air chaud Grilles de prise d air Tuyau d évacuation Cavité du câble Embout pour la connexion du tuyau d évacuation au dépôt interne Embout et robinet pour le tuyau d évacuation de déshumidification Accroche arrière du tuyau d expulsion d air chaud Plaque de caractéristiques ...

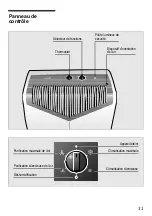
Страница 31: ...f d orientation de l air Thermostat Sélecteur de fonctions Appareil éteint Climatisation maximale Climatisation silencieuse Déshumidification Pilote lumineux de sécurité Purification silencieuse de l air Purification maximale de l air ...

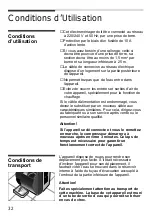
Страница 32: ...stituer par un nouveau câble aux caractéristiques similaires Pour cela dirigez vous au fabriquant ou à son service après vente ou le personnel similaire qualifié Attention Si l appareil se déconnecte et vous le remettez en marche le compresseur démarrera à nouveau après environ 3 minutes Ce laps de temps est nécessaire pour garantir un fonctionnement correct de l appareil Conditions de transport L...

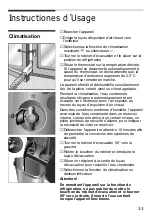
Страница 33: ...é au travers du tuyau d expulsion d air chaud Dans des conditions extrêmes d humidité l appareil accumule de l eau condensée dans un réservoir interne Lorsqu elle arrive à un certain niveau un pilote lumineux de sécurité s allume pour indiquer la nécessité de vider ce réservoir Débrancher l appareil et attendre 10 minutes afin de permettre la connexion des systèmes de sécurité Tourner le robinet d...

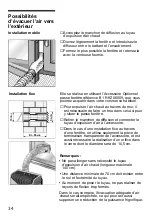
Страница 34: ...uisez le diffuseur entre le battant et l encadrement Fermez le plus possible la fenêtre et retenez la avec la ventouse fournie Installation mobile 34 Installation fixe Elle se réalise en utilisant l Accessoire Optionnel passe fenêtre référence B1 RKZ 06009 que vous pourrez acquérir dans votre commerce habituel Pour expulser l air chaud au travers du mur il est nécessaire de faire un trou dans celu...

Страница 35: ...ant il ne contrôle pas la température Tourner le robinet d évacuation 90 vers la gauche Retirer le manchon de diffusion et connecter le tuyau d évacuation qui est gardé dans le compartiment du filtre basique Situer un récipient à la sortie du tuyau d évacuation pour recueillir l eau condensée Situer le tuyau d expulsion d air sur la position de parking Sélectionner la fonction de déshumidification...

Страница 36: ... à être opérationnel Pour cela dirigez vous à votre commerce habituel L installation des filtres doit être faite comme le montrent les figures Situer seulement un jeu de filtres sur le support pour maintenir la puissance frigorifique Vous pouvez nettoyer l appareil à l aide d un chiffon ou d une éponge de l eau tiède et un détergeant doux N utilisez jamais d eau chaude à plus de 40 C de produit bl...

Страница 37: ...ntie Garantie Dans chaque pays sont établies les conditions de garantie par les correspondantes Sociétés de Distribution Pour plus de détails à cet effet dirigez vous au Distributeur qui vous a vendu l appareil en lui facilitant le nom du modèle et le n de fabrication Pour toute intervention qui se produit sous garantie il est indispensable de présenter le justificatif d achat de l appareil Les ac...

Страница 38: ...surface plane Si le pilote reste allumé videz le réservoir intérieur d eau de l appareil Voir instructions dans climatisation Vérifiez que le robinet d évacuation est sur la position adéquate Vérifiez que les unions du tuyau d expulsion de l air chaud sont correctes Vérifiez que la trajectoire du tuyau d expulsion n est pas trop courbe et que sa longueur ne dépasse pas 140 cm Vérifiez que le robin...

Страница 39: ...l air est correctement fixé à l appareil Vérifiez qu il n existe aucun obstacle à l entrée et la sortie d air de l appareil Le bruit cyclique d eau que vous pouvez entendre est dû au fonctionnement de la pompe qui fait circuler l eau pour améliorer la puissance de l appareil Toute autre panne ou réparation doit être faite par un technicien spécialisé Consultez dans ce cas le distributeur autorisé ...

Страница 40: ...t 41 Beschrijving van de werking Toebehoren 42 Veiligheidsbepalingen Veiligheidsbepalingen 44 Voorbereiden voor het transport 44 Gebruiksaanwijzing Koelen 45 Mogelijkheden voor afvoer van de warme lucht 46 Ontvochtigen 47 Reiniging van de lucht 47 Schoonmaken 48 Servicedienst Garantie 49 Overwegingen waardoor u de kosten van de Servicedienst kunt besparen 50 Technische gegevens 51 ...

Страница 41: ...ag bij het wegdoen van uw oude apparaat advies aan de gemeentelijke reinigingsdienst Voordat u het apparaat voor het eerst in gebruik neemt Lees voordat u het apparaat voor het eerst in gebruik neemt de gebruiksaanwijzing zorgvuldig door U vindt daarin belangrijke informatie over het gebruik uw eigen veiligheid en het onderhoud van het apparaat Bewaar de gebruiksaanwijzing voor een eventuele ander...

Страница 42: ...dje met raamzuiger Luchtafvoerslang Luchtinlaatopening Afvoerslang voor condensatiewater Kavelbak Opening voor het afvoeren van het water Aansluiting om het water tijdens het ontvochtigen te laten weglopen Knop om het water tijdens het ontvochtigen te laten weglopen Bevestigingshaak voor de afvoerslang Typeplaatje ...

Страница 43: ...ellen van de luchstroom Thermostaat Functie keuzeschakelaar Apparaat keuzeschakelaar Maximaal koelen Stiller koelen Ontvochtigen Signaallampje Stille luchtcirculatie om de lucht te reinigen Luchtcirculatie om de lucht te reinigen 43 ...

Страница 44: ...op met de fabrikant de Servicedienst of een vakkundig monteur Attentie Als het apparaat wordt uitgeschakeld en weer ingeschakeld zal de compressor na verloop van ongeveer 3 minuten weer starten Deze tijd is nodig om de correcte werking van het apparaat te garanderen Voorbereiden voor het transport Om het transport te vergemakkelijken is het apparaat voorzien van rollen Voordat het apparaat bij het...

Страница 45: ... via de afvoerslang die aan de onderkant van het apparaat aangesloten is Bij een overmatige luchtvochtigheid verzamelt het condenswater zich in een reservoir in het binnendeel Wanneer een bepaalde piekwaarde wordt bereikt gaat het waarschuwingslampje knipperen om aan te geven dat het condenswater reservoir moet worden leeggemaakt Het apparaat uitzetten en 10 minuten wachten om het opnieuw inschake...

Страница 46: ...e muur moet u een gat boren dat groot genoeg is Uisblaasmond eraf trekken en de luchtafvoerslang op de raam muurdoorvoer aansluiten In geval van installatie via het raam wordt alleen het transparente einde van het hulpstuk gebruikt Voor montage moet in het glas een ronde opening met een diameter van 10 5 cm worden aangebracht Attentie De luchtafvoerslang niet onnodig verlengen maximumlengte 140 cm...

Страница 47: ... De temperatuur wordt echter niet geregeld Knop voor het legen van het interne reservoir ca 90 naar links draaien Stopje eraf trekken en de afvoerslang erop steken In een geschikte bak het door de afvoerslang wegstromende condensatiewater opvangen Om uitsluitend de lucht te reinigen luchtafvoerslang in de parkeerstand zetten Zet de functiekeuzeschakelaar op het symbool Ontvochtigen Naar gelang de ...

Страница 48: ...randeren Vervangingsfilters zijn onder bestelnummer B1 RZK 09013 bij elke vakhandel tegen meerprijs verkrijgbaar Laten zien hoe de filters moeten worden ingezet Niet meer dan twee speciale filters op basisfilter aanbrengen om de koelcapaciteit niet te verminderen De roosters met een doekje of spons met lauw water met een mild reinigingsmiddel schoonmaken Nooit heet water meer dan 40 C bleekmiddel ...

Страница 49: ...cedienst inroept geef dan het typenummer E nummer en het serienummer FD nummer op U vindt deze gegevens op het typeplaatje op het het apparaat Servicedienst Garantie Garantie Voor het aangeschafte apparaat gelden de garantiebepalingen die door de vertegenwoordiging van de moederorganisatie in het land van aankoop zijn uitgegeven Eventuele bijzonderheden hierover zal de leverancier bij wie het appa...

Страница 50: ...ien het lampje blijft branden het interne waterreservoir van het apparaat leeg laten lopen Zie aanwijzingen bij klimaatregeling Controleer of de knop om het condensatiewater te laten weglopen in de juiste stand staat Controleer of de luchtafvoerslang op de juiste manier is aangesloten Controleer of de luchtafvoerslang geen te kleine radius van de bochten heeft en niet langer is dan 140 cm Controle...

Страница 51: ...28 het apparaat teveel geluid maakt Controleer of de luchtafvoerslang op de juiste manier aan het apparaat is bevestigd Controleer of de luchtinlaat en luchtuitblaasopeningen niet zijn afgedekt Andere ingrepen of reparaties moeten door een vakkundig monteur worden uitgevoerd Neem in dit geval contact op met uw leverancier of de Servicedienst Technische gegevens ...

Страница 52: ...4 Quadro di controllo 55 Condizioni d uso Condizioni d uso 56 Condizioni di trasporto 56 Istruzioni d Uso Climatizzazione 57 Possibilità di evacuare l aria all esterno 58 Deumidificazione 59 Purificazione dell aria 59 Pulizia e Manutenzione Pulizia 60 Prima del suo uso all inizio della stagione 60 Servizio Tecnico Garanzia 61 Considerazioni che vi faranno risparmiare telefonate al Servizio Tecnico...

Страница 53: ...arecchio prima di scartarlo in altro modo Contattate il vostro Municipio o altri centri competenti per la sua raccolta Prima di collegare il vostro apparecchio 53 Prima di utilizzare l apparecchio per la prima volta leggete il libro di istruzioni Esso contiene informazioni importanti non soltanto per l uso ma anche per la vostra sicurezza e per la manutenzione Conservate questo libro di istruzioni...

Страница 54: ...rificatori Manicotto diffusore Ventosa Tubo espulsore di aria calda Bocchetta di presa d aria Tubo di scolo Vano per il cavo Boccola per collegamento del tubo di scolo al serbatoio interno Boccola e chiave per il tubo di scolo della deumidificazione Aggancio posteriore del tubo espulsore d aria calda Targa di caratteristiche ...

Страница 55: ...ivo orientatore dell aria Termostato Selettore di funzioni Apparecchio inattivo Climatizzazio massima Climatizzazione silenziosa Deumidificazione Spia luminosa di sicurezza Purificazione d aria silenziosa Purificazione d aria massima ...

Страница 56: ... da un altro di caretteristiche simili Per farlo indirizzarsi al fabbricante o al suo servizio post vendita o personale equipollente qualificato Attenzione Se l apparecchio è scollegato e ricollegato il compressore si metterà in moto dopo 3 minuti Questo tempo è necessario per garantire il funzionamento corretto dell apparecchio Condizioni di trasporto L apparecchio è munito di ruote onde facilita...

Страница 57: ... espulsa attraverso il tubo espulsore dell aria calda In condizioni estreme di umidità l apparecchio accumulerà acqua condensata in un serbatoio interno Raggiunto un determinato livello si accenderà la spia luminosa di sicurezza indicando il bisogno di svutare il suddetto serbatoio Disinserite l apparecchio e aspettate 10 minuti per permettere il collegamento dei sistemi di sicurezza Girate la chi...

Страница 58: ...rete acquistare presso il vostro solito negozio Per espulsare l aria calda attraverso il muro è necessario forarlo per collocarci il passamuro Levate il manicotto diffusore e collegate il tubo espulsore d aria all accessorio Nel caso di installazione fissa attraverso la finestra viene utilizzato soltanto il pezzo finale trasparente dell accessorio ed è nescessario fare un foro nel vetro di 10 5 cm...

Страница 59: ...tale Non controlla comunque la temperatura Girate 90 a sinistra la schiave di scolo Levate il tappo della chiave e introducete il tubo di scolo che si ripone nello scomparto del filtro basico Collocate un recipiente all uscita del tubo di scolo per raccogliere l acqua consdensata Collocate il tubo espulsore in posizione di parcheggio Selezionate nella manopola la funzione di deumidificazione La qu...

Страница 60: ...finché continui ad essere operativo In merito indirizzatevi al vostro solito negozio L installazione dei filtri dev essere come indicato nella figura Collocate soltanto un complesso di filtri sul sostegno per così mantenere la potenza frigorifica Potete pulire l apparecchio con uno straccio o una spugna acqua tiepida e un detersivo soave Non usate mai dell acqua calda oltre i 40 C candeggina benzi...

Страница 61: ... In ogni paesi sono valide le condizioni di garanzia stabilite dalle relative Societa Distributrici Per ulteriori dettagli in merito dovrete recarvi presso il Distributore dove avete acquistato il vostro apparecchio fornendogli il modello e il n di fabbricazione Per qualsiasi intervento realizzato durante la garanzia è imprescindibile inoltrare lo scontrino dell acquisto dell apparecchio Le azioni...

Страница 62: ...la spia continua accesa svuotare il serbatoio interno dell acqua dell apparecchio Vedi istruzioni in Climatizzazione Verificare che la chiave di scolo è nella posizione apposita Verificare che le unioni del tubo espulsore dell aria calda siano corrette Verificare che la traiettoria del tubo di espulsione non sia troppo curvata e che la sua lunghezza non superi i 140 cm Verificare che la chiave di ...

Страница 63: ...ria sia correttamente fissato all apparecchio Verificare che l entrata e l uscita dell apparecchio siano libere da ostacoli Se sentite un rumore ciclico di acqua ciò è dovuto al funzionamento della pompa che fa ricircolare l acqua per migliorare la potenza dell apparecchio Per qualsiasi altro guasto la riparazione deve venir fatta da un tecnico specializzato In questo caso consultate il distributo...

Страница 64: ...diciones de Utilización Condiciones de utilización 68 Condiciones de transporte 68 Instrucciones de Uso Climatización 69 Posibilidades de evacuar aire al exterior 70 Deshumidificación 71 Purificación del aire 71 Limpieza y Mantenimiento Limpieza 72 Antes de su utilización al principio de temporada 72 Servicio Técnico Garantía 73 Consideraciones que le ahorrrarán llamadas al Servicio Técnico 74 Dat...

Страница 65: ...arato viejo antes de desecharlo por otros medios Contacte con su Ayuntamiento u otros centros competentes para la recogida del mismo Antes de conectar su aparato Lea el libro de instrucciones antes de utilizarlo por primera vez Contiene informaciones importantes no sólo para el uso sino también para su seguridad y mantenimiento Conserve este libro de instrucciones Eventualmente puede servir a otro...

Страница 66: ...es Manguito difusor Ventosa Tubo expulsor de aire caliente Rejillas de toma de aire Tubo de desagüe Hueco del cable Boquilla para conexión del tubo de desagüe al depósito interno Boquilla y llave para el tubo de desagüe de deshumidificación Enganche trasero del tubo expulsor de aire caliente Placa de características ...

Страница 67: ...o orientador del aire Termostato Selector de funciones Aparato inactivo Climatización máxima Climatización silenciosa Deshumidificación Piloto luminoso de seguridad Purificación del aire silenciosa Purificación del aire máxima 67 ...

Страница 68: ...do por otro de similares características Para ello dirijase al fabricante o su servicio posventa o personal similar cualificado Atención Si se desconecta el aparato y se vuelve a conectar el compresor volverá a arrancar transcurridos unos 3 minutos Este tiempo es necesario para garantizar el correcto funcionamiento del aparato Condiciones de transporte El aparato dispone de ruedas para facilitar s...

Страница 69: ...junto con el aire expulsado a través del tubo expulsor de aire caliente En condiciones extremas de humedad el aparato acumulará agua condensada en un depósito interno Llegado a un cierto nivel se encenderá el piloto luminoso de seguridad indicando la necesidad de vaciar dicho depósito Desconecte el aparato y espere 10 minutos para permitir la reconexión de los sistemas de seguridad Girar 90 a la i...

Страница 70: ...podrá adquirir en su comercio habitual Para expulsar el aire caliente a través de la pared se necesita practicar un orificio en la misma para colocar el pasapared Retirar el manguito difusor y conectar el tubo expulsor de aire al accesorio En el caso de instalación fija a través de ventana sólo se utiliza la pieza terminal transparente del accesorio y es necesario realizar un agujero en el cristal...

Страница 71: ...embargo no controla la temperatura Girar 90 a la izquierda la llave de desagüe Retirar el tapón de la llave e introducir el tubo de desagüe que se guarda en el compartimento del filtro básico Situar un recipiente en la salida del tubo de desagüe donde recoger el agua condensada Colocar el tubo expulsor de aire en posición de parking Seleccionar la función de deshumidificación en el mando La cantid...

Страница 72: ...evo cada año para que siga siendo operativo Para ello diríjase a su comercio habitual La instalación de los filtros debe ser como se muestra en la figura Colocar únicamente un juego de filtros sobre el soporte para mantener la potencia frigorífica Puede limpiar el aparato con un paño o esponja agua tibia y un detergente suave Nunca use agua caliente a más de 40 C blanqueador bencina gasolina ácido...

Страница 73: ... el n de fabricación FD de su aparato que podrá tomar de la placa de características Servicio Técnico Garantía Garantía En cada país rigen las condiciones de garantía establecidas por las correspondientes Sociedades Distribuidoras Para más detalles a este respecto deberá dirigirse al Distribuidor en donde ha adquirido su aparato facilitándole el modelo y n de fabricación Para cualquier intervenció...

Страница 74: ...iso plano Si sigue el piloto encendido vaciar el depósito interior de agua del aparato Ver instrucciones en climatización Comprobar que la llave de desagüe está en la posición adecuada Comprobar que las uniones del tubo expulsor del aire caliente son correctas Comprobar que la trayectoria del tubo de expulsión no está demasiado curvada y que su longitud no excede de 140 cm Comprobar que la llave d...

Страница 75: ...stá correctamente fijado al aparato Comprobar que la entrada y salida de aire del aparato se encuentran libre de obstáculos Si escucha un ruido cíclico de agua es debido al funcionamiento de la bomba que recircula el agua para mejorar la potencia del aparato Cualquier otra avería o reparación debe de ser llevada a cabo por un técnico especializado Consulte en este caso al distribuidor autorizado a...

Страница 76: ...olo 79 Condições de Utilização Condições de utilização 80 Condições de transporte 80 Instruções de Uso Arrefecimento 81 Possibilidades de evacuar o ar para o exteriorr 82 Desumidificação 83 Purificação do ar 83 Limpeza e Manutenção Limpieza 84 Antes da sua utilização no princípio da época 84 Serviço Técnico Garantia 85 Considerações que pouparão chamadas ao Serviço Técnico 86 Características Técni...

Страница 77: ...minar por outros meios Contacte a sua Câmara Municipal ou outros centros competentes para a recolha do mesmo Antes de ligar o seu aparelho 77 Antes de utilizar o aparelho pela primeira vez leia o livro de instruções correspondente Contém informações importantes não só para o uso mas também para a sua segurança e manutenção Conserve este livro de instruções Eventualmente poderá servir para outro ut...

Страница 78: ...entosa Tubo expulsor de ar quente Grelhas de entrada de ar Tubo de escoamento Orifício do fio Boca para a ligação do tubo de escoamento ao depósito interno Boca e torneira para o tubo de escoamento de desumidificação Fixação traseira do tubo expulsor de ar quente Placa de características Aparelho de ar condicionado ...

Страница 79: ...o Dispositivo orientador do ar Termostato Sélecteur de fonctions Aparelho inactivo Arrefecimento máximo Arrefecimento silencioso Desumidificação Luz de segurança Purificação do ar silenciosa Purificação do ar máxima 79 ...

Страница 80: ...outro de características idênticas Para tal dirija se ao fabricante ou ao seu serviço de pós venda ou a pessoal similar qualificado Atenção Se se desligar o aparelho e se tornar a ligar o compressor voltará a arrancar passados cerca de 3 minutos Este tempo é necessário para garantir o funcionamento correcto do aparelho Condições de transporte O aparelho dispõe de rodas para facilitar a sua mudança...

Страница 81: ...erto nível acender se á a luz indicadora de segurança mostrando a necessidade de esvaziar o referido depósito Desligue o aparelho e espere 10 minutos para permitir que os sistemas de segurança voltem a entrar em funcionamento Vire a torneira de esvaziamento 90 para a esquerda Retire a tampa da torneira e introduza o tubo de esvaziamento que se guarda no compartimento do filtro básico Situe um reci...

Страница 82: ...referência B1 RKZ 06009 que poderá adquirir no seu comércio habitual Para expulsar o ar quente através da parede é preciso fazer um orifício nesta para colocar o passaparede Retirar o manguito difusor e ligar o tubo expulsor de ar acessório Em caso de instalação fixa através da janela só se utiliza a peça terminal transparente do acessório sendo necessário realizar um orifício no vidro com um diâm...

Страница 83: ...ambiente No entanto não controla a temperatura Girar a chave de evacuação de água 90 para a esquerda Retirar o tampão da chave e introduzir o tubo de evacuação que se guarda no compartimento do filtro básico Situar um recipiente na saída do tubo de evacuação para recolher a água condensada Colocar o tubo expulsor de ar na posição de estacionamento Seleccionar a função de desumidificação no comando...

Страница 84: ...jogo novo cada ano para que continue a ser operacional Para isso dirija se ao seu comércio habitual A instalação dos filtros deve ser tal como se mostra na figura Colocar somente um jogo de filtros sobre o suporte para manter a potência frigorífica Pode limpar o aparelho com um pano ou esponja água morna e um detergente suave Nunca use água quente a mais de 40 C branqueadores benzina gasolina ácid...

Страница 85: ...rantia Em cada país regem as condições de garantia estabelecidas pelas respectivas Sociedades de Distribuição Para mais pormenores a este respeito deverá dirigir se ao Distribuidor onde adquiriu o seu aparelho facilitando lhe o modelo e o n de fabrico Para qualquer intervenção que se produza em garantia é imprescindível apresentar o comprovativo de compra do aparelho As acções descritas a seguir v...

Страница 86: ...indicadora continuar acesa esvaziar o depósito interior de água do aparelho Ver instruções no arrefecimento Verificar se a chave de evacuação de água se encontra na posição adequada Verificar se as uniões do tubo expulsor de ar quente estão em ordem Verificar se o percurso do tubo de expulsão não é demasiado curvo e certificar se de que o seu comprimento não excede os 140 cm Verificar se a chave d...

Страница 87: ... o tubo expulsor de ar está fixado de forma correcta ao aparelho Verificar que a entrada e a saída de ar do aparelho não tenham obstáculos Se ouvrir um ruído cíclico de água ele deve se ao funcionamiento da bomba que recircula a potência do aparelho Qualquer outra avaria ou reparação deverá ser realizada por um técnico especializado Consulte neste caso um distribuidor autorizado o serviço de atenç...

Страница 88: ...AC 22 130 157 Rev c ...

Отзывы: