background image

6 720 608 032

4

Appliance details

2.2

Unpacking the GWH 1600 H heater

This heater is packed securely.

Before installing the unit, be certain you have the
correct heater for your type of Gas - Propane or
Natural  Gas.

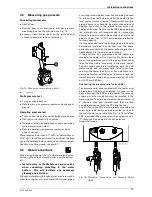
  Identification  labels  are  found  on  the

shipping box, and on the rating plate which is located on
the right side panel of the cover.

Fig. 2

Rating plate

A

Serial number

B

Type of gas

The box includes:
• Pressure relief valve
• Mounting screws
• Product registration card

• Installation manual
• Incandescent particle tray.

Do not lose this manual, there is a charge for a
replacement

.

Please  complete  and  return  the  enclosed  product
registration card.

The GWH 1600 H is not approved or designed for:

• Manufactured (mobile) homes, RV's or boats
• Heating or other recirculating/pumping applications*
• Solar/preheat  backup  or  high  temperature  booster

use

• Installation in bathroom, bedroom or other occupied 

rooms normally kept closed.

* This includes domestic hot water circulator pump loop
systems that may be installed in home hot water system
prior  to installing  this  unit.    An  approved  recirculation
design can be found in chapter 3.10.

2.3

General rules to follow for safe 

operation

1.

 You should follow these instructions when you install

your heater. In the United States: The installation must
conform  with  local  codes  or,  in  the  absence  of  local
codes,  the  National  Fuel  Gas  Code  ANSI  Z223.1/
NFPA 54.
In Canada: The Installation should conform with CGA
B149.(1,2)  INSTALLATION  CODES  and  /or  local
installation codes.

2. 

Carefully  plan  where  you  install  the  heater.  Proper

clearances must be followed.

3. 

The appliance must be isolated from the gas supply

piping  system  by  closing  its  individual  manual  gas
shutoff  valve  (not  supplied  with  heater)  during  any
pressure testing at pressures in excess of ½ Psig (3.5
kPa).
The  appliance  and  its  gas  connection  must  be  leak
tested before placing the appliance in operation.

4. 

Keep  water  heater  area  clear  and  free  from

combustibles and flammable liquids. Do not locate the
heater over any material which might burn.

5.  Correct  gas  pressure 

is  critical  for  the  optimum

operation of this heater. Gas piping must be sized to
provide the required pressure at the maximum output of
the  heater,  while  all  the  other  gas  appliances  are  in
operation. Check with your local gas supplier, and see
chapter 3.7 and  3.8 to verify proper gas line sizing.

6. 

Should  overheating  occur  or the  gas supply  fail  to

shut off, turn off the gas supply at the manual gas shut
off valve, on the gas line. Note: manual gas shutoff valve
is not supplied with the heater.

7. 

Do  not  use  this  appliance  if  any  part  has  been

underwater.  Immediately  call  a  qualified  service
technician to inspect the appliance and to replace any
part of the control system  and any  gas  control  which
has been underwater.

i

BOSCH  is  constantly  improving  its
products,  therefore  specifications  are
subject to change without prior notice.

Содержание Aquastar GWH 1600 H N

Страница 1: ...operty damage Refer to this manual For assistance or additional information consult a qualified installer service agency or the gas supplier In the Commonwealth of Massachusettes the installation must be performed by a licensed plumber or gas fitter Upon completion of the installation these instructions should be handed to the user of the appliance for future reference What to do if you smell gas ...

Страница 2: ...8 5 5 Vent assembly 18 5 6 Mineral scale build up 18 6 Troubleshooting 19 6 1 Introduction 19 6 2 No spark at pilot with water flow 19 6 3 Spark appears when hot water is turned on but pilot and burners will not ignite 19 6 4 Pilot light but burners will not come on 20 6 5 Main burners go out during hot water use 20 6 6 Hot water temperature fluctuates at tap 21 6 7 Water is too hot 21 6 8 Water i...

Страница 3: ...r 3 8 Venting Natural Draft Vent diameter inches 5 Minimum height feet 6 with no elbows Vertical termination Sidewall termination only with AQ4 power vent kit Water Hot water connection inches NPT Cold water connection inches NPT Water valve material Polymer PPS Polypropylene Sulfid Minimum water flow 0 6 gallon minute 2 2 l m Minimum recommended water pressure 30 PSI 2 07 bar Connections Bottom o...

Страница 4: ...National Fuel Gas Code ANSI Z223 1 NFPA 54 In Canada The Installation should conform with CGA B149 1 2 INSTALLATION CODES and or local installation codes 2 Carefully plan where you install the heater Proper clearances must be followed 3 The appliance must be isolated from the gas supply piping system by closing its individual manual gas shutoff valve not supplied with heater during any pressure te...

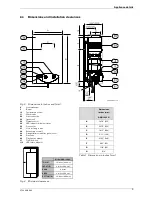
Страница 5: ...ver 37 Hole for fixing to wall 38 Exhaust pipe to wall 39 Draught diverter with flue gas monitor 40 Gas valve 49 Observation window 51 On Off switch 110 LED failure indicator Fig 4 Minimum clearances Model GWH 1600 H TOP A 12 inches 306 mm FRONT B 4 inches 100 mm BACK 0 inches SIDES 4 inches 100 mm BOTTOM C 12 inches 306 mm Dimensions inches mm GWH 1600 H A 16 73 425 B 25 75 655 C 13 15 334 D 5 11...

Страница 6: ...r is noncombustible For installations in an alcove or closet maintain the minimum clearances to combustible and non combustible materials listed below See also Fig 4 A Top 12 inches 306 mm B Front 4 inches 100 mm C Back 0 inches D Sides 4 inches 100 mm E Bottom 12 inches 306 mm Warning The water in this water heater is cold and always remains cold except for the times that hot water is being used ...

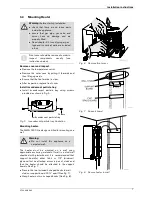
Страница 7: ...mmended that support board s either 1x4 s or 1 2 minimum plywood first be attached across a pair of studs and then the heater should be attached to the support boards See Fig 7 B Secure the two included L shaped hooks to wall studs or support board 13 apart See Fig 7 B Hang heater on two L shaped hooks See Fig 8 Fig 6 Remove front cover Fig 7 Support board Fig 8 Secure heater to wall Warning befor...

Страница 8: ...losure This opening must have a minimum free area of one square inch per 3000 Btu hr if all air is taken from the outside by a direct opening or vertical duct Louvers grills and screens have a blocking effect If the effective free area is not known increase the sizes of your openings by 400 if your louvers are wood and by 135 if your louvers are metal Refer to the National Fuel Gas Code for comple...

Страница 9: ...al gas vent height Vent termination The gas vent constructed of double wall Type B gas vent must terminate above the roof surface with a listed vent cap at a height that s in accordance with Fig 11 and table 2 provided they are at least 8 feet 2 4 m from a vertical wall or similar obstruction All other gas vents that are not able to terminate within the minimum specified height allowed must termin...

Страница 10: ...ipe check local codes for clarification The lining material must be listed for use only with naturally drafting draft hood equipped gas appliances Follow manufactures instructions for installation of listed lining material You may not vent any other fuel burning appliances into any free space remaining in the chimney The minimum vertical gas vent length within the masonry chimney should be no less...

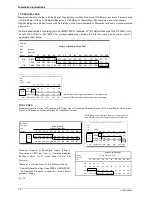
Страница 11: ...ks HIGH ALTITUDE INSTALLATION The pressure regulator provided with the heater is adjusted to deliver the proper gas pressure as indicated on the rating plate and in the manual for altitude up to 2000 feet 660 meters above sea level On appliances being installed above 2000 ft 660 meters elevation the inlet gas pressure should be set at installation to the value shown below Note The gas pressures sp...

Страница 12: ...ure Drop of 0 5 Inch Water Column EHD Equivalent Hydraulic Diameter The greater the value of EHD the greater the gas capacity of the tubing Tube size inches EHD 10 20 30 40 50 60 1 2 18 EHD 82 58 47 41 37 34 3 4 23 EHD 161 116 96 83 75 68 1 30 EHD 330 231 188 162 144 131 1 1 4 37 EHD 639 456 374 325 292 267 Length of Flexible Corrugated Stainless Steel Tubing CSST Feet Tube size inches EHD 10 20 3...

Страница 13: ...n occur to the internal water valve from heating of the pipe Plastics or other PEX type plumbing line materials are not recommended for connecting directly to the water heater Keep water inlet and outlet pipes to no less than 12 7mm diameter to allow the full flow capacity It is recommended that all water piping below the heater be properly insulated to avoid heat loss The freeze protection provid...

Страница 14: ...s When turning the heater on follow these instructions exactly B Before operating the unit set the On Off switch to the On position The On Off switch is located behind the flip down coverplate on the front panel strip Smell all around the appliance area for gas Be sure to smell next to the floor because some gas is heavier than air and will settle on the floor WHAT TO DO IF YOU SMELL GAS B Close g...

Страница 15: ... minimum activation rates listed in table 4 The automatic ignition system first ignites the safety pilot burner which then ignites the main burner in about 4 seconds B 6 The green LED indicator is on when the main burner is on B 7 The pilot flame will extinguish 10 30 seconds after the burners come on The burners will remain on until the hot water tap is turned off Note The GWH 1600 H operates in ...

Страница 16: ...details Fig 20 As the temperature adjustment knob is turned counter clockwise the output temperature will lower and the activation rate will be raised Turning the knob clockwise will raise the temperature and lower the activation rate 4 5 Power adjustment Less power Lower water temperature Fig 21 More power Higher water temperature Fig 22 4 6 Purge the appliance If there is a risk of freezing proc...

Страница 17: ...ter valve Loosen the two set screws at the bottom of the water valve where it connects to the gas valve If the set screws are seized STOP and call Bosch tech support before proceeding Forcing and snapping seized set screws may cause irrevocable damage to the water valve and gas valve assemblies Remove the water valve by pulling it to the right Separate the two halves of the water valve by removing...

Страница 18: ...ain water from the unit s heat exchanger by disconnecting inlet and outlet water connections 5 Connect the line A from the outlet of the circulating pump installer supplied to the inlet water fitting on the water heater 6 Using another line B connect to the water outlet fitting on the water heater Route the other end of this line into a descaling reservoir 7 Using a 3rd line C from the descaling r...

Страница 19: ...ush the hydro generator Reinstall hydro generator and take another voltage reading If voltage is at least 1 6VAC proceed to next step If voltage is still low hydro generator may be damaged defective Visit www boschhotwater com to purchase replacement part or call Bosch Water Heating at 800 642 3111 for replacement part if still under warranty 8 If using a power vent check the safety spillage switc...

Страница 20: ... eraser 6 The water valve assembly which allows gas flow to the burners requires periodic maintenance every 2 5 years depending on water quality and use Visit www boschhotwater com to purchase water valve rebuild kit to service the water valve 7 Electric control box burner electro valve or flame sensor maybe damaged defective Verify adequate voltage at the spade connection of the burner electro va...

Страница 21: ...d for cold water mixed by turning the power adjustment knob clockwise for lower hot water temperatures See chapter 4 5 If the problem persists go to www boschhotwater com for a more detailed service bulletin on this problem 4 The water heater is designed to modulate gas flow to the burners when water flow varies If the water pressure in the home is erratic and the water flow is not consistent whil...

Страница 22: ... depending on water quality and use Visit www boschhotwater com to purchase water valve rebuild kit to service the water valve 7 Gas pressure is too low Ensure gas pressure is in accordance with specifications in the installation manual See chapter 3 9 A gas pressure reading is needed to proceed further Contact your original installer or a local certified gas technician to obtain this reading 6 9 ...

Страница 23: ...rly Ensure the venting is in accordance with requirements in the installation manual See chapter 3 7 6 The water heater has burners much like a furnace It is essential that they remain clean and are supplied with adequate air for combustion If the flames burn yellow or orange it is strongly recommended that the burners be removed from the unit and cleaned Once the burners are removed the fins in t...

Страница 24: ... components and diagram parts list 8 1 Interior components Fig 26 Functional scheme 4 Heat exchanger 5 Main gas burner 9 Electronic control box 10 Temperature adjustment selector 11 Water valve 22 Flexible hot outlet 26 Output control 30 Pilot gas tubing 51 on off switch ...

Страница 25: ...omponents and diagram parts list 25 8 2 Components diagram Fig 27 Components Diagram 40 38 32 20 19 15 12 10 14 13 11 16 17 18 8 6 7 21 22 23 24 25 26 27 28 29 30 6720608032 07 1 JF 42 35 24 33 36 39 2 1 3 5 9 4 34 37 41 43 44 ...

Страница 26: ...962 0 19 Gas valve NG 8 707 011 976 0 20 Pilot injector LP 8 708 200 321 0 20 Pilot injector NG 8 708 200 322 0 21 Microswitch 8 707 200 020 0 22 Gas pressure regulator LP 8 707 406 083 0 22 Gas pressure regulator NG 8 707 406 084 0 23 Water valve 8 707 006 344 0 24 Watervalve pushrod 10x 8 703 204 051 0 25 Diaphragm L 8 700 503 084 0 26 Inlet water connection 8 700 306 110 0 27 Selector screw 8 7...

Страница 27: ...lying the replacement part s BBTNA will provide ground service delivery for these parts Expedited or upgraded shipping will be charged to the customer Service Labor Costs This warranty does not cover any labor costs associated with service removal or re installation of part s All such costs must be borne by the Purchaser Additionally this warranty does not cover any labor costs associated with ser...

Страница 28: ...re __________ Installing Company _____________________________________________ Installer name _____________________________________________ Address _____________________________________________ Phone _____________________________________________ See Chapter 3 8 and gas pressure table to be filled out by installer Installation manual should be left with the owner after the installation is tested an...

Отзывы: